利用Python+xarray实现遥感数据——海表温度的经验正交函数(EOF)分解——xarray学习文档02
利用python实现气象遥感数据的EOF分解,研究其空间变化特征。EOF的原理不再细讲。
1. 安装eofs
conda install eofs
or
pip install eofs
2. 进行EOF分解
2.1 import 模块
import xarray as xr
import numpy as np
from eofs.standard import Eof
import matplotlib.pyplot as plt
import cartopy.crs as ccrs
import cartopy.feature as cfeature
from cartopy.mpl.gridliner import LONGITUDE_FORMATTER, LATITUDE_FORMATTER,mticker
import cartopy.mpl.ticker as cticker
2.2 EOF的实现
SST= xr.open_dataset(r"*****mean_16.nc")['sst'].fillna(0.0)
cc = np.array(SST)
print(cc.shape)
lat = SST['lat']
lon = SST['lon']
coslat = np.cos(np.deg2rad(lat))
wgts = np.sqrt(coslat)[..., np.newaxis]
solver = Eof(cc, weights=wgts)
eof = solver.eofsAsCorrelation(neofs=3)        #   spatial
pc = solver.pcs(npcs=3, pcscaling=1)           #   temporal
var = solver.varianceFraction()               # 解释方差
2.3 制图
fig_ax1 = fig.add_axes([0.1, 0.8, 0.5, 0.3],projection = proj)
fig_ax1.set_extent([leftlon, rightlon, lowerlat, upperlat], crs=ccrs.PlateCarree())
# 设置地图属性:加载国界、海岸线、
fig_ax1.add_feature(cfeature.COASTLINE.with_scale('50m'), linewidth=0.8, zorder=1)
fig_ax1.add_feature(cfeature.BORDERS.with_scale('50m'), linewidth=0.8, zorder=1)
fig_ax1.set_xticks(np.arange(leftlon,rightlon+5,10), crs=ccrs.PlateCarree())
fig_ax1.set_yticks(np.arange(lowerlat,upperlat+5,10), crs=ccrs.PlateCarree())
fig_ax1.xaxis.set_major_formatter(lon_formatter)
fig_ax1.yaxis.set_major_formatter(lat_formatter)
fig_ax1.set_title('(a) EOF1',loc='left',fontsize =15,weight = 'semibold')
fig_ax1.set_title( '%.2f%%' % (var[0]*100),loc='right',fontsize =15,weight = 'semibold')
c1 = data0[0].plot(ax = fig_ax1,
                     transform =ccrs.PlateCarree(),
                     cmap = plt.cm.get_cmap('RdBu_r'),
                     add_colorbar = False,
                     )
fig_ax2 = fig.add_axes([0.1, 0.45, 0.5, 0.3],projection = proj)
fig_ax2.set_extent([leftlon, rightlon, lowerlat, upperlat], crs=ccrs.PlateCarree())
#fig_ax2.add_feature(cfeature.OCEAN, zorder=0,color = 'white',edgecolor='black')
fig_ax2.add_feature(cfeature.LAND,  color = 'lightgray',zorder=1,edgecolor='black')
fig_ax2.add_feature(cfeature.COASTLINE.with_scale('50m'), linewidth=0.8, zorder=1)
fig_ax2.add_feature(cfeature.BORDERS.with_scale('50m'), linewidth=0.8, zorder=1)
fig_ax2.set_xlabel('x',fontweight ='bold')
fig_ax2.set_ylabel('y',fontweight ='bold')
fig_ax2.set_xticks(np.arange(leftlon,rightlon+5,10), crs=ccrs.PlateCarree())
fig_ax2.set_yticks(np.arange(lowerlat,upperlat+5,10), crs=ccrs.PlateCarree())
fig_ax2.xaxis.set_major_formatter(lon_formatter)
fig_ax2.yaxis.set_major_formatter(lat_formatter)
fig_ax2.set_title('(c) EOF2',loc='left',fontsize =15,weight = 'semibold')
fig_ax2.set_title( '%.2f%%' % (var[1]*100),loc='right',fontsize =15,weight = 'semibold')
c2 = data0[1].plot(ax = fig_ax2,
                     transform =ccrs.PlateCarree(),
                     cmap = plt.cm.get_cmap('RdBu_r'),
                     add_colorbar = False,
                     )
fig_ax3 = fig.add_axes([0.1, 0.1, 0.5, 0.3],projection = proj)
fig_ax3.set_extent([leftlon, rightlon, lowerlat, upperlat], crs=ccrs.PlateCarree())
fig_ax3.add_feature(cfeature.LAND,  color = 'lightgray',zorder=1,edgecolor='black')
fig_ax3.add_feature(cfeature.COASTLINE.with_scale('50m'), linewidth=0.8, zorder=1)
fig_ax3.add_feature(cfeature.BORDERS.with_scale('50m'), linewidth=0.8, zorder=1)
fig_ax3.set_xlabel('x ',fontweight ='bold')
fig_ax3.set_ylabel('y ',fontweight ='bold')
fig_ax3.set_xticks(np.arange(leftlon,rightlon+5,10), crs=ccrs.PlateCarree())
fig_ax3.set_yticks(np.arange(lowerlat,upperlat+5,10), crs=ccrs.PlateCarree())
fig_ax3.xaxis.set_major_formatter(lon_formatter)
fig_ax3.yaxis.set_major_formatter(lat_formatter)
fig_ax3.set_title('(e) EOF3',loc='left',fontsize =15,weight = 'semibold')
fig_ax3.set_title( '%.2f%%' % (var[2]*100),loc='right',fontsize =15,weight = 'semibold')
c3 = data0[2].plot(ax = fig_ax3,
                     transform =ccrs.PlateCarree(),
                     cmap = plt.cm.get_cmap('RdBu_r'),
                     add_colorbar = False,
                    )
cbposition=fig.add_axes([0.13, 0.04, 0.4, 0.015])
fig.colorbar(c1,cax=cbposition,orientation='horizontal',format='%.1f',)

fig_ax4 = fig.add_axes([0.55, 0.808, 0.40, 0.285])
fig_ax4.set_title('(b) PC1',loc='left',fontsize = 15,weight = 'semibold')
fig_ax4.set_ylim(-3.0,3.0)
fig_ax4.axhline(0,linestyle="--")
fig_ax4.plot(np.arange(1,len(cc)+1,1),pc[:,0])
fig_ax5 = fig.add_axes([0.55, 0.458, 0.40, 0.285])
fig_ax5.set_title('(d) PC2',loc='left',fontsize = 15,weight = 'semibold')
fig_ax5.set_ylim(-3.0,3.0)
fig_ax5.axhline(0,linestyle="--")
fig_ax5.plot(np.arange(1,len(cc)+1,1),pc[:,1])
fig_ax6 = fig.add_axes([0.55, 0.108, 0.40, 0.285])
fig_ax6.set_title('(f) PC3',loc='left',fontsize = 15,weight = 'semibold')
fig_ax6.set_ylim(-3.0,3)
fig_ax6.axhline(0,linestyle="--")
fig_ax6.plot(np.arange(1,len(cc)+1,1),pc[:,2])
#plt.tight_layout()
plt.show()
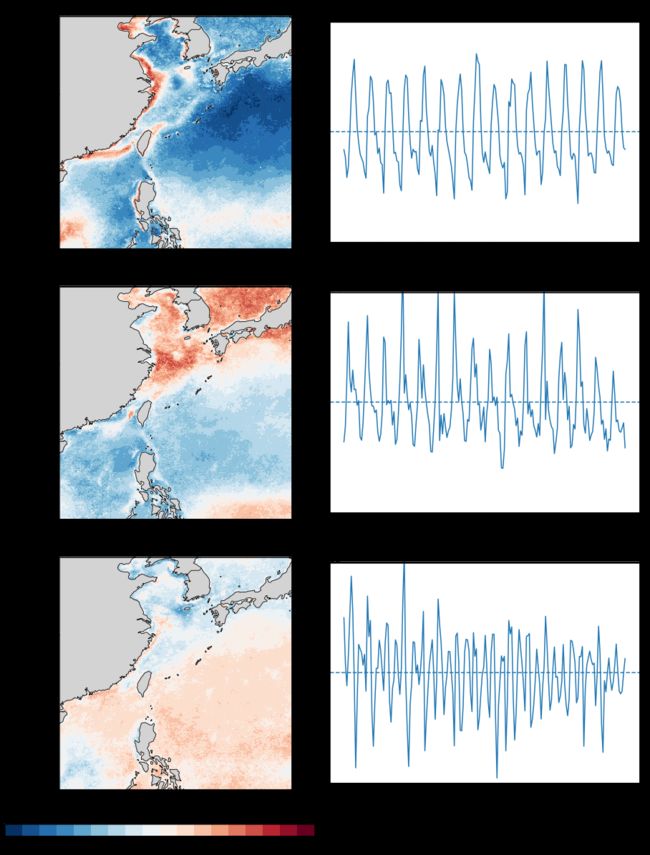
2.4 结果展示
3 分析
前面的EOF分析还有待完善,结果图的详细分析后续更新…