Ansible部署LAMP架构
Ansible实现LAMP的分离部署
-
- 1.配置主控机和受控主机
- 2.安装httpd服务
- 3.安装MySQL数据库
- 4.安装php
- 5.配置apache和php
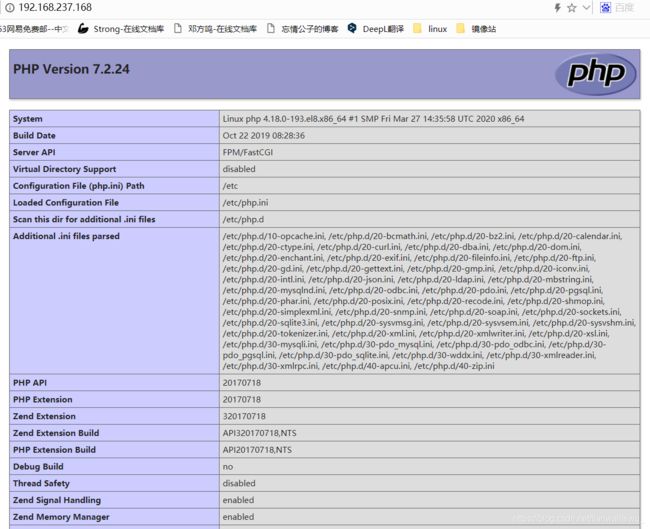
- 6.访问测试
1.配置主控机和受控主机
环境说明:
| 主机名 | 作用 | IP |
|---|---|---|
| ansible | Ansible控制主机 | 192.168.237.167 |
| apache | 受控主机1(apache) | 192.168.237.168 |
| mysql | 受控主机2(MySQL) | 192.168.237.169 |
| php | 受控主机3(PHP) | 192.168.237.170 |
在主控机上将node1、node2、node3加入清单文件:
[root@master ansible]# cat inventory
[apache]
192.168.237.168

[mysql]
192.168.237.169

[php]
192.168.237.170
配置免密登录:
[root@localhost ansible]# ssh-keygen
[root@localhost ansible]# ssh-copy-id [email protected]
[root@localhost ansible]# ssh-copy-id [email protected]
[root@localhost ansible]# ssh-copy-id [email protected]
测试,用ping模块看主控机与受控主机能否ping通:
[root@master ansible]# ansible all -m ping
192.168.237.168 | SUCCESS => {
    "ansible_facts": {
        "discovered_interpreter_python": "/usr/bin/python"
    },
    "changed": false,
    "ping": "pong"
}
192.168.237.169 | SUCCESS => {
    "ansible_facts": {
        "discovered_interpreter_python": "/usr/bin/python"
    },
    "changed": false,
    "ping": "pong"
}
192.168.237.170 | SUCCESS => {
    "ansible_facts": {
        "discovered_interpreter_python": "/usr/bin/python"
    },
    "changed": false,
    "ping": "pong"
}
为所有受控主机关闭防火墙和selinux
[root@localhost ansible]# ansible all -m service -a 'name=firewalld state=stopped enabled=no'
[root@localhost ansible]# ansible all -m lineinfile -a 'path=/etc/selinux/config regexp="SELINUX=enforcing" line="SELINUX=disabled"'
[root@localhost ansible]# ansible all -m shell -a 'setenforce 0'
2.安装httpd服务
在主控机上通过ansible在apache上安装apache服务:
[root@ansible ansible]# ansible apache -m yum -a 'name=httpd* state=present'
192.168.237.168 | CHANGED => {
    "ansible_facts": {
        "discovered_interpreter_python": "/usr/libexec/platform-python"
    },
    "changed": true,
    "msg": "",
    "rc": 0,
    "results": [
......
    ]
}
启用apache服务并设置开机自启:
[root@ansible ansible]# ansible apache -m service -a 'name=httpd state=started enabled=yes'
192.168.237.168 | CHANGED => {
    "ansible_facts": {
        "discovered_interpreter_python": "/usr/libexec/platform-python"
    },
    "changed": true,
    "enabled": true,
    "name": "httpd",
    "state": "started",
    "status": {
......
    }
}
3.安装MySQL数据库
在ansible主机中为mysql安装数据库服务
//安装mariadb
[root@ansible ansible]# ansible mysql -m yum -a 'name=mariadb* state=present'
192.168.237.169 | CHANGED => {
    "ansible_facts": {
        "discovered_interpreter_python": "/usr/libexec/platform-python"
    },
    "changed": true,
    "msg": "",
    "rc": 0,
    "results": [
......
    ]
}


//启动mariadb并设置开机自启动
[root@ansible ansible]# ansible mysql -m service -a 'name=mariadb state=started enabled=yes'
192.168.237.169 | CHANGED => {
    "ansible_facts": {
        "discovered_interpreter_python": "/usr/libexec/platform-python"
    },
    "changed": true,
    "enabled": true,
    "name": "mariadb",
    "state": "started",
    "status": {
        "ActiveEnterTimestampMonotonic": "0",
        "ActiveExitTimestampMonotonic": "0",
        "ActiveState": "inactive",
......
    }
}
4.安装php
//安装php
[root@ansible ansible]# ansible php -m yum -a 'name=php* state=present'
192.168.237.170 | CHANGED => {
    "ansible_facts": {
        "discovered_interpreter_python": "/usr/libexec/platform-python"
    },
    "changed": true,
    "msg": "",
    "rc": 0,
    "results": [
......
    ]
}

//启动php并设置开机自启
[root@ansible ansible]# ansible php -m service -a 'name=php-fpm state=started enabled=yes'
192.168.237.170 | CHANGED => {
    "ansible_facts": {
        "discovered_interpreter_python": "/usr/libexec/platform-python"
    },
    "changed": true,
    "enabled": true,
    "name": "php-fpm",
    "state": "started",
    "status": {
        "ActiveEnterTimestampMonotonic": "0",
        "ActiveExitTimestampMonotonic": "0",
        "ActiveState": "inactive",
......
    }
}
5.配置apache和php
apache服务配置:
//修改主配置文件 /etc/httpd/conf/httpd.conf
//添加服务器名称
[root@ansible ansible]# ansible apache -m lineinfile -a 'path=/etc/httpd/conf/httpd.conf regexp="^#ServerName" line="ServerName www.example.com:80"'
192.168.237.168 | CHANGED => {
"ansible_facts": {
"discovered_interpreter_python": "/usr/libexec/platform-python"
},
"backup": "",
"changed": true,
"msg": "line replaced"
}
//添加php类型
[root@ansible ansible]# ansible apache -m lineinfile -a 'path=/etc/httpd/conf/httpd.conf insertafter="AddType application\/x-gzip .gz .tgz" line="AddType application/x-httpd-php .php"'
192.168.237.168 | CHANGED => {
"ansible_facts": {
"discovered_interpreter_python": "/usr/libexec/platform-python"
},
"backup": "",
"changed": true,
"msg": "line added"
}
[root@ansible ansible]# ansible apache -m lineinfile -a 'path=/etc/httpd/conf/httpd.conf insertafter="AddType application\/x-httpd-php .php" line="AddType application/x-httpd-php-source .phps"'
192.168.237.168 | CHANGED => {
"ansible_facts": {
"discovered_interpreter_python": "/usr/libexec/platform-python"
},
"backup": "",
"changed": true,
"msg": "line added"
}
//获取php文件
[root@ansible ansible]# ansible apache -m lineinfile -a 'path=/etc/httpd/conf/httpd.conf regexp="^DirectoryIndex" line="DirectoryIndex index.php index.html"'
192.168.237.168 | CHANGED => {
"ansible_facts": {
"discovered_interpreter_python": "/usr/libexec/platform-python"
},
"backup": "",
"changed": true,
"msg": "line added"
}
//配置虚拟主机配置文件 /etc/httpd/conf.d/httpd-vhosts.conf
//httpd-vhosts.conf文件可以从/usr/share/doc/httpd/下复制
这里选择自行创建(create=yes),然后加入line里面的内容。
[root@ansible ansible]# ansible apache -m lineinfile -a 'path=/etc/httpd/conf.d/httpd-vhosts.conf line="\nDocumentRoot "/var/www/html"\nServerName www.example.com\nProxyRequests off\nProxyPassMatch ^/(.*\.php)$ fcgi://192.168.237.170:9000/data/php/$1\n\nOptions none\nAllowOverride none\nRequire all granted\n \n " create=yes'
192.168.237.168 | CHANGED => { //fcgi指向php主机的IP,/data/php文件自行创建,内容包含index.php文件
"ansible_facts": {
"discovered_interpreter_python": "/usr/libexec/platform-python"
},
"backup": "",
"changed": true,
"msg": "line added"
}
php配置:
//修改 /etc/php-fpm.d/www.conf
	//注释掉listen监听信息
[root@ansible ansible]# ansible php -m lineinfile -a 'path=/etc/php-fpm.d/www.conf regexp="^listen =" line=";listen = /run/php-fpm/www.sock"'
192.168.237.170 | CHANGED => {
    "ansible_facts": {
        "discovered_interpreter_python": "/usr/libexec/platform-python"
    },
    "backup": "",
    "changed": true,
    "msg": "line replaced"
}
	//添加新的监听IP地址和端口(php主机IP地址)
[root@ansible ansible]# ansible php -m lineinfile -a 'path=/etc/php-fpm.d/www.conf insertafter=";listen = \/run\/php-fpm\/www.sock" line="listen = 192.168.237.170:9000"'
192.168.237.170 | CHANGED => {
    "ansible_facts": {
        "discovered_interpreter_python": "/usr/libexec/platform-python"
    },
    "backup": "",
    "changed": true,
    "msg": "line added"
}

	//修改允许监听的客户端为apache主机的IP地址
[root@ansible ansible]# ansible php -m lineinfile -a 'path=/etc/php-fpm.d/www.conf regexp="^listen.allowed_clients" line="listen.allowed_clients = 192.168.237.168"'
192.168.237.170 | CHANGED => {
    "ansible_facts": {
        "discovered_interpreter_python": "/usr/libexec/platform-python"
    },
    "backup": "",
    "changed": true,
    "msg": "line replaced"
}

//创建apache配置文件httpd-vhosts.conf中指定的php文件
[root@ansible ansible]# ansible php -m lineinfile -a 'path=/data/php/index.php line="" create=yes'
192.168.237.170 | CHANGED => {
    "ansible_facts": {
        "discovered_interpreter_python": "/usr/libexec/platform-python"
    },
    "backup": "",
    "changed": true,
    "msg": "line added"
}
重启apache服务和php服务:
//重启apache
[root@ansible ansible]# ansible apache -m service -a 'name=httpd state=restarted'192.168.237.168 | CHANGED => {
    "ansible_facts": {
        "discovered_interpreter_python": "/usr/libexec/platform-python"
    },
    "changed": true,
    "name": "httpd",
    "state": "started",
    "status": {
......
    }
}

//重启php
[root@ansible ansible]# ansible php -m service -a 'name=php-fpm state=restarted'
192.168.237.170 | CHANGED => {
    "ansible_facts": {
        "discovered_interpreter_python": "/usr/libexec/platform-python"
    },
    "changed": true,
    "name": "php-fpm",
    "state": "started",
    "status": {
    ......
        }
}

