【Linux0.11 源码历险记 1】《开机启动》
开机启动后,bios加电,bios 会将启动盘的第一个扇区的512字节拷贝到0x7c00位置。然后CUP的寄存器CS:IP 会指向0x7c00 的位置,开始运行。
而第一个扇区放的东西就是 bootsect.s的内容,也就是从bootsect.s 开始运行。即执行操作系统的最开始命令。
bootsect.s
下面是源码:
// boot/bootsect.s
SETUPLEN = 4				; nr of setup-sectors
BOOTSEG  = 0x07c0			; original address of boot-sector
INITSEG  = 0x9000			; we move boot here - out of the way
SETUPSEG = 0x9020			; setup starts here
SYSSEG   = 0x1000			; system loaded at 0x10000 (65536).
ENDSEG   = SYSSEG + SYSSIZE		; where to stop loading

; ROOT_DEV:	0x000 - same type of floppy as boot.
;		0x301 - first partition on first drive etc
ROOT_DEV = 0x306

entry start
start:
	mov	ax,#BOOTSEG
	mov	ds,ax
	mov	ax,#INITSEG
	mov	es,ax
	mov	cx,#256
	sub	si,si
	sub	di,di
	rep
	movw
	jmpi	go,INITSEG
以上的行为就是将原本在0x7c00 的512字节代码移到0x90000。
	jmpi go,INITSEG
	// 跳转到 0x90000:go执行
	//其中go 是个符号,在编译时会被转换成当前文件的相对偏移地址,
	//所以是去go的地方执行。
go:	mov	ax,cs // cs = 0x9000
	mov	ds,ax // ds = 0x9000
	mov	es,ax // es = 0x9000
; put stack at 0x9ff00.
	mov	ss,ax // ss = 0x9000
	mov	sp,#0xFF00		; arbitrary value >>512
	// ss:sp = 0x9FF00栈底位置
go 这段代码主要做的就是给各个寄存器赋值。复习一下寄存器的作用:
| ax | bx | cx | dx |
|---|---|---|---|
| cs 代码段 | ds数据段 | ss堆栈段 | es附加段 |
| sp堆栈段指针 | bp基址指针 | si源变址 | di目的地址 |
| ip指令指针 | flags标志 | idtr中断描述符表索引 | gdtr全局描述符表索引 |
这里就把各种寄存器的值设置好了。接下来继续:
load_setup:
	mov	dx,#0x0000		; drive 0, head 0
	mov	cx,#0x0002		; sector 2, track 0
	mov	bx,#0x0200		; address = 512, in INITSEG
	mov	ax,#0x0200+SETUPLEN	; service 2, nr of sectors
	int	0x13			; read it
	jnc	ok_load_setup		; ok - continue
	mov	dx,#0x0000
	mov	ax,#0x0000		; reset the diskette
	int	0x13
	j	load_setup
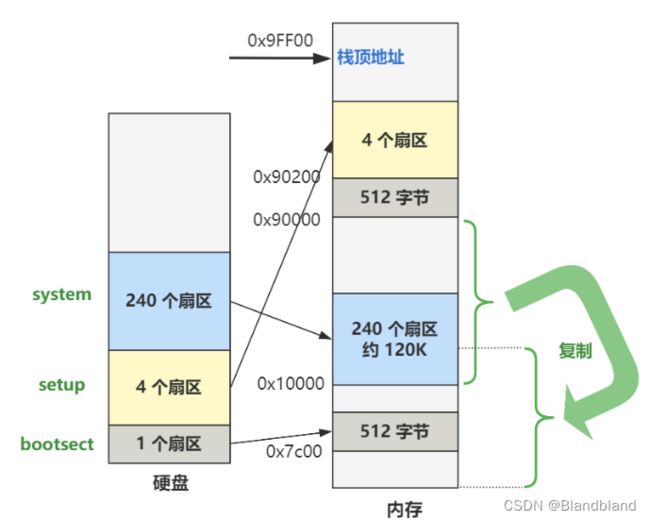
int 0x13 是一个中断,前面的四个寄存器的赋值,都是做这个中断程序的参数。这里就是不断尝试将磁盘的2-5个扇区加载到0x90200地址处。ok就跳转到 ok_load_setup 处执行。否则就不断重复。
ok_load_setup:
	; Get disk drive parameters, specifically nr of sectors/track
	...
	; Print some inane message
	...
	mov	ax,#SYSSEG
	mov	es,ax		; segment of 0x010000
	call	read_it
	...
这部分首先是读取磁盘的信息,调用int 0x13 中断。之后将从第6号扇区往后的240个扇区加载到0x10000处。最后开始跳转,进入setup.s执行:
jmpi 0,SETUPSEG // 0x90200 进入setupseg 的代码部分;
setup.s
INITSEG  = 0x9000	; we move boot here - out of the way
SYSSEG   = 0x1000	; system loaded at 0x10000 (65536).
SETUPSEG = 0x9020	; this is the current segment

.globl begtext, begdata, begbss, endtext, enddata, endbss
.text
begtext:
.data
begdata:
.bss
begbss:
.text

entry start
start:

; ok, the read went well so we get current cursor position and save it for
; posterity.

	mov	ax,#INITSEG	; this is done in bootsect already, but... ax = 0x9000
	mov	ds,ax // ds = 0x9000
	mov	ah,#0x03	; read cursor pos
	xor	bh,bh
	int	0x10		; save it in known place, con_init fetches
	mov	[0],dx		; it from 0x90000.
int 0x10 中断调用的是显示服务中断程序。下面就是获取各种信息:
; Get memory size (extended mem, kB) 内存信息

	mov	ah,#0x88
	int	0x15
	mov	[2],ax

; Get video-card data: 显卡信息

	mov	ah,#0x0f
	int	0x10
	mov	[4],bx		; bh = display page
	mov	[6],ax		; al = video mode, ah = window width

; check for EGA/VGA and some config parameters 检查显示方式

	mov	ah,#0x12
	mov	bl,#0x10
	int	0x10
	mov	[8],ax
	mov	[10],bx
	mov	[12],cx

; Get hd0 data 1号硬盘的信息

	mov	ax,#0x0000
	mov	ds,ax
	lds	si,[4*0x41]
	mov	ax,#INITSEG
	mov	es,ax
	mov	di,#0x0080
	mov	cx,#0x10
	rep
	movsb

; Get hd1 data 2块硬盘的信息

	mov	ax,#0x0000
	mov	ds,ax
	lds	si,[4*0x46]
	mov	ax,#INITSEG
	mov	es,ax
	mov	di,#0x0090
	mov	cx,#0x10
	rep
	movsb
如果如上面执行之后,就可以将各种信息保存在内存中,他们在内存中的分布如下表:
| 地址 | 长度 | 备注 |
|---|---|---|
| 0x90000 | 2 | 光标位置 |
| 0x90002 | 2 | 扩展内存数 |
| 0x90004 | 2 | 显示页面 |
| 0x90006 | 1 | 显示模式 |
| 0x90007 | 1 | 字符列数 |
| 0x90008 | 2 | 未知 |
| 0x9000A | 1 | 显示内存 |
| 0x9000B | 1 | 显示状态 |
| 0x9000C | 2 | 显卡特性参数 |
| 0x9000E | 1 | 屏幕行数 |
| 0x9000F | 1 | 屏幕列数 |
| 0x90080 | 16 | 硬盘1参数表 |
| 0x90090 | 16 | 硬盘2参数表 |
| 0x901FC | 2 | 根设备号 |
下面要做的就是将BIOS的中断向量表覆盖掉,要引入操作系统自己的中断表了。同时将内存重新挪个位置。
; now we want to move to protected mode ...

	cli			; no interrupts allowed ; 先关中断;

; first we move the system to it's rightful place

	mov	ax,#0x0000
	cld			; 'direction'=0, movs moves forward
do_move:
	mov	es,ax		; destination segment
	add	ax,#0x1000
	cmp	ax,#0x9000
	jz	end_move
	mov	ds,ax		; source segment
	sub	di,di
	sub	si,si
	mov 	cx,#0x8000
	rep
	movsw
	jmp	do_move
这里的内容就是将从0x10000到0x90000内存的东西挪到开头,将原本的bios信息直接覆盖掉:(下图从网上找的)

这样就将大部分的内存分布整理好了。
| 内存地址 | 内容 |
|---|---|
| 栈顶地址 | |
| 0x90200— | setup |
| 0x90000— 0x901FF | 临时变量 |
| 0x0 — 0x80000 | 操作系统的内容(6-266号扇区) |
下一节就进入保护模式了。