Spring Security(一) —— 整体架构与入门案例分析
一:整体架构
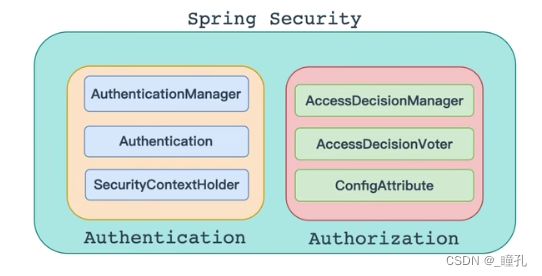
在
1.1:认证
1.1.1:AuthenticationManager
在Spring Security中认证是由AuthenticationManager接口来负责的,接口定义为:
public interface AuthenticationManager {
	Authentication authenticate(Authentication authentication)
			throws AuthenticationException;
}
- 返回Authentication则表示认证成功
- 返回AuthenticationException异常则表示认证失败
而该接口有如下实现类:

其中主要实现类为ProviderManager,在ProviderManager中管理了众多AuthenticationProvider实例,在一次完整的认证流程中,SpringSecurity允许存在多个AuthenticationProvider,用来实现多种认证方式,这些AuthenticationProvider都是由ProviderManager进行统一管理的
ProviderManager部分源码:
public class ProviderManager implements AuthenticationManager, MessageSourceAware,
		InitializingBean {

	private AuthenticationEventPublisher eventPublisher = new NullEventPublisher();
	private List<AuthenticationProvider> providers = Collections.emptyList();
	private AuthenticationManager parent;
	private boolean eraseCredentialsAfterAuthentication = true;

	public ProviderManager(List<AuthenticationProvider> providers) {
		this(providers, null);
	}

	public Authentication authenticate(Authentication authentication)
			throws AuthenticationException {
		Class<? extends Authentication> toTest = authentication.getClass();
		AuthenticationException lastException = null;
		AuthenticationException parentException = null;
		Authentication result = null;
		Authentication parentResult = null;
		boolean debug = logger.isDebugEnabled();

		for (AuthenticationProvider provider : getProviders()) {
			if (!provider.supports(toTest)) {
				continue;
			}

			if (debug) {
				logger.debug("Authentication attempt using "
						+ provider.getClass().getName());
			}

			try {
				result = provider.authenticate(authentication);

				if (result != null) {
					copyDetails(authentication, result);
					break;
				}
			}
			catch (AccountStatusException | InternalAuthenticationServiceException e) {
				prepareException(e, authentication);
				throw e;
			} catch (AuthenticationException e) {
				lastException = e;
			}
		}

		if (result == null && parent != null) {
			// Allow the parent to try.
			try {
				result = parentResult = parent.authenticate(authentication);
			}
			catch (ProviderNotFoundException e) {
			}
			catch (AuthenticationException e) {
				lastException = parentException = e;
			}
		}

		if (result != null) {
			if (eraseCredentialsAfterAuthentication
					&& (result instanceof CredentialsContainer)) {
				((CredentialsContainer) result).eraseCredentials();
			}

			if (parentResult == null) {
				eventPublisher.publishAuthenticationSuccess(result);
			}
			return result;
		}

		// Parent was null, or didn't authenticate (or throw an exception).

		if (lastException == null) {
			lastException = new ProviderNotFoundException(messages.getMessage(
					"ProviderManager.providerNotFound",
					new Object[] { toTest.getName() },
					"No AuthenticationProvider found for {0}"));
		}

		if (parentException == null) {
			prepareException(lastException, authentication);
		}

		throw lastException;
	}
}
1.1.2:Authentication
认证以及认证成功的信息主要是由Authentication的实现类进行保存的,Authentication接口定义如下:
public interface Authentication extends Principal, Serializable {
	// 获取用户权限信息
	Collection<? extends GrantedAuthority> getAuthorities();

	// 获取凭证信息,一般指密码
	Object getCredentials();

	// 获取用户详细信息
	Object getDetails();

	// 获取用户身份信息,用户名、用户对象等
	Object getPrincipal();

	// 用户是否认证成功
	boolean isAuthenticated();

	// 设置认证标记
	void setAuthenticated(boolean isAuthenticated) throws IllegalArgumentException;
}
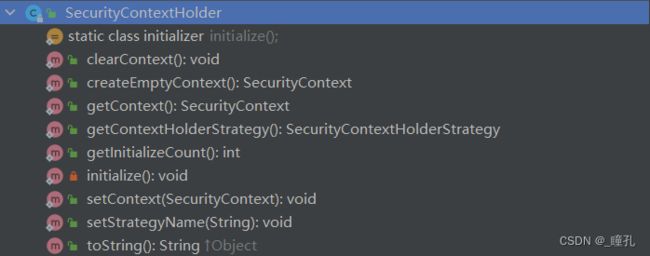
1.1.3:SecurityContextHolder
SecurityContextHolder用来获取登录之后用户信息。Spring Security会将登录用户数据保存在Session中。但是,为了使用方便,Spring Security在此基础上还做了一些改进,其中最主要的一个变化就是线程绑定。当用户登录成功后,Spring Security会将登录成功的用户信息保存到SecurityContextHolder中。SecurityContextHolder中的数据保存默认是通过ThreadLocal来实现的,使用Threadlocal创建的变量只能被当前线程访问,不能被其他线程访问和修改,也就是用户数据和请求线程绑定在一起。 当登录请求处理完毕后,Spring Security会将SecurityContextHolder中的数据拿出来保存到Session中,同时将SecurityContexHolder中的数据清空。以后每当有请求到来时,Spring Security就会先Session中取出用户登录数据,保存到SecurityContextHolder中,方便在该请求的后续处理过程中使用,同时在请求结束时将SecurityContextHolder中的数据拿出来保存到Session中,然后将SecurityContextHolder中的数据清空。这一策略能使用户在Controller、Service 层以及任何代码中获取当前登录用户数据。
1.2:授权
1.2.1:AccessDecisionManager
AccessDecisionManager是访问决策管理器,用来决定此次访问是否被允许
public interface AccessDecisionManager {
	// 决策方法
	void decide(Authentication authentication, Object object,
			Collection<ConfigAttribute> configAttributes) throws AccessDeniedException,
			InsufficientAuthenticationException;

	boolean supports(ConfigAttribute attribute);

	boolean supports(Class<?> clazz);
}
1.2.2:AccessDecisionVoter
AccessDecisionVoter是访问决定投票器,投票器会检查用户是否具备应有的角色,进而投出赞成、反对或者弃权票。
public interface AccessDecisionVoter<S> {
	// 赞同
	int ACCESS_GRANTED = 1;
	// 弃权
	int ACCESS_ABSTAIN = 0;
	// 反对
	int ACCESS_DENIED = -1;

	boolean supports(ConfigAttribute attribute);

	boolean supports(Class<?> clazz);

	// 投票方法
	int vote(Authentication authentication, S object,
			Collection<ConfigAttribute> attributes);
}
AccessDecisionManager和AccessDecisionVoter都有众多的实现类,在AccessDecisionManager中会遍历AccessDecisionVoter,进而决定是否允许用户访问,因而两者的关系类似于ProviderManager和AuthenticationProvider。我们可以看看AccessDecisionManager的实现类AffirmativeBased的决策方法,这是一个很清晰的投票逻辑。
	public void decide(Authentication authentication, Object object,
			Collection<ConfigAttribute> configAttributes) throws AccessDeniedException {
		int deny = 0;

		for (AccessDecisionVoter voter : getDecisionVoters()) {
			int result = voter.vote(authentication, object, configAttributes);

			if (logger.isDebugEnabled()) {
				logger.debug("Voter: " + voter + ", returned: " + result);
			}

			switch (result) {
			case AccessDecisionVoter.ACCESS_GRANTED:
				return;

			case AccessDecisionVoter.ACCESS_DENIED:
				deny++;

				break;

			default:
				break;
			}
		}

		if (deny > 0) {
			throw new AccessDeniedException(messages.getMessage(
					"AbstractAccessDecisionManager.accessDenied", "Access is denied"));
		}

		// To get this far, every AccessDecisionVoter abstained
		checkAllowIfAllAbstainDecisions();
	}
1.2.3:ConfigAttribute
ConfigAttribute用来保存授权时的角色信息,在Spring Security中,用户请求一个资源(通常是一个接口或者一个Java方法)需要的角色会被封装成一个ConfigAttribute对象,在ConfigAttribute中只有一个getAttribute方法, 该方法返回一个String字符串,就是角色的名称。一般来说,角色名称都带有一个ROLE_前缀,投票器AccessDecisionVoter所做的事情,其实就是比较用户所具的角色和请求某个
资源所需的ConfigAttribute之间的关系。
public interface ConfigAttribute extends Serializable {
	String getAttribute();
}
二:入门案例分析
2.1:环境搭建
引入SpringSecurity依赖:
        <dependency>
            <groupId>org.springframework.boot</groupId>
            <artifactId>spring-boot-starter-security</artifactId>
        </dependency>
写一个controller方法:
@RestController
public class TestController {

    @GetMapping("/hello")
    public String Hello() {
        System.out.println("hello security");
        return "hello security";
    }
}
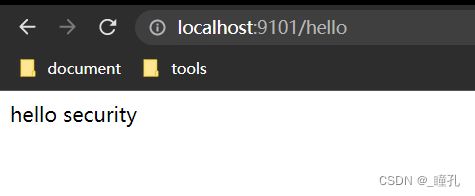
然后在浏览器访问http://localhost:9101/hello(我开了9101端口)的时候,就会默认跳转到http://localhost:9101/login,这就是SpringSecurity的强大之处,只需要引入一个依赖,所有的接口就会自动保护起来
输入SpringSecurity内置的user用户账号就可以登录,密码在控制台,填好后点击sign in即可跳转接口地址


2.2:实现原理
2.2.1:内置Filter以及默认加载Filter
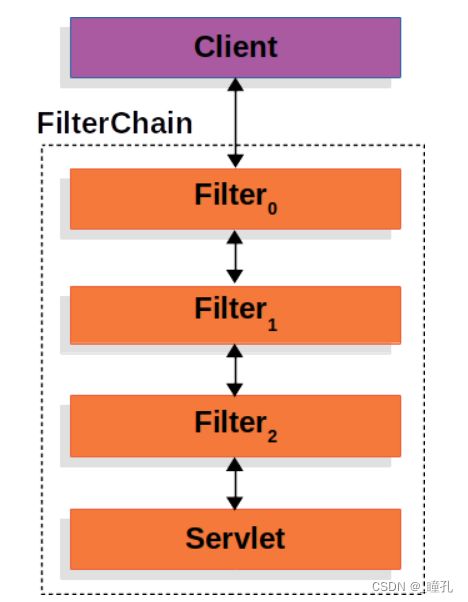
由上面案例可知,引入依赖后所有接口都默认需要登录才可以访问,这个过程是通过filter实现的,我们可以在官网找到SpringSecurity的过滤器链结构,可以看到,客户端向应用程序发送一个请求,容器创建一个FilterChain,其中包含过滤器和Servlet,它们应该根据请求URI的路径处理HttpServletRequest。
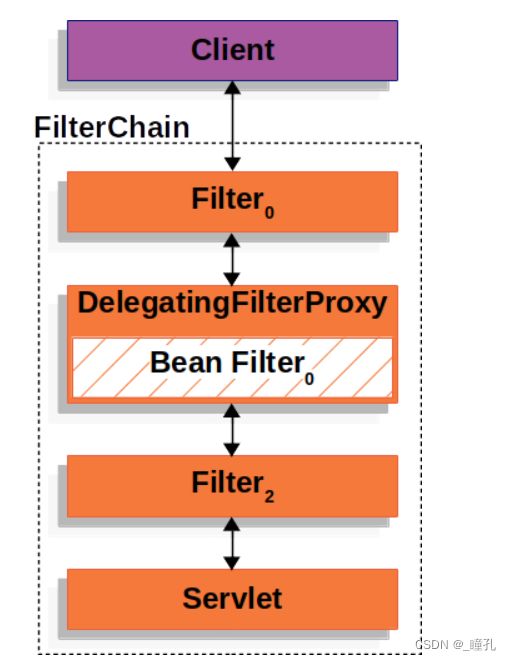
Spring提供了一个名为DelegatingFilterProxy的过滤器实现,它允许在Servlet容器的生命周期和Spring的ApplicationContext之间建立桥接。Servlet容器允许使用自己的标准注册过滤器,但它不知道Spring定义的bean。DelegatingFilterProxy可以通过标准的Servlet容器机制注册,但可以将所有工作委托给实现Filter的Spring Bean。
DelegatingFilterProxy的另一个好处是,它允许延迟查看Filter bean实例。这很重要,因为容器在启动之前需要注册Filter实例。但是,Spring通常使用ContextLoaderListener来加载Spring bean,直到需要注册Filter实例之后才会加载
Spring Security的Servlet支持包含在FilterChainProxy中。FilterChainProxy是Spring Security提供的一个特殊的Filter,它允许通过SecurityFilterChain委托给多个Filter实例。因为FilterChainProxy是一个Bean,它通常被包装在DelegatingFilterProxy中。
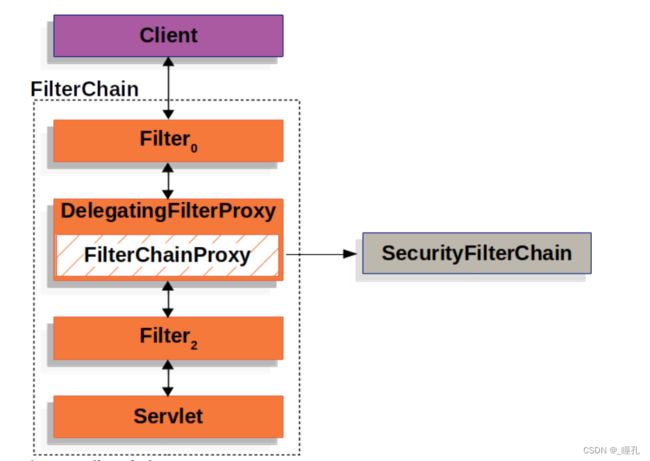
FilterChainProxy使用SecurityFilterChain来确定这个请求应该调用哪个Spring Security Filter,SecurityFilterChain中的Security Filter通常是bean,但它们是用FilterChainProxy而不是DelegatingFilterProxy注册的。FilterChainProxy为直接注册Servlet容器或DelegatingFilterProxy提供了许多优势:
- 它为Spring Security的所有Servlet支持提供了一个起点。因此,如果想排除Spring Security的Servlet支持故障,在FilterChainProxy中添加一个调试点是一个很好的开始。
- 由于FilterChainProxy是Spring Security使用的中心,它可以执行非可选的任务。例如,它清除SecurityContext以避免内存泄漏。它还应用Spring Security的HttpFirewall来保护应用程序免受某些类型的攻击。
- 它在决定何时应该调用SecurityFilterChain方面提供了更大的灵活性。在Servlet容器中,仅根据URL调用Filters。然而,FilterChainProxy可以通过利用RequestMatcher接口来确定基于HttpServletRequest中的任何东西的调用。
事实上,FilterChainProxy可以用来确定应该使用哪个SecurityFilterChain。这允许为应用程序的不同部分提供完全独立的配置。
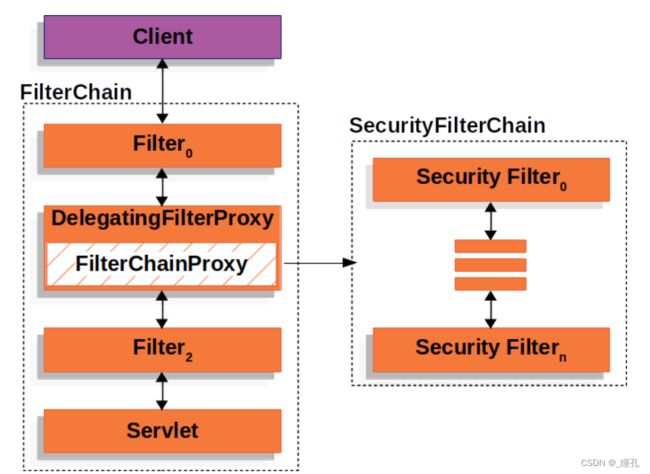
而过滤器链也不一定是一组,有可能是多组,此时就可以根据不同的请求去设置不同的过滤器链,这时就用到了Multiple SecurityFilterChain,在下图中,FilterChainProxy决定应该使用哪个SecurityFilterChain。只有第一个匹配的SecurityFilterChain会被调用。如果一个/api/messages/的URL被请求,它会首先匹配SecurityFilterChain0的/api/**模式,所以即使它也匹配SecurityFilterChainn,也只有SecurityFilterChain0会被调用。如果一个/messages/的URL被请求,它将不匹配SecurityFilterChain0的/api/**模式,因此FilterChainProxy将继续尝试后面的SecurityFilterChain
当然官网也按照顺序列出来了完整的过滤器链,其中15个过滤器会默认加载,标红表示默认加载:
- ChannelProcessingFilter:过滤请求协议HTTP、HTTPS,
WebAsyncManagerIntegrationFilter:将WebAsyncManager与SpringSecurity上下文进行集成SecurityContextPersistenceFilter:主要是使用SecurityContextRepository在session中保存或更新一个SecurityContext,并将SecurityContext给以后的过滤器使用,来为后续filter建立所需的上下文。即在处理请求之前,将安全信息加载到SecurityContextHolder中HeaderWriterFilter:向请求的Header中添加相应的信息,可在http标签内部使用security:headers来控制- CorsFilter:处理跨域问题
CsrfFilter:处理CSRF攻击,CSRF又称跨域请求伪造,SpringSecurity会对所有post请求验证是否包含系统生成的csrf的token信息,如果不包含,则报错。起到防止CSRF攻击的效果。LogoutFilter:匹配URL为/logout的请求,实现用户退出,清除认证信息。- OAuth2AuthorizationRequestRedirectFilter:处理OAuth2认证重定向
- Saml2WebSsoAuthenticationRequestFilter:处理SAML认证重定向
- X509AuthenticationFilter:处理X509认证
- AbstractPreAuthenticatedProcessingFilter:处理预认证问题
- CasAuthenticationFilter:处理CAS单点登录
- OAuth2LoginAuthenticationFilter:处理OAuth2认证
- Saml2WebSsoAuthenticationFilter:处理SAML认证
UsernamePasswordAuthenticationFilter:表单登录认证操作全靠这个过滤器,默认匹配URL为/login且必须为POST请求。- OpenIDAuthenticationFilter:处理OpenID认证
DefaultLoginPageGeneratingFilter:配置默认登录页面,如果没有在配置文件中指定认证页面,则由该过滤器生成一个默认认证页面。DefaultLogoutPageGeneratingFilter:配置默认注销页面,由此过滤器可以生产一个默认的退出登录页面- ConcurrentSessionFilter:处理Session有效期
- DigestAuthenticationFilter:处理HTTP摘要认证
- BearerTokenAuthenticationFilter:处理OAuth2认证的Access Token
BasicAuthenticationFilter:处理HttpBasic登录,此过滤器会自动解析HTTP请求中头部名字为Authentication,且以Basic开头的头信息。RequestCacheAwareFilter:处理缓存请求,通过HttpSessionRequestCache内部维护了一个RequestCache,用于缓存HttpServletRequestSecurityContextHolderAwareRequestFilter:针对ServletRequest进行了一次包装,使得request具有更加丰富的API- JaasApiIntegrationFilter:处理JAAS认证
- RememberMeAuthenticationFilter:处理RememberMe登录
AnonymousAuthenticationFilter:配置匿名认证,当SecurityContextHolder中认证信息为空,则会创建一个匿名用户存入到SecurityContextHolder中。Spring Security为了兼容未登录的访问,也走了一套认证流程,只不过是一个匿名的身份。- OAuth2AuthorizationCodeGrantFilter:处理OAuth2认证中的授权码
SessionManagementFilter:处理Session并发问题,SecurityContextRepository限制同一用户开启多个会话的数量ExceptionTranslationFilter:处理认证/授权中的异常,异常转换过滤器位于整个SpringSecurityFilterChain的后方,用来转换整个链路中出现的异常FilterSecurityInterceptor:处理授权相关操作,会获取所配置资源访问的授权信息,根据SecurityContextHolder中存储的用户信息来决定其是否有权限。- SwitchUserFilter:处理账户切换
可以看出,Spring Security提供了30多个过滤器。默认情况下Spring Boot在对Spring Security进入自动化配置时,会创建一个名为SpringSecurityFilterChain的过滤器,并注入到Spring容器中,这个过滤器将负责所有的安全管理,包括用户认证、授权、重定向到登录页面等。我们可以从源码开始看:
首先是DelegatingFilterProxy的部分源码
public class DelegatingFilterProxy extends GenericFilterBean {

	@Nullable
	private String contextAttribute;
	@Nullable
	private WebApplicationContext webApplicationContext;
	@Nullable
	private String targetBeanName;
	private boolean targetFilterLifecycle;
	@Nullable
	private volatile Filter delegate; //注:这个过滤器是真正加载的过滤器
	private final Object delegateMonitor;

	// doFilter是过滤器的入口
	public void doFilter(ServletRequest request, ServletResponse response, FilterChain filterChain) throws ServletException, IOException {
		Filter delegateToUse = this.delegate;
		if (delegateToUse == null) {
			synchronized(this.delegateMonitor) {
				delegateToUse = this.delegate;
				if (delegateToUse == null) {
					WebApplicationContext wac = this.findWebApplicationContext();
					if (wac == null) {
						throw new IllegalStateException("No WebApplicationContext found: no
						ContextLoaderListener or DispatcherServlet registered?");
					}
					// 第一步:doFilter中最重要的一步,初始化上面私有过滤器属性delegate
					delegateToUse = this.initDelegate(wac);
				}
				this.delegate = delegateToUse;
			}
		}
		// 第三步:执行FilterChainProxy过滤器
		this.invokeDelegate(delegateToUse, request, response, filterChain);
	}

	// 第二步:直接看最终加载的过滤器到底是谁
	protected Filter initDelegate(WebApplicationContext wac) throws ServletException {
		// debug得知targetBeanName为:springSecurityFilterChain
		String targetBeanName = this.getTargetBeanName();
		Assert.state(targetBeanName != null, "No target bean name set");
		// debug得知delegate对象为:FilterChainProxy
		Filter delegate = (Filter)wac.getBean(targetBeanName, Filter.class);
		if (this.isTargetFilterLifecycle()) {
			delegate.init(this.getFilterConfig());
		}
		return delegate;
	}

	protected void invokeDelegate(Filter delegate, ServletRequest request, ServletResponse response, FilterChain filterChain) throws ServletException, IOException {
		delegate.doFilter(request, response, filterChain);
	}
}
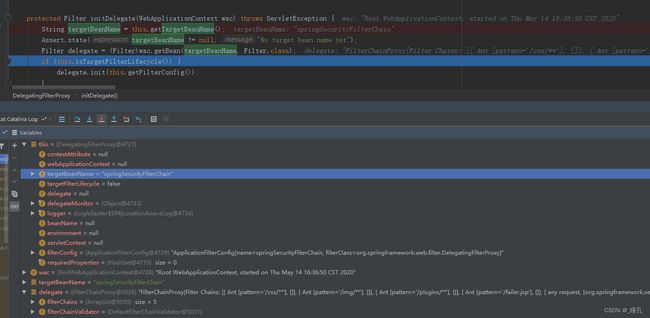
我们对第二步进行debug,如下图所示,DelegatingFilterProxy通过springSecurityFilterChain这个名称,得到了一个FilterChainProxy过滤器,最终在第三步执行了这个过滤器。
接着看FilterChainProxy:
public class FilterChainProxy extends GenericFilterBean {

	private static final Log logger = LogFactory.getLog(FilterChainProxy.class);
	private static final String FILTER_APPLIED = FilterChainProxy.class.getName().concat(".APPLIED");
	private List<SecurityFilterChain> filterChains;
	private FilterChainProxy.FilterChainValidator filterChainValidator;
	private HttpFirewall firewall;

	// 通过SecurityFilterChain的对象实例化出一个FilterChainProxy对象
	public FilterChainProxy(SecurityFilterChain chain) {
		this(Arrays.asList(chain));
	}

	public FilterChainProxy(List<SecurityFilterChain> filterChains) {
		this.filterChainValidator = new FilterChainProxy.NullFilterChainValidator();
		this.firewall = new StrictHttpFirewall();
		this.filterChains = filterChains;
	}

	// 直接从doFilter看
	public void doFilter(ServletRequest request, ServletResponse response, FilterChain chain) throws IOException, ServletException {
		boolean clearContext = request.getAttribute(FILTER_APPLIED) == null;
		if (clearContext) {
			try {
				request.setAttribute(FILTER_APPLIED, Boolean.TRUE);
				this.doFilterInternal(request, response, chain);
			} finally {
				SecurityContextHolder.clearContext();
				request.removeAttribute(FILTER_APPLIED);
			}
		} else {
			// 第一步:具体操作调用下面的doFilterInternal方法了
			this.doFilterInternal(request, response, chain);
		}
	}

	private void doFilterInternal(ServletRequest request, ServletResponse response, FilterChain chain) throws IOException, ServletException {
		FirewalledRequest fwRequest = this.firewall.getFirewalledRequest((HttpServletRequest)request);
		HttpServletResponse fwResponse = this.firewall.getFirewalledResponse((HttpServletResponse)response);
		// 第二步:封装要执行的过滤器链,过滤器就在这里被封装进去
		List<Filter> filters = this.getFilters((HttpServletRequest)fwRequest);
		if (filters != null && filters.size() != 0) {
			FilterChainProxy.VirtualFilterChain vfc = new FilterChainProxy.VirtualFilterChain(fwRequest, chain, filters);
			// 第四步:加载过滤器链
			vfc.doFilter(fwRequest, fwResponse);
		} else {
			if (logger.isDebugEnabled()) {
				logger.debug(UrlUtils.buildRequestUrl(fwRequest) + (filters == null ? " has no
				matching filters" : " has an empty filter list"));
			}
			fwRequest.reset();
			chain.doFilter(fwRequest, fwResponse);
		}
	}

	private List<Filter> getFilters(HttpServletRequest request) {
		Iterator var2 = this.filterChains.iterator();
		// 第三步:封装过滤器链到SecurityFilterChain中
		SecurityFilterChain chain;
		do {
			if (!var2.hasNext()) {
				return null;
			}
			chain = (SecurityFilterChain)var2.next();
		} while(!chain.matches(request));
		return chain.getFilters();
	}
}
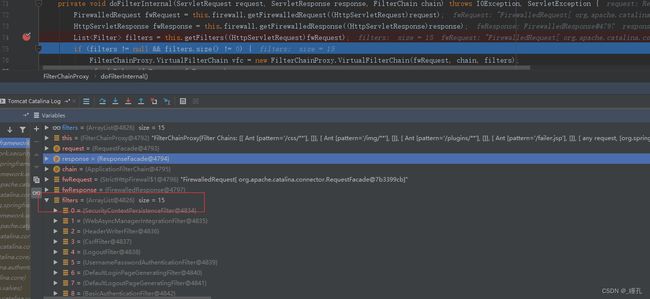
第二步debug结果如下图所示,十五个默认加载的过滤器都在这里了:
2.2.2:自动配置分析
SpringBootWebSecurityConfiguration是SpringBoot自动配置类,从源码可以看出,默认情况下对所有请求进行权限控制:
@Configuration(proxyBeanMethods = false)
@ConditionalOnDefaultWebSecurity
// 当运行容器为SERVLET是,该自动化配置才会生效
@ConditionalOnWebApplication(type = Type.SERVLET)
public class SpringBootWebSecurityConfiguration {

	@Bean
	@Order(SecurityProperties.BASIC_AUTH_ORDER)
	SecurityFilter defaultSecurityFilterChain(HttpSecurity http) throws Exception {
	    /*
	    	对http开启权限认证(authorizeRequests)
	    	对象为所有请求(anyRequest)
	    	认证之后才可以访问(authenticated)
	    	认证方式支持表单认证(formLogin)与httpBasic(httpBasic)
	    */
		http.authorizeRequests().anyRequest().authenticated().and().formLogin().and().httpBasic();
		return http.build();
	}
}
其中有个注解@ConditionalOnDefaultWebSecurity,即使用默认WebSecurity的条件,我们可以点进去看看:
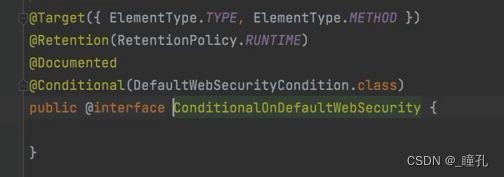
可见条件在DefaultWebSecurityCondition,再进去看看:
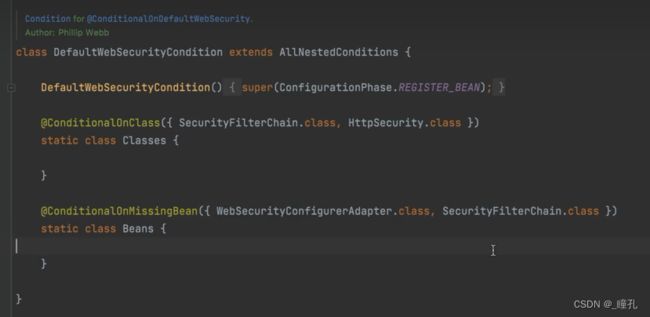
可见使用默认WebSecurity的条件的条件有两个:
- 当前类路径中要有SecurityFilterChain和HttpSecurity这两个类
- 实例中没有WebSecurityConfigurerAdapter和SecurityFilterChain实例
只要引入Spring Security依赖,就会有SecurityFilterChain和HttpSecurity,但是不会有WebSecurityConfigurerAdapter和SecurityFilterChain实例,因此,我们可以知道,如果我们自己配置了WebSecurityConfigurerAdapter和SecurityFilterChain实例,就可以让默认配置失效,而自定义登录页面、登录用户那些,就是通过破坏这个条件达到的
其中WebSecurityConfigurerAdapter类尤为重要,是扩展Spring Security所有配置的适配器类,而这是个抽象类,因此我们可以通过继承该类对其扩展。
public abstract class WebSecurityConfigurerAdapter implements
		WebSecurityConfigurer<WebSecurity>

WebSecurityConfigurerAdapter有大量的方法,可以看看其中的configure方法,里面的配置和默认的配置一致,以后我们可以通过重写这个方法去改变安全策略
	protected void configure(HttpSecurity http) throws Exception {
	    // 使用默认配置。如果被子类继承,则可以通过子类配置覆盖默认配置
		logger.debug("Using default configure(HttpSecurity). If subclassed this will potentially override subclass configure(HttpSecurity).");

		http
			.authorizeRequests()
				.anyRequest().authenticated()
				.and()
			.formLogin().and()
			.httpBasic();
	}
2.2.3:生成默认登录页面
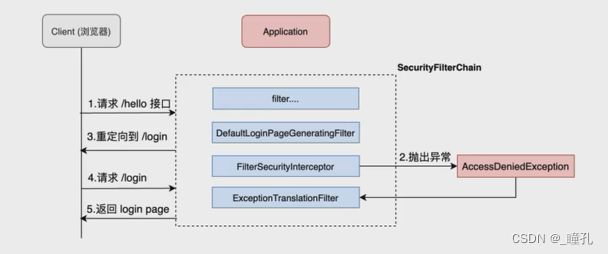
- 请求/hello接口,在引入spring security之后会先经过一系列过滤器
- 在请求到达FilterSecurityInterceptor时,发现请求并未认证,因此拦截请求并抛出AccessDeniedException异常
- 抛出的AccessDeniedException异常会被ExceptionTranslationFilter捕获,这个Filter中会调用LoginUrlAuthenticationEntryPoint#commence方法给客户端302,要求客户端进行重定向到/login页面
- 客户端发送/login请求
- /login请求会再次被拦截器中的DefaultLoginPageGeneratingFilter拦截到,并在拦截器中返回生成的登录页面
我们可以通过源码进一步了解这个流程,以下是部分源码
public class DefaultLoginPageGeneratingFilter extends GenericFilterBean {
// 默认登录页面路径
public static final String DEFAULT_LOGIN_PAGE_URL = "/login";
public static final String ERROR_PARAMETER_NAME = "error";
private String loginPageUrl;
private String logoutSuccessUrl;
private String failureUrl;
public DefaultLoginPageGeneratingFilter(AbstractAuthenticationProcessingFilter filter) {
if (filter instanceof UsernamePasswordAuthenticationFilter) {
init((UsernamePasswordAuthenticationFilter) filter, null);
}
else {
init(null, filter);
}
}
public DefaultLoginPageGeneratingFilter(
UsernamePasswordAuthenticationFilter authFilter,
AbstractAuthenticationProcessingFilter openIDFilter) {
init(authFilter, openIDFilter);
}
private void init(UsernamePasswordAuthenticationFilter authFilter,
AbstractAuthenticationProcessingFilter openIDFilter) {
this.loginPageUrl = DEFAULT_LOGIN_PAGE_URL;
this.logoutSuccessUrl = DEFAULT_LOGIN_PAGE_URL + "?logout";
this.failureUrl = DEFAULT_LOGIN_PAGE_URL + "?" + ERROR_PARAMETER_NAME;
if (authFilter != null) {
formLoginEnabled = true;
usernameParameter = authFilter.getUsernameParameter();
passwordParameter = authFilter.getPasswordParameter();
if (authFilter.getRememberMeServices() instanceof AbstractRememberMeServices) {
rememberMeParameter = ((AbstractRememberMeServices) authFilter
.getRememberMeServices()).getParameter();
}
}
if (openIDFilter != null) {
openIdEnabled = true;
openIDusernameParameter = "openid_identifier";
if (openIDFilter.getRememberMeServices() instanceof AbstractRememberMeServices) {
openIDrememberMeParameter = ((AbstractRememberMeServices) openIDFilter
.getRememberMeServices()).getParameter();
}
}
}
// 入口方法
public void doFilter(ServletRequest req, ServletResponse res, FilterChain chain)
throws IOException, ServletException {
HttpServletRequest request = (HttpServletRequest) req;
HttpServletResponse response = (HttpServletResponse) res;
boolean loginError = isErrorPage(request);
boolean logoutSuccess = isLogoutSuccess(request);
if (isLoginUrlRequest(request) || loginError || logoutSuccess) {
String loginPageHtml = generateLoginPageHtml(request, loginError,
logoutSuccess);
response.setContentType("text/html;charset=UTF-8");
response.setContentLength(loginPageHtml.getBytes(StandardCharsets.UTF_8).length);
response.getWriter().write(loginPageHtml);
return;
}
chain.doFilter(request, response);
}
// 页面生成方法
private String generateLoginPageHtml(HttpServletRequest request, boolean loginError,
boolean logoutSuccess) {
String errorMsg = "Invalid credentials";
if (loginError) {
HttpSession session = request.getSession(false);
if (session != null) {
AuthenticationException ex = (AuthenticationException) session
.getAttribute(WebAttributes.AUTHENTICATION_EXCEPTION);
errorMsg = ex != null ? ex.getMessage() : "Invalid credentials";
}
}
StringBuilder sb = new StringBuilder();
// 通过拼接字符串组成html页面
sb.append("\n"
+ "\n"
+ " \n"
+ " \n"
+ " \n"
+ " \n"
+ " \n"
+ " Please sign in \n"
+ " \n"
+ " \n"
+ " \n"
+ " \n"
+ " \n");
String contextPath = request.getContextPath();
if (this.formLoginEnabled) {
sb.append(" \n");
}
if (openIdEnabled) {
sb.append(" \n");
}
if (oauth2LoginEnabled) {
sb.append("Login with OAuth 2.0
");
sb.append(createError(loginError, errorMsg));
sb.append(createLogoutSuccess(logoutSuccess));
sb.append("\n");
for (Map.Entry<String, String> clientAuthenticationUrlToClientName : oauth2AuthenticationUrlToClientName.entrySet()) {
sb.append(" ");
String url = clientAuthenticationUrlToClientName.getKey();
sb.append(").append(contextPath).append(url).append("\">");
String clientName = HtmlUtils.htmlEscape(clientAuthenticationUrlToClientName.getValue());
sb.append(clientName);
sb.append("");
sb.append("
\n");
}
if (this.saml2LoginEnabled) {
sb.append("Login with SAML 2.0
");
sb.append(createError(loginError, errorMsg));
sb.append(createLogoutSuccess(logoutSuccess));
sb.append("\n");
for (Map.Entry<String, String> relyingPartyUrlToName : saml2AuthenticationUrlToProviderName.entrySet()) {
sb.append(" ");
String url = relyingPartyUrlToName.getKey();
sb.append(").append(contextPath).append(url).append("\">");
String partyName = HtmlUtils.htmlEscape(relyingPartyUrlToName.getValue());
sb.append(partyName);
sb.append("");
sb.append("
\n");
}
sb.append("\n");
sb.append("");
return sb.toString();
}
private String renderHiddenInputs(HttpServletRequest request) {
StringBuilder sb = new StringBuilder();
for (Map.Entry<String, String> input : this.resolveHiddenInputs.apply(request).entrySet()) {
sb.append(").append(input.getKey()).append("\" type=\"hidden\" value=\"").append(input.getValue()).append("\" />\n");
}
return sb.toString();
}
private String createRememberMe(String paramName) {
if (paramName == null) {
return "";
}
return " Remember me on this computer.
\n";
}
private boolean isLogoutSuccess(HttpServletRequest request) {
return logoutSuccessUrl != null && matches(request, logoutSuccessUrl);
}
private boolean isLoginUrlRequest(HttpServletRequest request) {
return matches(request, loginPageUrl);
}
private boolean isErrorPage(HttpServletRequest request) {
return matches(request, failureUrl);
}
private static String createError(boolean isError, String message) {
return isError ? "" + HtmlUtils.htmlEscape(message) + "" : "";
}
private static String createLogoutSuccess(boolean isLogoutSuccess) {
return isLogoutSuccess ? "You have been signed out" : "";
}
private boolean matches(HttpServletRequest request, String url) {
if (!"GET".equals(request.getMethod()) || url == null) {
return false;
}
String uri = request.getRequestURI();
int pathParamIndex = uri.indexOf(';');
if (pathParamIndex > 0) {
// strip everything after the first semi-colon
uri = uri.substring(0, pathParamIndex);
}
if (request.getQueryString() != null) {
uri += "?" + request.getQueryString();
}
if ("".equals(request.getContextPath())) {
return uri.equals(url);
}
return uri.equals(request.getContextPath() + url);
}
}
2.2.4:默认用户生成
从上面的SpringBootWebSecurityConfiguration中可以了解到,默认的账号密码登录应该跟formLogin这个方法有关,我们可以查看其源码:
	public HttpSecurity formLogin(Customizer<FormLoginConfigurer<HttpSecurity>> formLoginCustomizer) throws Exception {
		formLoginCustomizer.customize(getOrApply(new FormLoginConfigurer<>()));
		return HttpSecurity.this;
	}
可以看到它应用了FormLoginConfigurer的实现,查看FormLoginConfigurer源码:
	public FormLoginConfigurer() {
		super(new UsernamePasswordAuthenticationFilter(), null);
		usernameParameter("username");
		passwordParameter("password");
	}
可见我们在输入用户名密码,进行登录时,肯定会被UsernamePasswordAuthenticationFilter拦截,因为他不是servlet的过滤器而是Spring Security提供的,因此不是doFilter方法进行处理,从源码注释可以看出,处理登录的是attemptAuthentication()方法:
	public Authentication attemptAuthentication(HttpServletRequest request,
			HttpServletResponse response) throws AuthenticationException {
		// 要求登录请求必须是POST
		if (postOnly && !request.getMethod().equals("POST")) {
			throw new AuthenticationServiceException(
					"Authentication method not supported: " + request.getMethod());
		}

		// 获取用户名与密码
		String username = obtainUsername(request);
		String password = obtainPassword(request);

		if (username == null) {
			username = "";
		}

		if (password == null) {
			password = "";
		}

		// 去除首尾空格
		username = username.trim();

		// 将用户名与密码封装成token
		UsernamePasswordAuthenticationToken authRequest = new UsernamePasswordAuthenticationToken(
				username, password);

		// Allow subclasses to set the "details" property
		setDetails(request, authRequest);

		// 从这个可以看出,真正做认证的是getAuthenticationManager().authenticate
		return this.getAuthenticationManager().authenticate(authRequest);
	}
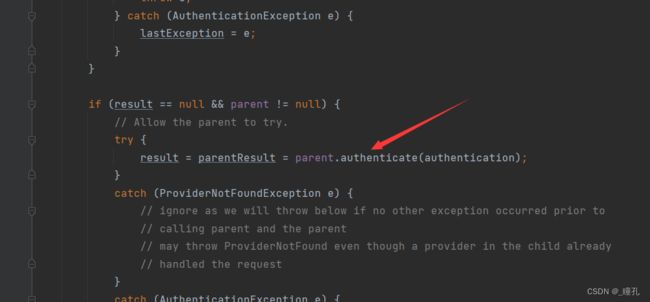
从返回值可以看出,真正做认证的是getAuthenticationManager().authenticate(),进入源码,可以看到,还是调用了父类的方法进行认证
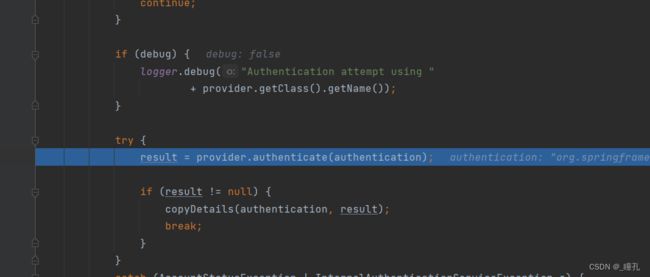
进入父类,可以看到是由provider进行认证
进入provider,查看其authenticate方法:
	public Authentication authenticate(Authentication authentication)
			throws AuthenticationException {
		Assert.isInstanceOf(UsernamePasswordAuthenticationToken.class, authentication,
				() -> messages.getMessage(
						"AbstractUserDetailsAuthenticationProvider.onlySupports",
						"Only UsernamePasswordAuthenticationToken is supported"));

		// 确定用户名
		String username = (authentication.getPrincipal() == null) ? "NONE_PROVIDED"
				: authentication.getName();

		boolean cacheWasUsed = true;
		// 根据用户名从缓存拿用户信息,但我们是第一次登录,自然没有缓存,user为null
		UserDetails user = this.userCache.getUserFromCache(username);

        // 由于缓存没有用户信息,因此在这里开始做认证
		if (user == null) {
			cacheWasUsed = false;

			try {
				// 这个方法就是做认证的
				user = retrieveUser(username,
						(UsernamePasswordAuthenticationToken) authentication);
			}
			catch (UsernameNotFoundException notFound) {
				logger.debug("User '" + username + "' not found");

				if (hideUserNotFoundExceptions) {
					throw new BadCredentialsException(messages.getMessage(
							"AbstractUserDetailsAuthenticationProvider.badCredentials",
							"Bad credentials"));
				}
				else {
					throw notFound;
				}
			}

		// 省略大量代码...

		return createSuccessAuthentication(principalToReturn, authentication, user);
	}
因此我们可以进入retrieveUser方法:
	protected final UserDetails retrieveUser(String username,
			UsernamePasswordAuthenticationToken authentication)
			throws AuthenticationException {
		prepareTimingAttackProtection();
		try {
			// 通过这个方法去根据用户名从数据源查找数据
			UserDetails loadedUser = this.getUserDetailsService().loadUserByUsername(username);
			if (loadedUser == null) {
				throw new InternalAuthenticationServiceException(
						"UserDetailsService returned null, which is an interface contract violation");
			}
			return loadedUser;
		}
		catch (UsernameNotFoundException ex) {
			mitigateAgainstTimingAttack(authentication);
			throw ex;
		}
		catch (InternalAuthenticationServiceException ex) {
			throw ex;
		}
		catch (Exception ex) {
			throw new InternalAuthenticationServiceException(ex.getMessage(), ex);
		}
	}
因此我们可以进入getUserDetailsService()方法的实现,返回值是InMemoryUserDetailsManager,从名字可以看出是基于内存的实现,里面有个名为users的HashMap,元素数量为1,那个元素的key为user,value为35a20737-3650-475d-bb6e-5068b77c4326,也就是控制台输出的密码,其中noop表示明文密码。
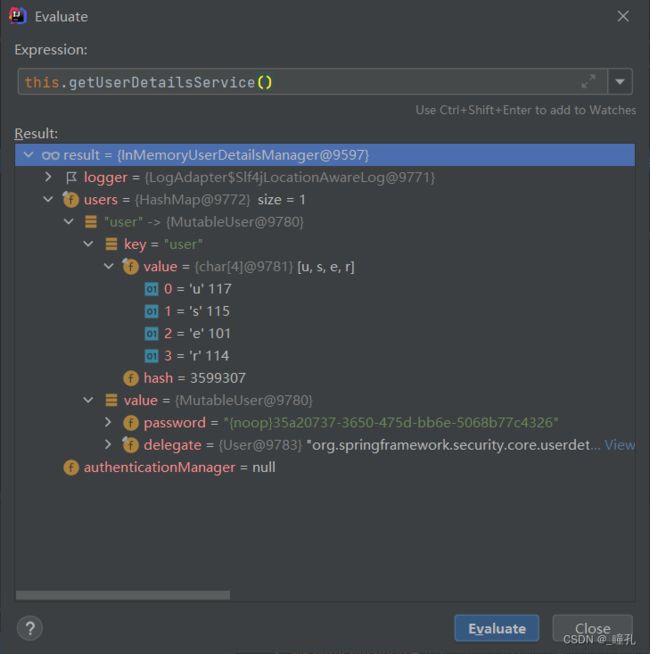

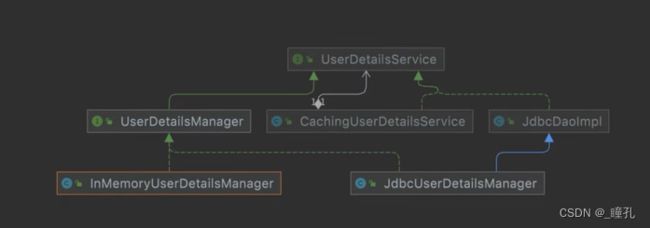
我们可以了解到getUserDetailsService()是真正做数据源认证的,由于默认是基于InMemoryUserDetailsManager这个实现类,而它是基于内存的,那么用户名密码应该是硬编码进内存中的。而getUserDetailsService()返回的就是UserDetailsService这个接口的实现类对象,因此我们可以知道,如果我们想更换数据源,就得自己去实现UserDetailsService接口,替换默认的InMemoryUserDetailsManager实现。
UserDetailsService规定了一个认证实现方法loadUserByUsername(),我们可以进入InMemoryUserDetailsManager去看看它是怎么实现的:
	public UserDetails loadUserByUsername(String username)
			throws UsernameNotFoundException {
		UserDetails user = users.get(username.toLowerCase());

		if (user == null) {
			throw new UsernameNotFoundException(username);
		}

		return new User(user.getUsername(), user.getPassword(), user.isEnabled(),
				user.isAccountNonExpired(), user.isCredentialsNonExpired(),
				user.isAccountNonLocked(), user.getAuthorities());
	}
但我们并不能从这里看到默认用户的用户名和密码的生成策略,因为其生成策略在自动配置类里,即UserDetailsServiceAutoConfiguration,下面是部分源码
@Configuration(proxyBeanMethods = false)
@ConditionalOnClass(AuthenticationManager.class)
@ConditionalOnBean(ObjectPostProcessor.class)
@ConditionalOnMissingBean(
		value = { AuthenticationManager.class, AuthenticationProvider.class, UserDetailsService.class },
		type = { "org.springframework.security.oauth2.jwt.JwtDecoder",
				"org.springframework.security.oauth2.server.resource.introspection.OpaqueTokenIntrospector" })
public class UserDetailsServiceAutoConfiguration {

	private static final String NOOP_PASSWORD_PREFIX = "{noop}";

	@Bean
	@ConditionalOnMissingBean(
			type = "org.springframework.security.oauth2.client.registration.ClientRegistrationRepository")
	@Lazy
	public InMemoryUserDetailsManager inMemoryUserDetailsManager(SecurityProperties properties,
			ObjectProvider<PasswordEncoder> passwordEncoder) {
	    // 自动配置时通过 properties.getUser()拿到了user对象
		SecurityProperties.User user = properties.getUser();
		List<String> roles = user.getRoles();
		return new InMemoryUserDetailsManager(
				User.withUsername(user.getName()).password(getOrDeducePassword(user, passwordEncoder.getIfAvailable()))
						.roles(StringUtils.toStringArray(roles)).build());
	}
}
自动配置时通过 properties.getUser()拿到了user对象,那么getUser应该就会返回默认的用户信息,进入getUser,可以看到静态User类(部分源码)
	public static class User {

		/**
		 * 默认用户名
		 */
		private String name = "user";

		/**
		 * 默认用户的密码
		 */
		private String password = UUID.randomUUID().toString();

		/**
		 * 为默认用户名授予的角色。
		 */
		private List<String> roles = new ArrayList<>();

		private boolean passwordGenerated = true;

		public void setPassword(String password) {
			if (!StringUtils.hasLength(password)) {
				return;
			}
			this.passwordGenerated = false;
			this.password = password;
		}

		public boolean isPasswordGenerated() {
			return this.passwordGenerated;
		}

	}
最终,我们找到了默认数据源,用户名是user,默认密码是UUID,生成策略为:UUID.randomUUID().toString()
而getUser的所属类是SecurityProperties,User也是它的内部类,从源码可知,它会读取配置文件中的spring.security配置

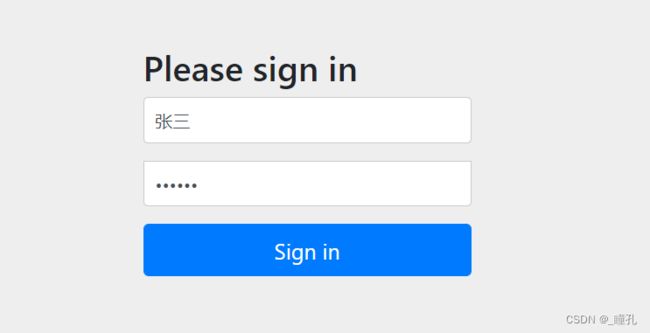
因此我们可以通过配置文件去设置默认用户名与密码:
spring:
  security:
    user:
      name: 张三
      password: 123456
如果有兴趣了解更多内容,欢迎来我的个人网站看看:瞳孔的个人网站
