Java多线程案例之阻塞队列
目录
一、阻塞队列的定义
二、阻塞队列的运用场景
2.1 何为生产者消费者模型?
2.2 使用生产者消费者模型有什么优点?
三、Java标准库中的阻塞队列
四、独立实现一个阻塞队列
4.1 为什么要用while来进行判断?
一、阻塞队列的定义
阻塞队列是一种特殊的队列,也遵守“先进先出”的原则,同时,它也是一种能保证线程安全的数据结构,并且具备以下特征:
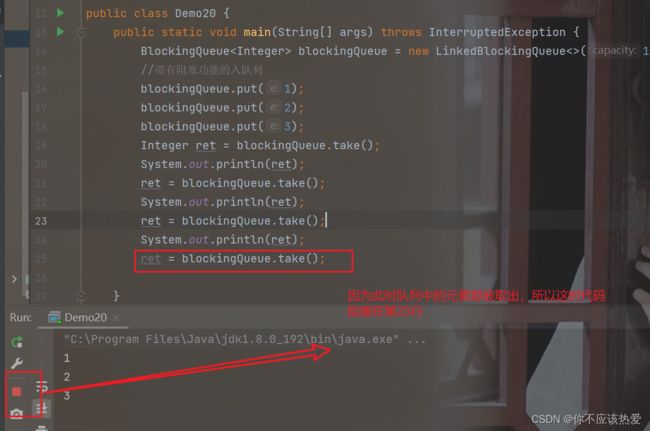
- 当队列满的时候,继续入队列就会阻塞,直到有其他线程从队列中取走元素。
- 当队列为空的时候,继续出队列也会阻塞,直到有其他线程往队列中插入元素。
二、阻塞队列的运用场景
阻塞队列的应用场景就是“生产者消费者模型”。这是一种非常典型的开发模式。
2.1 何为生产者消费者模型?
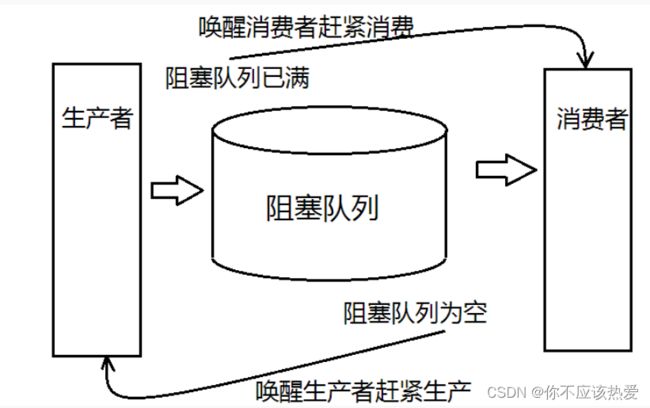
生产者消费者模型是通过添加一个介于二者中的一个“容器”来解决生产者和消费者的强耦合问题。
简单来说,这个模型是由两类线程构成的:
- 生产者线程:“生产产品”,并把产品放到一个阻塞队列里;
- 消费者线程:“消费产品”。
2.2 使用生产者消费者模型有什么优点?
1、有利于代码解耦合。所谓耦合,我们可以简单的理解为两个模块之间的关联关系,关系越紧密,耦合越高,反之亦然。
如下图所展示的这般,“生产者”和“消费者“并不直接进行通信,而是通过之间的阻塞队列进行通信,这也就意味着双方互相不知道对方的存在,这也就导致两者之间耦合度低。
 2、削峰填谷,阻塞队列在其中还充当了一个缓冲区的角色,平衡了生产者和消费者的处理能力。
比如在一款游戏突然爆火的时候,服务器同时刻可能会收到大量的登录请求。服务器可能扛不住,这时就可以将这些请求都丢到阻塞队列中,然后再由消费者线程慢慢的处理每个登录请求。
三、Java标准库中的阻塞队列
在Java标准库中内置了阻塞队列,如果需要在一些程序中使用阻塞队列,直接调用标准库即可。
- BlockingQueue 是一个接口,其实现类可以是 LinkedBlockingQueue,PriorityBlcokingQueue等。
- put方法用于阻塞式的入队列,take用于阻塞式的出队列。
- BlockingQueue 也有offer,poll,peek等方法,但是这些方法不带有阻塞功能。
这里以实现LinkedBlockingQueue为例:
实现生产者消费模型:
import java.util.concurrent.BlockingQueue;
import java.util.concurrent.LinkedBlockingQueue;

/**
 * Created with IntelliJ IDEA.
 * Description:
 * User: 86136
 * Date: 2023-01-23
 * Time: 23:21
 */
public class Demo21 {
    public static void main(String[] args) throws InterruptedException {
        BlockingQueue blockingQueue = new LinkedBlockingQueue<>();
        Thread producer = new Thread(()-> {
            for (int i = 0; i < 1000; i++) {
                try {
                    System.out.println("生产的元素是"+i);
                    blockingQueue.put(i);
                    Thread.sleep(1000);
                } catch (InterruptedException e) {
                    throw new RuntimeException(e);
                }
            }
        });
        producer.start();
        Thread customer = new Thread(()-> {
            for (int i = 0; i < 1000; i++) {
                try {
                    int value = blockingQueue.take();
                    System.out.println("消费者元素是"+value);
                } catch (InterruptedException e) {
                    throw new RuntimeException(e);
                }
            }
        });
        customer.start();
        producer.join();
        customer.join();
    }
}
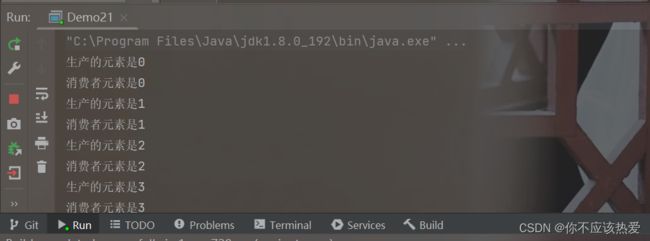
实现效果:
四、独立实现一个阻塞队列
首先我们先实现简单的出队与入队功能:
class MyBlockingQueue {
    private int[] items = new int[1000];
    private int head = 0;
    private int tail = 0;
    private int size = 0;

    //入队列
    public void put(int elem) {
        //先判断队列是否为满
        if(size >= items.length) {
            return;
        }
        items[head] = elem;
        tail++;
        if(tail >= items.length) {
            tail = 0;
        }
        size++;
    }
    //出队列
    public Integer take() {
        if(size == 0) {
            return null;
        }
        int ret = items[head];
        head++;
        if(head >= items.length) {
            head = 0;
        }
        size--;
        return ret;
    }
}
因为入队列与出队列中设计到许多变量的修改,所以这里我们直接无脑加锁:
    //入队列
    public void put(int elem) {
        synchronized (this) {
            //先判断队列是否为满
            if(size >= items.length) {
                return;
            }
            items[head] = elem;
            tail++;
            if(tail >= items.length) {
                tail = 0;
            }
            size++;
        }
    }
    //出队列
    public Integer take() {
        synchronized (this) {
            if(size == 0) {
                return null;
            }
            int ret = items[head];
            head++;
            if(head >= items.length) {
                head = 0;
            }
            size--;
            return ret;
        }
    }
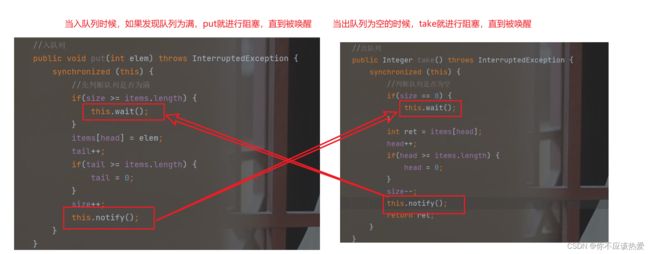
接下来是最关键的一步,实现阻塞,如果队列为空,出队列就阻塞:如果队列为满,入队列就阻塞:
完成以上步骤之后,其实还存在一些问题,那就是当线程进入wait后,下一次被唤醒的时间是不确定的,中间具体发生什么我们也不知道,于是最稳妥的做法就是将put和take中执行wait的条件判定由if改为while。
4.1 为什么要用while来进行判断?
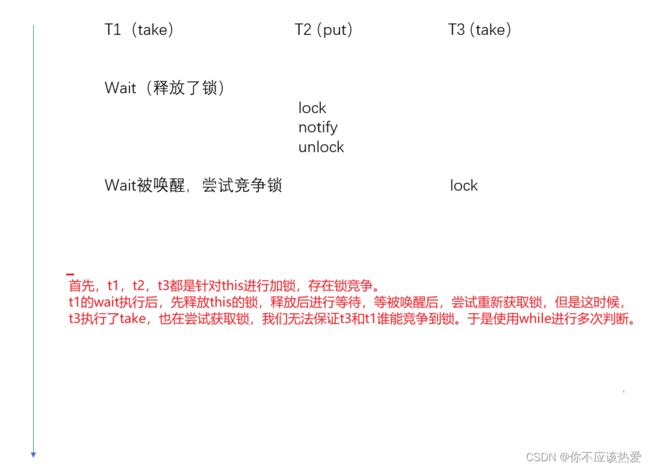
因为 线程A:take中的wait,不一定是被另一个线程B:put成功后的notify唤醒的,也可能是代码触发了Interruption异常唤醒的,
也有可能线程B:put在执行notify之后(这时候释放了锁,并将执行线程A从wait中唤醒),这时线程C执行了take(需要加锁),因为这时,线程A与线程C需要进行锁竞争,如果线程C竞争成功拿走了锁,这时,虽然线程A被唤醒了,但是队内元素仍然为空,如果这时候仍然用if,就会发生错误。
下面我们画一组图来加深一下印象:
ps:可能很多人会说,双if判断是否可行?
答案是不行的,因为刚刚也说到,系统的调度是不确定的,在wait进行等待的过程可能很漫长,中间可能出现多个线程调用take的情况。
最后以用阻塞队列实现生产者消费者模型作为总结:
实现代码:
class MyBlockingQueue {
    private int[] items = new int[1000];
    private int head = 0;
    private int tail = 0;
    private int size = 0;

    //入队列
    public void put(int elem) throws InterruptedException {
        synchronized (this) {
            //先判断队列是否为满
            while(size >= items.length) {
                this.wait();
            }
            items[head] = elem;
            tail++;
            if(tail >= items.length) {
                tail = 0;
            }
            size++;
            this.notify();
        }
    }
    //出队列
    public Integer take() throws InterruptedException {
        synchronized (this) {
            //判断队列是否为空
            while(size == 0) {
                this.wait();
            }
            int ret = items[head];
            head++;
            if(head >= items.length) {
                head = 0;
            }
            size--;
            this.notify();
            return ret;
        }
    }
}
public class Demo22 {
    public static void main(String[] args) throws InterruptedException {
        MyBlockingQueue queue = new MyBlockingQueue();
        Thread producer = new Thread(() -> {
            int n = 1;
            while(true) {
                try {
                    queue.put(n);
                    System.out.println("生产元素"+n);
                    n++;
                    Thread.sleep(500);
                } catch (InterruptedException e) {
                    throw new RuntimeException(e);
                }
            }
        });
        Thread customer = new Thread(() -> {
            while(true) {
                try {
                    int n = queue.take();
                    System.out.println("消费元素"+n);
                } catch (InterruptedException e) {
                    throw new RuntimeException(e);
                }

            }
        });
        producer.start();
        customer.start();
        producer.join();
        customer.join();
    }
}
运行结果:
