openlayers 使用天地图 切换图层
前言: 刚开发完一个模块,主要的功能都是由openlayers实现的,写篇博客,一个是为后来者指引条明路(前端的大佬们都只喜欢讲理论,我不喜欢理论,我只喜欢实现的过程,所以这篇文章我只会告诉你怎么实现。同时作者的水平也不高,没有达到做封装的地步,如果你觉得简单,那就再好不过了。),二是给自己做个总结。
看不懂?没关系,我也看不懂,但相信你有过openlayers的使用你应该能知道这个WMTS是什么。他在官网的有些实例加载地图的时候不是等到地图初始化完毕直接渲染的,而是通过一个一个预定义图块进行渲染的。
了解这点开始写代码,首先天地图去获取key
https://www.tianditu.gov.cn/
接着找到地图API
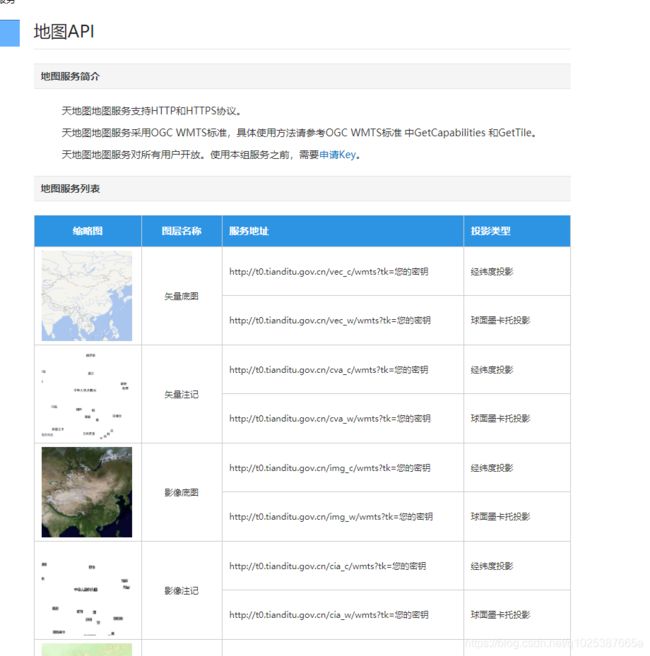
底图与注记都需要加载才可以正常的显示一张地图。 有经纬度投影,有球面墨卡托投影,一个是对应EPSG4326,一个是EPSG3857坐标系。
https://openlayers.org/en/latest/examples/wmts.html
这个网址是一个标准的wmts openlayers官网实例。在实例的基础上再酌情修改
以下代码使用vue 进行编写 ,如果你还未引入openlayers
输入>>>>>>>>npm install ol --save
地图渲染
var projection = getProjection("EPSG:3857");
      var projectionExtent = projection.getExtent();
      var size = getWidth(projectionExtent) / 256;
      var resolutions = new Array(14);
      var matrixIds = new Array(14);
      for (var z = 0; z < 14; ++z) {
        // generate resolutions and matrixIds arrays for this WMTS
        resolutions[z] = size / Math.pow(2, z);
        matrixIds[z] = z;
      }

      // 开发者凭证密钥
      let TiandituKey = "036b8f2c434072539f8e1444c9fc0448";

      // 矢量底图  与矢量 注记
      // let wmtsUrl_vecBase = "http://t{0-7}.tianditu.gov.cn/vec_w/wmts?tk=";
      // let wmtsUrl_vecNote = "http://t{0-7}.tianditu.gov.cn/cva_w/wmts?tk=";

      // 地形晕渲 与 地形注记
      // let wmtsUrl_terBase = "http://t{0-7}.tianditu.gov.cn/ter_w/wmts?tk=";
      // let wmtsUrl_terNote = "http://t{0-7}.tianditu.gov.cn/cta_w/wmts?tk=";

      // // 影像底图 与 影像注记
      // let wmtsUrl_satBase = "http://t0.tianditu.gov.cn/img_w/wmts?tk=";
      // let wmtsUrl_satNote = "http://t0.tianditu.gov.cn/cia_w/wmts?tk=";

      // 图层相关配置
      // 暂时 数组长度为6  后续添加 配置 如果要添加新的图层 记得在judgeTileLayerType 添加新的键值对
      let layersLength = 6;
      let layersOption = new Array(layersLength);

      for (let i = 0; i < layersLength; i++) {
        // 参数 typeString 用于指定 引用source源的layer类型  visibleStatus 表示一开始渲染我们只需要他的第一个相关的矢量底图与注记
        let typeString = this.judgeTileLayerType(i);
        let curUrl =
          "http://t{0-7}.tianditu.gov.cn/" +
          typeString +
          "_w/wmts?tk=" +
          TiandituKey;
        let visibleStatus = i <= 1 ? true : false;
        layersOption[i] = new TileLayer({
          opacity: 1,
          source: new WMTS({
            url: curUrl,
            layer: typeString,
            matrixSet: "w",
            format: "tiles",
            style: "default",
            projection: projection,
            tileGrid: new WMTSTileGrid({
              origin: getTopLeft(projectionExtent),
              resolutions: resolutions,
              matrixIds: matrixIds,
            }),
            wrapX: true,
          }),
          visible: visibleStatus,
        });
        if (visibleStatus) {
          this.curShowLayerIndex.push(i);
        }
      }

      var map = new Map({
        layers: layersOption,
        target: "map",
        view: new View({
          center: [15000000, 3000000],
          zoom: 5,
        }),
      });

      this.map2d = map;
这里的图层我主要就是使用了地形、影像与矢量。我的写法也许不是很好,但一时间我也想不到更好的写法,就先写出来了。主要就是通过 一张自定义的键值对关系根据索引拼接请求的地址。而visibleStatus表示一开始我们让矢量图与他的注记表示显示。
/**
     * 判断图层类型  大概率只能用于该界面的配置 不可轻易复用
     * @param {index} 自定义选项索引
     * @return {ret} 引用的source的layer名称
     * @rules [0: 'vec', 1: 'cva' , 2: 'ter' , 3: 'cta' , 4: 'img' , 5: 'cia']
     */
    judgeTileLayerType: function (index) {
      let ret;
      let map = {
        0: "vec",
        1: "cva",
        2: "ter",
        3: "cta",
        4: "img",
        5: "cia",
      };
      for (let i in map) {
        if (index == i) {
          ret = map[i];
        }
      }
      return ret;
    },
图层切换
// 图层切换 控件的主要实现
    checkLayer: function (e) {
      // 这里应该将当前显示的两个图层进行隐藏
      let tempLayerIndex = this.curShowLayerIndex;

      switch (e) {
        case "地形":
          this.setLayersVisible(false, tempLayerIndex);
          this.setLayersVisible(true, [2, 3]);
          this.curShowLayerIndex = [2, 3];
          break;
        case "深蓝":
          this.setLayersVisible(false, tempLayerIndex);
          this.setLayersVisible(true, [0, 1]);
          this.curShowLayerIndex = [0, 1];
          break;
        case "绚丽":
          this.setLayersVisible(false, tempLayerIndex);
          this.setLayersVisible(true, [4, 5]);
          this.curShowLayerIndex = [4, 5];
          break;
        default:
          break;
      }
    },
    // 对渲染的索引数组进行赋值 避免满屏幕的重复代码
    setLayersVisible: function (status, tempLayerIndex) {
      this.map2d.getLayers().item(tempLayerIndex[0]).setVisible(status);
      this.map2d.getLayers().item(tempLayerIndex[1]).setVisible(status);
    },
这个倒没什么好说的了,通过获取地图的layers 的第几项,设置visible,同时记录这一次的curShowLayerIndex,在下一次的时候设置为false。记得确保这个地图的初始化是在最开始的时候,如果你在这期间加载了别的图层,item 获取到的也许不是正确的。
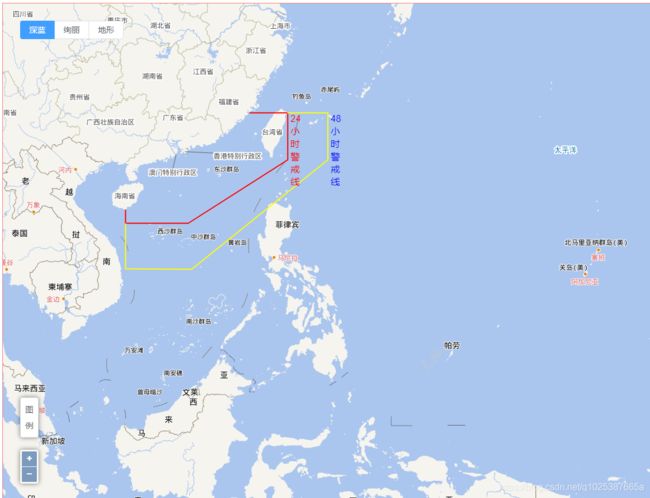
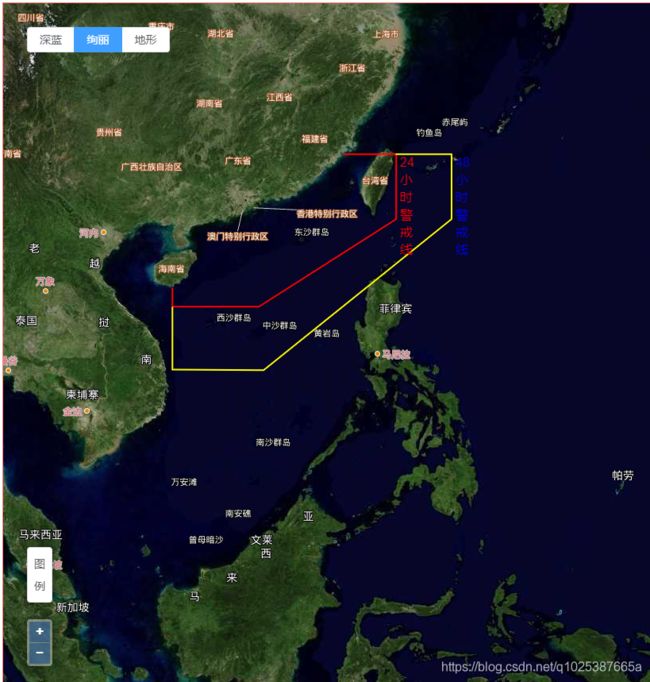
效果展示