如何利用金山云ARM云服务器搭建Nginx服务
金山云ARM云服务器于2019年10月26日正式上线,大大推动了基于ARM架构的国产CPU普及和应用。本文介绍创建一个金山云ARM云服务器实例,进行服务器性能测试,并安装Nginx服务的过程。
1 环境准备
本文创建的ARM云服务器位于金山云北京6区,可用区C。因此,根据金山云VPC机制,提前完成如下网络规划:
1.1 VPC配置信息
| 网络资源 | 名称 | CIDR |
|---|---|---|
| VPC | sbt-vpc | 10.34.0.0/16 |
1.2 子网配置信息
| 子网名称 | 所属VPC | 可用区 | 子网类型 | CIDR | 说明 |
|---|---|---|---|---|---|
| public_a | sbt-vpc | 可用区A | 普通子网 | 10.34.51.0/24 | 用于跳板机 |
| private_c | sbt-vpc | 可用区C | 普通子网 | 10.34.32.0/2 | 用于ARM云服务器 |
此外,需要提前完成相应的安全组配置,确保ARM云服务器的网络连通性。
2 创建ARM云服务器
2.1 新建ARM云服务器
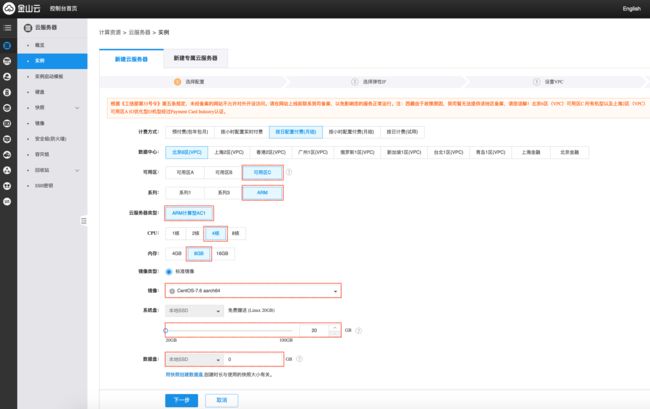
进入金山云控制台https://kec.console.ksyun.com/v2/#/kec,选择“北京6区(VPC)“,点解“新建实例”,进入下图的云服务器创建界面。

上图的重要参数如下:
- 可用区:选择“可用区C"。当前ARM云服务器只在金山云北京6区-可用区C提供;
- 系列:选择“ARM";
- 云服务器类型:选择“ARM计算型AC1";
- CPU:选择云服务器核数;
- 内存:选择云服务器内存数;
- 镜像:当前在ARM服务器上只支持使用“CentOS-7.6 aarch64”镜像;
- 系统盘:当前只支持本地SSD,最大100GB;
- 数据盘:当前只支持本地盘,最大30GB。
点击“下一步”,在完成后续网络等配置后,将完成ARM云服务器创建。
2.2 检查ARM云服务器配置
在通过堡垒机登录到ARM云服务器后,验证ARM云服务器的相关配置信息。
- 验证操作系统版本。显示版本是CentOS 7.6。
[root@vm10-34-32-9 ~]# cat /etc/redhat-release
CentOS Linux release 7.6.1810 (AltArch)
- 验证处理器类型。其中aarch64是是ARMv8架构的一种执行状态。
[root@vm10-34-32-9 ~]# uname -p
aarch64
- 检测CPU核数。
[root@vm10-34-32-9 ~]#  cat /proc/cpuinfo| grep "processor"| wc -l
4
- 检测内存数。
[root@vm10-34-32-9 ~]# cat /proc/meminfo | grep MemTotal
MemTotal:        7755840 kB
3 ARM云服务器性能测试
3.1 磁盘IO性能测试
安装fio工具
[root@vm10-34-32-9 ~]# yum install libaio-devel.aarch64 -y

root@vm10-34-32-9 ~]# yum install fio -y

[root@vm10-34-32-9 ~]# yum info fio
Name        : fio
Arch        : aarch64
Version     : 3.7
Release     : 1.el7
Size        : 1.9 M
Repo        : installed
From repo   : base
Summary     : Multithreaded IO generation tool
URL         : http://git.kernel.dk/?p=fio.git;a=summary
License     : GPLv2
Description : fio is an I/O tool that will spawn a number of threads or
            : processes doing a particular type of io action as specified by the
            : user.  fio takes a number of global parameters, each inherited by
            : the thread unless otherwise parameters given to them overriding
            : that setting is given. The typical use of fio is to write a job
            : file matching the io load one wants to simulate.
执行fio命令。
[root@vm10-34-32-9 ~]# fio --ioengine=libaio --rw=randread --direct=1 --size=1G --numjobs=16 --time_based --runtime=60 --group_reporting --name fio_test_file --bs=4k --iodepth=32 --filename=/root/fio-test
fio_test_file: (g=0): rw=randread, bs=(R) 4096B-4096B, (W) 4096B-4096B, (T) 4096B-4096B, ioengine=libaio, iodepth=32
...
fio-3.7
...
fio_test_file: (groupid=0, jobs=16): err= 0: pid=7046: Tue Nov  5 10:46:07 2019
   read: IOPS=41.5k, BW=162MiB/s (170MB/s)(9744MiB/60083msec)
在测试结果中可以得到如下IO性能指标:
- 每秒随机读次数:IOPS=41.5k
- IO读带宽:BW=162MiB/s
3.2 利用UnixBench进行CPU性能测试
- 安装gcc。
[root@vm10-34-32-9 ~]# yum install gcc -y

[root@vm10-34-32-9 ~]# gcc -v
Using built-in specs.
COLLECT_GCC=gcc
COLLECT_LTO_WRAPPER=/usr/libexec/gcc/aarch64-redhat-linux/4.8.5/lto-wrapper
Target: aarch64-redhat-linux
Configured with: ../configure --prefix=/usr --mandir=/usr/share/man --infodir=/usr/share/info --with-bugurl=http://bugzilla.redhat.com/bugzilla --enable-bootstrap --enable-shared --enable-threads=posix --enable-checking=release --with-system-zlib --enable-__cxa_atexit --disable-libunwind-exceptions --enable-gnu-unique-object --enable-linker-build-id --with-linker-hash-style=gnu --enable-languages=c,c++,objc,obj-c++,java,fortran,ada,lto --enable-plugin --enable-initfini-array --disable-libgcj --with-isl=/builddir/build/BUILD/gcc-4.8.5-20150702/obj-aarch64-redhat-linux/isl-install --with-cloog=/builddir/build/BUILD/gcc-4.8.5-20150702/obj-aarch64-redhat-linux/cloog-install --enable-gnu-indirect-function --build=aarch64-redhat-linux
Thread model: posix
gcc version 4.8.5 20150623 (Red Hat 4.8.5-39) (GCC)
- 安装UnixBench
下载源代码程序包,并执行编译。
[root@vm10-34-32-9 ~]# wget https://github.com/kdlucas/byte-unixbench/archive/v5.1.3.tar.gz

[root@vm10-34-32-9 ~]# tar zxvf v5.1.3.tar.gz

[root@vm10-34-32-9 byte-unixbench-5.1.3]# pwd
/root/byte-unixbench-5.1.3
[root@vm10-34-32-9 byte-unixbench-5.1.3]# ls
README.md  UnixBench
运行UnixBench。
[root@vm10-34-32-9 UnixBench]# pwd
/root/byte-unixbench-5.1.3/UnixBench
[root@vm10-34-32-9 UnixBench]# ./Run

========================================================================
   BYTE UNIX Benchmarks (Version 5.1.3)

   System: vm10-34-32-9: GNU/Linux
   OS: GNU/Linux -- 4.18.0-80.7.2.el7.aarch64 -- #1 SMP Thu Sep 12 16:13:20 UTC 2019
   Machine: aarch64 (aarch64)
   Language: en_US.utf8 (charmap="UTF-8", collate="UTF-8")
   11:16:50 up 35 min,  1 user,  load average: 0.00, 0.00, 0.13; runlevel 3

------------------------------------------------------------------------
Benchmark Run: Tue Nov 05 2019 11:16:50 - 11:45:00
0 CPUs in system; running 1 parallel copy of tests

Dhrystone 2 using register variables       13956914.8 lps   (10.0 s, 7 samples)
Double-Precision Whetstone                     3314.4 MWIPS (9.9 s, 7 samples)
Execl Throughput                               2329.1 lps   (29.9 s, 2 samples)
File Copy 1024 bufsize 2000 maxblocks        315072.2 KBps  (30.0 s, 2 samples)
File Copy 256 bufsize 500 maxblocks           87512.0 KBps  (30.0 s, 2 samples)
File Copy 4096 bufsize 8000 maxblocks        975173.6 KBps  (30.0 s, 2 samples)
Pipe Throughput                              697095.2 lps   (10.0 s, 7 samples)
Pipe-based Context Switching                  44122.8 lps   (10.0 s, 7 samples)
Process Creation                               3303.1 lps   (30.0 s, 2 samples)
Shell Scripts (1 concurrent)                   4412.3 lpm   (60.0 s, 2 samples)
Shell Scripts (8 concurrent)                   1101.0 lpm   (60.1 s, 2 samples)
System Call Overhead                         659287.2 lps   (10.0 s, 7 samples)

System Benchmarks Index Values               BASELINE       RESULT    INDEX
Dhrystone 2 using register variables         116700.0   13956914.8   1196.0
Double-Precision Whetstone                       55.0       3314.4    602.6
Execl Throughput                                 43.0       2329.1    541.6
File Copy 1024 bufsize 2000 maxblocks          3960.0     315072.2    795.6
File Copy 256 bufsize 500 maxblocks            1655.0      87512.0    528.8
File Copy 4096 bufsize 8000 maxblocks          5800.0     975173.6   1681.3
Pipe Throughput                               12440.0     697095.2    560.4
Pipe-based Context Switching                   4000.0      44122.8    110.3
Process Creation                                126.0       3303.1    262.1
Shell Scripts (1 concurrent)                     42.4       4412.3   1040.6
Shell Scripts (8 concurrent)                      6.0       1101.0   1835.0
System Call Overhead                          15000.0     659287.2    439.5
                                                                   ========
System Benchmarks Index Score                                         627.9
在输出结果中,我们看到本台云服务求的跑分是627.9。
4 部署Nginx服务
4.1 安装Nginx
金山云ARM云服务器当前硬盘空间最大130GB(100GB系统盘,30GB数据盘),可用作Web服务器。下面介绍如何安装Nginx的过程。
下载Nginx源代码,并解压缩。
[root@vm10-34-32-9 ~]# wget http://nginx.org/download/nginx-1.17.5.tar.gz

[root@vm10-34-32-9 ~]# tar zxvf nginx-1.17.5.tar.gz
安装Nginx所需程序包。
[root@vm10-34-32-9 nginx-1.17.5]# yum install zlib-devel.aarch64 pcre.aarch64 pcre-devel.aarch64 -y
编译并安装Nginx。
[root@vm10-34-32-9 nginx-1.17.5]# pwd
/root/nginx-1.17.5
[root@vm10-34-32-9 nginx-1.17.5]# ./configure
[root@vm10-34-32-9 nginx-1.17.5]# make install

[root@vm10-34-32-9 nginx]# pwd
/usr/local/nginx
[root@vm10-34-32-9 nginx]# ls
conf  html  logs  sbin
启动Nginx,并访问站点。
[root@vm10-34-32-9 sbin]# pwd
/usr/local/nginx/sbin

[root@vm10-34-32-9 sbin]# ./nginx
[root@vm10-34-32-9 sbin]# ps -ef|grep nginx
root     14705     1  0 12:12 ?        00:00:00 nginx: master process ./nginx
nobody   14706 14705  0 12:12 ?        00:00:00 nginx: worker process
root     14709  6940  0 12:12 pts/0    00:00:00 grep --color=auto nginx
[root@vm10-34-32-9 sbin]# curl -I localhost
HTTP/1.1 200 OK
Server: nginx/1.17.5
Date: Tue, 05 Nov 2019 04:12:32 GMT
Content-Type: text/html
Content-Length: 612
Last-Modified: Tue, 05 Nov 2019 04:10:52 GMT
Connection: keep-alive
ETag: "5dc0f64c-264"
Accept-Ranges: bytes
4.2 配置开机自动启动Nginx
为了提高云服务器的可用性,云服务商通常在宿主机发生故障,或者宿主机性能不足时,自动把云服务器从原有宿主机迁移到别的宿主机上。这个过程会导致云服务器重新启动。因为,为了避免对应用的影响,建议在云服务器启动时自动启动应用所需要的服务。下面介绍如何配置Nginx服务启动启动的过程。
- 修改/etc/rc.d/rc.local,增加Nginx启动命令。内容如下:
#!/bin/bash
# THIS FILE IS ADDED FOR COMPATIBILITY PURPOSES
#
# It is highly advisable to create own systemd services or udev rules
# to run scripts during boot instead of using this file.
#
# In contrast to previous versions due to parallel execution during boot
# this script will NOT be run after all other services.
#
# Please note that you must run 'chmod +x /etc/rc.d/rc.local' to ensure
# that this script will be executed during boot.

touch /var/lock/subsys/local

/usr/local/nginx/sbin/nginx
其中/usr/local/nginx/sbin/nginx是增加的启动Nginx的命令。
此外,需要增加/etc/rc.d/rc.local文件的执行权限。
[root@vm10-34-32-9 sbin]# chmod +x /etc/rc.d/rc.local
[root@vm10-34-32-9 sbin]# ls -al /etc/rc.d/rc.local
-rwxr-xr-x 1 root root 502 Nov  5 12:21 /etc/rc.d/rc.local
6 总结
本文描述了如何在金山云上创建和使用ARM云服务器的过程。由于金山云的ARM云服务器采用国产CPU,因此很好地满足了用户在自主可控方面的需求。随著ARM服务器的不断普及,软件生态的不断丰富,必将会有越来越多的应用场景。
7 参考资料
- 金山云云服务器帮助: https://docs.ksyun.com/products/24
