JAVA社交平台项目第一天 项目介绍和工程搭建
第1章 - 项目介绍和工程搭建
学习目标:
- 了解十次方项目需求;
- 了解前后端分离开发模式
- 理解RESTful
- 完成项目开发环境搭建
- 完成父工程、公共模块和文章微服务的搭建
- 掌握mybatis plus的使用,并开发完成文章微服务中文章的增删改查功能
- 掌握公共异常处理类的使用
1 十次方项目需求分析
1.1 项目介绍
十次方是程序员的专属社交平台,包括头条、问答、活动、交友、吐槽、招聘六大频道。
十次方名称的由来:2的10次方为1024,程序员都懂的。
如果你是一位技术大咖,那么赶快发布文章,增加知名度吧。
如果你是一名技术小白,那么赶快到问答频道寻求帮助的,这里高手如云哦!
如果你不想错过各种技术交流会,那么请经常关注活动频道吧。
如果你还是单身,那么赶快到交友频道找到你心仪的另一半。
如果你有太多的苦恼,那么赶快吐个槽吧。
如果你正在找工作或是想跳槽拿高薪,那么来招聘频道淘金吧。
1.2 项目需求
详见: 资源\文档\十次方需求规格说明书.docx
2 系统设计
2.1 开发模式
十次方项目采用前后端分离的开发模式
2.2 技术选型
后端:springboot + springcloud + mybatis plus + mysql5.7
前端:nodejs + NUXT + elementUI + vue
2.3 技术架构
采用前后端分离的系统架构
2.4 微服务模块划分
| 模块名称 | 模块中文名称 |
|---|---|
| tensquare_common | 公共模块 |
| tensquare_base | 基础微服务 |
| tensquare_article | 文章微服务 |
| tensquare_friend | 交友微服务 |
| tensquare_gathering | 活动微服务 |
| tensquare_qa | 问答微服务 |
| tensquare_recruit | 招聘微服务 |
| tensquare_user | 用户微服务 |
| tensquare_spit | 吐槽微服务 |
| tensquare_search | 搜索微服务 |
| tensquare_web | 前台微服务网关 |
| tensquare_manager | 后台微服务网关 |
| tensquare_eureka | 注册中心 |
| tensquare_config | 配置中心 |
| tensquare_sms | 短信微服务 |
| tensquare_notice | 消息通知微服务 |
2.5 数据库表结构分析
采用的分库分表设计,每个微服务模块为1个独立的数据库。
tensquare_article 文章
tensquare_base 基础
tensquare_friend 交友
tensquare_gathering 活动
tensquare_qa 问答
tensquare_recruit 招聘
tensquare_user 用户
tensquare_spit 吐槽
详见 资源\文档\十次方数据库文档.xlsx
2.6 API文档
课程提供了前后端开发接口文档(采用Swagger语言进行编写),并与Nginx进行了整 合。双击Nginx执行文件启动后,在地址栏输入http://localhost:801 即可访问API文档
前后端约定的返回码列表:
| 状态描述 | 返回码 |
|---|---|
| 成功 | 20000 |
| 失败 | 20001 |
| 用户名或密码错误 | 20002 |
| 权限不足 | 20003 |
| 远程调用失败 | 20004 |
| 重复操作 | 20005 |
3 RESTful架构说明
3.1 何为RESTful
RESTful架构是目前最流行的一种互联网软件架构
是Roy Thomas Fielding在他2000年的博士论文中提出的
是Representational State Transfer的缩写,翻译过来是”表现层状态转化”
是所有Web应用都应该遵守的架构设计指导原则
7个HTTP方法:GET、POST、PUT、DELETE、PATCH、HEAD、OPTIONS
3.2 接口规范
十次方项目使用GET、POST、PUT、DELETE四种方法
幂等性:不论你请求多少次,资源的状态是一样的。
3.2.1 GET
- 安全且幂等
- 获取表示
- 变更时获取表示(缓存)
适合查询类的接口使用
3.2.2 POST
- 不安全且不幂等
- 使用服务端管理的(自动产生)的实例号创建资源
- 创建子资源
- 部分更新资源
- 如果没有被修改,则不过更新资源(乐观锁)
适合数据提交类的接口使用
3.2.3 PUT
- 不安全但幂等
- 用客户端管理的实例号创建一个资源
- 通过替换的方式更新资源
- 如果未被修改,则更新资源(乐观锁)
适合更新数据的接口使用
3.2.4 DELETE
- 不安全但幂等
- 删除资源
适合删除数据的接口使用
请求返回响应码:
| 代码 | 含义 |
|---|---|
| 200 | (OK)- 如果现有资源已被更改 |
| 201 | (created)- 如果新资源被创建 |
| 202 | (accepted)- 已接受处理请求但尚未完成(异步处理) |
| 301 | (Moved Permanently)- 资源的URI被更新 |
| 303 | (See Other)- 其他(如,负载均衡) |
| 400 | (bad request)- 指代坏请求 |
| 404 | (not found)- 资源不存在 |
| 406 | (not acceptable)- 服务端不支持所需表示 |
| 409 | (conflict)- 通用冲突 |
| 412 | (Precondition Failed)- 前置条件失败(如执行条件更新时的冲突) |
| 415 | (unsupported media type)- 接受到的表示不受支持 |
| 500 | (internal server error)- 通用错误响应 |
| 503 | (Service Unavailable)- 服务当前无法处理请求 |
4 项目开发准备
4.1 开发环境
- 虚拟系统环境 VMware Workstation
- 虚拟机系统 CentOS 7
- 容器 docker
- JDK1.8
- 数据库 mysql 5.7
- 开发工具 idea
- 项目构建工具 maven
所有的第三方工具如mysql等都是运行在docker容器中的
注:虚拟机的帐户名root 密码itcast
4.2 mysql建库建表
进入安装了docker的虚拟机中,按以下顺序执行命令
(1)下载镜像(此步可省略)
docker pull centos/mysql‐57‐centos7
注:docker默认从国外的镜像网站拉取镜像,速度很慢。可以使用国内的阿里云镜像加速站点提升镜像拉取速度。具体步骤可以参考文档
docker配置国内镜像加速站点.pdf
(2)创建容器
docker run -di --name=tensquare_mysql -p 3306:3306 -e MYSQL_ROOT_PASSWORD=root centos/mysql-57-centos7
(3)连接MYSQL ,并执行资料中的建表脚本,创建article数据库
4.3 接口测试工具postman
postman是一款强大网页调试工具
- 能够发送任何类型的HTTP 请求 (GET,HEAD, POST,PUT。。。)
- 附带任意数量的参数
5 项目工程搭建
5.1 父工程搭建
创建项目类型为maven的父工程
-
打开idea开发工具
-
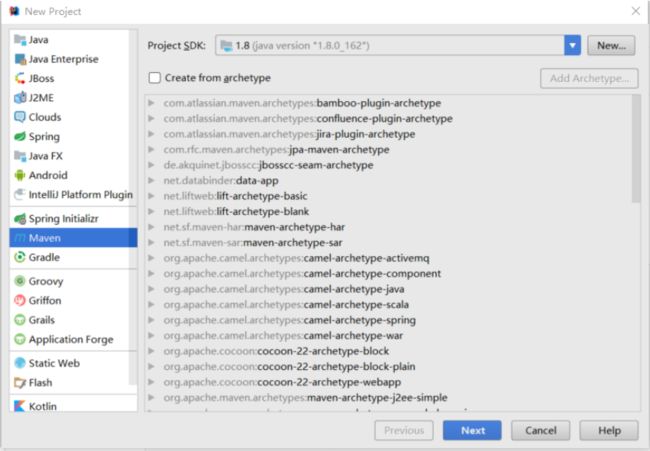
选择菜单file-new project ,弹出窗口中左侧菜单选择Maven ,点击next按钮
-
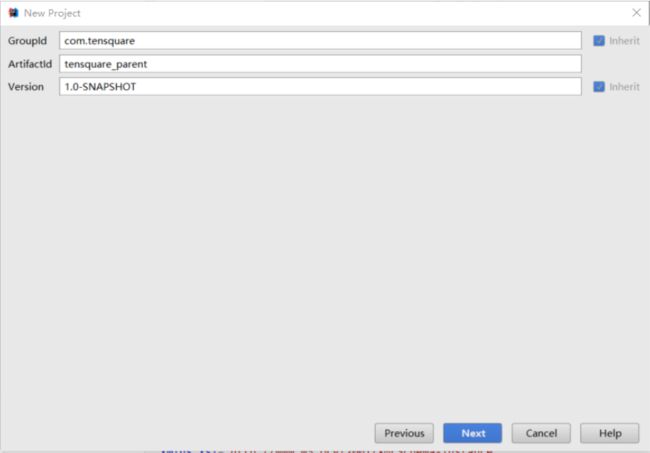
GroupId填写com.tensquare,ArtifacetId填写tensquare_parent,点击next按钮
-
点击Finish 完成
-
修改pom.xml文件,添加以下内容
        org.springframework.boot

        spring-boot-starter-parent

        2.1.4.RELEASE


        UTF-8

        UTF-8

        1.8

        1.8

        1.8

        1.0.5

        2.2.0

        1.2.39

        2.8.0


            org.springframework.boot

            spring-boot-starter-web


            org.springframework.boot

            spring-boot-starter-test

            test


            spring-snapshots

            Spring Snapshots

            https://repo.spring.io/snapshot


                true


            spring-milestones

            Spring Milestones

            https://repo.spring.io/milestone


                false


            spring-snapshots

            Spring Snapshots

            https://repo.spring.io/snapshot


                true


            spring-milestones

            Spring Milestones

            https://repo.spring.io/milestone


                false
5.2 搭建公共子模块
5.2.1 搭建子模块步骤
-
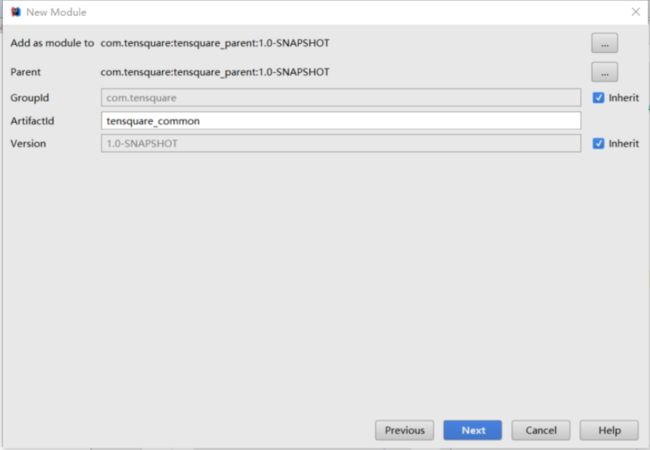
右键点击父工程tensquare_parent,选择 New -> Module 弹出窗口选择Maven ,点击next按钮
-
ArtifacetId填写tensquare_common,点击next按钮
-
点击finish
5.2.2 创建公共实体类和工具类
-
新建com.tensquare.entity包,包下创建Result类,用于controller返回结果
public class Result { private boolean flag;//是否成功 private Integer code;// 返回码 private String message;//返回信息 private Object data;// 返回数据 public Result(boolean flag, Integer code, String message, Object data) { super(); this.flag = flag; this.code = code; this.message = message; this.data = data; } public Result() { } public Result(boolean flag, Integer code, String message) { super(); this.flag = flag; this.code = code; this.message = message; } public boolean isFlag() { return flag; } public void setFlag(boolean flag) { this.flag = flag; } public Integer getCode() { return code; } public void setCode(Integer code) { this.code = code; } public String getMessage() { return message; } public void setMessage(String message) { this.message = message; } public Object getData() { return data; } public void setData(Object data) { this.data = data; } } -
创建类PageResult ,用于返回分页结果
public class PageResult{ private Long total; private List rows; public PageResult(Long total, List rows) { super(); this.total = total; this.rows = rows; } //getter and setter .... } -
返回码定义类
public class StatusCode { public static final int OK=20000;//成功 public static final int ERROR =20001;//失败 public static final int LOGINERROR =20002;//用户名或密码错误 public static final int ACCESSERROR =20003;//权限不足 public static final int REMOTEERROR =20004;//远程调用失败 public static final int REPERROR =20005;//重复操作 } -
分布式ID生成器
课程中已经提供了分布式ID生成器
资源\微服务相关\工具类\IdWorker.java
tensquare_common工程创建util包,将IdWorker.java直接拷贝到tensquare_common工程的util包中。
不能使用数据库本身的自增功能来产生主键值,原因是生产环境为分片部署的。
使用snowflake (雪花)算法(twitter出品)生成***唯一***的主键值
- 41bit的时间戳可以支持该算法使用到2082年
- 10bit的工作机器id可以支持1024台机器
- 序列号支持1毫秒产生4096个自增序列id
- 整体上按照时间自增排序
- 整个分布式系统内不会产生ID碰撞
- 每秒能够产生26万ID左右
6 文章微服务-文章管理
6.1 模块搭建
-
在tensquare_parent项目下创建tensquare_article模块,创建过程参考第4.2节公共子模块的创建过程
-
修改tensquare_article模块的pom.xml文件,添加以下依赖
mysql mysql-connector-java com.tensquare tensquare_common 1.0-SNAPSHOT -
创建com.tensquare.article包,并创建BaseApplication启动类
package com.tensquare.article; import org.springframework.boot.SpringApplication; import org.springframework.boot.autoconfigure.SpringBootApplication; import org.springframework.context.annotation.Bean; import util.IdWorker; @SpringBootApplication public class ArticleApplication { public static void main(String[] args) { SpringApplication.run(ArticleApplication.class, args); } @Bean public IdWorker idWorker(){ return new IdWorker(1,1); } } -
在resources文件夹下创建application.yml,并添加以下内容
server:
  port: 9004
spring:
  application:
    name: tensquare-article #指定服务名
  datasource:
    driver-class-name: com.mysql.jdbc.Driver
    url: jdbc:mysql://192.168.200.129:3306/tensquare_article?characterEncoding=utf-8
    username: root
    password: root
6.2 文章管理-CRUD
6.2.1 表结构分析
tensquare_article数据库,tb_article表
| 文章表 | tb_article | ||
|---|---|---|---|
| 字段名称 | 字段含义 | 字段类型 | 备注 |
| id | ID | 文本 | |
| columnid | 专栏ID | 文本 | |
| userid | 用户ID | 文本 | |
| title | 文章标题 | 文本 | |
| content | 文章内容 | 文本 | |
| image | 文章封面 | 文本 | |
| createtime | 发表日期 | 日期 | |
| updatetime | 修改日期 | 日期 | |
| ispublic | 是否公开 | 文本 | 0:不公开 |
| istop | 是否置顶 | 文本 | 0:不置顶 |
| visits | 浏览量 | 整型 | |
| thumbup | 点赞数 | 整型 | |
| comment | 评论数 | 整型 | |
| state | 审核状态 | 文本 | 0:未审核 1:已审核 |
| channelid | 所属频道 | 整型 | 关联频道表ID |
| url | URL地址 | 文本 | |
| type | 文章类型 | 文本 | 0:分享 |
6.2.2 集成mybatis plus
-
mybatis plus概述
- 是对Mybatis框架的二次封装和扩展
- 纯正血统:完全继承原生 Mybatis 的所有特性
- 最少依赖:仅仅依赖Mybatis以及Mybatis-Spring
- 性能损耗小:启动即会自动注入基本CURD ,性能无损耗,直接面向对象操作
- 自动热加载:Mapper对应的xml可以热加载,大大减少重启Web服务器时间,提升开发效率
- 性能分析:自带Sql性能分析插件,开发测试时,能有效解决慢查询
- 全局拦截:提供全表delete、update操作智能分析阻断
- 避免Sql注入:内置Sql注入内容剥离器,预防Sql注入攻击
-
在pom.xml文件中引入相关依赖
com.baomidou mybatisplus-spring-boot-starter ${mybatisplus-spring-boot-starter.version} com.baomidou mybatis-plus ${mybatisplus.version} -
在配置文件application.yml中添加相关配置
# Mybatis-Plus 配置 mybatis-plus: # mapper-locations: classpath:/mapper/*Mapper.xml #实体扫描,多个package用逗号或者分号分隔 typeAliasesPackage: com.tensquare.article.pojo global-config: id-type: 1 #0:数据库ID自增 1:用户输入id db-column-underline: false refresh-mapper: true configuration: map-underscore-to-camel-case: true cache-enabled: true #配置的缓存的全局开关 lazyLoadingEnabled: true #延时加载的开关 multipleResultSetsEnabled: true #开启延时加载,否则按需加载属性 log-impl: org.apache.ibatis.logging.stdout.StdOutImpl #打印sql语句,调试用 -
修改启动类,增加Mapper扫描注解
@SpringBootApplication

//Mapper扫描注解
@MapperScan("com.tensquare.article.dao")
public class ArticleApplication {
    public static void main(String[] args) {
        SpringApplication.run(ArticleApplication.class, args);
    }

    @Bean
    public IdWorker idWorker() {
        return new IdWorker(1, 1);
    }
}
6.2.3 实现查询所有文章和根据id号查询文章功能
-
在com.tensquare.article包下面创建pojo包,并创建Article实体类
package com.tensquare.article.pojo; import com.baomidou.mybatisplus.annotations.TableId; import com.baomidou.mybatisplus.annotations.TableName; import com.baomidou.mybatisplus.enums.IdType; import java.io.Serializable; import java.util.Date; @TableName("tb_article") public class Article implements Serializable { @TableId(type = IdType.INPUT) private String id;//ID private String columnid; //专栏ID private String userid; //用户ID private String title; //标题 private String content; //文章正文 private String image; //文章封面 private Date createtime; //发表日期 private Date updatetime; //修改日期 private String ispublic; //是否公开 private String istop; //是否置顶 private Integer visits; //浏览量 private Integer thumbup; //点赞数 private Integer comment; //评论数 private String state; //审核状态 private String channelid; //所属频道 private String url; //URL private String type; //类型 //getters and setters } -
编写数据访问接口dao
public interface ArticleDao extends BaseMapper{ } -
编写service
@Service public class ArticleService { @Autowired private ArticleDao articleDao; public ListfindAll() { return articleDao.selectList(null); } public Article findById(String id) { return articleDao.selectById(id); } } -
编写controller
@RestController

@RequestMapping("/article")

public class ArticleController {

    @Autowired

    private ArticleService articleService;

    @RequestMapping(method = RequestMethod.GET)

    public Result findAll() {

        List list = articleService.findAll();

        return new Result(true, StatusCode.OK, "查询成功", list);

    }

    @RequestMapping(value = "/{id}", method = RequestMethod.GET)

    public Result findById(@PathVariable String id) {

        Article Article = articleService.findById(id);

        return new Result(true, StatusCode.OK, "查询成功", Article);

    }

}
6.2.4 添加文章、修改文章和删除文章
-
添加文章 ArticleController中添加代码
//新增标签数据接口

@RequestMapping(method = RequestMethod.POST)

public Result add(@RequestBody Article article) {

    articleService.add(article);

    return new Result(true, StatusCode.OK, "添加成功");

}
ArticleService中添加代码
@Autowired
private IdWorker idWorker;
public void add(Article article) {
article.setId(idWorker.nextId() + "");

articleDao.insert(article);
}
-
修改文章
ArticleController中添加代码
//修改标签数据接口

@RequestMapping(value = "{id}", method = RequestMethod.PUT)

public Result update(@PathVariable String id, @RequestBody Article article) {

    article.setId(id);

    articleService.update(article);

    return new Result(true, StatusCode.OK, "修改成功");

}
ArticleService中添加代码
public void update(Article article) { //根据id号更新 //方法1 articleDao.updateById(article); //方法2 EntityWrapper wrapper = new EntityWrapper(); wrapper.eq("id", article.getId()); articleDao.update(article, wrapper); } -
删除文章
ArticleController中添加代码
//删除文章数据接口

@RequestMapping(value = "{id}", method = RequestMethod.DELETE)

public Result delete(@PathVariable String id) {

    articleService.delete(id);

    return new Result(true, StatusCode.OK, "删除成功");

}
ArticleService中添加代码
public void delete(String id) {

    articleDao.deleteById(id);

}
6.2.5 条件查询和分页
-
条件查询
使用Mybatis Plus 提供的EntityWrapper对象封装where查询条件,例如以下使用方式:
EntityWrapper wrapper = new EntityWrapper(); wrapper.eq("id", article.getId()); //动态sql,例如 and field='xxx' wrapper.eq(null != map.get(field), field, map.get(field)); -
分页
- 使用 Mybatis Plus 提供的Page对象
- 向Mybatis Plus中注入PaginationInterceptor插件
- 新建config包,创建MybatisPlusConfig对象,添加下面的代码
@Configuration public class MybatisPlusConfig { @Bean public PaginationInterceptor paginationInterceptor() { return new PaginationInterceptor(); } } -
完整代码
ArticleController中添加代码
     @RequestMapping(value="/search/{page}/{size}", method = RequestMethod.POST)

    public Result search(@RequestBody Map map, @PathVariable int page, @PathVariable int size) {

        Page page1 = articleService.search(map, page, size);

        return new Result(true, StatusCode.OK, "查询成功", new PageResult((int) page1.getTotal(), page1.getRecords()));

    }
ArticleService中添加代码
public Page search(Map map, int page, int size) {

    EntityWrapper wrapper = new EntityWrapper();

    Set fieldSet = map.keySet();

    for(String field : fieldSet) {

        //wrapper.eq(field, map.get(field));

        wrapper.eq(null != map.get(field), field, map.get(field));

    }

    Page page1 = new Page(page, size);

    List list = articleDao.selectPage(page1, wrapper);

    page1.setRecords(list);

    return page1;

}
6.3 公共异常处理类
为了使代码容易维护,减少冗余,我们创建一个类集中处理异常
在com.tensquare.user.controller包下创建公共异常处理类BaseExceptionHandler,并添加代码
@ControllerAdvice
public class BaseExceptionHandler {

    @ExceptionHandler(value = Exception.class)
    @ResponseBody
    public Result error(Exception e) {
        e.printStackTrace();
        return new Result(false, StatusCode.ERROR, e.getMessage());
    }
}
ArticleController中添加测试代码
@RequestMapping(value="/exception", method = RequestMethod.GET)
public Result exception() throws Exception {
    throw new Exception("测试统一异常处理");
}
6.4 跨域处理
-
何谓跨域
浏览器从一个域名的网页去请求另一个域名的资源时,域名、端口、协议任一不同,都是跨域 。
十次方项目是采用前后端分离开发的,也是前后端分离部署的,必然会存在跨域问题。
-
如何解决跨域
只需要在controller类上添加注解
@CrossOrigin即可!
e}", method = RequestMethod.POST)
   public Result search(@RequestBody Map map, @PathVariable int page, @PathVariable int size) {

       Page page1 = articleService.search(map, page, size);

       return new Result(true, StatusCode.OK, "查询成功", new PageResult((int) page1.getTotal(), page1.getRecords()));

   }
ArticleService中添加代码
public Page search(Map map, int page, int size) {
   EntityWrapper wrapper = new EntityWrapper();

   Set fieldSet = map.keySet();

   for(String field : fieldSet) {

       //wrapper.eq(field, map.get(field));

       wrapper.eq(null != map.get(field), field, map.get(field));

   }

   Page page1 = new Page(page, size);

   List list = articleDao.selectPage(page1, wrapper);

   page1.setRecords(list);

   return page1;
}
## 6.3 公共异常处理类

为了使代码容易维护,减少冗余,我们创建一个类集中处理异常

在com.tensquare.user.controller包下创建公共异常处理类BaseExceptionHandler,并添加代码
@ControllerAdvice
public class BaseExceptionHandler {
@ExceptionHandler(value = Exception.class)
@ResponseBody
public Result error(Exception e) {
    e.printStackTrace();
    return new Result(false, StatusCode.ERROR, e.getMessage());
}
}
ArticleController中添加测试代码
@RequestMapping(value=“/exception”, method = RequestMethod.GET)
public Result exception() throws Exception {
throw new Exception(“测试统一异常处理”);
}
## 6.4 跨域处理

1. 何谓**跨域**

   浏览器从一个域名的网页去请求另一个域名的资源时,域名、端口、协议任一不同,都是跨域 。

   十次方项目是采用前后端分离开发的,也是前后端分离部署的,必然会存在跨域问题。

2. 如何解决跨域

   只需要在controller类上添加注解`@CrossOrigin`即可!


