javaweb04(10-14)
10、MVC三层架构
什么是MVC: Model view Controller 模型、视图、控制器
10.1、早先年

用户直接访问控制层,控制层就可以直接操作数据库;
servlet--CRUD-->数据库
弊端:程序十分臃肿,不利于维护
servlet的代码中:处理请求、响应、视图跳转、处理JDBC、处理业务代码、处理逻辑代码

架构:没有什么是加一层解决不了的!
程序猿调用
JDBC
Mysql Oracle SqlServer
10.2、MVC三层架构
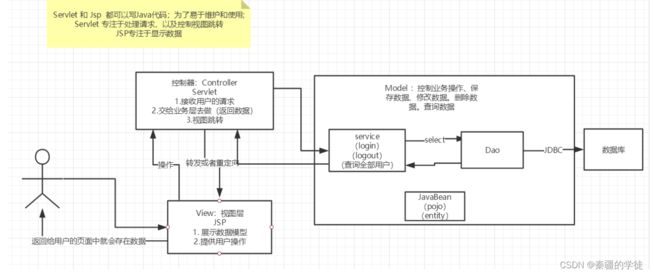
Model
-
业务处理 :业务逻辑(Service)
-
数据持久层:CRUD (Dao)
View
-
展示数据
-
提供链接发起Servlet请求 (a,form,img…)
Controller (Servlet)
-
接收用户的请求 :(req:请求参数、Session信息….)
-
交给业务层处理对应的代码
-
控制视图的跳转
登录--->接收用户的登录请求--->处理用户的请求(获取用户登录的参数,username,password)---->交给业务层处理登录业务(判断用户名密码是否正确:事务)--->Dao层查询用 户名和密码是否正确-->数据库
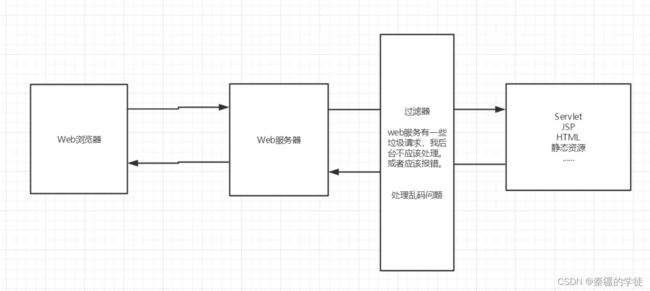
11、Filter(重点)
Filter:过滤器 ,用来过滤网站的数据;
-
处理中文乱码
-
登录验证….
Filter开发步骤:
-
导包
-
编写过滤器
- 导包不要错
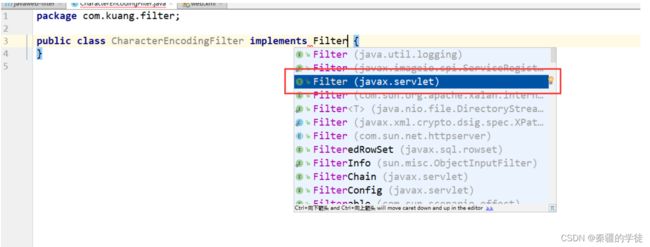
  实现Filter接口,重写对应的方法即可

  ```java
  public class CharacterEncodingFilter implements Filter {

      //初始化:web服务器启动,就以及初始化了,随时等待过滤对象出现!
      public void init(FilterConfig filterConfig) throws ServletException {
          System.out.println("CharacterEncodingFilter初始化");
      }

      //Chain : 链
      /*
      1. 过滤中的所有代码,在过滤特定请求的时候都会执行
      2. 必须要让过滤器继续同行
      chain.doFilter(request,response);
      */
      public void doFilter(ServletRequest request, ServletResponse response, FilterChain chain) throws IOException, ServletException {
          request.setCharacterEncoding("utf-8");
          response.setCharacterEncoding("utf-8");
          response.setContentType("text/html;charset=UTF-8");

          System.out.println("CharacterEncodingFilter执行前....");
          chain.doFilter(request,response);
          //让我们的请求继续走,如果不 写,程序到这里就被拦截停止!
          System.out.println("CharacterEncodingFilter执行后....");
      }
      //销毁:web服务器关闭的时候,过滤会销毁
      public void destroy() {
          System.out.println("CharacterEncodingFilter销毁");
      }
  }


  ```
- 在web.xml中配置 Filter
<filter>
    <filter-name>CharacterEncodingFilterfilter-name>
    <filter-class>com.kuang.filter.CharacterEncodingFilterfilter- class>
filter>
<filter-mapping>
    <filter-name>CharacterEncodingFilterfilter-name>

    <url-pattern>/servlet/*url-pattern>

filter-mapping>
12、监听器
实现一个监听器接口:
-
编写一个监听器
实现监听器的接口
//统计网站在线人数 : 统计session public class OnlineCountListener implements HttpSessionListener { //创建session监听: 看你的一举一动 //一旦创建Session就会触发一次这个事件! public void sessionCreated(HttpSessionEvent se) { ServletContext ctx = se.getSession().getServletContext(); System.out.println(se.getSession().getId()); Integer onlineCount = (Integer) ctx.getAttribute("OnlineCount"); if (onlineCount==null){ onlineCount = new Integer(1); }else { int count = onlineCount.intValue(); onlineCount = new Integer(count+1); } ctx.setAttribute("OnlineCount",onlineCount); } //销毁session监听 //一旦销毁Session就会触发一次这个事件! public void sessionDestroyed(HttpSessionEvent se) { ServletContext ctx = se.getSession().getServletContext(); Integer onlineCount = (Integer) ctx.getAttribute("OnlineCount"); if (onlineCount==null){ onlineCount = new Integer(0); }else { int count = onlineCount.intValue(); onlineCount = new Integer(count-1); } ctx.setAttribute("OnlineCount",onlineCount); } } /* Session销毁: 1. 手动销毁 getSession().invalidate(); 2. 自动销毁 */ -
web.xml中注册监听器
<listener>
    <listener-class>com.kuang.listener.OnlineCountListenerlistener- class> listener>
- 看情况是否使用!
13、过滤器、监听器常见应用
监听器:GUI编程中经常使用:
public class TestPanel {
    public static void main(String[] args) {
        Frame frame = new Frame("中秋节快乐");//新建一个窗体
        Panel panel = new Panel(null); //面板
        frame.setLayout(null); //设置窗体的布局

        frame.setBounds(300,300,500,500);
        frame.setBackground(new Color(0,0,255)); //设置背景颜色

        panel.setBounds(50,50,300,300);
        panel.setBackground(new Color(0,255,0)); //设置背景颜色

        frame.add(panel);
        frame.setVisible(true);

        //监听事件,监听关闭事件
        frame.addWindowListener(new WindowAdapter() {
            @Override
            public void windowClosing(WindowEvent e) {
                super.windowClosing(e);
            }
        });
    }
}
用户登陆之后才能进去主页!用户注销后就不能进去主页了!
-
用户登录之后,向Sesison中放入用户的数据
-
进入主页的时候要判断用户是否已经登录;要求:在过滤器中实现!
HttpServletRequest request = (HttpServletRequest) req;
HttpServletResponse response = (HttpServletResponse) resp;

if (request.getSession().getAttribute(Constant.USER_SESSION)==null){
    response.sendRedirect("/error.jsp");
}

chain.doFilter(request,response);
14、JDBC
什么是JDBC : Java连接数据库!

需要jar包的支持
- java.sql
- javax.sql
- mysql-conneter-java… 连接驱动(必须要导入)
建数据库
CREATE TABLE users(
	id INT PRIMARY KEY,
	`name` VARCHAR(40),
    `password` VARCHAR(40),
    email VARCHAR(60),
    birthday DATE
);

INSERT INTO users(id,`name`,`password`,email,birthday)
VALUES(1,'张三','123456','[email protected]','2000-01-01');
INSERT INTO users(id,`name`,`password`,email,birthday)
VALUES(2,'李四','123456','[email protected]','2000-01-01');
INSERT INTO users(id,`name`,`password`,email,birthday)
VALUES(3,'王五','123456','[email protected]','2000-01-01');

SELECT * FROM users;
导入数据库依赖
<dependency>
    <groupId>mysqlgroupId>
    <artifactId>mysql-connector-javaartifactId>
    <version>5.1.47version>
dependency>
IDEA连接数据库

JDBC固定步骤:
- 加载驱动
- 连接数据库,代表数据库
- 向数据库发送SQL的对象Statement:CRUD
- 编写sql(根据业务,不同的SQL)
- 执行sql
- 关闭连接
public class TestJdbc {
    public static void main(String[] args) throws ClassNotFoundException, SQLException {

        //配置信息
        //useUnicode=true&characterEncoding=utf-8 解决中文乱码
        String url="jdbc:mysql://localhost:3306/jdbc?useUnicode=true&characterEncoding=utf-8";
        String username = "root";
        String password = "123456";

        //1.加载驱动
        Class.forName("com.mysql.jdbc.Driver");
        //2.连接数据库,代表数据库
        Connection connection = DriverManager.getConnection(url, username, password);

        //3.向数据库发送SQL的对象Statement,PreparedStatement : CRUD
        Statement statement = connection.createStatement();

        //4.编写SQL
        String sql = "select * from users";

        //5.执行查询SQL,返回一个 ResultSet : 结果集
        ResultSet rs = statement.executeQuery(sql);

        while (rs.next()){
            System.out.println("id="+rs.getObject("id"));
            System.out.println("name="+rs.getObject("name"));
            System.out.println("password="+rs.getObject("password"));
            System.out.println("email="+rs.getObject("email"));
            System.out.println("birthday="+rs.getObject("birthday"));
        }

        //6.关闭连接,释放资源(一定要做) 先开后关
        rs.close();
        statement.close();
        connection.close();
    }
}
预编译SQL
public class TestJDBC2 {
    public static void main(String[] args) throws Exception {
        //配置信息
        //useUnicode=true&characterEncoding=utf-8 解决中文乱码 String
        url="jdbc:mysql://localhost:3306/jdbc? useUnicode=true&characterEncoding=utf-8";
        String username = "root";
        String password = "123456";

        //1.加载驱动
        Class.forName("com.mysql.jdbc.Driver");

        //2.连接数据库,代表数据库
        Connection connection = DriverManager.getConnection(url, username, password);

        //3.编写SQL
        String sql = "insert into users(id, name, password, email, birthday) values (?,?,?,?,?);";

        //4.预编译
        PreparedStatement preparedStatement = connection.prepareStatement(sql);

        preparedStatement.setInt(1,2);//给第一个占位符? 的值赋值为1;
        preparedStatement.setString(2,"狂神说Java");//给第二个占位符? 的值赋值为 狂神说Java;
        preparedStatement.setString(3,"123456");//给第三个占位符? 的值赋值为 123456;
        preparedStatement.setString(4,"[email protected]");//给第四个占位符?的 值赋值为1;
        preparedStatement.setDate(5,new Date(new java.util.Date().getTime()));//给第五个占位符?的值赋值为new Date(new java.util.Date().getTime());

        //5.执行SQL
        int i = preparedStatement.executeUpdate();
        if (i>0){
            System.out.println("插入成功@");
                }

        //6.关闭连接,释放资源(一定要做) 先开后关
        preparedStatement.close();
        connection.close();
    }
}
事务
要么都成功,要么都失败!
ACID原则:保证数据的安全。
开启事务
事务提交 commit()
事务回滚 rollback()
关闭事务

转账:
A:1000
B:1000

A(900) --100--> B(1100)
junit单元测试
依赖
<dependency>
    <groupId>junitgroupId>
    <artifactId>junitartifactId>
    <version>4.12version>
dependency>
简单使用
@Test注解只有在方法上有效,只要加了这个注解的方法,就可以直接运行!
@Test
public void test(){
    System.out.println("Hello");
}
搭建一个环境
CREATE TABLE account(
    id INT PRIMARY KEY AUTO_INCREMENT,
    `name` VARCHAR(40),
    money FLOAT
);

INSERT INTO account(`name`,money) VALUES('A',1000);
INSERT INTO account(`name`,money) VALUES('B',1000);
INSERT INTO account(`name`,money) VALUES('C',1000);
@Test
public void test() {
    //配置信息
    //useUnicode=true&characterEncoding=utf-8 解决中文乱码 String
    url="jdbc:mysql://localhost:3306/jdbc? useUnicode=true&characterEncoding=utf-8";
    String username = "root";
    String password = "123456";

    Connection connection = null;

    //1.加载驱动
    try {
        Class.forName("com.mysql.jdbc.Driver");
         //2.连接数据库,代表数据库
        connection = DriverManager.getConnection(url, username, password);
        //3.通知数据库开启事务,false 开启
        connection.setAutoCommit(false); String sql = "update account set money = money-100 where name = 'A'";
        connection.prepareStatement(sql).executeUpdate();

        //制造错误
        //int i = 1/0;
        String sql2 = "update account set money = money+100 where name = 'B'";
        connection.prepareStatement(sql2).executeUpdate();

        connection.commit();//以上两条SQL都执行成功了,就提交事务!
        System.out.println("success");
    } catch (Exception e) {
        try {
            //如果出现异常,就通知数据库回滚事务
            connection.rollback();
        } catch (SQLException e1) {
            e1.printStackTrace();
        }e.printStackTrace();
    }finally {
        try {
            connection.close();
        } catch (SQLException e) {
            e.printStackTrace();
        }
    }
}