Ansible自动化运维
Ansible自动化运维
介绍
自动化运维
-
当管理的服务器很多时,假设有1000台,如果想要在1000台服务器上做一个简单的操作:
- 按照传统方法,一台连着一台服务器的ssh登录,然后手动操作,效率太低;
- 若写脚本实现,会有以下缺点
- 管理的机器平台不一致,脚本可能不具备通用性
- 传密码麻烦(在非免密登录的环境下, 需要expect来传密码)
- 效率较低,循环1000次也需要一个一个的完成,如果用
&符放到后台执行,则会产生1000个进程
-
自动化运维:将日常IT运维中大量的重复性工作,小到简单的日常检查、配置变更和软件安装,大到整个变更流程的组织调度,由过去的手工执行转为自动化操作,从而减少乃至消除运维中的延迟,实现“零延时”的IT运维
-
管理多台服务器,自动化运维需要关注以下几个方面
-
管理机与被管理机的连接(管理机如何将管理指令发送给被管理机)
-
服务器信息收集 (如果被管理的服务器有centos7.5外还有其它linux发行版,如suse,ubuntu等。当你要做的事情在不同OS上有所不同,你需要收集信息,并将其分开处理)
-
服务器分组(因为有些时候我要做的事情不是针对所有服务器,可能只针对某一个分组)
-
管理内容的主要分类
- 文件目录管理(包括文件的创建,删除,修改,查看状态,远程拷贝等)
- 用户和组管理
- cron时间任务管理
- yum源配置与通过yum管理软件包
- 服务管理
- 远程执行脚本
- 远程执行命令
-
-
常见自动化运维工具
-
puppet
基于ruby语言,成熟稳定。适合于大型架构,相对于ansible和saltstack会复杂些。
-
saltstack
基于python语言,相对简单,大并发能力比ansible要好, 但需要维护被管理端的服务。如果服务断开,连接就会出问题。
-
ansible
基于python语言,简单快捷,被管理端不需要启服务。直接走ssh协议,需要验证所以机器多的话速度会较慢。
-
Ansible
-
ansible是一种由Python开发的自动化运维工具,集合了众多运维工具(puppet、cfengine、chef、func、fabric)的优点,实现了批量系统配置、批量程序部署、批量运行命令等功能
-
ansible是基于模块工作的,本身没有批量部署的能力,真正具有批量部署能力的是ansible运行的模块,ansible只是提供一个框架。
-
特点
- 不需要在被监控端上安装任何服务程序,部署简单
- 无服务器端,使用时直接运行命令即可
- 基于模块工作,可以使用任意语言开发
- 使用yaml语言编写playbook,可以通过playbook(剧本)进行多个任务的编排
- 基于ssh工作
- 可实现多级指挥
- 具有幂等性,一种操作重复多次执行结果相同
-
执行过程
- 加载自己的配置文件,默认为/etc/ansible/ansible.cfg
- 加载自己对应的模块文件
- 通过ansible将模块或命令生成对应的临时py文件,并将该文件传输至远程服务器
- 对应执行用户的家目录的.ansible/tmp/xx.py文件
- 给文件+x执行权限
- 执行并将返回结果,删除临时py文件,sleep 0 退出
-
核心组件
- ansbile:核心程序
- modules:包括ansible自带的核心模块以及自定义模块
- plugins:完成模块功能的补充,包括连接插件,邮箱插件
- palybooks:剧本,定义ansbile多任务配置文件,由ansible自动执行
- inventory:定义ansbile管理的主机清单
- connection plugins:负责和被监控端实现通信

安装部署ansible
| 虚拟机 | IP地址 | 作用 |
|---|---|---|
| server1 | 192.168.139.10 | 管理节点 |
| server2 | 192.168.139.20 | 被管理节点 |
| server3 | 192.168.139.30 | 被管理节点 |
- 基本环境配置
域名解析
cat >> /etc/hosts <.168.139.10 server1
	192.168.139.20 server2
	192.168.139.30 server3
	EOF

关闭防火墙,selinux
systemctl stop firewalld
systemctl disable firewalld
iptables -F
setenforce 0
sed -i 's/SELINUX=enforced/SELINUX=disabled/' /etc/selinux/config

时间同步
ntpdate cn.ntp.org.cn

yum源配置
yum install -y epel-release.noarch
- 管理节点安装ansible
[root@server1 ~]# yum install ansible -y
[root@server1 ~]# ansible --version
ansible 2.9.25
  config file = /etc/ansible/ansible.cfg
  configured module search path = [u'/root/.ansible/plugins/modules', u'/usr/share/ansible/plugins/modules']
  ansible python module location = /usr/lib/python2.7/site-packages/ansible
  executable location = /usr/bin/ansible
  python version = 2.7.5 (default, Nov 16 2020, 22:23:17) [GCC 4.8.5 20150623 (Red Hat 4.8.5-44)]
- 免密登陆
[root@server1 ~]# ssh-keygen
[root@server1 ~]# ssh-copy-id 192.168.139.20
[root@server1 ~]# ssh-copy-id 192.168.139.30
- 定义主机组
[root@server1 ~]# vim /etc/ansible/hosts
[root@server1 ~]# cat /etc/ansible/hosts |grep -Ev '^#|^$'
[mygroup]
192.168.139.20
192.168.139.30
- 测试连接
[root@server1 ~]# ansible -m ping all
192.168.139.20 | SUCCESS => {
    "ansible_facts": {
        "discovered_interpreter_python": "/usr/bin/python"
    },
    "changed": false,
    "ping": "pong"
}
192.168.139.30 | SUCCESS => {
    "ansible_facts": {
        "discovered_interpreter_python": "/usr/bin/python"
    },
    "changed": false,
    "ping": "pong"
}
[root@server1 ~]# ansible -m ping mygroup
192.168.139.20 | SUCCESS => {
    "ansible_facts": {
        "discovered_interpreter_python": "/usr/bin/python"
    },
    "changed": false,
    "ping": "pong"
}
192.168.139.30 | SUCCESS => {
    "ansible_facts": {
        "discovered_interpreter_python": "/usr/bin/python"
    },
    "changed": false,
    "ping": "pong"
}
服务器分组
- ansible组件inventory:用于定义ansbile管理的主机清单
- 默认主机清单配置文件为/etc/ansible/hosts,可在该文件中进行服务器分组
- 分组方法
多台合写
apache[1:10].aaa.com	表示apache1.aaa.com到apache10.aaa.com这10台机器
nginx[a:z].aaa.com		表示nginxa.aaa.com到nginxz.aaa.com共26台机器
10.1.1.[11:15]			表示10.1.1.11到10.1.1.15这5台机器

定义端口
10.1.1.13:2222

定义别名(定义10.1.1.12:2222这台服务器的别名为nginx1)
nginx1 ansible_ssh_host=10.1.1.13 ansible_ssh_port=2222

指定用户名和密码
nginx1  ansible_ssh_host=10.1.1.13 ansible_ssh_port=2222 ansible_ssh_user=root ansible_ssh_pass="123456"

利用别名分组
ginx1  ansible_ssh_host=10.1.1.13 ansible_ssh_port=2222 ansible_ssh_user=root ansible_ssh_pass="123456"
nginx2  ansible_ssh_host=10.1.1.12

[nginx]
nginx1
nginx2
ansible模块
介绍
官网模块文档地址: https://docs.ansible.com/ansible/latest/modules/list_of_all_modules.html
ansible的执行状态
- 绿色:执行成功并且不需要做改变的操作
- 黄色:执行成功并且对目标主机做变更
- 红色:执行失败
- 粉色:警告信息
- 蓝色:显示ansible命令执行的过程
查看模块用法
ansible-doc 模块名
使用模块的基本格式
ansible 操作对象(域名|IP地址|组名) -m 模块名 -a "参数1=值1 参数2=值2"
ping
- 主机连通性测试
[root@server1 ~]# ansible -m ping mygroup
192.168.139.30 | SUCCESS => {
    "ansible_facts": {
        "discovered_interpreter_python": "/usr/bin/python"
    },
    "changed": false,
    "ping": "pong"
}
192.168.139.20 | SUCCESS => {
    "ansible_facts": {
        "discovered_interpreter_python": "/usr/bin/python"
    },
    "changed": false,
    "ping": "pong"
}
hostname
- 修改主机名(注意: 它不能修改/etc/hosts文件)
[root@server1 ~]# ansible 192.168.139.20 -m hostname -a 'name=server2'
192.168.139.20 | CHANGED => {
    "ansible_facts": {
        "ansible_domain": "",
        "ansible_fqdn": "server2",
        "ansible_hostname": "server2",
        "ansible_nodename": "server2",
        "discovered_interpreter_python": "/usr/bin/python"
    },
    "changed": true,
    "name": "server2"
}
file
-
官网:https://docs.ansible.com/ansible/latest/modules/file_module.html#file-module
-
操作文件(创建, 删除, 软硬链接等)
创建目录
[root@server1 ~]# ansible mygroup -m file -a 'path=/test state=directory'

创建文件
[root@server1 ~]# ansible mygroup -m file -a 'path=/test/file1 state=touch'

创建软连接
[root@server1 ~]# ansible mygroup -m file -a 'src=/etc/fstab path=/tmp/fstab state=link'

创建硬链接
[root@server1 ~]# ansible mygroup -m file -a 'src=/etc/fstab path=/tmp/fstab1 state=hard'

递归修改owner,group,mode
[root@server1 ~]# ansible mygroup -m file -a 'path=/test recurse=yes owner=bin group=daemon mode=1777'

删除文件
[root@server1 ~]# ansible mygroup -m file -a 'path=/test/file1 state=absent'
copy
- 文件远程拷贝,默认会覆盖
- 所有需要修改的远程文件,都可以在本地改好,通过copy模块传至远程
- 官网https://docs.ansible.com/ansible/latest/modules/copy_module.html#copy-module
拷贝
[root@server1 ~]# ansible mygroup -m copy -a 'src=/etc/fstab dest=/tmp/fstab'

如果文件存在,不覆盖
[root@server1 ~]# ansible mygroup -m copy -a 'src=/etc/fstab dest=/tmp/fstab force=no'

如果文件存在,先备份,后覆盖
[root@server1 ~]# ansible mygroup -m copy -a 'src=/etc/fstab dest=/tmp/fstab backup=yes'

拷贝目录要注意/
/etc/表示拷贝etc目录里的所有文件
/etc表示拷贝整个etc目录

如果想要目录内的内容完全一致,copy模块不能做到
因为copy模块默认不会删除目标目录内的多余文件
可以先删除目标文件|目录,再使用copy模块实现
[root@server1 ~]# ansible mygroup -m file -a 'path=/etc/yum.repos.d/ state=absent'
[root@server1 ~]# ansible mygroup -m copy -a 'src=/etc/yum.repos.d dest=/etc/'
fetch
- 远程文件拷到本地,不能下载目录
- 常用于拷贝远程日志
[root@server1 ~]# ansible 192.168.139.20 -m fetch -a 'src=/tmp/fstab dest=/tmp/'
user
- 用户管理
- https://docs.ansible.com/ansible/latest/modules/user_module.html#user-module
创建普通用户
[root@server1 ~]# ansible mygroup -m user -a 'name=zhangsan state=present'

创建系统用户
[root@server1 ~]# ansible mygroup -m user -a 'name=aaa state=present system=yes shell="/sbin/nologin"'

创建用户,指定uid,指定密码
[root@server1 ~]# echo 123456 |openssl passwd -1 -stdin
$1$K32qQQ5j$mS.9Ecez2jbROYL6auz7N0
[root@server1 ~]# ansible mygroup -m user -a 'name=lisi state=present uid=2000 password="$1$K32qQQ5j$mS.9Ecez2jbROYL6auz7N0"'

用户添加到组中
[root@server1 ~]# ansible mygroup -m user -a 'name=zhangsan state=present group=1500'

删除用户
[root@server1 ~]# ansible mygroup -m user -a 'name=zhangsan state=absent'

删除用户的同时删除家目录
[root@server1 ~]# ansible mygroup -m user -a 'name=aaa state=absent remove=yes'
group
- 组管理
- https://docs.ansible.com/ansible/latest/modules/group_module.html#group-module
创建
[root@server1 ~]# ansible mygroup -m group -a 'name=group_test state=present gid=1500'

删除组(先删组中用户)
[root@server1 ~]# ansible mygroup -m user -a 'name=zhangsan state=absent'
[root@server1 ~]# ansible mygroup -m group -a 'name=group_test state=absent'
cron
- 计划任务,默认用户为root
- https://docs.ansible.com/ansible/latest/modules/cron_module.html#cron-module7
- 通过copy本地/var/spool/cron文件,也可实现计划任务
创建
[root@server1 ~]# ansible mygroup -m cron -a 'name=cron1 user=root job="touch /tmp/111" minute=*/2 hour=1'

删除
[root@server1 ~]# ansible mygroup -m cron -a 'name=cron1 state=absent'
yum
- 软件包安装与卸载
- https://docs.ansible.com/ansible/latest/modules/yum_module.html#yum-module
安装
[root@server1 ~]# ansible mygroup -m yum -a 'name=vsftpd state=present'

安装最新版
[root@server1 ~]# ansible mygroup -m yum -a 'name=httpd,httpd-devel state=latest'

卸载
[root@server1 ~]# ansible mygroup -m cron -a 'name=cron1 state=absent'
service
- 控制服务的启动,关闭,开机自启动等
- https://docs.ansible.com/ansible/latest/modules/service_module.html#service-module
启动服务,并设置为开机自启
[root@server1 ~]# ansible mygroup -m service -a 'name=vsftpd state=started enabled=on'

关闭服务,并设为开机不自动启动
[root@server1 ~]# ansible mygroup -m service -a 'name=vsftpd state=stopped enabled=false'
script
- 在远程机器上执行本地脚本
- https://docs.ansible.com/ansible/latest/modules/script_module.html#script-module
准备脚本
[root@server1 ~]# vim /tmp/1.sh
[root@server1 ~]# cat /tmp/1.sh
#!/bin/bash
yum install -y mariadb-server &> /dev/null
systemctl start mariadb
systemctl enable mariadb
mysql << EOF
create database abc;
quit
EOF

远程执行脚本
[root@server1 ~]# ansible mygroup -m script -a '/tmp/1.sh'
shell(command)
- shell和command都可以执行linux命令
- command模块不能执行一些类似$HOME,>,<,|等符号,但shell可以,推荐shell
- https://docs.ansible.com/ansible/latest/modules/command_module.html
- https://docs.ansible.com/ansible/latest/modules/shell_module.html
[root@server1 ~]# ansible mygroup -m shell -a 'useradd xiaoming'
192.168.139.20 | CHANGED | rc=0 >>

192.168.139.30 | CHANGED | rc=0 >>

[root@server1 ~]# ansible mygroup -m shell -a 'id xiaoming'
192.168.139.20 | CHANGED | rc=0 >>
uid=2002(xiaoming) gid=2002(xiaoming) 组=2002(xiaoming)
192.168.139.30 | CHANGED | rc=0 >>
uid=2002(xiaoming) gid=2002(xiaoming) 组=2002(xiaoming)
[root@server1 ~]# ansible mygroup -m shell -a 'tail -1 /etc/passwd'
192.168.139.20 | CHANGED | rc=0 >>
xiaoming:x:2002:2002::/home/xiaoming:/bin/bash
192.168.139.30 | CHANGED | rc=0 >>
xiaoming:x:2002:2002::/home/xiaoming:/bin/bash
playbook
介绍
-
playbook(剧本): 是ansible用于配置,部署,和管理被控节点的剧本。用于ansible操作的编排
-
playbook是由一个或者多个play组成的列表,可以让这些列表按事先编排的机制执行;所谓task是调用ansible的具体模块,在模块参数中可以使用变量。模块执行是幂等性的,意味着多次执行结果相同。
-
使用yaml语言编写playbook,后缀名一般为.yml(saltstack,elk,docker,docker-compose,kubernetes等也都会用到yaml格式)
-
https://docs.ansible.com/ansible/latest/user_guide/playbooks_intro.html
YMAL
格式
- 以
.yaml或.yml结尾
- 文件(或段落)的第一行以
"---"开始,表明YMAL文件(或段落)的开始,可不写 - 以#号开头为注释
- 列表中的所有成员都开始于相同的缩进级别, 并且使用一个
"- "作为开头(一个横杠和一个空格) - 一个字典是由一个简单的
键: 值的形式组成**(这个冒号后面必须是一个空格)** - 写这种文件不要使用tab键,都使用空格
https://docs.ansible.com/ansible/latest/reference_appendices/YAMLSyntax.html#yaml-syntax
官方示例
---
- hosts: group1
  remote_user: root
  tasks:
  - name: ensure apache is at the latest version
    yum: name=httpd,httpd-devel state=latest

  - name: write the apache config file
    copy: src=/etc/httpd/conf/httpd.conf dest=/etc/httpd/conf/httpd.conf

    notify:
    - restart apache

  - name: ensure apache is running (and enable it at boot)
    service: name=httpd state=started enabled=yes

  handlers:
    - name: restart apache
      service: name=httpd state=restarted
特点
- yaml的可读性好
- yaml和脚本语言的交互性好
- yaml使用实现语言的数据类型
- yaml有一个一致性的信息模型
- yaml易于实现
- yaml可以基于流来处理
核心组件
- hosts:执行的远程主机列表
- tasks:任务,由模块定义操作列表
- variables:内置变量或者自定义变量
- templates:模板,定义模板文件,模板文件一般是由jinja2语言编写的
- handlers:和nogity结合使用,为条件触发操作,满足条件则执行
- roles:角色
playbook实现vsftpd服务自动化
准备配置文件并修改
[root@server1 playbook]# yum install -y vsftpd
[root@server1 playbook]# vim /etc/vsftpd/vsftpd.conf

剧本编写
[root@server1 ~]# cd /etc/ansible/
[root@server1 ansible]# mkdir playbook
[root@server1 ansible]# cd playbook/
[root@server1 playbook]# vim vsftpd.yml
[root@server1 playbook]# cat vsftpd.yml
---
- hosts: mygroup
  remote_user: root
  tasks:
    - name: 安装vstfpd
      yum: name=vsftpd state=present

    - name: 同步vsftpd.conf配置文件
      copy: src=/etc/vsftpd/vsftpd.conf dest=/etc/vsftpd/vsftpd.conf

      notify: restart vsftpd

    - name: 启动vsftpd服务,并设置开机自启
      service: name=vsftpd state=started enabled=on

  handlers:
  - name: restart vsftpd
    service: name=vsftpd state=restarted

执行剧本
[root@server1 playbook]# ansible-playbook vsftpd.yml

PLAY [mygroup] **********************************************************************************

TASK [Gathering Facts] **************************************************************************
ok: [192.168.139.20]
ok: [192.168.139.30]

TASK [安装vstfpd] *********************************************************************************
ok: [192.168.139.30]
ok: [192.168.139.20]

TASK [同步vsftpd.conf配置文件] ************************************************************************
changed: [192.168.139.20]
changed: [192.168.139.30]

TASK [启动vsftpd服务,并设置开机自启] ***********************************************************************
changed: [192.168.139.30]
changed: [192.168.139.20]

RUNNING HANDLER [restart vsftpd] ****************************************************************
changed: [192.168.139.20]
changed: [192.168.139.30]

PLAY RECAP **************************************************************************************
192.168.139.20             : ok=5    changed=3    unreachable=0    failed=0    skipped=0    rescued=0    ignored=0
192.168.139.30             : ok=5    changed=3    unreachable=0    failed=0    skipped=0    rescued=0    ignored=0
playbook实现nfs客户端挂载
准备nfs配置文件
[root@server1 playbook]# vim /etc/exports
[root@server1 playbook]# cat /etc/exports
/share *(ro)

编写剧本
[root@server1 playbook]# vim nfs.yml
[root@server1 playbook]# cat nfs.yml
---
- hosts: mygroup
  remote_user: root
  tasks:
  - name: 安装nfs服务软件包
    yum: name=nfs-utils,rpcbind,setup state=latest

  - name: 创建共享目录
    file: path=/share/ state=directory

  - name: 同步nfs配置文件
    copy: src=/etc/exports dest=/etc/exports

    notify: restart nfs

  - name: 启动rpcbind服务,并设置为开机自启动
    service: name=rpcbind state=started enabled=on

  - name: 启动nfs服务,并设置为开机自启动
    service: name=nfs state=started enabled=on

  handlers:
  - name: restart nfs
    service: name=nfs state=restarted

- hosts: 192.168.139.20
  remote_user: root
  tasks:
  - name: 安装nfs客户端软件包
    yum: name=nfs-utils state=latest

  - name: 挂载nfs服务器的共享
    shell: mount 192.168.139.30:/share /mnt

执行剧本
[root@server1 playbook]# ansible-playbook nfs.yml

验证
[root@server2 ~]# df -Th
文件系统                类型      容量  已用  可用 已用% 挂载点
devtmpfs                devtmpfs  899M     0  899M    0% /dev
tmpfs                   tmpfs     910M     0  910M    0% /dev/shm
tmpfs                   tmpfs     910M   18M  893M    2% /run
tmpfs                   tmpfs     910M     0  910M    0% /sys/fs/cgroup
/dev/mapper/centos-root xfs        17G  2.1G   15G   12% /
/dev/sda1               xfs      1014M  194M  821M   20% /boot
tmpfs                   tmpfs     182M     0  182M    0% /run/user/0
192.168.139.30:/share   nfs4       17G  2.1G   15G   12% /mnt
roles
介绍
- roles(角色): 就是通过分别将variables, tasks及handlers等放置于单独的目录中,并可以便捷地调用它们的一种机制
- 假设我们要写一个playbook来安装管理lamp环境,那么这个playbook就会写很长。所以我们希望把这个很大的文件分成多个功能拆分, 分成apache管理,php管理,mysql管理,然后在需要使用的时候直接调用就可以了,以免重复写。就类似编程里的模块化的概念,以达到代码复用的效果
roles目录结构介绍
- files:用来存放由copy模块或script模块调用的文件
- tasks:至少有一个main.yml文件,定义各tasks
- handlers:有一个main.yml文件,定义各handlers
- templates:用来存放jinjia2模板
- vars:有一个main.yml文件,定义变量
- meta:有一个main.yml文件,定义此角色的特殊设定及其依赖关系
roles实现lamp架构搭建
- 创建roles的目录结构
[root@server1 playbook]# cd /etc/ansible/roles/
[root@server1 roles]# mkdir -p {httpd,mysql,php}/{files,tasks,handlers,templates,vars,meta}
[root@server1 roles]# touch {httpd,mysql,php}/{tasks,handlers,vars,meta}/main.yaml
[root@server1 roles]# tree -a /etc/ansible/roles/
/etc/ansible/roles/
├── httpd
│   ├── files
│   ├── handlers
│   │   └── main.yaml
│   ├── meta
│   │   └── main.yaml
│   ├── tasks
│   │   └── main.yaml
│   ├── templates
│   └── vars
│       └── main.yaml
├── mysql
│   ├── files
│   ├── handlers
│   │   └── main.yaml
│   ├── meta
│   │   └── main.yaml
│   ├── tasks
│   │   └── main.yaml
│   ├── templates
│   └── vars
│       └── main.yaml
└── php
    ├── files
    ├── handlers
    │   └── main.yaml
    ├── meta
    │   └── main.yaml
    ├── tasks
    │   └── main.yaml
    ├── templates
    └── vars
        └── main.yaml
- 编写httpd角色
准备http主页文件
[root@server1 roles]# echo 'test main page' > /etc/ansible/roles/httpd/files/index.html

准备php测试文件
[root@server1 roles]# echo -e "" > /etc/ansible/roles/httpd/files/test.php

将http主页文件和php测试文件移动同一目录下,便于拷贝
[root@server1 roles]# cd httpd/files/
[root@server1 files]# mkdir httpd_doc
[root@server1 files]# mv index.html httpd_doc/
[root@server1 files]# mv test.php httpd_doc/

准备并修改httpd的配置文件
[root@server1 roles]# yum install -y httpd
[root@server1 roles]# vim /etc/httpd/conf/httpd.conf
[root@server1 roles]# cp /etc/httpd/conf/httpd.conf /etc/ansible/roles/httpd/files/

编写tasks/main.yaml文件
[root@server1 roles]# vim httpd/tasks/main.yaml
[root@server1 roles]# cat httpd/tasks/main.yaml
- name: 安装httpd
  yum: name=httpd state=latest

- name: 同步httpd.conf配置文件
  copy: src=/etc/ansible/roles/httpd/files/httpd.conf dest=/etc/httpd/conf/httpd.conf

  notify: restart httpd

- name: 同步数据文件
  copy: src=/etc/ansible/roles/httpd/files/httpd_doc/ dest=/var/www/html

- name: 启动httpd,设置为开机自启
  service: name=httpd state=started enabled=on

编写handlers/main.yaml文件
[root@server1 roles]# vim httpd/handlers/main.yaml
[root@server1 roles]# cat httpd/handlers/main.yaml
- name: restart httpd
  service: name=httpd state=restarted
- 编写mysql角色
编写tasks/main.yaml文件
[root@server1 roles]# cd mysql/
[root@server1 mysql]# vim tasks/main.yaml
[root@server1 mysql]# cat tasks/main.yaml
- name: 安装mariadb
  yum: name=mariadb-server state=latest

- name: 启动mariadb服务,并设置为开机自启
  service: name=mariadb state=started enabled=on
- 编写php角色
编写tasks/main.yaml文件
[root@server1 mysql]# cd ../php/
[root@server1 php]# vim tasks/main.yaml
[root@server1 php]# cat tasks/main.yaml
- name: 安装php
  yum: name=php,php-gd,php-ldap,php-odbc,php-pear,php-xml,php-xmlrpc,php-mbstring,php-snmp,php-soap,curl,curl-devel,php-bcmath,php-mysql state=present

  notify: restart httpd
- 编写剧本,调用前面定义好的3个角色
[root@server1 php]# cd ../../
[root@server1 ansible]# cd playbook/
[root@server1 playbook]# vim lamp.yml
[root@server1 playbook]# cat lamp.yml
---
- hosts: mygroup
  remote_user: root
  roles:
    - httpd
    - mysql
    - php
- 执行剧本
[root@server1 php]# ansible-playbook /etc/ansible/playbook/lamp.yml

PLAY [mygroup] **********************************************************************************************************

TASK [Gathering Facts] **************************************************************************************************
ok: [192.168.139.30]
ok: [192.168.139.20]

TASK [安装httpd] **********************************************************************************************************
ok: [192.168.139.30]
ok: [192.168.139.20]

TASK [同步httpd.conf配置文件] *************************************************************************************************
ok: [192.168.139.20]
ok: [192.168.139.30]

TASK [httpd : 同步数据文件] ***************************************************************************************************
changed: [192.168.139.30]
changed: [192.168.139.20]

TASK [启动httpd,设置为开机自启] **************************************************************************************************
changed: [192.168.139.30]
changed: [192.168.139.20]

TASK [mysql : 安装mariadb] ************************************************************************************************
ok: [192.168.139.20]
ok: [192.168.139.30]

TASK [mysql : 启动mariadb服务,并设置为开机自启] *************************************************************************************
ok: [192.168.139.20]
ok: [192.168.139.30]

TASK [安装php] ************************************************************************************************************
changed: [192.168.139.20]
changed: [192.168.139.30]

RUNNING HANDLER [restart httpd] *****************************************************************************************
changed: [192.168.139.20]
changed: [192.168.139.30]

PLAY RECAP **************************************************************************************************************
192.168.139.20             : ok=9    changed=4    unreachable=0    failed=0    skipped=0    rescued=0    ignored=0
192.168.139.30             : ok=9    changed=4    unreachable=0    failed=0    skipped=0    rescued=0    ignored=0
roles实现discuz论坛搭建
在搭建完lamp的基础上,搭建discuz论坛
- 创建roles的目录结构(同上)
[root@server1 playbook]# cd /etc/ansible/roles/
[root@server1 roles]# mkdir -p {httpd,mysql,php}/{files,tasks,handlers,templates,vars,meta}
[root@server1 roles]# touch {httpd,mysql,php}/{tasks,handlers,vars,meta}/main.yaml
- 编写httpd角色
准备discuz软件包
[root@server1 ~]# yum install -y lrzsz
[root@server1 ~]# rz
[root@server1 ~]# mv discuz.zip /etc/ansible/roles/httpd/files/
[root@server1 files]# ls
discuz.zip  httpd.conf  httpd_doc

修改tasks/main.yaml
[root@server1 httpd]# vim tasks/main.yaml
[root@server1 httpd]# cat tasks/main.yaml
- name: 安装httpd
  yum: name=httpd state=latest

- name: 同步httpd.conf配置文件
  copy: src=/etc/ansible/roles/httpd/files/httpd.conf dest=/etc/httpd/conf/httpd.conf

  notify: restart httpd

- name: 拷贝discuz的压缩包
  copy: src=/etc/ansible/roles/httpd/files/discuz.zip dest=/tmp

- name: 删除/var/www/html/discuz,再次同步会快捷
  file: path=/var/www/html/discuz state=absent

- name: 解压至https数据目录,并修改数据目录的权限
  shell: unzip /tmp/discuz.zip -d /var/www/html/ &> /dev/null && chown -R apache.apache /var/www/html/

- name: 启动httpd,设置为开机自启
  service: name=httpd state=started enabled=on
- 编写mysql角色
编写脚本,用于建库,授权
[root@server1 mysql]# vim files/create.sh
[root@server1 mysql]# cat files/create.sh
#!/bin/bash
mysql << EOF
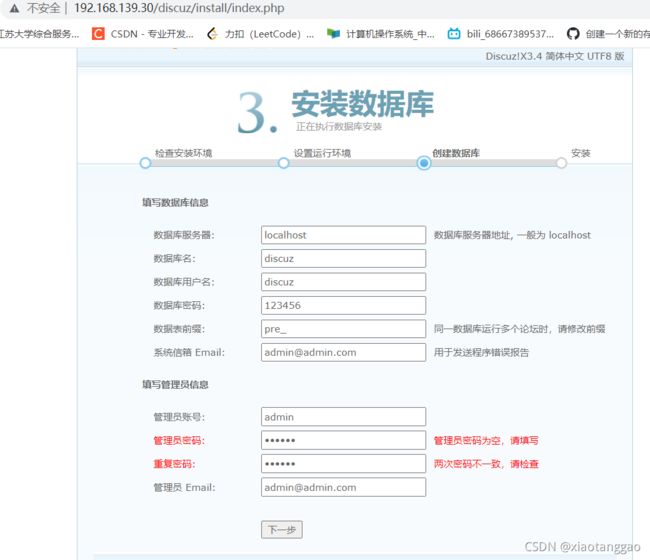
create database if not exists discuz default charset=utf8;
grant all on discuz.* to 'discuz'@'localhost' identified by '123456';
flush privileges;
EOF
修改tasks/main.yaml
[root@server1 mysql]# cat tasks/main.yaml
- name: 安装mariadb
yum: name=mariadb-server state=latest
- name: 启动mariadb服务,并设置为开机自启
service: name=mariadb state=started enabled=on
- name: 执行脚本,用于建库,授权
script: /etc/ansible/roles/mysql/files/create.sh
- 编写php角色(同上)
编写tasks/main.yaml文件
[root@server1 mysql]# cd ../php/
[root@server1 php]# vim tasks/main.yaml
[root@server1 php]# cat tasks/main.yaml
- name: 安装php
  yum: name=php,php-gd,php-ldap,php-odbc,php-pear,php-xml,php-xmlrpc,php-mbstring,php-snmp,php-soap,curl,curl-devel,php-bcmath,php-mysql state=present

  notify: restart httpd
- 编写剧本,调用前面定义好的3个角色(同上)
[root@server1 php]# cd ../../
[root@server1 ansible]# cd playbook/
[root@server1 playbook]# vim lamp.yml
[root@server1 playbook]# cat lamp.yml
---
- hosts: mygroup
  remote_user: root
  roles:
    - httpd
    - mysql
    - php
- 执行剧本
[root@server1 mysql]# ansible-playbook /etc/ansible/playbook/lamp.y
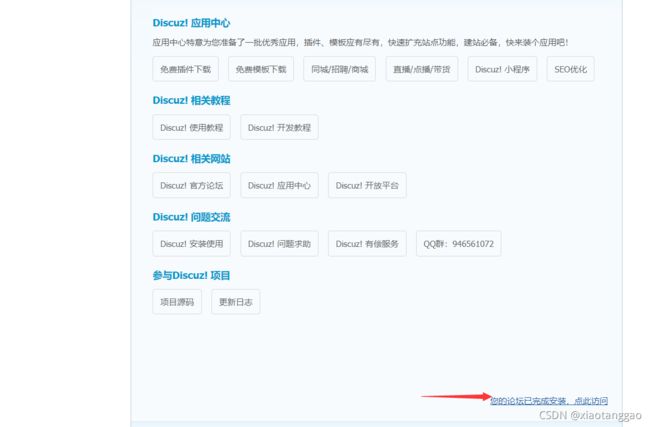
- 浏览器访问