MySQL主从复制和读写分离
1.理解MySQL主从复制原理。
主从复制简介
在实际的生产中,为了解决Mysql的单点故障已经提高MySQL的整体服务性能,一般都会采用「主从复制」。
比如:在复杂的业务系统中,有一句sql执行后导致锁表,并且这条sql的的执行时间有比较长,那么此sql执行的期间导致服务不可用,这样就会严重影响用户的体验度。
主从复制中分为「主服务器(master)「和」从服务器(slave)」,「主服务器负责写,而从服务器负责读」,Mysql的主从复制的过程是一个「异步的过程」。
这样读写分离的过程能够是整体的服务性能提高,即使写操作时间比较长,也不影响读操作的进行。
主从复制的原理
首先放一张Mysql主从复制的原理图,总的来说Mysql的主从复制原理还是比较好理解的,原理非常的简单。
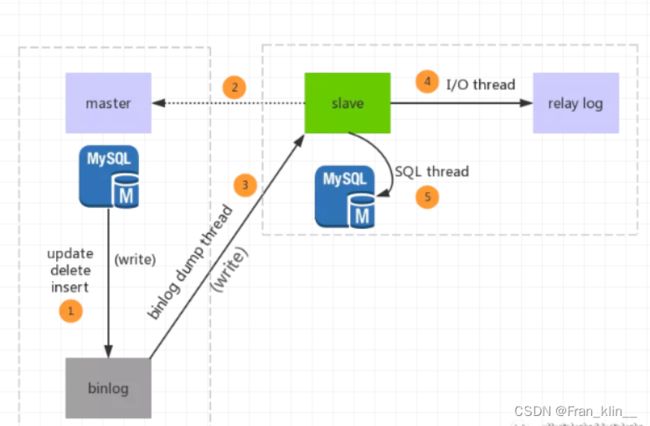
Mysql的主从复制中主要有三个线程:master(binlog dump thread)、slave(I/O thread 、SQL thread),Master一条线程和Slave中的两条线程。
master(binlog dump thread)主要负责Master库中有数据更新的时候,会按照binlog格式,将更新的事件类型写入到主库的binlog文件中。
并且,Master会创建log dump线程通知Slave主库中存在数据更新,这就是为什么主库的binlog日志一定要开启的原因。
I/O thread线程在Slave中创建,该线程用于请求Master,Master会返回binlog的名称以及当前数据更新的位置、binlog文件位置的副本。
然后,将binlog保存在 「relay log(中继日志)」 中,中继日志也是记录数据更新的信息。
SQL线程也是在Slave中创建的,当Slave检测到中继日志有更新,就会将更新的内容同步到Slave数据库中,这样就保证了主从的数据的同步。
以上就是主从复制的过程,当然,主从复制的过程有不同的策略方式进行数据的同步,主要包含以下几种:
1、「同步策略」:Master会等待所有的Slave都回应后才会提交,这个主从的同步的性能会严重的影响。
2、「半同步策略」:Master至少会等待一个Slave回应后提交。
3、「异步策略」:Master不用等待Slave回应就可以提交。
4、「延迟策略」:Slave要落后于Master指定的时间。
对于不同的业务需求,有不同的策略方案,但是一般都会采用最终一致性,不会要求强一致性,毕竟强一致性会严重影响性能。
2.完成MySQL主从复制(一主两从)。
1.修改主服务器master
# vi /etc/my.cnf

[mysqld]
server-id = 1              # 节点ID,确保唯一

# log config
log-bin = mysql-bin        # 开启mysql的binlog日志功能
sync_binlog = 1            # 控制数据数据库的binlog刷到磁盘上去 , 0 不控制,性能最好,1每次事物提交都会刷到日志文件中,性能最差,最安全
binlog_format = mixed   #binlog日志格式,mysql默认采用statement,建议使用mixed
expire_logs_days = 7                           #binlog过期清理时间
max_binlog_size = 100m                    #binlog每个日志文件大小
binlog_cache_size = 4m                        #binlog缓存大小
max_binlog_cache_size= 512m              #最大binlog缓存大
binlog-ignore-db=mysql #不生成日志文件的数据库,多个忽略数据库可以用逗号拼接,或者 复制这句话,写多行

auto-increment-offset = 1     # 自增值的偏移量
auto-increment-increment = 1  # 自增值的自增量
slave-skip-errors = all #跳过从库错误
2.修改从服务器slave
server-id = 2
log-bin=mysql-bin
relay-log = mysql-relay-bin
#以下参数为过滤掉某些表以不记录到从服务器
#replicate-wild-ignore-table=mysql.%
#replicate-wild-ignore-table=test.%
#replicate-wild-ignore-table=information_schema.%
3.master数据库,创建复制用户并授权
- root进入master数据库,为master创建复制用户
CREATE USER repl_user IDENTIFIED BY 'repl_passwd';- 授权
grant replication slave on *.* to 'repl_user'@'192.168.31.99'  identified by 'repl_passwd';

FLUSH PRIVILEGES;- 查看master状态
mysql> show master status;
+------------------+----------+--------------+------------------+-------------------+
| File             | Position | Binlog_Do_DB | Binlog_Ignore_DB | Executed_Gtid_Set |
+------------------+----------+--------------+------------------+-------------------+
| mysql-bin.000001 |      1928 |              | mysql            |                   |
+------------------+----------+--------------+------------------+-------------------+
1 row in set (0.00 sec)
4. slave数据库
- root进入slave数据库
mysql> CHANGE MASTER TO
    -> MASTER_HOST = '192.168.31.7',              #这里填master的IP
    -> MASTER_USER = 'repl_user',
    -> MASTER_PASSWORD = 'repl_passwd',
    -> MASTER_PORT = 3306,                        #这里填master的PORT
    -> MASTER_LOG_FILE='mysql-bin.000001',        #这里填第4步中的File
    -> MASTER_LOG_POS=1928,                       #这里填第4步中的Position
    -> MASTER_RETRY_COUNT = 60,
    -> MASTER_HEARTBEAT_PERIOD = 10000;
Query OK, 0 rows affected, 3 warnings (0.02 sec)- 启动slave
mysql> START SLAVE;
Query OK, 0 rows affected (0.01 sec)- 检查slave服务器复制功能状态
mysql> show slave status\G;
*************************** 1. row ***************************
               Slave_IO_State: Waiting for master to send event
                  Master_Host: 192.168.31.7
                  Master_User: repl_user
                  Master_Port: 3306
                Connect_Retry: 60
              Master_Log_File: mysql-bin.000001
          Read_Master_Log_Pos: 1928
               Relay_Log_File: mysql-relay-bin.000144
                Relay_Log_Pos: 320
        Relay_Master_Log_File: mysql-bin.000001
        #************************下面必须是两个YES**********
             Slave_IO_Running: Yes
            Slave_SQL_Running: Yes
        #*************************************************
5.测试
master
[root@localhost ~]# mysql -u root -p
Enter password:
Welcome to the MySQL monitor.  Commands end with ; or \g.
Your MySQL connection id is 14
Server version: 5.7.37-log MySQL Community Server (GPL)

Copyright (c) 2000, 2022, Oracle and/or its affiliates.

Oracle is a registered trademark of Oracle Corporation and/or its
affiliates. Other names may be trademarks of their respective
owners.

Type 'help;' or '\h' for help. Type '\c' to clear the current input statement.

mysql> create database test1;
Query OK, 1 row affected (0.00 sec)

mysql> use test1;
Database changed
mysql> create table test(id int(3),name char(10));
Query OK, 0 rows affected (0.03 sec)

mysql> insert into test values(001,'aaa');
Query OK, 1 row affected (0.04 sec)

mysql> show databases;
+--------------------+
| Database           |
+--------------------+
| information_schema |
| mysql              |
| performance_schema |
| sys                |
| test1              |
+--------------------+
5 rows in set (0.01 sec)

mysql> exit
Bye
slave
[root@localhost src]# mysql -u root -p
Enter password:
Welcome to the MySQL monitor.  Commands end with ; or \g.
Your MySQL connection id is 20
Server version: 5.7.37-log MySQL Community Server (GPL)

Copyright (c) 2000, 2022, Oracle and/or its affiliates.

Oracle is a registered trademark of Oracle Corporation and/or its
affiliates. Other names may be trademarks of their respective
owners.

Type 'help;' or '\h' for help. Type '\c' to clear the current input statement.

mysql> show databases;
+--------------------+
| Database           |
+--------------------+
| information_schema |
| mysql              |
| performance_schema |
| sys                |
| test1              |
+--------------------+
5 rows in set (0.00 sec)

mysql> use test1;
Reading table information for completion of table and column names
You can turn off this feature to get a quicker startup with -A

Database changed
mysql> show tables;
+-----------------+
| Tables_in_test1 |
+-----------------+
| test            |
+-----------------+
1 row in set (0.00 sec)

mysql> select * from test;
+------+------+
| id   | name |
+------+------+
|    1 | aaa  |
+------+------+
1 row in set (0.00 sec)

mysql> exit
Bye
3.基于MySQL一主两从配置,完成MySQL读写分离配置
master主服务器的配置
2.1 配置文件my.cnf的修改
[root@localhost mysql]# vim /etc/my.cnf

#在[mysqld]中添加:
server-id=1
log_bin=master-bin
log_bin_index=master-bin.index
#自动清理 7 天前的log文件,可根据需要修改
expire_logs_days=7
#binlog_do_db=custom01
#binlog_do_db=custom02
#binlog_do_db=custom03
#备注:
#server-id 服务器唯一标识。
#log_bin 启动MySQL二进制日志,即数据同步语句,从数据库会一条一条的执行这些语句。
#binlog_do_db 指定记录二进制日志的数据库,即需要复制的数据库名,如果复制多个数据库,重复设置这个选项即可。
#binlog_ignore_db 指定不记录二进制日志的数据库,即不需要复制的数据库名,如果有多个数据库,重复设置这个选项即可。
#其中需要注意的是,binlog_do_db和binlog_ignore_db为互斥选项,一般只需要一个即可。
2.2 创建从服务器的用户和权限
#进入mysql数据库
[root@localhost mysql]# mysql -uroot -p
Enter password:

#创建从数据库的masterbackup用户和权限
mysql> grant replication slave on *.* to masterbackup@'192.168.17.%' identified by '123456';
#备注
#192.168.17.%通配符,表示0-255的IP都可访问主服务器,正式环境请配置指定从服务器IP
#若将 192.168.17.% 改为 %,则任何ip均可作为其从数据库来访问主服务器

#退出mysql
mysql> exit;
2.3 重启mysql服务
[root@localhost mysql]# service mysql restart
Shutting down MySQL.... SUCCESS!
Starting MySQL. SUCCESS!
2.4 查看主服务器状态
#进入mysql数据库
[root@localhost mysql]# mysql -uroot -p
Enter password:

#查看主服务器状态
mysql> show master status;
+-------------------+----------+--------------+------------------+-------------------+
| File              | Position | Binlog_Do_DB | Binlog_Ignore_DB | Executed_Gtid_Set |
+-------------------+----------+--------------+------------------+-------------------+
| master-bin.000001 |      154 | test         |                  |                   |
+-------------------+----------+--------------+------------------+-------------------+
1 row in set (0.00 sec)
---------------------
slave从服务器的配置
3.1 配置文件my.cnf的修改
#根据上一篇文章,编辑my.cnf文件
[root@localhost mysql]# vim /etc/my.cnf

#在[mysqld]中添加:
server-id=2
relay-log=slave-relay-bin
relay-log-index=slave-relay-bin.index
#replicate-do-db=custom01
#备注:
#server-id 服务器唯一标识,如果有多个从服务器,每个服务器的server-id不能重复,跟IP一样是唯一标识,如果你没设置server-id或者设置为0,则从服务器不会连接到主服务器。
#relay-log 启动MySQL二进制日志,可以用来做数据备份和崩溃恢复,或主服务器挂掉了,将此从服务器作为其他从服务器的主服务器。
#replicate-do-db 指定同步的数据库,如果复制多个数据库,重复设置这个选项即可。若在master端不指定binlog-do-db,则在slave端可用replication-do-db来过滤。
#replicate-ignore-db 不需要同步的数据库,如果有多个数据库,重复设置这个选项即可。
#其中需要注意的是,replicate-do-db和replicate-ignore-db为互斥选项,一般只需要一个即可
---------------------
3.2 重启mysql服务
[root@localhost mysql]# service mysql restart
Shutting down MySQL.... SUCCESS!
Starting MySQL. SUCCESS!
3.3 连接master主服务器
#进入mysql数据库
[root@localhost mysql]# mysql -uroot -p
Enter password:

#连接master主服务器
mysql> change master to master_host='192.168.17.130',master_port=3306,master_user='masterbackup',master_password='123456',master_log_file='master-bin.000001',master_log_pos=154;
#备注:
#master_host对应主服务器的IP地址。
#master_port对应主服务器的端口。
#master_log_file对应show master status显示的File列:master-bin.000001。
#master_log_pos对应show master status显示的Position列:154。
---------------------
3.4 启动slave数据同步
#启动slave数据同步
mysql> start slave;

#停止slave数据同步(若有需要)
mysql> stop slave;
3.5 查看slave信息
mysql> show slave status\G;
测试
1)在主服务器上登陆mysql,且进入test数据库,创建test表,且插入一条数据
#创建tb_test表
create table tb_test(ID varchar(36) primary key comment '主键ID',MEMO varchar(500) not null comment '信息');
#插入一条数据
insert into tb_test(ID,MEMO) values('1','one test');
#提交
commit;