Redis - 10、主从复制
1、是什么?
主机更新后根据配置和策略,自动同步到备机的master/slave机制,Master以写为主,Slave以读为主。
2、能干嘛?
- 读写分离,性能扩展,降低主服务器的压力
- 容灾,快速恢复,主机挂掉时,从机变为主机
3、主从复制:怎么玩?
3.1、配置1主2从
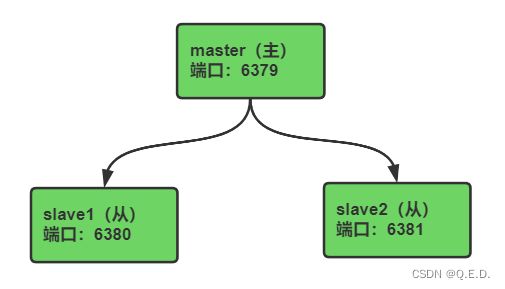
下面我们来配置1主2从的效果,现实中是需要3台机器的,为了方便,我们就在一台机器上来演示,通过不同的端口来区分机器,3台机器的配置
| 角色 | 端口 |
| master(主) | 6379 |
| slave1(从) | 6380 |
| slave2(从) | 6381 |
3.2、配置主从
3.2.1、创建案例工作目录:master-slave
执行下面命令创建 /opt/master-slave 目录,本次所有操作,均在 master-slave 目录进行。
ps -ef | grep redis | awk -F" " '{print $2;}' | xargs kill -9 # 方便演示,停止所有的redis
mkdir /opt/master-slave
cd /opt/master-slave/
3.2.2、将redis.conf复制到master-slave目录
cp /opt/redis-6.2.1/redis.conf /opt/master-slave/
3.2.3、创建master的配置文件:redis-6379.conf
在/opt/master-slave目录创建 redis-6379.conf 文件,内容如下,注意 192.168.200.129 是这个测试机器的ip,大家需要替换为自己的
#redis.conf是redis原配置文件,内部包含了很多默认的配置,这里使用include将其引用,相当于把redis.conf内容直接贴进来了
include /opt/master-slave/redis.conf
daemonize yes
bind 192.168.200.129
#配置密码
requirepass 123456
dir /opt/master-slave/
logfile /opt/master-slave/6379.log

#端口
port 6379
#rdb文件
dbfilename dump_6379.rdb
#pid文件
pidfile /var/run/redis_6379.pid
3.2.4、创建slave1的配置文件:redis-6380.conf
在/opt/master-slave目录创建 redis-6380.conf 文件,内容如下,和上面master的类似,多了后面2行
include /opt/master-slave/redis.conf
daemonize yes
bind 192.168.200.129
requirepass 123456
dir /opt/master-slave/

port 6380
dbfilename dump_6380.rdb
pidfile /var/run/redis_6380.pid
logfile /opt/master-slave/6380.log

#用来指定主机:slaveof 主机ip 端口
slaveof 192.168.200.129 6379
#主机的密码
masterauth 123456
3.2.5、创建slave2的配置文件:redis-6381.conf
include /opt/master-slave/redis.conf
daemonize yes
bind 192.168.200.129
requirepass 123456
dir /opt/master-slave/

port 6381
dbfilename dump_6381.rdb
pidfile /var/run/redis_6381.pid
logfile /opt/master-slave/6381.log

#用来指定主机:slaveof 主机ip 端口
slaveof 192.168.200.129 6379
#主机的密码
masterauth 123456
3.2.6、启动master
redis-server /opt/master-slave/redis-6379.conf
3.2.7、启动slave1
redis-server /opt/master-slave/redis-6380.conf3.2.8、启动slave2
redis-server /opt/master-slave/redis-6381.conf
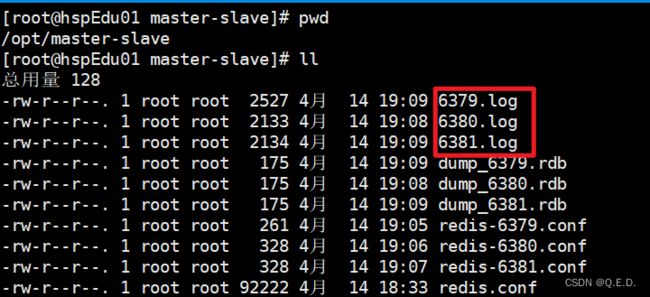
若启动有误,大家好好检查下配置,也可以看日志,3台机器启动会在 /opt/master-slave 目录产生日志,如下
3.2.9、查看主机的信息
通过redis-cli命令连接主机,如下
redis-cli -h 192.168.200.129 -p 6379 -a 123456通过下面命令,查看主机信息
info Replication3.2.10、查看slave1的信息
通过下面2个命令查询从机slave1的信息
redis-cli -h 192.168.200.129 -p 6380 -a 123456
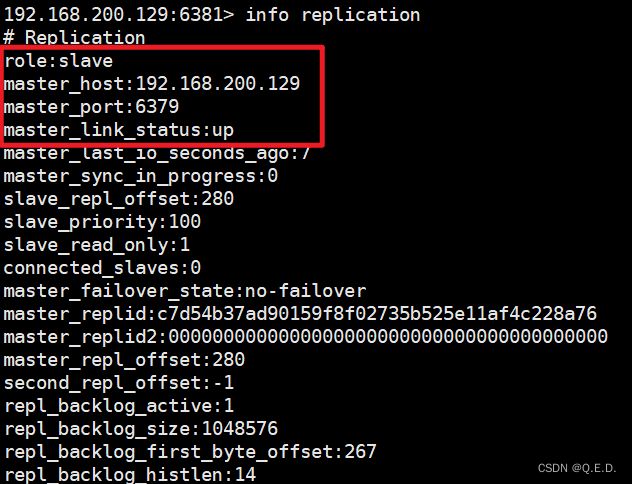
info Replication
3.2.11、同样查看slave2的信息
redis-cli -h 192.168.200.129 -p 6381 -a 123456
info Replication
3.2.12、验证主从同步效果
在master上面执行下面2个命令
192.168.200.129:6379> flushdb
OK
192.168.200.129:6379> set name ready
OK
192.168.200.129:6379> set age 30
OK
到slave1上执行下面命令,可以看出来数据已经同步过来了
192.168.200.129:6380> mget name age
1) "ready"
2) "30"
192.168.200.129:6380>
同样到slave2上也执行一下,效果如下
192.168.200.129:6381> mget name age
1) "ready"
2) "30"
192.168.200.129:6381>
3.3、主从复制原理
- slave启动成功连接到master后,会给master发送数据同步消息(发送sync命令)
- master接收到slave发来的数据同步消息后,把主服务器的数据进行持久化到rdb文件,同时会收集接收到的用于修改数据的命令,master将传rdb文件发送给你slave,完成一次完全同步
- 全量复制:而slave服务在接收到master发来的rdb文件后,将其存盘并加载到内存
- 增量复制:master继续将收集到的修改命令依次传给slave,完成同步
- 但是只要重新连接master,一次完全同步(全量复制)将会被自动执行
3.4、小结
3.4.1、主redis挂掉以后情况会如何?从机是上位还是原地待命?
主机挂掉后,从机会待命,小弟还是小弟,会等着大哥恢复,不会篡位。
3.4.2、从挂掉后又恢复了,会继续从主同步数据么?
会的,当从重启之后,会继续将中间缺失的数据同步过来。
3.4.3、info Replication:查看主从复制信息
上面已经演示过了,主、从上都可以执行,用来查看主从信息。
4、常用的主从结构
4.1、一主二从
刚刚上面演示的就是一主二从,不过采用的都是配置文件的方式,实际上从机可以采用命令的方式配置,下面我们来演示一遍,大家看好了。
4.1.1、创建案例工作目录:master-slave
执行下面命令创建 /opt/master-slave 目录,本次所有操作,均在 master-slave 目录进行。
ps -ef | grep redis | awk -F" " '{print $2;}' | xargs kill -9 # 方便演示,停止所有的redis
mkdir /opt/master-slave
cd /opt/master-slave/
4.1.2、将redis.conf复制到master-slave目录
cp /opt/redis-6.2.1/redis.conf /opt/master-slave/4.1.3、创建master的配置文件:redis-6379.conf
在/opt/master-slave目录创建 redis-6379.conf 文件,内容如下,注意 192.168.200.129 是这个测试机器的ip,大家需要替换为自己的
include /opt/master-slave/redis.conf
daemonize yes
bind 192.168.200.129
requirepass 123456
dir /opt/master-slave/

port 6379
dbfilename dump_6379.rdb
pidfile /var/run/redis_6379.pid
logfile /opt/master-slave/6379.log
4.1.4、创建slave1的配置文件:redis-6380.conf
在/opt/master-slave目录创建 redis-6380.conf 文件,内容如下,和上面master的类似,只是将6379换成6380了
include /opt/master-slave/redis.conf
daemonize yes
bind 192.168.200.129
requirepass 123456
dir /opt/master-slave/

port 6380
dbfilename dump_6380.rdb
pidfile /var/run/redis_6380.pid
logfile /opt/master-slave/6380.log
4.1.5、创建slave2的配置文件:redis-6381.conf
include /opt/master-slave/redis.conf
daemonize yes
bind 192.168.200.129
requirepass 123456
dir /opt/master-slave/

port 6381
dbfilename dump_6381.rdb
pidfile /var/run/redis_6381.pid
logfile /opt/master-slave/6381.log
4.1.6、启动master
redis-server /opt/master-slave/redis-6379.conf
4.1.7、启动slave1
redis-server /opt/master-slave/redis-6380.conf
4.1.8、启动slave2
redis-server /opt/master-slave/redis-6381.conf4.1.9、分别登陆3台机器,查看各自主从信息
本次我们并没有在slave1和slave2的配置文件通过 slaveof 命令配置主从信息,所以目前3台机器的角色都是master。
分别登陆对3个redis,然后用 info replication 命令看下3个的主从信息,如下:
下面我们将通过控制台命令来指定slave1和slave2的为master的从库。
4.1.10、配置slave1为master的从库
执行下面命令,连接slave1
redis-cli -h 192.168.200.129 -p 6380 -a 123456
执行下面命令,设置master的密码
由于master需要密码,所以在slave1中需要指定master的密码,否则无法同步数据。
config set masterauth 123456执行下面命令,指定slave1的作为master的从机
slaveof 192.168.200.129 6379
如下,使用 info replication 查看下slave1的主从信息
4.1.11、配置slave1为master的从库
执行下面命令,连接slave2
redis-cli -h 192.168.200.129 -p 6381 -a 123456执行下面命令,设置master的密码
由于master需要密码,所以在slave2中需要指定master的密码,否则无法同步数据。
config set masterauth 123456执行下面命令,指定slave2的作为master的从机
slaveof 192.168.200.129 6379如下,使用 info replication 查看下slave2的主从信息
4.1.12、再来看看master的主从信息
[root@service ~]# redis-cli -h 192.168.200.129 -p 6379 -a 123456
192.168.200.129:6379> info replication
注意:通过 slaveof 命令指定主从的方式,slave重启之后主从配置会失效,所以,重启后需要在slave上重新通过 slaveof 命令进行设置,这个不要忘记了。
中途通过 slaveof 变更转向,本地的数据会被清除,会从新的master重新同步数据。
4.2、薪火相传
若master下面挂很多slave,master会有压力,实际上slave下面也可以挂slave,如下图,配置这里就不演示了,和上面的类似。
4.3、反客为主
当master挂掉之后,我们可以从slave中选择一个作为主机。
比如我们想让slave1作为主机,那么可以在slave1上执行下面的命令就可以了。
slaveof no one此时slave1就变成主机了,然后再去其他slave上面执行 slaveof 命令将其挂在slave1上。
这种主备切换有个缺点:需要手动去执行命令去操作,不是太方便。
下面来介绍另外一种方式:哨兵模式,主挂掉之后,自动从slave中选举一个作为主机,自动实现故障转移。
5、哨兵(Sentinel)模式
5.1、什么是哨兵模式?
反客为主的自动版,能够自动监控master是否发生故障,如果故障了会根据投票数从slave中挑选一个作为master,其他的slave会自动转向同步新的master,实现故障自动转义。
5.2、原理
sentinel会按照指定的频率给master发送ping请求,看看master是否还活着,若master在指定时间内未正常响应sentinel发送的ping请求,sentinel则认为master挂掉了,但是这种情况存在误判的可能,比如:可能master并没有挂,只是sentinel和master之间的网络不通导致,导致ping失败。
为了避免误判,通常会启动多个sentinel,一般是奇数个,比如3个,那么可以指定当有多个sentinel都觉得master挂掉了,此时才断定master真的挂掉了,通常这个值设置为sentinel的一半,比如sentinel的数量是3个,那么这个量就可以设置为2个。
当多个sentinel经过判定,断定master确实挂掉了,接下来sentinel会进行故障转移:会从slave中投票选出一个服务器,将其升级为新的主服务器, 并让失效主服务器的其他从服务器slaveof指向新的主服务器; 当客户端试图连接失效的主服务器时, 集群也会向客户端返回新主服务器的地址, 使得集群可以使用新主服务器代替失效服务器。
5.3、怎么玩?
5.3.1、需求:配置1主2从3个哨兵
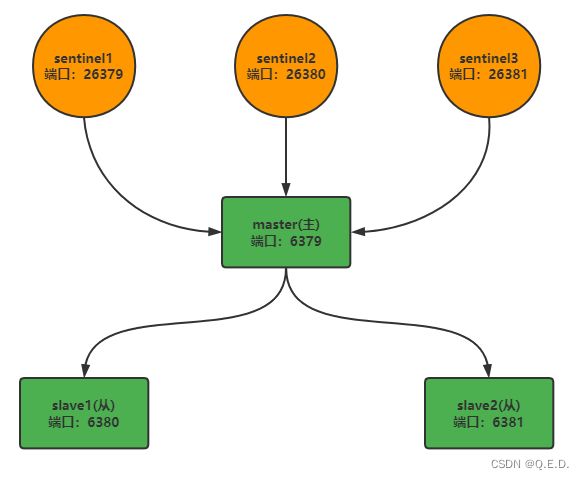
下面我们来实现1主2从3个sentinel的配置,当从的挂掉之后,要求最少有2个sentinel认为主的挂掉了,才进行故障转移。
为了方便,我们在一台机器上进行模拟,我的机器ip是:192.168.200.129,通过端口来区分6个不同的节点(1个master、2个slave、3个sentinel),节点配置信息如下
5.3.2、创建案例工作目录:sentinel
执行下面命令创建 /opt/sentinel 目录,本次所有操作,均在 sentinel 目录进行。
# 方便演示,停止所有的redis
ps -ef | grep redis | awk -F" " '{print $2;}' | xargs kill -9
mkdir /opt/sentinel
cd /opt/sentinel/
5.3.3、将redis.conf复制到sentinel目录
redis.conf 是redis默认配置文件
cp /opt/redis-6.2.1/redis.conf /opt/sentinel/
5.3.4、创建master的配置文件:redis-6379.conf
在/opt/sentinel目录创建 redis-6379.conf 文件,内容如下,注意 192.168.200.129 是这个测试机器的ip,大家需要替换为自己的
include /opt/sentinel/redis.conf
daemonize yes
bind 192.168.200.129
dir /opt/sentinel/

port 6379
dbfilename dump_6379.rdb
pidfile /var/run/redis_6379.pid
logfile "./6379.log"
5.3.5、创建slave1的配置文件:redis-6380.conf
在/opt/sentinel目录创建 redis-6380.conf 文件,内容如下,和上面master的类似,只是将6379换成6380了
include /opt/sentinel/redis.conf
daemonize yes
bind 192.168.200.129
dir /opt/sentinel/

port 6380
dbfilename dump_6380.rdb
pidfile /var/run/redis_6380.pid
logfile "./6380.log"
5.3.6、创建slave2的配置文件:redis-6381.conf
在/opt/sentinel目录创建 redis-6381.conf 文件,内容如下
include /opt/sentinel/redis.conf
daemonize yes
bind 192.168.200.129
dir /opt/sentinel/

port 6381
dbfilename dump_6381.rdb
pidfile /var/run/redis_6381.pid
logfile "./6381.log"
5.3.7、启动master、slave1、slave2
redis-server /opt/sentinel/redis-6379.conf
redis-server /opt/sentinel/redis-6380.conf
redis-server /opt/sentinel/redis-6381.conf
5.3.8、配置slave1为master的从库
执行下面命令,连接slave1
redis-cli -h 192.168.200.129 -p 6380
执行下面命令,指定slave1的作为master的从机
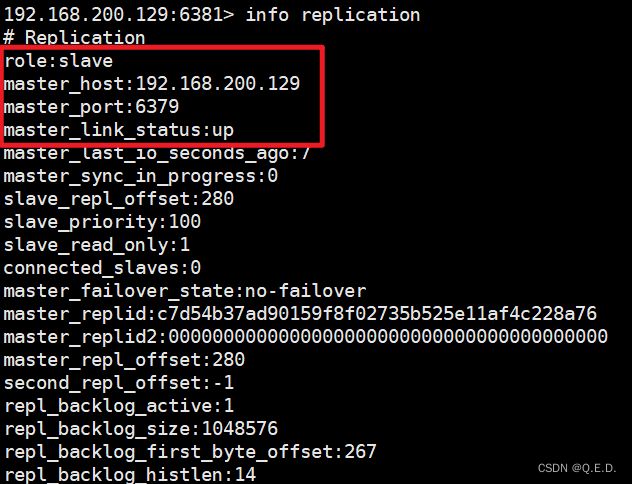
slaveof 192.168.200.129 6379如下,使用 info replication 查看下slave1的主从信息
5.3.9、配置slave2为master的从库
执行下面命令,连接slave2
redis-cli -h 192.168.200.129 -p 6381
执行下面命令,指定slave2的作为master的从机
slaveof 192.168.200.129 6379如下,使用 info replication 查看下slave2的主从信息
5.3.10、验证主从复制是否正常
运行下面命令,连接master
redis-cli -h 192.168.200.129 -p 6379运行下面命令,查看master主从信息
info replication在master中执行下面命令,写入数据
flushdb
set name jack
如下,查看slave1中name的值
192.168.200.129:6380> get name
"jack"
如下,查看slave2中name的值
192.168.200.129:6381> get name
"jack"
数据一致,说明同步正常。
5.3.11、创建sentinel1的配置文件:sentinel-26379.conf
在/opt/sentinel目录创建 sentinel-26379.conf 文件,内容如下
# 配置文件目录
dir /opt/sentinel/
# 日志文件位置
logfile "./sentinel-26379.log"
# pid文件
pidfile /var/run/sentinel_26379.pid
# 是否后台运行
daemonize yes
# 端口
port 26379
# 监控主服务器master的名字:mymaster,IP:192.168.200.129,port:6379,最后的数字2表示当Sentinel集群中有2个Sentinel认为master存在故障不可用,则进行自动故障转移
sentinel monitor mymaster 192.168.200.129 6379 2
# master响应超时时间(毫秒),Sentinel会向master发送ping来确认master,如果在20秒内,ping不通master,则主观认为master不可用
sentinel down-after-milliseconds mymaster 60000
# 故障转移超时时间(毫秒),如果3分钟内没有完成故障转移操作,则视为转移失败
sentinel failover-timeout mymaster 180000
# 故障转移之后,进行新的主从复制,配置项指定了最多有多少个slave对新的master进行同步,那可以理解为1是串行复制,大于1是并行复制
sentinel parallel-syncs mymaster 1
# 指定mymaster主的密码(没有就不指定)
# sentinel auth-pass mymaster 123456
5.3.12、创建sentinel2的配置文件:sentinel-26380.conf
在/opt/sentinel目录创建 sentinel-26380.conf 文件,内容如下
# 配置文件目录
dir /opt/sentinel/
# 日志文件位置
logfile "./sentinel-26380.log"
# pid文件
pidfile /var/run/sentinel_26380.pid
# 是否后台运行
daemonize yes
# 端口
port 26380
# 监控主服务器master的名字:mymaster,IP:192.168.200.129,port:6379,最后的数字2表示当Sentinel集群中有2个Sentinel认为master存在故障不可用,则进行自动故障转移
sentinel monitor mymaster 192.168.200.129 6379 2
# master响应超时时间(毫秒),Sentinel会向master发送ping来确认master,如果在20秒内,ping不通master,则主观认为master不可用
sentinel down-after-milliseconds mymaster 60000
# 故障转移超时时间(毫秒),如果3分钟内没有完成故障转移操作,则视为转移失败
sentinel failover-timeout mymaster 180000
# 故障转移之后,进行新的主从复制,配置项指定了最多有多少个slave对新的master进行同步,那可以理解为1是串行复制,大于1是并行复制
sentinel parallel-syncs mymaster 1
# 指定mymaster主的密码(没有就不指定)
# sentinel auth-pass mymaster 123456
5.3.13、创建sentinel3的配置文件:sentinel-26381.conf
在/opt/sentinel目录创建 sentinel-26381.conf 文件,内容如下
# 配置文件目录
dir /opt/sentinel/
# 日志文件位置
logfile "./sentinel-26381.log"
# pid文件
pidfile /var/run/sentinel_26381.pid
# 是否后台运行
daemonize yes
# 端口
port 26381
# 监控主服务器master的名字:mymaster,IP:192.168.200.129,port:6379,最后的数字2表示当Sentinel集群中有2个Sentinel认为master存在故障不可用,则进行自动故障转移
sentinel monitor mymaster 192.168.200.129 6379 2
# master响应超时时间(毫秒),Sentinel会向master发送ping来确认master,如果在20秒内,ping不通master,则主观认为master不可用
sentinel down-after-milliseconds mymaster 60000
# 故障转移超时时间(毫秒),如果3分钟内没有完成故障转移操作,则视为转移失败
sentinel failover-timeout mymaster 180000
# 故障转移之后,进行新的主从复制,配置项指定了最多有多少个slave对新的master进行同步,那可以理解为1是串行复制,大于1是并行复制
sentinel parallel-syncs mymaster 1
# 指定mymaster主的密码(没有就不指定)
# sentinel auth-pass mymaster 123456
5.3.14、启动3个sentinel
启动sentinel有2种方式
方式1:redis-server sentinel.conf --sentinel
方式2:redis-sentinel sentinel.conf
下面我们使用方式2来启动3个sentinel
/opt/redis-6.2.1/src/redis-sentinel /opt/sentinel/sentinel-26379.conf
/opt/redis-6.2.1/src/redis-sentinel /opt/sentinel/sentinel-26380.conf
/opt/redis-6.2.1/src/redis-sentinel /opt/sentinel/sentinel-26381.conf
5.3.15、分别查看3个sentinel的信息
分别对3个sentinel执行下面命令,查看每个sentinel的信息
redis-cli -p sentinel的端口
info sentinel
sentinel1 的信息如下,其他2个sentinel的信息这里就不列了,大家自己去看一下
5.3.16、验证故障自动转移是否成功
step1:在master中执行下面命令,停止master
192.168.200.129:6379> shutdown
step2:等待2分钟,等待完成故障转移
sentinel中我们配置 down-after-milliseconds 的值是60秒,表示判断主机下线时间是60秒,所以我们等2分钟,让系统先自动完成故障转移。
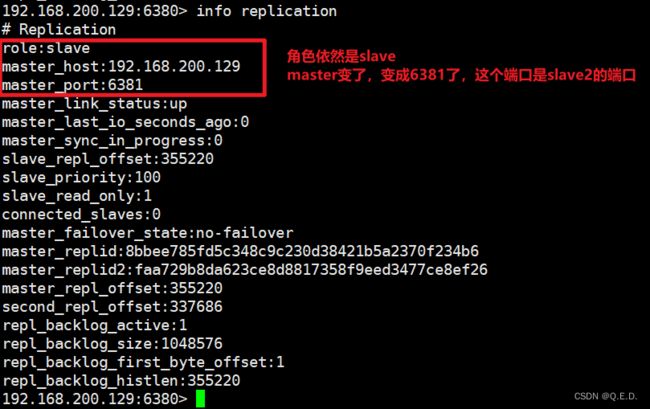
step3:查看slave1的主从信息,如下
使用 info replication 命令查看主从信息
step4:查看slave2的主从信息,如下
slave2变成master了,且slave2变成slave1的从库了,完成了故障转移。
step5:下面验证下slave1和slave2是否同步
在slave2中执行下面命令
192.168.200.129:6381> set address china
OK
在slave1中执行下面命令,查询一下address的值,效果如下,说明slave2和slave1同步正常
192.168.200.129:6380> get address
"china"
5.3.17、恢复旧的master自动俯首称臣
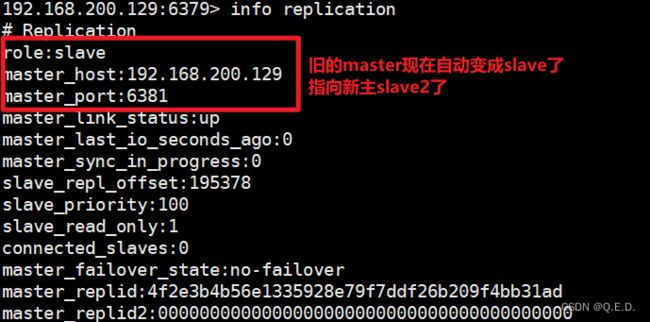
当旧的master恢复之后,会自动挂在新的master下面,咱们来验证下是不是这样的。
step1:执行下面命令,启动旧的master
redis-server /opt/sentinel/redis-6379.confstep2:执行下面命令,连接旧的master
redis-cli -h 192.168.200.129 -p 6379
step3:执行下面命令,查看其主从信息
info replication
效果如下,确实和期望的一致。
5.4、更多Sentinel介绍
关于sentinel更多信息,见:Redis-Sentinel
5.5、SpringBoot整合Sentinel模式
5.5.1、引入redis的maven配置
    org.springframework.boot
    spring-boot-starter-data-redis
5.5.2、application.properties中配置redis sentinel信息
# redis sentinel主服务名称,这个可不是随便写的哦,来源于:sentinel配置文件中sentinelmonitor后面跟的那个名称
spring.redis.sentinel.master=mymaster
# sentinel节点列表(host:port),多个之间用逗号隔开
spring.redis.sentinel.nodes=192.168.200.129:26379,192.168.200.129:26380,192.168.200.129:26381
# sentinel密码
#spring.redis.sentinel.password=
# 连接超时时间(毫秒)
spring.redis.timeout=60000
# Redis默认情况下有16个分片,这里配置具体使用的分片,默认是0
spring.redis.database=0
5.5.3、使用RedisTemplate工具类操作redis
springboot中使用RedisTemplate来操作redis,需要在我们的bean中注入这个对象,代码如下:
@Autowired
private RedisTemplate redisTemplate;

// 用下面5个对象来操作对应的类型
this.redisTemplate.opsForValue(); //提供了操作string类型的所有方法
this.redisTemplate.opsForList(); // 提供了操作list类型的所有方法
this.redisTemplate.opsForSet(); //提供了操作set的所有方法
this.redisTemplate.opsForHash(); //提供了操作hash表的所有方法
this.redisTemplate.opsForZSet(); //提供了操作zset的所有方法
5.5.4、RedisTemplate示例代码
import org.springframework.beans.factory.annotation.Autowired;
import org.springframework.data.redis.core.RedisTemplate;
import org.springframework.web.bind.annotation.RequestMapping;
import org.springframework.web.bind.annotation.RestController;

import java.util.HashMap;
import java.util.List;
import java.util.Map;
import java.util.Set;

/**
 * @className RedisController
 * @date 2022/6/21
 **/
@RestController
@RequestMapping("/redis")
public class RedisController {
    @Autowired
    private RedisTemplate redisTemplate;

    @RequestMapping("/stringTest")
    public String stringTest() {
        this.redisTemplate.delete("name");
        this.redisTemplate.opsForValue().set("name", "路人");
        String name = this.redisTemplate.opsForValue().get("name");
        return name;
    }

    @RequestMapping("/listTest")
    public List listTest() {
        this.redisTemplate.delete("names");
        this.redisTemplate.opsForList().rightPushAll("names", "刘德华", "张学友", "郭富城", "黎明");
        List courses = this.redisTemplate.opsForList().range("names", 0, -1);
        return courses;
    }

    @RequestMapping("setTest")
    public Set setTest() {
        this.redisTemplate.delete("courses");
        this.redisTemplate.opsForSet().add("courses", "java", "spring", "springboot");
        Set courses = this.redisTemplate.opsForSet().members("courses");
        return courses;
    }

    @RequestMapping("hashTest")
    public Map hashTest() {
        this.redisTemplate.delete("userMap");
        Map map = new HashMap<>();
        map.put("name", "路人");
        map.put("age", "30");
        this.redisTemplate.opsForHash().putAll("userMap", map);
        Map userMap = this.redisTemplate.opsForHash().entries("userMap");
        return userMap;
    }

    @RequestMapping("zsetTest")
    public Set zsetTest() {
        this.redisTemplate.delete("languages");
        this.redisTemplate.opsForZSet().add("languages", "java", 100d);
        this.redisTemplate.opsForZSet().add("languages", "c", 95d);
        this.redisTemplate.opsForZSet().add("languages", "php", 70);
        Set languages = this.redisTemplate.opsForZSet().range("languages", 0, -1);
        return languages;
    }

} 
