8. unity脚本参数输入、键盘控制、组件脚本调用
1. 脚本参数:
在脚本文件中可以定义一些公开的属性,这时对应的属性也会在编辑器中显示出来,可以在编辑器中直接改动属性的值,如下代码,将 rotateSpeed 属性使用 public 修饰后:
using System.Collections;
using System.Collections.Generic;
using UnityEngine;

public class SampleLogic : MonoBehaviour
{
    //必须使用public进行修饰,才能在编辑器中看到这个属性
    [Tooltip("这是旋转速度")]//加入这航代码好,在编辑器中当鼠标指针悬浮在此属性上方时会显示这个提示字符
    public float rotateSpeed = 20;

    // Start is called before the first frame update
    void Start()
    {
        Application.targetFrameRate = 60;//设定帧更新速率

    }

    // Update is called once per frame
    void Update()
    {
        float angleDelta = rotateSpeed * Time.deltaTime;

        //使用API实现
        this.transform.Rotate(0, angleDelta, 0, Space.Self);

    }
}
保存脚本文件,打开编辑器会看到在挂载的脚本中,会有一个同名的属性可以供修改,如下图:

脚本参数的赋值顺序:
在为脚本添加参数时,可以在定义时提供一个默认值,当脚本运行后,会进入Awake初始化函数进行第一次初始化,此时也可以在这个函数中对参数重新赋值,然后会在编辑器界面中查看该参数的设置,如果在界面中又进行了修改,则会以界面中设置的参数值为准,然后会进入Start初始化函数,进行第二次初始化,也可以在这个函数中进行参数赋值,到这里就是最后一次赋值了,后面会始终以start函数中的赋值为准执行脚本。
参数类型:
值类型:如 int float bool
值类型(struct):如 Vector3 Color
引用类型(class):
- 节点:如 GameObject
- 组件:如 Transform MeshRenderer AudioSource…
- 资源:如 Material Texture AudioClip…
- 数组类型
示例:
using System.Collections;
using System.Collections.Generic;
using UnityEngine;

public class SampleLogic : MonoBehaviour
{
    public GameObject flag;//将这个属性暴漏出去,需要在编辑器中进行赋值设置
    // Start is called before the first frame update
    void Start()
    {
        Application.targetFrameRate = 60;//设定帧更新速率

        this.transform.LookAt(flag.transform);//将移动物体看向目标物体,可实现物体的转向
    }

    // Update is called once per frame
    void Update()
    {
        Vector3 flagTrf = flag.transform.position;
        Vector3 objTrf = this.transform.position;
        Vector3 subTrf = flagTrf - objTrf;
        float minDistance = subTrf.magnitude;//根据坐标计算距离差值

        if(minDistance > 6.0f)//距离大于阈值时,才会移动物体,否则不移动
        {
            float speed = 3;    //定义移动速度
            float distance = speed * Time.deltaTime;    //速度与时间相乘计算出每次更新时移动的距离

            this.transform.Translate(0, 0, distance, Space.Self);//相对于自身坐标系进行z轴上的移动
        }
    }
}
在编辑器中指定上述代码中的属性flag:可以在Hierarchy层级树种选中物体,将物体拖拽到对应的属性框内,如下图所示:

2. 运行时调试:
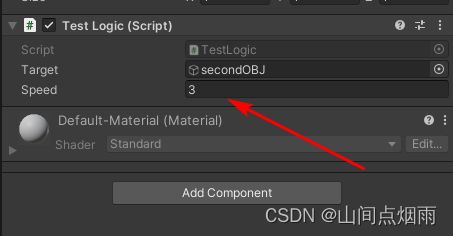
当在编辑器中运行游戏时,在Inspector属性窗口中是可以看到物体对应的属性值是时刻变化的,同时也可以在程序运行中手动调整某一个属性的值,比如调整物体的移动速度属性:

但当游戏运行结束后,这些在运行过程中调整的属性值是无法自动保存下来的。如果想保存这些调试后的最优值,可以在程序运行过程中,找到组件的右上角,点击**…,选择Copy Component将其属性值全部复制下来,如下图所示:

然后当程序运行结束后,将复制下来的最优值添加进去即可,点击*…,选择Paste Component Values***将其属性值全部复制下来,如下图所示:

3. 鼠标键盘输入:
在unity当中接收外界的控制输入,可以使用Input,比如接收鼠标按键输入:
//鼠标输入
Input.GetMouseButton(0)//鼠标左键按下
Input.GetMouseButton(1)//鼠标右键按下
Input.GetMouseButton(2)//鼠标中键按下
Input.GetAxis("Mouse X");//鼠标横向移动
Input.GetAxis("Mouse Y");//鼠标纵向移动
Input.GetAxis("Horizontal");//横向轴
Input.GetAxis ("Vertical");//纵向轴

//键盘输入
Input.GetKey ("up")//上方向键按下
Input.GetKey ("down")//下方向键按下
Input.GetKey ("left")//左方向键按下
Input.GetKey ("right")//右方向键按下
Input.GetKey(KeyCode.W)//指定字母键按下
示例代码:挂在到物体上后,可实现WASD和上下左右键控制物体运动
using System.Collections;
using System.Collections.Generic;
using UnityEngine;

public class TestLogic : MonoBehaviour
{
    public GameObject target;
    public float speed = 3;
    // Start is called before the first frame update
    void Start()
    {
        Application.targetFrameRate = 60;

        this.transform.LookAt(target.transform);
    }

    // Update is called once per frame
    void Update()
    {
        Vector3 targetTrf = target.transform.position;
        Vector3 objTrf = this.transform.position;
        Vector3 subTrf = targetTrf - objTrf;
        float minDistance = subTrf.magnitude;

        // W 键或者 ↑ 键按下
        if(minDistance > 3.0f && (Input.GetKey (KeyCode.W) || Input.GetKey("up")))
        {
            //向前移动
            float distance = speed * Time.deltaTime;
            this.transform.Translate(0,0,distance,Space.Self);
        }
        // S 键或者 ↓ 键按下
        if(minDistance > 3.0f && (Input.GetKey (KeyCode.S) || Input.GetKey("down")))
        {
            //向后移动
            float distance = speed * Time.deltaTime;
            this.transform.Translate(0,0,-distance,Space.Self);
        }
        // A 键或者 ← 键按下
        if(minDistance > 3.0f && (Input.GetKey (KeyCode.A) || Input.GetKey("left")))
        {
            //向左移动
            float distance = speed * Time.deltaTime;
            this.transform.Translate(-distance,0,0,Space.Self);
        }
        // D 键或者 → 键按下
        if(minDistance > 3.0f && (Input.GetKey (KeyCode.D) || Input.GetKey("right")))
        {
            //向左移动
            float distance = speed * Time.deltaTime;
            this.transform.Translate(distance,0,0,Space.Self);
        }
    }
}
4. 添加其他组件(Add Component):
在编辑器界面中,鼠标选中任何一个物体模型,在属性窗口中都会看到其对应的各种属性,同时在最下方也有一个按钮Add Component,用于在模型上挂在其他我们想要添加的组件,比如AudioSource,如下图:

点击后选择Audio -> Audio Source即可为模型添加一个音效组件,将音效文件拖放到对应选框中,并设置一些属性。其中,Play On Awake属性指定运行时启动,属性Loop开启循环播放,如下图所示:

4.1 代码控制组件(Getomponent)
在代码中获取组件,可以使用this.GetComponent<类型>();
示例如下:点击鼠标左键控制音效启动(先在界面中将其自动播放属性关闭)
using System.Collections;
using System.Collections.Generic;
using UnityEngine;

public class TestLogic : MonoBehaviour
{
    // Start is called before the first frame update
    void Start()
    {
        Application.targetFrameRate = 60;
    }

    // Update is called once per frame
    void Update()
    {
        if(Input.GetMouseButtonDown(0))//捕获鼠标左键
        {
            playAudio();
        }
    }

    void playAudio()
    {
    	//获取AudioSource组件
        AudioSource audio = this.GetComponent<AudioSource>();
        if(audio.isPlaying)
        {
            Debug.Log("停止播放音乐...");
            audio.Stop();
        }
        else
        {
            Debug.Log("开始播放音乐...");
            audio.Play();
        }
    }
}
4.2 组件参数
在为模型添加一个组件之后,界面编辑器中可以看到有很多属性可以设置,这些属性在代码脚本中同样也是可以访问更改的。比如在上图中的黄色框框内的属性,获取到这个组件后进行更改,代码如下:
using System.Collections;
using System.Collections.Generic;
using UnityEngine;

public class TestLogic : MonoBehaviour
{
    // Start is called before the first frame update
    void Start()
    {
        Application.targetFrameRate = 60;
    }

    // Update is called once per frame
    void Update()
    {
        if(Input.GetMouseButtonDown(0))//捕获鼠标左键
        {
            playAudio();
        }
    }

    void playAudio()
    {
    	//获取AudioSource组件
        AudioSource audio = this.GetComponent<AudioSource>();
        //获取组件后开始更改属性:
        audio.loop = true;//设置循环播放
        audio.mute = true;//设置静音
    }
}
4.3 引用别的组件
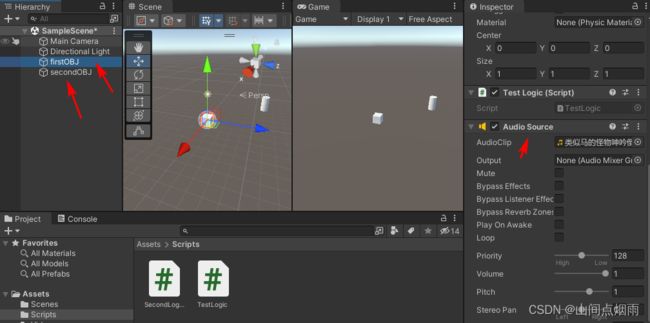
有时在一个脚本文件中,想访问别的模型挂载的组件,这样也是可以操作的,比如在第一个模型上挂在了一个AudioSource组件,在第二个模型的脚本中想获取第一个模型下的这个音乐组件,如图:

第一种方法:(不常用)
先在第二个模型脚本中获取到目标模型,然后再在这个模型下面获取其拥有的组件,示例代码如下:
using System.Collections;
using System.Collections.Generic;
using UnityEngine;

public class SecondLogic : MonoBehaviour
{
    public GameObject audioObj;		//在这里添加一个公共的属性,这样在界面编辑器中就可以给其赋值

    // Start is called before the first frame update
    void Start()
    {
        AudioSource audio = audioObj.GetComponent<AudioSource>();	//然后再在audioObj模型下寻找AudioSource组件
    }

    // Update is called once per frame
    void Update()
    {
        if(Input.GetMouseButtonDown(0))
        {
            audio.Play();	//开启
        }
    }
}
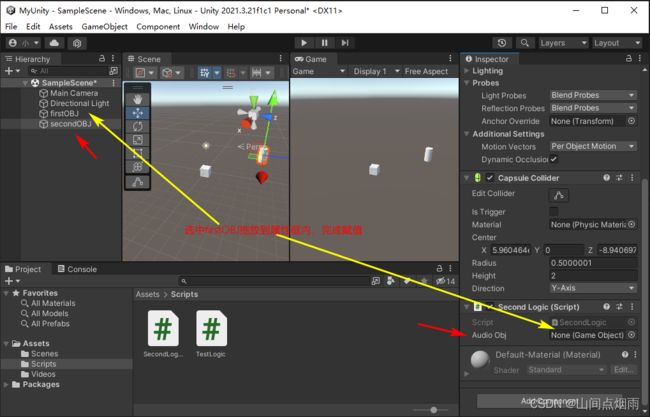
在上述代码中定义了一个公共的属性 audioObj,此时打开界面编辑器后,可以看到第二个模型的脚本组件有一个属性为audioObj,这样就可以将目标模型拖入这个属性框中,即可完成对 audioObj 的赋值,然后就可以在第二个模型的脚本文件中正常使用了,赋值操作如下图所示:

第二种方法:(常用)
和第一种方法很类似,第一种方法在定义属性时,属性的类型是GameObject,这样还需要再一次寻找到其下面对应的组件AudioSource,第二种方法直接将属性的类型设置为目标类型,即想访问其它组件的AudioSource组件,那么就先该属性的类型设置为AudioSource,赋值方式和第一种方式一样,都是把目标模型拖入到属性框内,这样unity可以自动寻找到目标模型下面的对应组件进行赋值,再代码中也可以直接使用变量进行操作,如下:
using System.Collections;
using System.Collections.Generic;
using UnityEngine;

public class SecondLogic : MonoBehaviour
{
    public AudioSource audio;//这里直接将属性类型设置为AudioSource
    // Start is called before the first frame update
    void Start()
    {

    }

    // Update is called once per frame
    void Update()
    {
        if(Input.GetMouseButtonDown(0))
        {
            audio.Play();//直接使用
        }
    }
}
注意:如果引用的是脚本组件,和上面的引用方式是一样的,只不过是将定义的属性类型改为脚本组件的类类型,比如要引用secondLogic脚本组件,那么再设置变量时,就定义为:Public SecondLogic scriptobj;即可。
5. 消息调用(SendMessage):
在第四小节引用其它组件是通过找到该组件并直接设置其属性的方式实现的,消息调用这个方法的含义是指在其它组件中找到目标组件后,可以给它发送一个消息,相当于一个控制信号,当目标组件接收到这个信号后做出对应的响应。
举例:在secondObj当中给firstObj发送信号,让firstObj启动音乐,场景如图所示:
代码如下:
SecondLogic.cs:
using System.Collections;
using System.Collections.Generic;
using UnityEngine;

public class SecondLogic : MonoBehaviour
{

    public GameObject target;	//在界面编辑器中对这个属性进行赋值

    // Start is called before the first frame update
    void Start()
    {

    }

    // Update is called once per frame
    void Update()
    {
        if(Input.GetMouseButtonDown(0))
        {
            //向目标节点发送一个‘消息’
            target.SendMessage("DoAudio");	//里面的参数是目标物体脚本文件中的函数
            target.SendMessage("StopAudio",3);//里面第一个参数是目标物体脚本文件中的函数名,后面的参数是函数需要的参数
        }
    }
}
FirstLogic.cs:
using System.Collections;
using System.Collections.Generic;
using UnityEngine;

public class TestLogic : MonoBehaviour
{
    AudioSource audio;
    // Start is called before the first frame update
    void Start()
    {
        Application.targetFrameRate = 60;

        audio = this.GetComponent<AudioSource>();//获取本模型下的AudioSource组件
    }

    // Update is called once per frame
    void Update()
    {

    }

    public void DoAudio()	//定义执行函数,注意此函数名称和上面secondlogic.cs发送消息的函数中的参数保持一致
    {
        audio.Play();
    }
    public void StopAudio(int mCount)	//定义执行函数,注意此函数名称和上面secondlogic.cs发送消息的函数中的参数保持一致
    {
    	Debug.Log(mCount);
        audio.Play();
    }

}
在界面编辑器中对Second Logic.cs代码中的target属性进行赋值:
