java经典面试题JUC并发篇(持续更新)
文章目录
- 一. 线程状态
-
- 1.1 java的六种线程状态
- 1.2 操作系统五种状态
- 二.线程池核心参数
- 三. JUC并发篇重要内容
-
- 3.1 sleep 和wait
- 3.2 lock和synchronized
-
- 3.2.1 synchronized锁升级
-
- 3.2.1.1 轻量级锁流程
- 3.2.1.2 锁膨胀升级重量级锁流程
- 3.2.1.3 `锁膨胀期间`的自旋优化
- 3.2.1.4 偏向锁
- 3.2.1.5 偏向锁撤销的情况
- 3.3 公平锁
- 3.4 锁消除(并没有测试到差距)
- 3.5 volatile
-
- 3.5.1原子性
- 3.5.2 可见性
- 3.5.3有序性
- 3.6 悲观锁和乐观锁
-
- 3.6.1 乐观锁测试用例
- 3.6.2 悲观锁样例
- 3.6.3 CAS如何解决ABA问题
- 3.7 HashTable和ConcurrentHashMap
- 3.8 ThreadLocal
-
- 3.8.1 作用
- 3.8.2 原理
- 3.8.3 弱引用 key
- 3.9 线程安全分析
-
- 3.9.1 局部变量线程安全分析
- 3.9.2 成员变量线程安全分析
- 四.小知识
-
- 4.1在A线程停止B线程-停止线程
java经典面试题基础篇(持续更新)
一. 线程状态
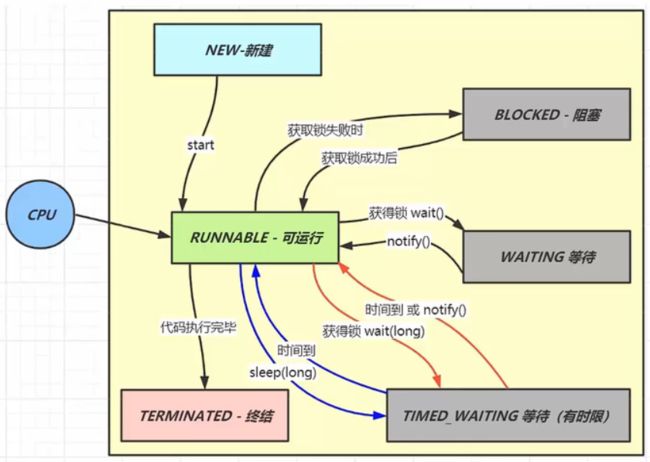
1.1 java的六种线程状态
- 1.新建
- 当一个线程对象被创建,但还未调用 start 方法时处于新建状态
- 此时未与操作系统底层线程关联
- 2.可运行
- 调用了 start 方法,就会由新建进入可运行
- 此时与底层线程关联,由操作系统调度执行
- 3.终结
- 线程内代码已经执行完毕,由可运行进入终结
- 此时会取消与底层线程关联
- 4.阻塞
- 当获取锁失败后,由可运行进入 Monitor 的阻塞队列阻塞,此时不占用 cpu 时间
- 当持锁线程释放锁时,会按照一定规则唤醒阻塞队列中的阻塞线程,唤醒后的线程
进入可运行状态
- 5.等待
- 当获取锁成功后,但由于条件不满足,调用了 wait() 方法,此时从可运行状态释放锁
进入 Monitor 等待集合等待,同样不占用 cpu 时间 - 当其它持锁线程调用 notify() 或 notifyAll() 方法,会按照一定规则唤醒等待集合中的等
待线程,恢复为可运行状态
- 当获取锁成功后,但由于条件不满足,调用了 wait() 方法,此时从可运行状态释放锁
- 6.有时限等待
- 当获取锁成功后,但由于条件不满足,调用了 wait(long) 方法,此时从可运行状态释
放锁进入 Monitor 等待集合进行有时限等待,同样不占用 cpu 时间 - 当其它持锁线程调用 notify() 或 notifyAll() 方法,会按照一定规则唤醒等待集合中的有
时限等待线程,恢复为可运行状态,并重新去竞争锁 - 如果等待超时,也会从有时限等待状态恢复为可运行状态,并重新去竞争锁
- 还有一种情况是调用 sleep(long) 方法也会从可运行状态进入有时限等待状态,但与
Monitor 无关,不需要主动唤醒,超时时间到自然恢复为可运行状态
- 当获取锁成功后,但由于条件不满足,调用了 wait(long) 方法,此时从可运行状态释
1.2 操作系统五种状态
- 运行态:分到 cpu 时间,能真正执行线程内代码的
- 就绪态:有资格分到 cpu 时间,但还未轮到它的
- 阻塞态:没资格分到 cpu 时间的
- 涵盖了 java 状态中提到的阻塞、等待、有时限等待
- 多出了阻塞 I/O,指线程在调用阻塞 I/O 时,实际活由 I/O 设备完成,此时线程无事可
做,只能干等
- 新建与终结态:与 java 中同名状态类似。
二.线程池核心参数
多线程概述
package com.vector.mallsearch.thread;
import java.util.Optional;
import java.util.concurrent.*;
/**
* @ClassName ThreadTest
* @Description TODO
* @Author YuanJie
* @Date 2022/8/17 10:13
*/
public class ThreadTest {
// 当前系统中应当只有一两个池,每个异步任务交由线程池执行
/**
* 七大参数
* corePoolSize – the number of threads to keep in the pool, even if they are idle, unless allowCoreThreadTimeOut is set
* maximumPoolSize – the maximum number of threads to allow in the pool
* keepAliveTime – (maximumPoolSize - corePoolSize)when the number of threads is greater than the core, this is the maximum time that excess idle threads will wait for new tasks before terminating.
* unit – the time unit for the keepAliveTime argument
* workQueue – the queue to use for holding tasks before they are executed. This queue will hold only the Runnable tasks submitted by the execute method.
* threadFactory – the factory to use when the executor creates a new thread
* handler – the handler to use when execution is blocked because the thread bounds and queue capacities are reached
*/
/**
* 工作顺序:
* 1)、线程池创建,准备好core数量的核心线程,准备接受任务
* 1.1、core满了,就将再进来的任务放入阻塞队列中。空闲的core就会自己去阻塞队列获取任务执行
* 1.2、阻塞队列满了,就直接开新线程执行,最大只能开到max指定的数量
* 1.3、max满了就用RejectedExecutionHandLer拒绝任务
* 1.4、max都执行完成,有很多空闲.在指定的时间keepAliveTime以后,释放max-core这些线程
*
* new LinkedBLoclingDeque<>():默认是Integer的最大值。内存不够
*
* 拒绝策略: DiscardOldestPolicy丢弃最旧的任务
* AbortPolicy 丢弃新任务并抛出异常
* CallerRunsPolicy 峰值同步调用
* DiscardPolicy 丢弃新任务不抛异常
* 一个线程池core 7; max 20 , queue: 50,100并发进来怎么分配的;
* 7个会立即得到执行,50个会进入队列,再开13个进行执行。剩下的30个就使用拒绝策略。
*/
// 创建自定义线程
public static ThreadPoolExecutor threadPoolExecutor = new ThreadPoolExecutor(5,
200,
10,
TimeUnit.SECONDS,
new LinkedBlockingQueue<>(100000),
Executors.defaultThreadFactory(),
new ThreadPoolExecutor.AbortPolicy());
public static void main(String[] args) throws ExecutionException, InterruptedException {
// CompletableFuture异步编排,类似vue中promise,Docker-compose容器编排
System.out.println("main...start....");
// 无返回值
// CompletableFuture voidCompletableFuture = CompletableFuture.runAsync(() -> {
// System.out.println("当前线程池: " + Thread.currentThread().getId());
// int i = 10 / 2;
// System.out.println("运行结果: " + i);
// }, threadPoolExecutor);
// 有返回值 且进行异步编排
CompletableFuture<String> future = CompletableFuture.supplyAsync(() -> {
System.out.println("当前线程池: " + Thread.currentThread().getId());
String i = String.valueOf(10 / 2);
System.out.println("运行结果: " + i);
return i;
}, threadPoolExecutor)
// 接收上一步的结果和异常
.handle((result,error)->{
if(Optional.ofNullable(result).isPresent()){
return "success";
}
return "error";
});
String s = future.get();
System.out.println("main...end...." + s);
// 线程串行化 thenRunAsync 没法获取上一步执行结果
System.out.println("main---start---");
CompletableFuture<Void> VoidCompletableFuture = CompletableFuture.supplyAsync(() -> {
System.out.println("当前线程池: " + Thread.currentThread().getId());
int i = 10 / 2;
System.out.println("运行结果: " + i);
return i;
}, threadPoolExecutor)
.thenRunAsync(()-> {
System.out.println("thenRunAsync()继续执行其他任务,没法获取上一步执行结果");
},threadPoolExecutor);
System.out.println("main---end---");
// 线程串行化 thenAcceptAsync 能接收上一步结果但无返回值
CompletableFuture<Void> NullCompletableFuture = CompletableFuture.supplyAsync(() -> {
System.out.println("当前线程池: " + Thread.currentThread().getId());
int i = 10 / 2;
System.out.println("运行结果: " + i);
return i;
}, threadPoolExecutor)
.thenAcceptAsync((result)-> {
System.out.println("thenRunAsync()作为程序的最后执行结果,无返回值, i= "+ result);
},threadPoolExecutor);
// 线程串行化 thenApplyAsync 可以处理上一步结果,有返回值
System.out.println("main---start---");
CompletableFuture<String> stringCompletableFuture = CompletableFuture.supplyAsync(() -> {
System.out.println("当前线程池: " + Thread.currentThread().getId());
int i = 10 / 2;
System.out.println("运行结果: " + i);
return i;
}, threadPoolExecutor)
.thenApplyAsync((result)-> {
System.out.println("thenRunAsync()可以处理上一步结果,有返回值");
result = result*2;
return "最新的i = "+result;
},threadPoolExecutor);
System.out.println("main---end---"+stringCompletableFuture.get());
// 线程串行化 多任务组合
System.out.println("main...start....");
CompletableFuture<String> work01 = CompletableFuture.supplyAsync(()-> {
System.out.println("任务work01进行中");
return "info 1";
},threadPoolExecutor);
CompletableFuture<String> work02 = CompletableFuture.supplyAsync(()-> {
System.out.println("任务work02进行中");
try {
Thread.sleep(3000);
} catch (InterruptedException e) {
e.printStackTrace();
}
return "info 2";
},threadPoolExecutor);
CompletableFuture<String> work03 = CompletableFuture.supplyAsync(()-> {
System.out.println("任务work03进行中");
return "info 3";
},threadPoolExecutor);
// work01.get(); work02.get(); work03.get();.... get乃是每个线程都会被阻塞等待结果
// 而allof()是一个非阻塞等待方法
CompletableFuture<Void> allResult = CompletableFuture.allOf(work01,work02,work03);
// 等待最长的任务执行完毕后,获得最终结果
allResult.get();
System.out.println("main...end...."+work01.get()+"=>"+work02.get()+"=>"+work03.get());
// // 一个成功即可
// CompletableFuture
// System.out.println("main...end...."+allResult.get());
}
}
三. JUC并发篇重要内容
3.1 sleep 和wait
共同点
- wait() ,wait(long) 和 sleep(long) 的效果都是让当前线程暂时放弃 CPU 的使用权,进入阻塞状
态
不同点
- 方法归属不同
- sleep(long) 是 Thread 的静态方法
- 而 wait(),wait(long) 都是 Object 的成员方法,每个对象都有
- 醒来时机不同
- 执行 sleep(long) 和 wait(long) 的线程都会在等待相应毫秒后醒来
- wait(long) 和 wait() 还可以被 notify 唤醒,wait() 如果不唤醒就一直等下去
- 它们都可以被打断唤醒
- 锁特性不同(重点)
- wait 方法的调用必须先获取 wait 对象的锁,而 sleep 则无此限制
- wait 方法执行后会释放对象锁,允许其它线程获得该对象锁
- 而 sleep 如果在 synchronized 代码块中执行,并不会释放对象锁
3.2 lock和synchronized
不同点
-
语法层面
- synchronized 是关键字,源码在 jvm 中,用 c++ 语言实现
- Lock 是接口,源码由 jdk 提供,用 java 语言实现
- 使用 synchronized 时,退出同步代码块锁会自动释放,而使用 Lock 时,需要手动调
用 unlock 方法释放锁
-
功能层面
- 二者均属于悲观锁、都具备基本的互斥、同步、锁重入功能
- Lock 提供了许多 synchronized 不具备的功能,例如获取等待状态、公平锁、可打
断、可超时、多条件变量 - Lock 有适合不同场景的实现,如 ReentrantLock, ReentrantReadWriteLock
-
性能层面
- 在没有竞争时,synchronized 做了很多优化,如偏向锁、轻量级锁,性能不赖
- 在竞争激烈时,Lock 的实现通常会提供更好的性能
注意: 加在成员方法上的synchronized关键字相当于 synchronized(this) 锁住的this对象;
加在静态方法上的synchronized关键字相当于synchronized(类.clss)锁住的当前类对象
3.2.1 synchronized锁升级
常规monitor监控锁由操作系统提供.
前置知识java对象头:


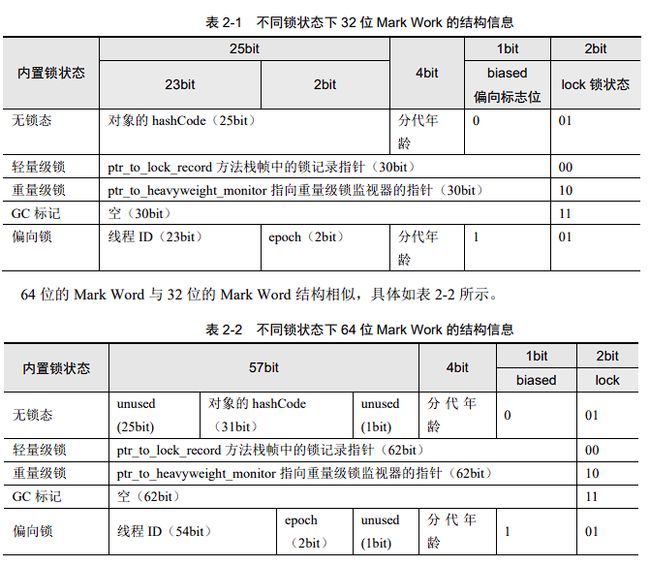
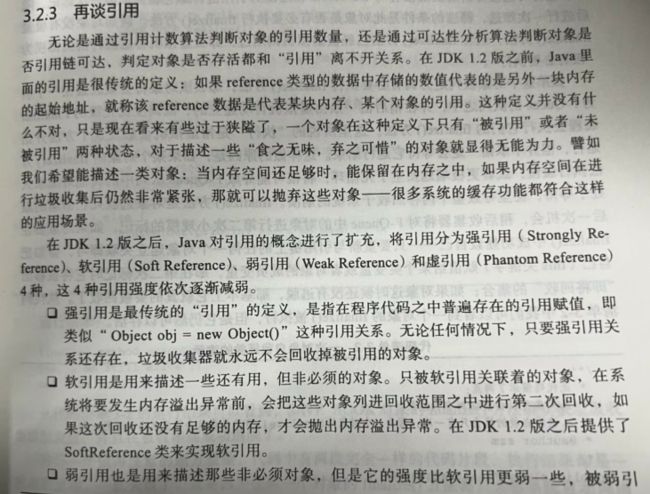
在JDK1.6之后 synchronized锁引入了锁升级的过程 无锁、偏向锁、轻量级锁、重量级锁,4种状态,4种状态会随着竞争的情况逐渐升级,升级的过程是不可逆的
轻量级锁适用场景: 如果一个对象虽然有多线程访问,但多线程访问没有竞争,那么可以使用轻量级锁来优化。轻量级锁对使用者是透明的,即语法仍然是synchronized
3.2.1.1 轻量级锁流程
-
1.
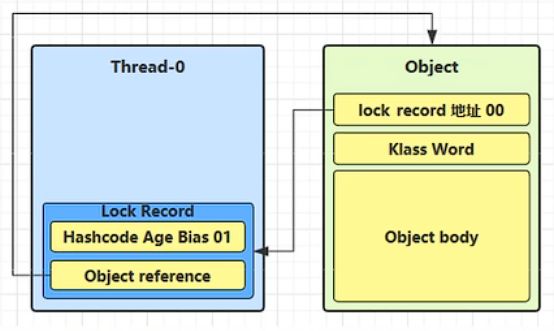
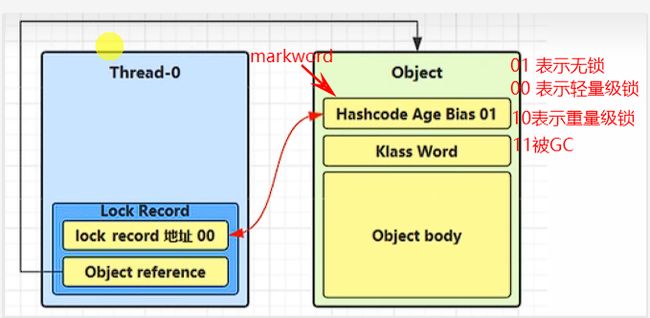
当调用synchronized(obj)每个线程的栈帧会包含锁记录的结构(该结构是jvm层),内部可以存储锁定对象的mark word .让锁记录中Object reference指向锁对象,并尝试用cas替换Object的Mark Word并将Mark Word的值存入锁记录.如下图
-
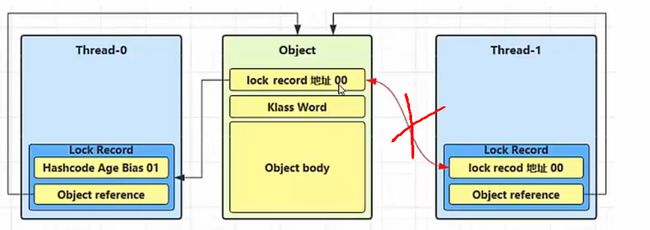
如果cas失败.
-
失败情况1 object被其他线程尝试加锁,lock record记录的是当前线程的地址,且状态为00.此时表明有竞争进入锁膨胀过程.
-
- 当退出synchronized代码块(解锁时) 如果有取值为null的锁记录,表示有重入,这时重置锁记录,表示重入计数减一
-
当退出synchronized代码块(解锁时)锁记录的值不为null,这时使用cas将Mark Word的值恢复给对象头
-
成功,则解锁成功
-
失败,说明轻量级锁进行了锁膨胀或已经升级为重量级锁,进入重量级锁解锁流程
3.2.1.2 锁膨胀升级重量级锁流程
如果在尝试加轻量级锁的过程中,CAS操作无法成功,这时一种情况就是有其它线程为此对象加上了轻量级锁(有竞争),这时需要进行锁膨胀,将轻量级锁变为重量级锁。
-
2.进入锁膨胀流程(为使加锁失败的线程进入阻塞状态等待).即为Object对象申请Monitor锁,让Object指向重量级锁地址
然后自己进入Monitor的EntryList BLOCKED.上图变更为下图所示:
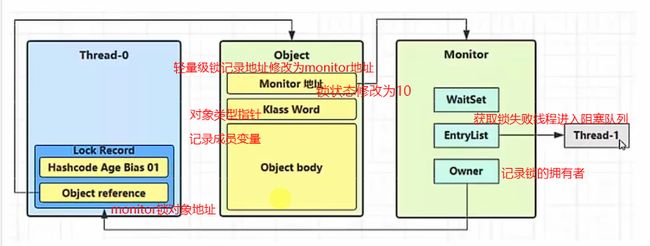
waitSet: 当有A线程获得了锁.但执行条件不满足.调用wait()方法.进入waitSet队列等待(此时其他阻塞线程可以被唤醒获得锁).当条件满足被notify()唤醒重回EntryList阻塞队列. -
3 .当Thread-0退出同步块解锁时,使用cas将Mark Word的值恢复给对象头失败。这时会进入重量级解锁流程,即按照Monitor地址找到Monitor对象,设置Owner为null,唤醒EntryList中BLOCKED线程
3.2.1.3 锁膨胀期间的自旋优化
在Java6之后自旋锁是自适应的,比如对象刚网刚的一次自旋操作成功过,那么认为这次自旋成功的可能性会高,就多自旋几次;反之,就少自旋甚至不自旋,总之,比较智能。
自旋会占用CPU时间,单核CPU自旋就是浪费,多核CPU自旋才能发挥优势。
java7之后不能控制是否开启自旋功能
自旋优化核心: 重量级锁竞争的时候,还可以使用自旋来进行优化,如果当前线程自旋成功(即这时候持锁线程已经退出了 同步块,释放了锁),这时当前线程就可以避免阻塞。

3.2.1.4 偏向锁
轻量级锁在没有竞争时(就自己这个线程),每次重入仍然需要执行CAS操作。为优化这部分性能synchronized在无锁和轻量级锁中间增加偏向锁.
偏向锁核心: 偏向锁是比轻量级锁性能更高的锁.偏向锁在多线程无竞争状态下,A线程触发偏向锁状态,锁释放时不触发Mark work重置.当由B线程调用时撤销偏向锁.如果少于一定的撤销阈值(即被其他线程调用阈值).B线程调用结束时恢复A线程偏向锁.(其他撤销情况详见下文描述)
重温 java对象头mark work信息


言归正传
从 JDK6 开始,虽然 JVM 默认开启偏向锁,但是默认延时 4 秒开启(JVM 在启动的时候需要加载资源,这些对象加上偏向锁没有任何意义,减少了大量偏向锁撤销的成本).如果想避免延迟,可以加VM参数-Xx:BiasedLockingStartupDelay=0来禁用延迟
如果没有开启偏向锁,那么对象创建后,第一次用到hashcode时才会赋值.
Java6中引入了偏向锁来做进一步优化:只有第一次使用CAS将线程ID设置到对象的Mark Word头,之后发现这个线程ID是自己的就表示没有竞争,不用重新CAS。以后只要不发生竞争,这个对象就归该线程所有.
偏向锁适合冲突较少的情况.在多线程竞争激烈时我们可以在添加VM参数-XX: -UseBiasedLocking禁用偏向锁
3.2.1.5 偏向锁撤销的情况
-
轻量级锁调用对象的hashcode()或System.identityHashCode( )方法会导致偏向锁失效降为无锁状态.而重量级锁不会.原因如下

哈希码将放置到 Mark Word 中,内置锁变成无锁状态,偏向锁将被撤销 -
其他线程(无竞争情况)获取该对象锁,会使偏向锁升级到轻量级锁.有竞争则锁膨胀升级(要保证等待线程进入阻塞态).
-
批量重偏向: 如果对象虽然被多个线程访问,但没有竞争,这时偏向了线程T1的对象仍有机会重新偏向T2,重偏向会重
置对象的Thread ID.当撤销偏向锁阈值超过20次后,会在给这些对象加锁时重新偏向至加锁线程.而不会升级为轻量级锁.当撤销偏向锁阈值超过40次后,整个类的所有对象都会变为不可偏向的,新建的对象也是不可偏向的.
3.3 公平锁
- 公平锁的公平体现
- 已经处在阻塞队列中的线程(不考虑超时)始终都是公平的,先进先出
- 公平锁是指未处于阻塞队列中的线程来争抢锁,如果队列不为空,则老实到队尾等
待 - 非公平锁是指未处于阻塞队列中的线程来争抢锁,与队列头唤醒的线程去竞争,谁
抢到算谁的
- 公平锁会降低吞吐量,一般不用
- ReentrantLock 中的条件变量功能类似于普通 synchronized 的 wait,notify,用在当线程获得锁
后,发现条件不满足时,临时等待的链表结构 - 与 synchronized 的等待集合不同之处在于,ReentrantLock 中的条件变量可以有多个,可以实现
更精细的等待、唤醒控制
- ReentrantLock 中的条件变量功能类似于普通 synchronized 的 wait,notify,用在当线程获得锁
3.4 锁消除(并没有测试到差距)
锁消除核心: 逃逸分析,JIT即时编译器中的C2编译器(JDK19 GraalVM取代C2)会对调用超过一定阈值的热点代码进行优化.C2发现局部变量不会逃逸方法的作用范围,即局部变量不可被共享.
但是经过我的测试,不管禁不禁用JIT都差距都不大. ns捕捉n次。也测不出差距。
锁消除测试示例:
/**
 * @ClassName Main
 * @Description 锁消除 jdk1.8 测试套件jmh-core jmh-generator-annprocess
 * @Author YuanJie
 * @Date 2023/1/27 14:01
 */
@Fork(1) // 指定fork出多少个子进程来执行同一基准测试方法。
@BenchmarkMode(Mode.AverageTime) // 求平均时间
@Warmup(iterations = 3) // 预热jvm,防止首次执行造成不准确
@Measurement(iterations = 6) // 测试轮次
@OutputTimeUnit(TimeUnit.MILLISECONDS) // 输出的单位是毫秒
@State(value = Scope.Benchmark) // 代码测试作用域
public class TestLockPerformance {
    static int x = 1000;

    @Benchmark
    public void test1() throws Exception {
        for (int i = 0; i < x; i++) {
            System.out.println("test1 running... " + i);
        }
    }

    @Benchmark
    public void test2() throws Exception {
        Object o = new Object();
        for (int i = 0; i < x; i++) {
            synchronized (o) {
                System.out.println("test2 running... " + i);
            }
        }
    }

    public static void main(String[] args) throws RunnerException {
        Options opt = new OptionsBuilder()
                .include(TestLockPerformance.class.getSimpleName())
                .result("result.json")
                .resultFormat(ResultFormatType.JSON).build();
        new Runner(opt).run();
    }
}
不禁用JIT无锁和偏向锁耗时测试报告
第一次程序启动6论测试 无锁和偏向锁耗时相差不大


第二次程序启动6论测试 无锁和偏向锁耗时差距不大

禁用JIT无锁和偏向锁耗时测试报告
jvm参数指令手册jdk8
3.5 volatile
3.5.1原子性
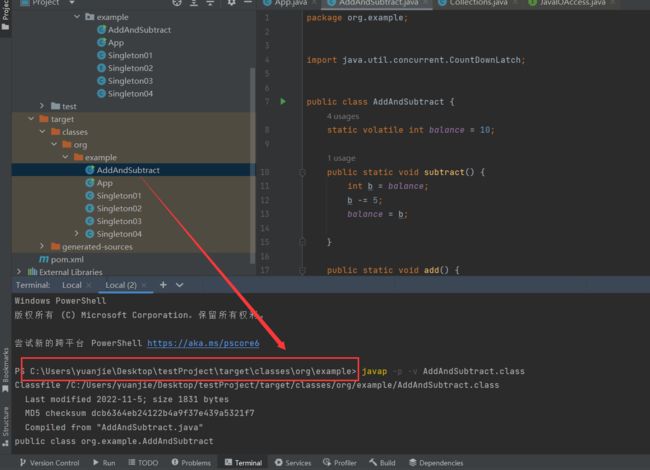
编译阶段赋值语句会被拆分成多条。当a线程刚获取静态值,被b线程打断。那么b线程获取的也是原始数据,且b线程执行完,不影响a线程获取的静态值。那么a线程继续执行还是利用a已经获取的值,无法感知b修改的值。造成数据错乱。volatile 并不能解决原子性
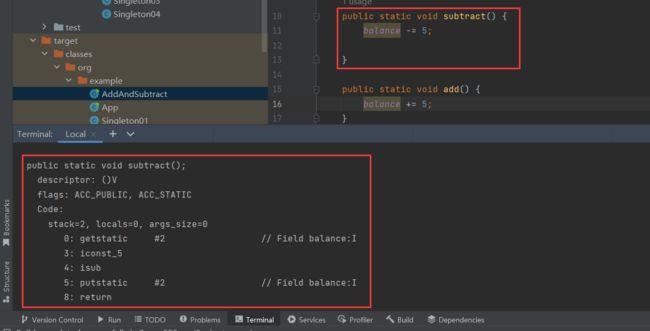
要么指令是原子的,要么多条指令作为一个整体,不能被其他线程指令插队。可以使用lock或synchronized锁,cas等
public class AddAndSubtract {
    static volatile int balance = 10;

    public static void subtract() {
    	// balance -= 5;
        int b = balance;
        b -= 5;
        balance = b;

    }

    public static void add() {
    	// balance += 5;
        int b = balance;
        b += 5;
        balance = b;
    }

    public static void main(String[] args) throws InterruptedException {
        final CountDownLatch latch = new CountDownLatch(2);
        new Thread(() -> {
            subtract();
            latch.countDown();
        }).start();


        new Thread(() -> {
            add();
            latch.countDown();
        }).start();

        latch.await();
    }
}
3.5.2 可见性
- 起因:由于编译器优化、或缓存优化、或 CPU 指令重排序优化导致的对共享变量所做的修改,另外的线程看不到
- 解决:用 volatile 修饰共享变量,能够防止编译器等优化发生,让一个线程对共享变量的修改对另一个线程可见
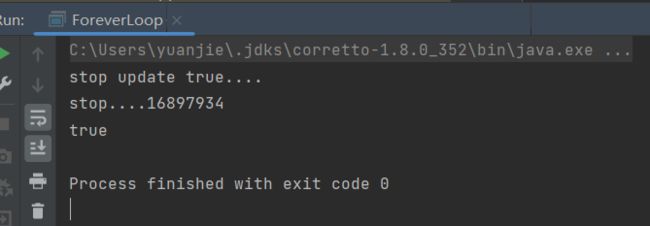
public class ForeverLoop {
    static boolean stop = false;

    public static void main(String[] args) {
        new Thread(() -> {
            try {
                Thread.sleep(100);
            } catch (InterruptedException e) {
                throw new RuntimeException(e);
            }
            stop = true;
            System.out.println("stop update true....");
        }).start();

        // 测试其他线程是否能读到
        new Thread(() -> {
            try {
                Thread.sleep(200);
            } catch (InterruptedException e) {
                throw new RuntimeException(e);
            }
            System.out.println(stop);
        }).start();

        foo();
    }
    static void foo(){
        int i=0;
        while (!stop){
            i++;
        }
        System.out.println("stop...."+ i);
    }
}
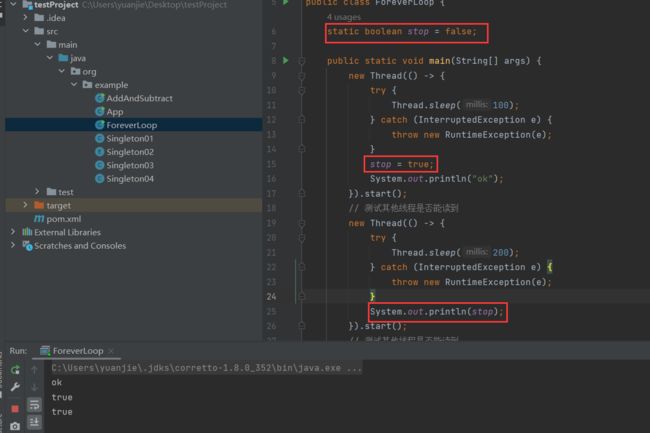
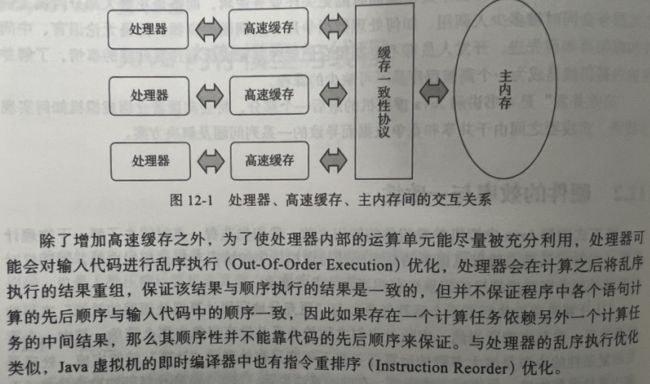
为什么会出现这种情况,程序不终止呢?网上大部分传言是主内存模型与工作模型,工作内存中修改的变量并未同步到主内存而相关解释通过上述实践表明不正确。而我们用多个线程(避免是同一个cpu线程)同步打印,获取了主内存中的stop变量。可以发现工作内存修改的值已经同步到主内存了。这一错误可能是根据周志明前辈书中如下内容引起的

但是请注意
在jvm虚拟机中,HotSpot引入了jit解释器。jit在优化代码时候
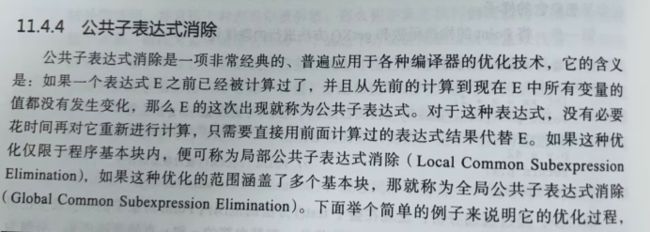

解释器JIT对热点代码的优化。发现cpu频繁调用物理内存。那么JIT会大胆预测调了上万次是false,他就把你频繁替换的物理内存替换为false,不让你再频繁调内存了。
也可以降低修改线程时间,让jit认为该循环非热点代码。
根本解决方案还是volatile,被volatile修饰不做优化,这个指令会强制cpu去主存读数据
关于如何优化的可以进一步看周志明第三版《深入理解java虚拟机的内容》和这位博主的博客
深入理解java虚拟机(十三) Java 即时编译器JIT机制以及编译优化
感谢北京-战斗,大佬说了很多,我断章取义了。详情大佬后续博文
3.5.3有序性
- 起因:由于编译器优化、或缓存优化、或 CPU 指令重排序优化导致指令的实际执行顺序与编写顺序不一致
- 解决:用 volatile 修饰共享变量会在读、写共享变量时加入不同的屏障,阻止其他读写操作越过屏障,从而达到阻止重排序的效果
- 注意:
- volatile 变量写加的屏障是阻止上方其它写操作越过屏障排到 volatile 变量写之下
- volatile 变量读加的屏障是阻止下方其它读操作越过屏障排到 volatile 变量读之上
- volatile 读写加入的屏障只能防止同一线程内的指令重排
3.6 悲观锁和乐观锁
- 悲观锁的代表是 synchronized 和 Lock 锁
- 其核心思想是【线程只有占有了锁,才能去操作共享变量,每次只有一个线程占锁成
功,获取锁失败的线程,都得停下来等待】 - 线程从运行到阻塞、再从阻塞到唤醒,涉及线程上下文切换,如果频繁发生,影响性
能 - 实际上,线程在获取 synchronized 和 Lock 锁时,如果锁已被占用,都会做几次重试
操作,减少阻塞的机会
- 其核心思想是【线程只有占有了锁,才能去操作共享变量,每次只有一个线程占锁成
- 乐观锁的代表是 AtomicInteger,使用 cas 来保证原子性
- 其核心思想是【无需加锁,每次只有一个线程能成功修改共享变量,其它失败的线程
不需要停止,不断重试直至成功】 - 由于线程一直运行,不需要阻塞,因此不涉及线程上下文切换
- 它需要多核 cpu 支持,且线程数不应超过 cpu 核数
- 其核心思想是【无需加锁,每次只有一个线程能成功修改共享变量,其它失败的线程
3.6.1 乐观锁测试用例
public class SyncVsCas {
    static final Unsafe U;

    static {
        try {
            Field theUnsafe = Unsafe.class.getDeclaredField("theUnsafe");
            theUnsafe.setAccessible(true);
            U = (Unsafe) theUnsafe.get(null);
        } catch (NoSuchFieldException | IllegalAccessException e) {
            throw new RuntimeException(e);
        }
    }


    static final long BALANCE;

    static {
        try {
            BALANCE = U.objectFieldOffset(Account.class.getDeclaredField("balance"));
        } catch (NoSuchFieldException e) {
            throw new RuntimeException(e);
        }
    }

    public static void cas(Account account) throws InterruptedException {
        Thread t1 = new Thread(() -> {
            while (true) {
                int o = account.balance;
                int i = o + 5;
                /**
                 * debug修改o观察
                 * 要修改的对象
                 * 修改偏移量
                 * 旧值
                 * 新值
                 */
                // cas保证原子性
                if (U.compareAndSwapInt(account, BALANCE, o, i)) {
                    break;
                }
            }
        }, "t1");

        Thread t2 = new Thread(() -> {
            while (true) {
                int o = account.balance;
                int i = o - 5;
                // cas保证原子性
                if (U.compareAndSwapInt(account, BALANCE, o, i)) {
                    break;
                }
            }
        }, "t2");

        t1.start();
        t2.start();
        t1.join();
        t2.join();
        System.out.println(account.balance);
    }
    static class Account {
        // volatile保证可见性,顺序性
        volatile int balance = 10;
    }


    public static void main(String[] args) throws InterruptedException {
        Account account = new Account();

        cas(account);
    }
}
3.6.2 悲观锁样例
public class SyncVsCas {
    static final Unsafe U;

    static {
        try {
            Field theUnsafe = Unsafe.class.getDeclaredField("theUnsafe");
            theUnsafe.setAccessible(true);
            U = (Unsafe) theUnsafe.get(null);
        } catch (NoSuchFieldException | IllegalAccessException e) {
            throw new RuntimeException(e);
        }
    }


    static final long BALANCE;

    static {
        try {
            BALANCE = U.objectFieldOffset(Account.class.getDeclaredField("balance"));
        } catch (NoSuchFieldException e) {
            throw new RuntimeException(e);
        }
    }

    static class Account {
        // volatile保证可见性,顺序性
        volatile int balance = 10;
    }

    public static void sync(Account account)  throws InterruptedException {
        Thread t1 = new Thread(() -> {
            synchronized (account) {
                int old = account.balance;
                int n = old - 5;
                account.balance = n;
            }
        }, "t1");

        Thread t2 = new Thread(() -> {
            synchronized (account) {
                int old = account.balance;
                int n = old + 5;
                account.balance = n;
            }
        }, "t2");
        t1.start();
        t2.start();
        t1.join();
        t2.join();
        System.out.println(account.balance);
    }

    public static void main(String[] args)  throws InterruptedException {
        Account account = new Account();
        sync(account);
    }
}
3.6.3 CAS如何解决ABA问题
什么是ABA:在CAS过程中,线程1、线程2分别从内存中拿到了当前值为A,同时线程2把当前值A改为B,随后又把B改回来变为A,此后线程1检查到当前值仍为A而导致执行cas成功,但这个过程却发生了ABA问题,现场资源可能和当初不一样了(线程2把当前值由A->B->A)
解决方法:版本号机制,利用版本号标记线程1拿到的‘当前值’的版本,若线程2进行了A->B->A操作,则版本号会改变,那线程1再次拿到的‘当前值’的版本和第一次的肯定是不同的,从而判定cas失败;
java代码中AtomicStampedReference类的cas方法实现了版本号机制,可用它来解决ABA问题
3.7 HashTable和ConcurrentHashMap
- Hashtable 与 ConcurrentHashMap 都是线程安全的 Map 集合
- Hashtable 并发度低,整个 Hashtable 对应一把锁,同一时刻,只能有一个线程操作它
- ConcurrentHashMap 并发度高,整个 ConcurrentHashMap 对应多把锁,只要线程访问的是不同
锁,那么不会冲突
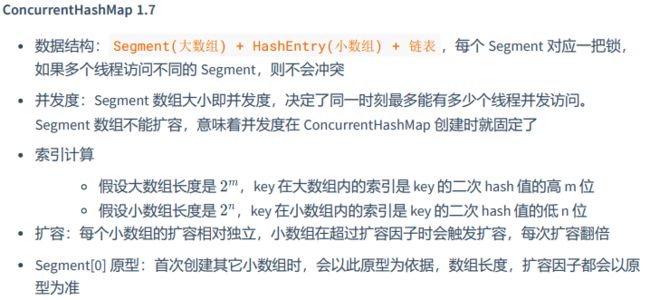
- ConcurrentHashMap 1.8
- 数据结构: Node 数组 + 链表或红黑树 ,数组的每个头节点作为锁,如果多个线程访问的头
节点不同,则不会冲突。首次生成头节点时如果发生竞争,利用 cas 而非 syncronized,进一步
提升性能 - 并发度:Node 数组有多大,并发度就有多大,与 1.7 不同,Node 数组可以扩容
- 扩容条件:Node 数组满 3/4 时就会扩容
- 扩容单位:以链表为单位从后向前迁移链表,迁移完成的将旧数组头节点替换为ForwardingNode
- 扩容时并发 get
- 根据是否为 ForwardingNode 来决定是在新数组查找还是在旧数组查找,不会阻塞
- 如果链表长度超过 1,则需要对节点进行复制(创建新节点),怕的是节点迁移后next 指针改变
- 如果链表最后几个元素扩容后索引不变,则节点无需复制
- 扩容时并发 put
- 如果 put 的线程与扩容线程操作的链表是同一个,put 线程会阻塞
- 如果 put 的线程操作的链表还未迁移完成,即头节点不是 ForwardingNode,则可以
并发执行 - 如果 put 的线程操作的链表已经迁移完成,即头结点是 ForwardingNode,则可以协
助扩容
- 与 1.7 相比是懒惰初始化
- capacity 代表预估的元素个数,capacity / factory 来计算出初始数组大小,需要贴近2的n次幂
- loadFactor 只在计算初始数组大小时被使用,之后扩容固定为 3/4
- 超过树化阈值时的扩容问题,如果容量已经是 64,直接树化,否则在原来容量基础上做 3 轮扩
容
- 数据结构: Node 数组 + 链表或红黑树 ,数组的每个头节点作为锁,如果多个线程访问的头
8版本扩容细节视频详解
3.8 ThreadLocal
3.8.1 作用
- ThreadLocal 可以实现【资源对象】的线程隔离,让每个线程各用各的【资源对象】,避免争
用引发的线程安全问题(局部变量也可以实现数据隔离,但是局部变量生命周期只限于方法内) - ThreadLocal 同时实现了线程内的资源共享
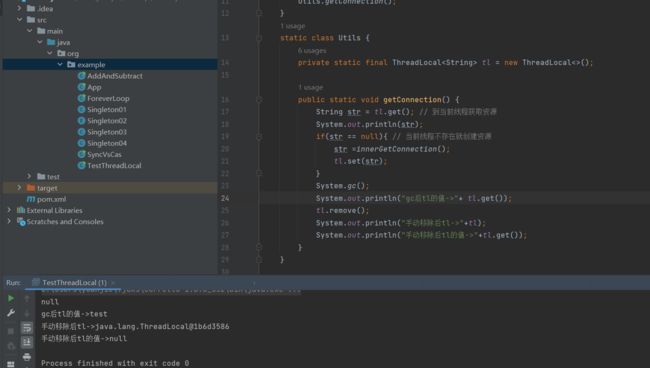
public class TestThreadLocal {


    public static void main(String[] args) {
        Utils.getConnection();
    }
    static class Utils {
        private static final ThreadLocal<String> tl = new ThreadLocal<>();

        public static void getConnection() {
            String str = tl.get(); // 到当前线程获取资源
            System.out.println(str);
            if(str == null){ // 当前线程不存在就创建资源
                str =innerGetConnection();
                tl.set(str);
            }
            System.gc();
            System.out.println("gc后tl的值->"+ tl.get());
            tl.remove();
            System.out.println("手动移除后tl->"+tl);
            System.out.println("手动移除后tl的值->"+tl.get());
        }
    }

    private static String innerGetConnection(){
        return "test";
    }
}
3.8.2 原理
3.8.3 弱引用 key
ThreadLocalMap 中的 key 被设计为弱引用,原因如下
- Thread 可能需要长时间运行(如线程池中的线程),如果 key 不再使用,需要在内存不足
(GC)时释放其占用的内存
内存释放时机:
- 被动 GC 释放 key
不可行,threadLoacl对象一般为静态变量,强引用。GC无法回收- 仅是让 key 的内存释放,关联 value 的内存并不会释放
- 懒惰被动释放 value
不可行,threadLoacl对象一般为静态变量,强引用。GC无法回收- get key 时,发现是 null key,则释放其 value 内存
- set key 时,会使用启发式扫描,清除临近的 null key 的 value 内存,启发次数与元素
个数,是否发现 null key 有关
- 主动 remove 释放 key,value
可行,必须- 会同时释放 key,value 的内存,也会清除临近的 null key 的 value 内存
- 推荐使用它,因为一般使用 ThreadLocal 时都把它作为静态变量(即强引用),因此
无法被动依靠 GC 回收
ThreadLocalMap使用ThreadLocal的弱引用作为key,如果一个ThreadLocal没有外部关联的强引用,那么在虚拟机进行垃圾回收时,这个ThreadLocal会被回收,这样,ThreadLocalMap中就会出现key为null的Entry,这些key对应的value也就再无妨访问,但是value却存在一条从Current Thread过来的强引用链。因此只有当Current Thread销毁时,value才能得到释放。
3.9 线程安全分析
3.9.1 局部变量线程安全分析
当有多个线程调用同一个方法.在方法栈中,每个线程会复制一份在自己的栈帧中.而局部变量也是栈帧中私有的.互相独立,互不影响.
3.9.2 成员变量线程安全分析
成员变量注意变量共享导致的线程问题
四.小知识
4.1在A线程停止B线程-停止线程
错误方法: 1.调用线程的stop()停止.可能造成B未释放锁.出现死锁
2.调用System.exit(int).会直接停止程序
两阶段终止模式:
/**
 * @ClassName Main
 * @Description TODO
 * @Author YuanJie
 * @Date 2023/1/27 14:01
 */
@Slf4j
public class Main {
    private Thread monitor;

    // 启动监控线程
    public void start(){
        monitor = new Thread(()->{
            while (true){
                Thread currentThread = Thread.currentThread();
                if(currentThread.isInterrupted()){
                    log.info("当前线程被打断结束");
                    break;
                }
                try {
                    // wait,join,sleep被打断
                    Thread.sleep(1000);
                } catch (InterruptedException e) {
                    e.printStackTrace();
                    // 重置打断标记
                    currentThread.interrupt();
                }
            }
        });
        monitor.start();
    }

    public void stop(){
        monitor.interrupt();
    }
}
