学习HM微博项目第9天
步骤:发微博07-表情键盘01-切换键盘 -> 发微博08-表情键盘02-表情工具条 -> 发微博09-表情键盘03-加载表情数据和切换表情按钮 -> 发微博10-表情键盘04-表情分页 -> 发微博11-表情键盘05-显示表情
发微博07-表情键盘01-切换键盘
在HMComposeViewController类的HMComposeToolbarDelegate代理方法composeToolbar:didClickButton:中,完善HMComposeToolbarButtonTypeEmotion里的代码,如下:
其中,switchKeyboard的详细代码如下:
/**
 *  切换键盘
 */
- (void)switchKeyboard
{

//    HMLog(@"switchKeyboard");
    //self.textView.inputView == nil代表系统键盘
    if (self.textView.inputView == nil) {//切换表情键盘
        HMEmotionKeyboard *emtionKeyboard = [[HMEmotionKeyboard alloc] init];
        //设置尺寸(不设置不会显示)
        emtionKeyboard.width = self.view.width;
        emtionKeyboard.height = 216;
        self.textView.inputView = emtionKeyboard;

    }else{//切换系统键盘
        self.textView.inputView = nil;
    }

    //开始切换键盘
    self.switchingKeyboard = YES;

    //退出键盘
    [self.textView endEditing:YES];
//    [self.view endEditing:YES];
//    [self.view.window endEditing:YES];
//    [self.textView resignFirstResponder];


    //延迟0.1s
    dispatch_after(dispatch_time(DISPATCH_TIME_NOW, (int64_t)(0.1 * NSEC_PER_SEC)), dispatch_get_main_queue(), ^{

        //弹出键盘
        [self.textView becomeFirstResponder];

        //结束切换键盘
        self.switchingKeyboard = NO;

    });

}
注意点:swichingKeyboard是记录是否正在切换键盘的布尔值,用来控制composeToolBar的位置。(详细的逻辑看源码)
APP的演示动画:
发微博08-表情键盘02-表情工具条
前文已经完成了切换键盘按钮的点击事件,现在要完善表情键盘的表情工具条。
进一步完善前文的switchKeyboard方法,代码如下:
/**
 *  切换键盘
 */
- (void)switchKeyboard
{
    //self.textView.inputView == nil 表示在使用系统键盘
    if (self.textView.inputView == nil) {//切换表情键盘
        self.textView.inputView = self.emotionKeyboard;

        //显示键盘按钮
        self.toolbar.showKeyboardButton = YES;

    }else{//切换系统键盘
        self.textView.inputView = nil;
        self.toolbar.showKeyboardButton = NO;
    }

    //开始切换键盘
    self.switchingKeyboard = YES;

    //退出键盘
    [self.textView endEditing:YES];

    //延迟0.1s
    dispatch_after(dispatch_time(DISPATCH_TIME_NOW, (int64_t)(0.1 * NSEC_PER_SEC)), dispatch_get_main_queue(), ^{

        //弹出键盘
        [self.textView becomeFirstResponder];

        //结束切换键盘
        self.switchingKeyboard = NO;
    });

}
说明:
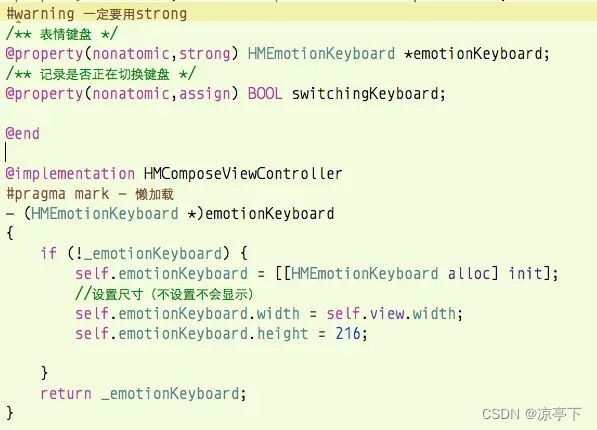
把HMEmotionKeyboard改成懒加载并且要用strong声明变量。如下:
在HMEmotionKeyboard类初始化表情键盘的子控件(HMEmotionListView和HMEmotionTabBar),并且设置frame。
详细代码如下:
#import "HMEmotionKeyboard.h"
#import "HMEmotionTabBar.h"
#import "HMEmotionListView.h"

@interface HMEmotionKeyboard ()

@property(nonatomic,weak) HMEmotionListView *emotionView;
@property(nonatomic,weak) HMEmotionTabBar *tabBar;

@end

@implementation HMEmotionKeyboard

- (id)initWithFrame:(CGRect)frame
{
    self = [super initWithFrame:frame];
    if (self) {

        //初始化子控件

        //1.表情
        HMEmotionListView *emotionView = [[HMEmotionListView alloc] init];
        emotionView.backgroundColor = HMRandomColor;
        [self addSubview:emotionView];
        self.emotionView = emotionView;

        //2.tabBar
        HMEmotionTabBar *tabBar = [[HMEmotionTabBar alloc] init];
        //设置代理
        tabBar.delegate = self;
        [self addSubview:tabBar];
        self.tabBar = tabBar;

    }
    return self;
}

- (void)layoutSubviews
{
    [super layoutSubviews];

    //设置子控件的frame(先确定的tabBar)

    //1.tabBar
    self.tabBar.height = 37;
    self.tabBar.width = self.width;
    self.tabBar.x = 0;
    self.tabBar.y = self.height - self.tabBar.height;

    //2.表情
    self.emotionView.x = self.emotionView.y = 0;
    self.emotionView.width = self.width;
    self.emotionView.height = self.tabBar.y;
}

#pragma mark - HMEmotionTabBarDeleage
- (void)emotionTabBar:(HMEmotionTabBar *)tarBar didTabBarType:(HMEmotionTabBarButtonType)btnType
{
    switch (btnType) {
        case HMEmotionTabBarButtonTypeRecent: // 最近
            HMLog(@"最近");
            break;

        case HMEmotionTabBarButtonTypeDefault: // 默认
            HMLog(@"默认");
            break;

        case HMEmotionTabBarButtonTypeEmoji: // Emoji
            HMLog(@"Emoji");
            break;

        case HMEmotionTabBarButtonTypeLxh: // Lxh
            HMLog(@"Lxh");
            break;
    }
}

@end
其中,HMEmotionTabBar是表情工具条,用来存放切换各种表情内容的按钮。HMEmotionTabBarDeleage是HMEmotionTabBar所声明的代理协议,用来通知代理(HMEmotionKeyboard)对象工具条所点击的按钮类型。
APP的演示动画:
发微博09-表情键盘03-加载表情数据和切换表情按钮
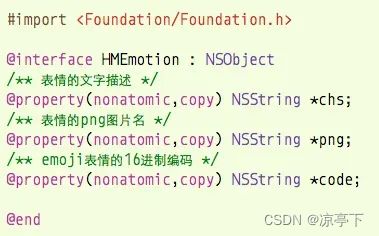
新建模型HMEmotion,存放表情数据。如下:
在HMEmotionKeyboard类,完善MEmotionTabBarDeleage代理协议的
emotionTabBar:didTabBarType:方法,如下:
#pragma mark - HMEmotionTabBarDeleage
- (void)emotionTabBar:(HMEmotionTabBar *)tarBar didTabBarType:(HMEmotionTabBarButtonType)btnType
{
    //移除contenView之前显示的控件
    [self.contentView.subviews makeObjectsPerformSelector:@selector(removeFromSuperview)];

    //根据按钮类型,切换contentView上面的控件
    switch (btnType) {
        case HMEmotionTabBarButtonTypeRecent:{ // 最近
            HMLog(@"最近");
            [self.contentView addSubview:self.recentEmotionView];//要设置frame

            break;
        }
        case HMEmotionTabBarButtonTypeDefault:{ // 默认
            HMLog(@"默认");
            [self.contentView addSubview:self.defaultEmotionView];

            break;
        }
        case HMEmotionTabBarButtonTypeEmoji:{ // Emoji
            HMLog(@"Emoji");
            [self.contentView addSubview:self.emojiEmotionView];

            break;
        }
        case HMEmotionTabBarButtonTypeLxh:{ // Lxh
            HMLog(@"Lxh");
            [self.contentView addSubview:self.lxhEmotionView];

            break;
        }
    }

    //重新计算子控件的frame(setNeedsLayout内部会在恰当的时刻,重新调用layoutSubviews,重新布局子控件)
    [self setNeedsLayout];
    //错误:得在layoutSubviews时就设置frame,要不然defaul按钮在响应了点击事件也会没有frame
//    UIView *chird = [self.contentView.subviews lastObject];
//    chird.frame = self.contentView.bounds;

#warning 有一个bug,表情键盘出现默认按钮没有选中,需要到代理协议修改delegate的setter方法
}
说明:
1.self.recentEmotionView、self.defaultEmotionView等都是懒加载的,如下:
2.需要给self.recentEmotionView、self.defaultEmotionView等设置frame才能显示,要在layoutSubviews方法设置,如下:
通过[self setNeedsLayout]重新计算子控件的frame。
APP的演示动画:
发微博10-表情键盘04-表情分页
完善前文的HMEmotionKeyboard类中的emotionTabBar:didTabBarType:方法,如下:
#pragma mark - HMEmotionTabBarDeleage
- (void)emotionTabBar:(HMEmotionTabBar *)tarBar didTabBarType:(HMEmotionTabBarButtonType)btnType
{
    //移除listView显示的控件
    [self.showingEmotionView removeFromSuperview];

    //根据按钮类型,切换contentView上面的控件
    switch (btnType) {
        case HMEmotionTabBarButtonTypeRecent:{ // 最近
            HMLog(@"最近");
            [self addSubview:self.recentEmotionView];//要设置frame
//            self.showingEmotionView = self.recentEmotionView;

            break;
        }
        case HMEmotionTabBarButtonTypeDefault:{ // 默认
            HMLog(@"默认");
            [self addSubview:self.defaultEmotionView];
//            self.showingEmotionView = self.defaultEmotionView;


            break;
        }
        case HMEmotionTabBarButtonTypeEmoji:{ // Emoji
            HMLog(@"Emoji");
            [self addSubview:self.emojiEmotionView];
//            self.showingEmotionView = self.emojiEmotionView;

            break;
        }
        case HMEmotionTabBarButtonTypeLxh:{ // Lxh
            HMLog(@"Lxh");
            [self addSubview:self.lxhEmotionView];
//            self.showingEmotionView = self.lxhEmotionView;

            break;
        }
    }

    //设置正在显示的listView
    self.showingEmotionView = [self.subviews lastObject];

    //重新计算子控件的frame(setNeedsLayout内部会在恰当的时刻,重新调用layoutSubviews,重新布局子控件)
    [self setNeedsLayout];

}
说明:
1.前文是把self.recentEmotionView、self.defaultEmotionView等放在self.contentView(继承自UIView)上,而现在把它们都放在self.showingEmotionView 上,而self.showingEmotionView 的声明如下:
2.在layoutSubviews方法设置self.recentEmotionView、self.defaultEmotionView等的frame的代码可以删掉,由于它们与self.showingEmotionView都是继承自HMEmotionListView所以不需要额外再设置frame。
在HMEmotionListView类中,初始化子控件(scrollIView和pageControl)和设置子控件的frame,重写emotions的setter方法,设置分页,并实现pageControl的currentPage能随着页码改变,具体代码如下:
#import "HMEmotionListView.h"

#define HMEmotionsPageCount 20

@interface HMEmotionListView ()

@property(nonatomic,weak) UIScrollView *scrollView;
@property(nonatomic,weak) UIPageControl *pageControl;

@end

@implementation HMEmotionListView

- (id)initWithFrame:(CGRect)frame
{
    self = [super initWithFrame:frame];
    if (self) {

        self.backgroundColor = [UIColor whiteColor];

        //1.scrollView
        UIScrollView *scrollView = [[UIScrollView alloc] init];
        scrollView.backgroundColor = [UIColor yellowColor];
        //设置分页
        scrollView.pagingEnabled = YES;
        //取消水平和垂直滚动条的显示
        scrollView.showsVerticalScrollIndicator = NO;
        scrollView.showsHorizontalScrollIndicator = NO;
        scrollView.delegate = self;
        [self addSubview:scrollView];
        self.scrollView = scrollView;

        //2.pageControl
        UIPageControl *pageControl = [[UIPageControl alloc] init];
        //设置圆点的图片(系统属性,不开放,用kvc)
//        UIImage*        _currentPageImage;
//        UIImage*        _pageImage;
        [pageControl setValue:[UIImage imageNamed:@"compose_keyboard_dot_normal"] forKeyPath:@"pageImage"];
        [pageControl setValue:[UIImage imageNamed:@"compose_keyboard_dot_selected"] forKeyPath:@"currentPageImage"];
        [self addSubview:pageControl];
        self.pageControl = pageControl;
    }
    return self;
}

- (void)setEmotions:(NSArray *)emotions
{
    _emotions = emotions;
//    HMLog(@"%d",emotions.count);
    //99 80 40

    NSUInteger count = (emotions.count + HMEmotionsPageCount -1 ) / HMEmotionsPageCount;

    //1.设置页数
     self.pageControl.numberOfPages = count;

    //2.创建用来显示每一页表情的控件
    for (int i = 0; i < count; i ++) {
        UIView *pageView = [[UIView alloc] init]; //设置frame
        pageView.backgroundColor = HMRandomColor;
        [self.scrollView addSubview:pageView];
    }

}

- (void)layoutSubviews
{
    [super layoutSubviews];

    //1.pageControl
    self.pageControl.width = self.width;
    self.pageControl.height = 45;
    self.pageControl.x = 0;
    self.pageControl.y = self.height - self.pageControl.height;

    //2.scrollView
    self.scrollView.width = self.width;
    self.scrollView.height = self.pageControl.y;
    self.scrollView.x = self.scrollView.y = 0;

    //3.设置用来显示每一页表情的控件的frame
    NSUInteger count = self.scrollView.subviews.count;
    for (int i = 0; i< count; i++) {
        UIView *pageView = self.scrollView.subviews[i];
        pageView.width = self.scrollView.width;
        pageView.height = self.scrollView.height;
        pageView.x = i * pageView.width;
        pageView.y = 0;
    }

    //4.设置scrollView的contentSize
    self.scrollView.contentSize = CGSizeMake(count * self.scrollView.width, 0);

}

#pragma mark - UIScrollViewDelegate
- (void)scrollViewDidScroll:(UIScrollView *)scrollView
{
//    HMLog(@"%f",scrollView.contentOffset.x / scrollView.width);
    double pageDouble = scrollView.contentOffset.x / scrollView.width;
    self.pageControl.currentPage = (int)(pageDouble + 0.5);

}

@end
说明:
1.只有设置contenSize,scrollView才能滚动。
2.一般运用scrollView都需要设置这三个属性。
3.这里,通过scrollViewDidScroll:方法监听scrollView的滚动实现pageControll切换页码。
APP的演示动画:
发微博11-表情键盘05-显示表情
前文已经设置好分页,现在需要显示表情。
完善setEmotions:方法,具体代码如下:
- (void)setEmotions:(NSArray *)emotions
{
    _emotions = emotions;
//    HMLog(@"%d",emotions.count);
    //99 80 40

    NSUInteger count = (emotions.count + HMEmotionsPageCount -1 ) / HMEmotionsPageCount;

    //1.设置页数
     self.pageControl.numberOfPages = count;

    //2.创建用来显示每一页表情的控件
    for (int i = 0; i < count; i ++) {
        HMPageEmotionView *pageView = [[HMPageEmotionView alloc] init]; //设置frame
//        pageView.backgroundColor = HMRandomColor;
        //计算这一页的表情图标范围
        NSRange range = NSMakeRange(0, 0);
        range.location = i * HMEmotionsPageCount;
        //剩余的表情图标个数
        //99 i = 4 location 80
        NSInteger left = emotions.count -  range.location;
        if (left >= 20) {//满足一页20个
            range.length = HMEmotionsPageCount;
        }else{
            range.length = left;
        }
        //截取表情图标数组
        pageView.emotions = [emotions subarrayWithRange:range];
        [self.scrollView addSubview:pageView];
    }

}
其中,HMPageEmotionView是scrollView上每一页表情的内容,其具体代码如下:
#import "HMPageEmotionView.h"
#import "HMEmotion.h"

@implementation HMPageEmotionView

- (id)initWithFrame:(CGRect)frame
{
    self = [super initWithFrame:frame];
    if (self) {

    }
    return self;
}

- (void)setEmotions:(NSArray *)emotions
{
    _emotions = emotions;

//    HMLog(@"%lu",emotions.count);
    NSUInteger count = emotions.count;
    //添加按钮
    for (int i = 0; i< count; i++) {
        UIButton *btn = [[UIButton alloc] init];
//        btn.backgroundColor = HMRandomColor;

        HMEmotion *emotion = emotions[i];
        if (emotion.png) {
//            HMLog(@"%@",emotion.png);
            UIImage *imageTest = [UIImage imageNamed:emotion.png];
            if (imageTest) {
                [btn setImage:[UIImage imageNamed:emotion.png] forState:UIControlStateNormal];
            }else{
                HMLog(@"why is my image object nil?");
            }
//            HMLog(@"%@",btn.currentImage);
        }else if (emotion.code){
            //设置emoji
//            HMLog(@"%@",emotion.code);
            [btn setTitle:emotion.code.emoji forState:UIControlStateNormal];
            btn.titleLabel.font = [UIFont systemFontOfSize:32];
//            HMLog(@"%@",btn.currentTitle);
        }
        [self addSubview:btn];
    }

}
//CUICatalog: Invalid asset name supplied: (null)
// 警告原因: 尝试去加载的图片不存在

- (void)layoutSubviews
{
    [super layoutSubviews];

    //设置frame
    NSUInteger count = self.emotions.count;
    //内边距(四周)
    CGFloat padding = 10;
    CGFloat btnW = (self.width - 2 * padding) / HMEmotionMaxCols;
    CGFloat btnH = (self.height -  padding) / HMEmotionMaxRows;
    for (int i = 0; i< count; i++) {
        UIButton *btn = self.subviews[i];
        //宽高
        btn.width = btnW;
        btn.height = btnH;
        //位置
        int col = i % HMEmotionMaxCols;
        btn.x = padding +  btnW * col;
        int cow = i / HMEmotionMaxCols;
        btn.y = padding + btnH *cow;

    }
}


