python,tkinter,在 matplotlib 中交互式地拖动定点
1,需求
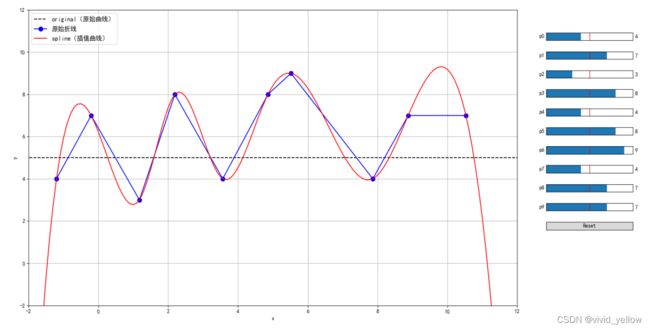
matplotlib中交互式地拖动定点改变整条曲线(一条是当前曲线,一条是计算曲线(根据当前曲线计算而来)(这里是样条插值曲线,还可以是其他函数;类型曲线))
2,参考代码及其改进
2.1,原始版本路径在 matplotlib 交互式图中拖动点
2.2,改进
在网上版本基础上 拖动改变 x和y 坐标(不过需要保持原有顺序,否则序号会打乱,拟合插条曲线计算不出来)
3,代码实现
#!/usr/bin/env python3
# -*- coding:utf-8 -*-

import matplotlib.animation as animation
from matplotlib.widgets import Slider, Button  # matplotlib的控件
import matplotlib as mpl
from matplotlib import pyplot as plt
import scipy.interpolate as inter  # 插值处理
import numpy as np

mpl.rcParams['font.sans-serif'] = ['SimHei']  # 用来正常显示中文标签
plt.rcParams['axes.unicode_minus'] = False  # 坐标轴的负号
# figure.subplot.right
mpl.rcParams['figure.subplot.right'] = 0.8
mpl.rcParams['figure.subplot.bottom'] = 0.1


def update(val):
    """更新曲线"""
    global yvals
    global spline
    # update curve
    for i in np.arange(N):  # 所有滑块更新
        yvals[i] = sliders[i].val  # 点折线

    print(f"X: {X}")
    # print(f"x: {x}")
    # print(f"yvals: {yvals}")
    l.set_xdata(x)
    l.set_ydata(yvals)  # 更新折线数据(原始)

    spline = inter.InterpolatedUnivariateSpline(x, yvals)  # 点的插值曲线
    m.set_xdata(X)
    m.set_ydata(spline(X))  # 更新插值数据(插值拟合后)
    # redraw canvas while idle

    fig.canvas.draw_idle()  # 画图


def reset(event):
    """恢复到初始值和曲线"""
    global yvals
    global spline

    # reset the values
    yvals = func(x)  # 重新生成原始数据:点折线
    for i in np.arange(N):
        sliders[i].reset()  # ---------sliders更新到预设值【应该对应yvals数据位置才对(有关联?)】

    spline = inter.InterpolatedUnivariateSpline(x, yvals)  # 重新生成原始数据:点的插值曲线

    l.set_xdata(x)
    l.set_ydata(yvals)

    m.set_xdata(X)
    m.set_ydata(spline(X))

    # redraw canvas while idle
    fig.canvas.draw_idle()


def button_press_callback(event):
    """whenever a mouse button is pressed"""
    # 在图形区域按下左键,返回当前选中的活动点(必须在10个点的限定像素范围内)

    print(f"event.inaxes: {event.inaxes}")
    print(f"event.button: {event.button}")
    global pind  # 活动点
    if event.inaxes is None:  # 如果没有点进 Axes 区域就是 None (不管哪里的 Axes (0.84,0.8;0.12x0.02))
        return
    if event.button != 1:  # 如果不是按下 【鼠标左键1】【鼠标中键2】【鼠标右键3】
        return

    # 合理的按键,就更新当前活动点
    # print(pind)
    pind = get_ind_under_point(event)


def button_release_callback(event):
    """whenever a mouse button is released"""
    # 释放左键后,当前活动点置为None(如果不是左键那就不动作)
    global pind
    if event.button != 1:
        return
    pind = None


def motion_notify_callback(event):
    """on mouse movement【鼠标移动过程的操作(这里除非是选中活动点,左键,选中图形区域,然后才更新图形数据并重绘图形)】"""
    global x
    global X
    global yvals
    if pind is None:  # 如果没有选中活动点,当然不操作
        return
    if event.inaxes is None:
        return
    if event.button != 1:
        return

    # 【这里只更新了y坐标】更新此点的新的y坐标数据(x坐标不变) update yvals
    # print('motion x: {0}; y: {1}'.format(event.xdata,event.ydata))
    x[pind] = event.xdata
    yvals[pind] = event.ydata

    # 对应滑块也更新一下 update curve via sliders and draw
    sliders[pind].set_val(yvals[pind])

    # 刷图
    fig.canvas.draw_idle()


def get_ind_under_point(event):
    """
        获取活动点序号【这个函数很关键】
        get the index of the vertex under point if within epsilon tolerance
        如果鼠标位置在10个固定点的限定范围内(像素限定),就返回点的序号
    """

    # display coords
    # print('display x is: {0}; display y is: {1}'.format(event.x,event.y))

    tinv = ax1.transData  # 主图 axes
    # t = tinv.inverted()  # 主图 axes
    # xy = t.transform([event.x, event.y])

    # 1 维的数据搞成 2 维的
    # print('data x is: {0}; data y is: {1}'.format(xy[0],xy[1]))
    print(f"np.shape(x): {np.shape(x)}")
    print(f"np.shape(yvals): {np.shape(yvals)}")

    # 1 维的数据搞成 2 维的: [[x0] [x1] ...]
    xr = np.reshape(x, (np.shape(x)[0], 1))
    yr = np.reshape(yvals, (np.shape(yvals)[0], 1))

    # 合并到一起,不是行堆叠,而是列合并,仍然是2维:[[x0, y0] [x1, y1] ...]
    xy_vals = np.append(xr, yr, 1)

    # 应该是转换为 主图 axes 里面的坐标像素位置(一个个的点)
    xyt = tinv.transform(xy_vals)

    # 应该是一个个的像素点拆开为 x, y
    xt, yt = xyt[:, 0], xyt[:, 1]

    # 应该是所有像素点对应当前鼠标位置的距离
    d = np.hypot(xt - event.x, yt - event.y)
    print(f"d: {d}")

    # 找到 距离等于 离当前鼠标位置最近的距离 的 那个d的序号 0-based
    print(f"d == d.min(): {d == d.min()}")  # [ True False False False False False False False False False]
    indseq, = np.nonzero(d == d.min())
    print(f"indseq: {indseq}")
    ind = indseq[0]

    # 超出限定像素范围,就视为没有点中 固定点
    # print(d[ind])
    if d[ind] >= epsilon:
        ind = None

    # print(ind)
    return ind


# func = lambda x: 0.1 * x ** 2  # 插值函数
func = lambda x: (x > -50000) * 5

# get a list of points to fit a spline to as well
N = 10  # 一共多少个点(控件的定位要用到)
xmin = 0
xmax = 10
ymax = 10
x = np.linspace(xmin, xmax, N)  # 生成横坐标

# spline fit
yvals = func(x)  # 生成原始数据:点折线(原始→可以手动拖动固定的各个频点,然后改变曲线)【函数对np的数列进行处理后得到新的数列(离散点)】
spline = inter.InterpolatedUnivariateSpline(x, yvals)  # 生成原始数据:点的插值曲线(原始→可以手动拖动固定的各个频点,然后改变曲线)

# 主图【图形的 axes】 set up a plot
fig, axes = plt.subplots(1, 1, figsize=(9.0, 8.0))  # , sharex=True
ax1 = axes

# ??
pind = None  # active point【当前活动点?】
epsilon = 5  # max pixel distance【最大像素距离(左右?)】

# 比较细的点【对应原始曲线函数】
X = np.arange(-10, xmax + 10, 0.1)
ax1.plot(X, func(X), 'k--', label='original(原始曲线)')

# 绘图(获取线的对象,后续更新其数据就行:set_ydata函数)
l, = ax1.plot(x, yvals, color='b', linestyle='-', marker='o', markersize=8, label='原始折线')
m, = ax1.plot(X, spline(X), 'r-', label='spline(插值曲线)')

# 作图的周边设置:范围,标签,网格,legend 图例
ax1.set_yscale('linear')  # 线性坐标 linear, 对数坐标 log
ax1.set_xlim(-2, xmax + 2)
ax1.set_ylim(-2, ymax + 2)
ax1.set_xlabel('x')
ax1.set_ylabel('y')
ax1.grid(True)
ax1.yaxis.grid(True, which='minor', linestyle='--')
ax1.legend(loc=2, prop={'size': 12})

# sliders 控件【各给定一个 axes】
sliders = []
for i in np.arange(N):
    axamp = plt.axes([0.84, 0.8 - (i * 0.05), 0.12, 0.02])
    # Slider
    s = Slider(axamp, 'p{0}'.format(i), 0, 10, valinit=yvals[i])  # valinit=yvals[i]这句很关键(控件跟变量值绑定了,后续reset的时候,会根据值来决定控件位置)
    sliders.append(s)
# sliders 控件绑定事件(更新图形)
for i in np.arange(N):
    # samp.on_changed(update_slider)
    sliders[i].on_changed(update)

# Reset 按钮【给定一个 axes】
axres = plt.axes([0.84, 0.8 - ((N) * 0.05), 0.12, 0.02])
bres = Button(axres, 'Reset')
bres.on_clicked(reset)

# 绑定鼠标按键事件:拖动数据点用的(只是固定了横坐标(只能上下拖动,不能左右拖动))
fig.canvas.mpl_connect('button_press_event', button_press_callback)
fig.canvas.mpl_connect('button_release_event', button_release_callback)
fig.canvas.mpl_connect('motion_notify_event', motion_notify_callback)  # 很在意这个函数,拖动数据点,然后触发改动曲线

plt.show()
