Apache Shiro ⒊ (Subject) 的认证和授权流程详述
Apache Shiro (Subject) 的认证和授权流程
从 上一篇, 我们初步了解到 Shiro 框架中最最核心的过滤器 ShiroFilter 是如何创建的 (ShiroFilterFactoryBean). 接下来两篇, 将会介绍 Shiro 的认证和授权流程…
PART A / Subject
Shiro 的认证和授权离不开 Subject. 在本篇内容正式开始之前, 再稍稍深入一下…
那么, 首先来分析下, ShiroFilter 是在什么时机被 SpringBoot 注册成过滤器的? 既然是 SpringBoot, 自然而然地就可以想到肯定是从各种 starter 入手, 其中 shiro-spring-boot-web-starter 这个 starter 中, ShiroWebFilterConfiguration 类的实现我们来看一下:
@Configuration
@ConditionalOnProperty(name = "shiro.web.enabled", matchIfMissing = true)
public class ShiroWebFilterConfiguration extends AbstractShiroWebFilterConfiguration {

    public static final String REGISTRATION_BEAN_NAME = "filterShiroFilterRegistrationBean";
    public static final String FILTER_NAME = "shiroFilter";

    @Bean
    @ConditionalOnMissingBean
    @Override
    protected ShiroFilterFactoryBean shiroFilterFactoryBean() {
        return super.shiroFilterFactoryBean();
    }

    @Bean(name = REGISTRATION_BEAN_NAME)
    @ConditionalOnMissingBean(name = REGISTRATION_BEAN_NAME)
    protected FilterRegistrationBean<AbstractShiroFilter> filterShiroFilterRegistrationBean() throws Exception {
        FilterRegistrationBean<AbstractShiroFilter> filterRegistrationBean = new FilterRegistrationBean<>();
        filterRegistrationBean.setDispatcherTypes(DispatcherType.REQUEST, DispatcherType.FORWARD, DispatcherType.INCLUDE, DispatcherType.ERROR);
        filterRegistrationBean.setFilter((AbstractShiroFilter) shiroFilterFactoryBean().getObject());
        filterRegistrationBean.setName(FILTER_NAME);
        filterRegistrationBean.setOrder(1);

        return filterRegistrationBean;
    }

    ...
}
↑ Starter 中通过 SpringBoot 提供的 FilterRegistrationBean 的方式注册了一个高优先级, 默认 urlPattern 为 /* 的名为 shiroFilter 的过滤器. 可见, 在 Shiro 中每个 HTTP 请求都会经过这个过滤器 (从上一篇博文中我们知道, ShiroFilterFactoryBean 的 getObject() -> createInstance()): SpringShiroFilter. SpringShiroFilter 继承了 AbstractShiroFilter, AbstractShiroFilter 继承了 OncePerRequestFilter: 这是一个确保了一次请求只会通过一次的过滤器, 也确保了具体的过滤器逻辑应该实现于自身提供的抽象方法 doFilterInternal 之中 (通过将 doFilter 标记为 final 并且提供了一个子类应当实现的抽象方法 doFilterInternal).
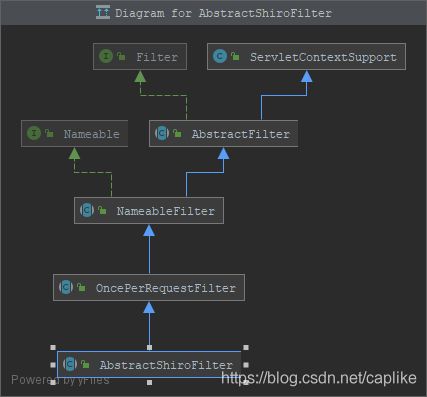
也就是说, 在 Shiro 中, 每个 HTTP 请求都会经过 SpringShiroFilter 的父类 AbstractShiroFilter 中的 doFilterInternal 方法. AbstractShiroFilter 的 doFilterInternal 主要完成了 4 个操作:
- 包装请求对象
- 包装响应对象
- 创建 Subject
- 执行 updateSessionLastAccessTime 以及 excuteChain (通过上一篇文章介绍过的
FilterChainResolver(这个 resolver 在ShiroFilterFactoryBean创建SpringShiroFilter的时候随着 securityManager 置入了 chainResolver) 获取到匹配的FilterChain(实际上是个代理对象:ProxiedFilterChain))
public class ShiroFilterFactoryBean implements FactoryBean, BeanPostProcessor {
    ...
    private static final class SpringShiroFilter extends AbstractShiroFilter {
        protected SpringShiroFilter(WebSecurityManager webSecurityManager, FilterChainResolver resolver) {
            super();
            if (webSecurityManager == null) {
                throw new IllegalArgumentException("WebSecurityManager property cannot be null.");
            }
            setSecurityManager(webSecurityManager);
            if (resolver != null) {
                setFilterChainResolver(resolver);
            }
        }
    }
}
public abstract class AbstractShiroFilter extends OncePerRequestFilter {
    ...
    protected void doFilterInternal(ServletRequest servletRequest, ServletResponse servletResponse, final FilterChain chain) throws ServletException, IOException {
        Throwable t = null;
        try {
            final ServletRequest request = prepareServletRequest(servletRequest, servletResponse, chain);
            final ServletResponse response = prepareServletResponse(request, servletResponse, chain);
            final Subject subject = createSubject(request, response);
            //noinspection unchecked
            subject.execute(new Callable() {
                public Object call() throws Exception {
                    updateSessionLastAccessTime(request, response);
                    executeChain(request, response, chain);
                    return null;
                }
            });
        } catch (ExecutionException ex) {
            t = ex.getCause();
        } catch (Throwable throwable) {
            t = throwable;
        }
        if (t != null) {
            if (t instanceof ServletException) {
                throw (ServletException) t;
            }
            if (t instanceof IOException) {
                throw (IOException) t;
            }
            //otherwise it's not one of the two exceptions expected by the filter method signature - wrap it in one:
            String msg = "Filtered request failed.";
            throw new ServletException(msg, t);
        }
    }
    ...
}
Subject 的创建
↑ 可以看到, 在每一个请求经过时, 就会创建 Subject. 进入 createSubject 方法,
public abstract class AbstractShiroFilter extends OncePerRequestFilter {
    ...
    protected WebSubject createSubject(ServletRequest request, ServletResponse response) {
        return new WebSubject.Builder(getSecurityManager(), request, response).buildWebSubject();
    }
    ...
}
↑ 这里用到了构造器模式, 进入 Builder: 主要用于设置 SecurityManager, ServletRequest 以及 ServletResponse.
public interface WebSubject extends Subject, RequestPairSource {
    ...
    public static class Builder extends Subject.Builder {
        ...
        public Builder(SecurityManager securityManager, ServletRequest request, ServletResponse response) {
            super(securityManager);
            if (request == null) {
                throw new IllegalArgumentException("ServletRequest argument cannot be null.");
            }
            if (response == null) {
                throw new IllegalArgumentException("ServletResponse argument cannot be null.");
            }
            setRequest(request);
            setResponse(response);
        }
    }
}
→ 其中, super(securityManager) 调用父类 Subject.Builder 的构造, 用于构建 subjectContext, 这是一个持有了 “为 SecurityManager 构造 Subject 所需的必要的数据” 的 Subject 上下文.
public interface Subject {
    ...
    public static class Builder {
        ...
        public Builder(SecurityManager securityManager) {
            if (securityManager == null) {
                throw new NullPointerException("SecurityManager method argument cannot be null.");
            }
            this.securityManager = securityManager;
            this.subjectContext = newSubjectContextInstance();
            if (this.subjectContext == null) {
                throw new IllegalStateException("Subject instance returned from 'newSubjectContextInstance' cannot be null.");
            }
            this.subjectContext.setSecurityManager(securityManager);
        }
    }
}
→ 进入 buildWebSubject 的 super.buildSubject 可以看到: 具体的实现是由 SecurityManager 来完成的,
public interface Subject {
    ...
    public static class Builder {
        /**
         * Hold all contextual data via the Builder instance's method invocations to be sent to the
         * {@code SecurityManager} during the {@link #buildSubject} call.
         */
        private final SubjectContext subjectContext;

        /**
         * The SecurityManager to invoke during the {@link #buildSubject} call.
         */
        private final SecurityManager securityManager;

        ...
        public Subject buildSubject() {
            return this.securityManager.createSubject(this.subjectContext);
        }
    }
}
↑ 继续跟进到 DefaultSecurityManager 的 createSubject:
public Subject createSubject(SubjectContext subjectContext) {
    //create a copy so we don't modify the argument's backing map:
    SubjectContext context = copy(subjectContext);
    //ensure that the context has a SecurityManager instance, and if not, add one:
    context = ensureSecurityManager(context);
    //Resolve an associated Session (usually based on a referenced session ID), and place it in the context before
    //sending to the SubjectFactory.  The SubjectFactory should not need to know how to acquire sessions as the
    //process is often environment specific - better to shield the SF from these details:
    context = resolveSession(context);
    //Similarly, the SubjectFactory should not require any concept of RememberMe - translate that here first
    //if possible before handing off to the SubjectFactory:
    context = resolvePrincipals(context);
    Subject subject = doCreateSubject(context);
    //save this subject for future reference if necessary:
    //(this is needed here in case rememberMe principals were resolved and they need to be stored in the
    //session, so we don't constantly rehydrate the rememberMe PrincipalCollection on every operation).
    save(subject);
    return subject;
}

...
protected Subject doCreateSubject(SubjectContext context) {
    return getSubjectFactory().createSubject(context);
}
↑ 最终在 DefaultWebSubjectFactory 的 createSubject 中
public Subject createSubject(SubjectContext context) {
    //Check if the existing subject is NOT a WebSubject. If it isn't, then call super.createSubject instead.
    //Creating a WebSubject from a non-web Subject will cause the ServletRequest and ServletResponse to be null, which wil fail when creating a session.
    boolean isNotBasedOnWebSubject = context.getSubject() != null && !(context.getSubject() instanceof WebSubject);
    if (!(context instanceof WebSubjectContext) || isNotBasedOnWebSubject) {
        return super.createSubject(context);
    }
    WebSubjectContext wsc = (WebSubjectContext) context;
    SecurityManager securityManager = wsc.resolveSecurityManager();
    Session session = wsc.resolveSession();
    boolean sessionEnabled = wsc.isSessionCreationEnabled();
    PrincipalCollection principals = wsc.resolvePrincipals();
    boolean authenticated = wsc.resolveAuthenticated();
    String host = wsc.resolveHost();
    ServletRequest request = wsc.resolveServletRequest();
    ServletResponse response = wsc.resolveServletResponse();
    return new WebDelegatingSubject(principals, authenticated, host, session, sessionEnabled, request, response, securityManager);
}
这就是 Subject 的创建过程, 创建完成后还得绑定, 我们才能使用到.
Subject 的绑定
上一节, 我们分析了 AbstractShiroFilter 的 doFilterInternal 的 createSubject. 在 createSubject 下一行逻辑, 就是完成与请求所属的线程进行绑定的操作. 首先我们看下绑定操作的入口: execute 是执行绑定, 后续操作采用回调机制来实现.
//noinspection unchecked
subject.execute(new Callable() {
    public Object call() throws Exception {
        updateSessionLastAccessTime(request, response);
        executeChain(request, response, chain);
        return null;
    }
});
↓ 初始化一个 SubjectCallable, 并把 回调函数↑ 传进去:
public class DelegatingSubject implements Subject {
    ...
    public <V> V execute(Callable<V> callable) throws ExecutionException {
        Callable<V> associated = associateWith(callable);
        try {
            return associated.call();
        } catch (Throwable t) {
            throw new ExecutionException(t);
        }
    }

    ...
    public <V> Callable<V> associateWith(Callable<V> callable) {
        return new SubjectCallable<V>(this, callable);
    }
}
↓ SubjectCallable: 将 Subject 与一个 Callable 关联起来以确保当 Callable 回调执行的时候正确的 Subject 被绑定到当前线程. 保证当开发者获取 Subject (SecurityUtils.getSubject() 的时候 ← 即使 Callable 执行在一个不同于创建它的线程之上: 因为执行绑定后, 会把绑定前的线程状态信息 (如果有) 恢复 → threadState.restore() )
public class SubjectCallable<V> implements Callable<V> {
    protected final ThreadState threadState;
    private final Callable<V> callable;

    public SubjectCallable(Subject subject, Callable<V> delegate) {
        this(new SubjectThreadState(subject), delegate);
    }

    protected SubjectCallable(ThreadState threadState, Callable<V> delegate) {
        if (threadState == null) {
            throw new IllegalArgumentException("ThreadState argument cannot be null.");
        }
        this.threadState = threadState;
        if (delegate == null) {
            throw new IllegalArgumentException("Callable delegate instance cannot be null.");
        }
        this.callable = delegate;
    }

    public V call() throws Exception {
        try {
            threadState.bind();
            return doCall(this.callable);
        } finally {
            threadState.restore();
        }
    }

    protected V doCall(Callable<V> target) throws Exception {
        return target.call();
    }
}
↓ 具体的绑定和恢复操作 (ThreadContext 维护着一个 ThreadLocal)
public void bind() {
    SecurityManager securityManager = this.securityManager;
    if ( securityManager == null ) {
        //try just in case the constructor didn't find one at the time:
        securityManager = ThreadContext.getSecurityManager();
    }
    this.originalResources = ThreadContext.getResources();
    ThreadContext.remove();
    ThreadContext.bind(this.subject);
    if (securityManager != null) {
        ThreadContext.bind(securityManager);
    }
}

// 尝试恢复之前 ThreadContext 持有的 resources, 实际上就是 ThreadLocal Map, Subject, SecurityManager 都在其中
public void restore() {
    ThreadContext.remove();
    if (!CollectionUtils.isEmpty(this.originalResources)) {
        ThreadContext.setResources(this.originalResources);
    }
}
以上, 就是 Subject 的绑定过程.
[ ! ] Conclusion
我们已经知道, 当一个请求访问接入了 Shiro 的应用程序的时候, 会经过 AbstractShiroFilter 的 doFilterInternal 方法, 其内 createSubject 方法会调用 WebSubject.Builder 的 buildWebSubject:
// 这个 Builder 会调用父类的进而创建一个默认的 SubjectContext:
//     this.subjectContext = newSubjectContextInstance();
return new WebSubject.Builder(getSecurityManager(), request, response).buildWebSubject();
后者通过父类 Subject.Builder 的 buildSubject 最终是用 securityManager (实际上就是 DefaultWebSecurityManager 的父类 DefaultSecurityManager) 的 createSubject 来创建 Subject
// 进而会调用内部 doCreateSubject, 随后通过 SubjectFactory (DefauleWebSubjectFactory) 创建,
return this.securityManager.createSubject(this.subjectContext);
public class DefaultWebSubjectFactory extends DefaultSubjectFactory {
    ...
    public Subject createSubject(SubjectContext context) {
        //SHIRO-646
        //Check if the existing subject is NOT a WebSubject. If it isn't, then call super.createSubject instead.
        //Creating a WebSubject from a non-web Subject will cause the ServletRequest and ServletResponse to be null, which wil fail when creating a session.
        boolean isNotBasedOnWebSubject = context.getSubject() != null && !(context.getSubject() instanceof WebSubject);
        if (!(context instanceof WebSubjectContext) || isNotBasedOnWebSubject) {
            return super.createSubject(context);
        }
        WebSubjectContext wsc = (WebSubjectContext) context;
        SecurityManager securityManager = wsc.resolveSecurityManager();
        Session session = wsc.resolveSession();
        boolean sessionEnabled = wsc.isSessionCreationEnabled();
        PrincipalCollection principals = wsc.resolvePrincipals();
        // ~ 判断是否已经认证
        boolean authenticated = wsc.resolveAuthenticated();
        String host = wsc.resolveHost();
        ServletRequest request = wsc.resolveServletRequest();
        ServletResponse response = wsc.resolveServletResponse();
        return new WebDelegatingSubject(principals, authenticated, host, session, sessionEnabled, request, response, securityManager);
    }
    ...
}
↑ 其中会设置当前 Subject 是否已经认证过了的标识 (该逻辑实现于 DefaultSubjectFactory):
public boolean resolveAuthenticated() {
    Boolean authc = getTypedValue(AUTHENTICATED, Boolean.class);
    if (authc == null) {
        //see if there is an AuthenticationInfo object.  If so, the very presence of one indicates a successful
        //authentication attempt:
        AuthenticationInfo info = getAuthenticationInfo();
        authc = info != null;
    }
    if (!authc) {
        //fall back to a session check:
        Session session = resolveSession();
        if (session != null) {
            Boolean sessionAuthc = (Boolean) session.getAttribute(AUTHENTICATED_SESSION_KEY);
            authc = sessionAuthc != null && sessionAuthc;
        }
    }
    return authc;
}
接下来, 是时候开始认证流程的分析了!
PART B / 认证流程
从上一篇文章中我们知道, securityManager 同样负责认证和授权的管理. DefaultWebSecurityManager 的超类 AuthenticatingSecurityManager 赋予其认证的能力:
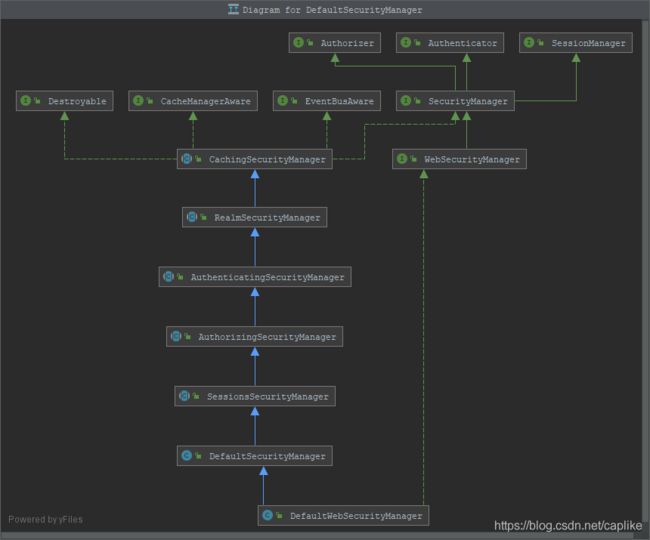
↑ 而 AuthenticatingSecurityManager 是委托 Authenticator (默认的实际类型为: ModularRealmAuthenticator extends AbstractAuthenticator) 来进行认证操作的. 默认支持实现了 AuthenticatingRealm 的 Realm.
-
AuthenticatingSecurityManager实现了Authenticator的 authenticate 方法, 而在方法体内部又调用的是内部持有的 authenticator 的 authenticate 方法. 而这个内部的 authenticator 的默认类型就是ModularRealmAuthenticator, 它的 authenticate 被其父类AbstractAuthenticator实现, 在 authenticate 方法内部又调用了子类 (ModularRealmAuthenticator) 的 doAuthenticate 方法. -
doAuthenticate 方法又根据持有的 Realm 的数量调用本类的 doSingleRealmAuthentication / doMultiRealmAuthentication.
-
如果调用 doSingleRealmAuthentication, 则表示当前仅有一个 Realm, 而如果这个 Realm 不支持当前 AuthenticationToken, 则会抛出异常:
if (!realm.supports(token)) { String msg = "Realm [" + realm + "] does not support authentication token [" + token + "]. Please ensure that the appropriate Realm implementation is configured correctly or that the realm accepts AuthenticationTokens of this type."; throw new UnsupportedTokenException(msg); } -
如果调用 doMultiRealmAuthentication, 则会筛选匹配的 Realm 用于认证:
if (realm.supports(token)) {
    log.trace("Attempting to authenticate token [{}] using realm [{}]", token, realm);
    AuthenticationInfo info = null;
    Throwable t = null;
    try {
        info = realm.getAuthenticationInfo(token);
    } catch (Throwable throwable) {
        t = throwable;
        if (log.isDebugEnabled()) {
            String msg = "Realm [" + realm + "] threw an exception during a multi-realm authentication attempt:";
            log.debug(msg, t);
        }
    }
    aggregate = strategy.afterAttempt(realm, token, info, aggregate, t);
} else {
    log.debug("Realm [{}] does not support token {}.  Skipping realm.", realm, token);
}
-
-
接下来, 会调用 Realm 的 getAuthenticationInfo 方法, 该方法在
AuthenticationRealm有 final 的实现:public final AuthenticationInfo getAuthenticationInfo(AuthenticationToken token) throws AuthenticationException { AuthenticationInfo info = getCachedAuthenticationInfo(token); if (info == null) { //otherwise not cached, perform the lookup: info = doGetAuthenticationInfo(token); log.debug("Looked up AuthenticationInfo [{}] from doGetAuthenticationInfo", info); if (token != null && info != null) { cacheAuthenticationInfoIfPossible(token, info); } } else { log.debug("Using cached authentication info [{}] to perform credentials matching.", info); } if (info != null) { assertCredentialsMatch(token, info); } else { log.debug("No AuthenticationInfo found for submitted AuthenticationToken [{}]. Returning null.", token); } return info; }- getAuthenticationInfo 调用
AuthenticatingRealm的抽象方法 doGetAuthenticatingInfo, ← 这就是开发者需要实现的抽象方法了: 通过参数AuthenticationToken从数据源 (数据库/Redis 等) 获取认证信息.
- getAuthenticationInfo 调用
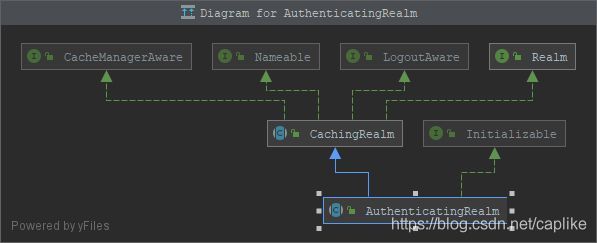
↓ AuthenticatingRealm 是 Realm 接口的顶层抽象实现, 它仅仅实现了认证 (log-in) 相关的操作, 而把授权 (访问控制) 相关的逻辑留给子类去实现.
[ ! ] 那, 什么时候会触发 AuthenticatingSecurityManager 的 authenticate 方法呢:
-
AuthenticationSecurityManager的 authenticate 的首次显示被调用是在DefaultWebSecurityManager的父类DefaultSecurityManager的实现了接口SecurityManager的名为 login 的方法中:public Subject login(Subject subject, AuthenticationToken token) throws AuthenticationException { AuthenticationInfo info; try { info = authenticate(token); } catch (AuthenticationException ae) { try { onFailedLogin(token, ae, subject); } catch (Exception e) { if (log.isInfoEnabled()) { log.info("onFailedLogin method threw an " + "exception. Logging and propagating original AuthenticationException.", e); } } throw ae; //propagate } Subject loggedIn = createSubject(token, info, subject); onSuccessfulLogin(token, info, loggedIn); return loggedIn; } -
而
DelegatingSubject的 login 方法 (实现于Subject接口) 会调用DefaultSecurityManager的 login: 由此我们可知, Subject (void login(AuthenticationToken token)) 的登陆实际上也是委托 SecurityManager (Subject login(Subject subject, AuthenticationToken authenticationToken)) 来完成的 (并且,DelegatingSubject内的其他 Access Control 相关的方法都是委托 securityManager 来完成的):public void login(AuthenticationToken token) throws Authenticatio clearRunAsIdentitiesInternal(); Subject subject = securityManager.login(this, token); PrincipalCollection principals; String host = null; if (subject instanceof DelegatingSubject) { DelegatingSubject delegating = (DelegatingSubject) subjec //we have to do this in case there are assumed identities principals = delegating.principals; host = delegating.host; } else { principals = subject.getPrincipals(); } if (principals == null || principals.isEmpty()) { ... } this.principals = principals; this.authenticated = true; if (token instanceof HostAuthenticationToken) { host = ((HostAuthenticationToken) token).getHost(); } if (host != null) { this.host = host; } Session session = subject.getSession(false); if (session != null) { this.session = decorate(session); } else { this.session = null; } } -
最终. 这个 (
DelegatingSubject) login 被AuthenticatingFilter的 executeLogin 执行:protected boolean executeLogin(ServletRequest request, ServletResponse response) throws Exception { AuthenticationToken token = createToken(request, response); if (token == null) { String msg = "createToken method implementation returned null. A valid non-null AuthenticationToken must be created in order to execute a login attempt."; throw new IllegalStateException(msg); } try { Subject subject = getSubject(request, response); subject.login(token); return onLoginSuccess(token, subject, request, response); } catch (AuthenticationException e) { return onLoginFailure(token, e, request, response); } }
这是一个供实现类自行显示调用的 “简单” 方法, 之所以说它简单, 是因为其参数列表是 Filter 必然能够提供的 ServletRequest 和 ServletResponse.
↓ 接下来我们就来简单浏览一下 AuthenticatingFilter, 彻底搞清楚认证流程的入口在哪里.
AuthenticatingFilter 与 AccessControlFilter
这是一个具有根据请求执行登陆操作能力的 Filter. 它实现了 AccessControlFilter , 它的实现类有 FormAuthenticationFilter, BearerHttpAuthenticationFilter, BasicHttpAuthenticationFilter 等 (它们都是上一篇所介绍到的默认预设的默认过滤器 (DefaultFilter)).
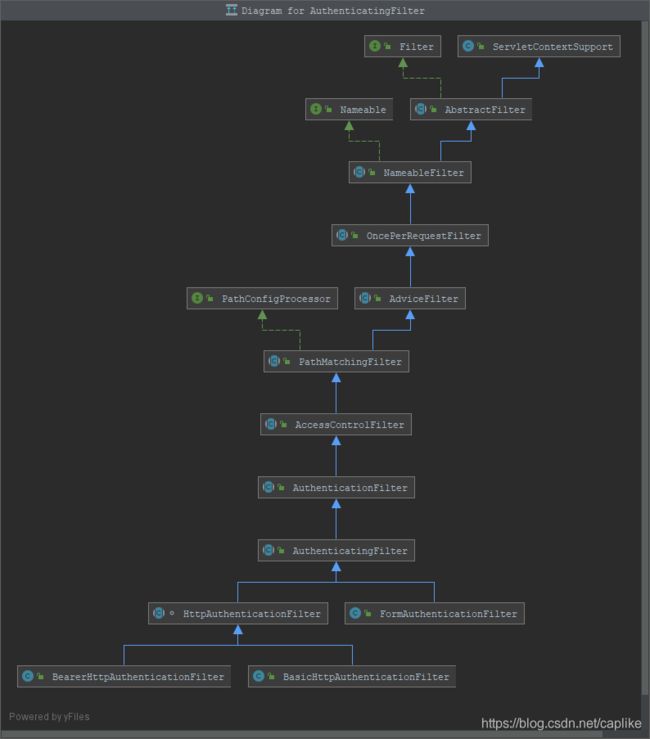
AuthenticatingFilter 的 executeLogin 无论是在 FormAuthenticationFilter, 还是 HttpAuthenticationFilter, AuthenticationFilter 的调用时机都是在它们实现的超类 AccessControlFilter 的 onAccessDenied 方法之中 ↓
-
以
HttpAuthenticationFilter为例, 在它实现的AccessControlFilter的 onAccessDenied 方法中, 判断了如果当前是登陆请求, 就调用 executeLogin 执行登陆.protected boolean onAccessDenied(ServletRequest request, ServletResponse response) throws Exception { boolean loggedIn = false; //false by default or we wouldn't be in this method if (isLoginAttempt(request, response)) { loggedIn = executeLogin(request, response); } if (!loggedIn) { sendChallenge(request, response); } return loggedIn; }executeLogin 默认实现于其父类
AuthenticatingFilter之中,protected boolean executeLogin(ServletRequest request, ServletResponse response) throws Exception { AuthenticationToken token = createToken(request, response); if (token == null) { String msg = "createToken method implementation returned null. A valid non-null AuthenticationToken must be created in order to execute a login attempt."; throw new IllegalStateException(msg); } try { Subject subject = getSubject(request, response); subject.login(token); // 预留了实现类可以实现的, 登陆成功的 "收尾" 工作 return onLoginSuccess(token, subject, request, response); } catch (AuthenticationException e) { // 预留了实现类可以实现的, 登陆失败的 "收尾" 工作 return onLoginFailure(token, e, request, response); } } -
AccessControlFilter这是一个提供给那些负责控制对目标资源的访问的过滤器可以实现的超类. 它提供了一些访问控制的默认行为:- 持有可配置的属性 loginUrl, 在 isLoginRequest 方法中会依据这个地址判断当前请求是否是一个登陆的请求.
- 而当访问被拒的时候, 开发者可以实现抽象方法 onAccessDenied, 将访问被拒绝的时候的逻辑实现其中.
-
AccessControlFilter的父类AdviceFilter正如其名 Advice, 为过滤器提供了 “环绕通知” 的功能 (抽象方法 preHandle, postHandle, afterCompletion 以及实现了逻辑的 cleanup), 实现也很简单, 就是硬编码在 doFilterInternal 中的:public void doFilterInternal(ServletRequest request, ServletResponse response, FilterChain chain) throws ServletException, IOException { Exception exception = null; try { boolean continueChain = preHandle(request, response); if (log.isTraceEnabled()) { log.trace("Invoked preHandle method. Continuing chain?: [" + continueChain + "]"); } if (continueChain) { executeChain(request, response, chain); } postHandle(request, response); if (log.isTraceEnabled()) { log.trace("Successfully invoked postHandle method"); } } catch (Exception e) { exception = e; } finally { cleanup(request, response, exception); } }-
其中 cleanup 在
AuthenticatingFilter被重写了, 追加了对子类实现的 onAccessDenied 方法的调用, 而在其子类HttpAuthenticationFilter中, 这个实现就是追加执行之前提到的 executeLogin (进而调用 subject#login, 同时创建 authenticationToken → securityManager#login → authenticatingSecurityManager#authenticate → abstractAuthenticator#authenticate → (支持 (在 realm 中定义的支持的 token 类型) 这个 authenticationToken 的 realm) realm.getAuthenticationInfo). -
另外一次调用发生在
AccessControlFilter的 onPreHandle,public boolean onPreHandle(ServletRequest request, ServletResponse response, Object mappedValue) throws Exception { return isAccessAllowed(request, response, mappedValue) || onAccessDenied(request, response, mappedValue); }onPreHandle 会在
AccessControlFilter的父类PathMatchingFilter的 ifFilterChainContinued 中, 后者被PathMatchingFilter实现的AdviceFilter的 preHandle 中被调用.private boolean isFilterChainContinued(ServletRequest request, ServletResponse response, String path, Object pathConfig) throws Exception { if (isEnabled(request, response, path, pathConfig)) { //isEnabled check added in 1.2 if (log.isTraceEnabled()) { log.trace("Filter '{}' is enabled for the current request under path '{}' with config [{}]. Delegating to subclass implementation for 'onPreHandle' check.", new Object[]{getName(), path, pathConfig}); } //The filter is enabled for this specific request, so delegate to subclass implementations //so they can decide if the request should continue through the chain or not: return onPreHandle(request, response, pathConfig); } if (log.isTraceEnabled()) { log.trace("Filter '{}' is disabled for the current request under path '{}' with config [{}]. The next element in the FilterChain will be called immediately.", new Object[]{getName(), path, pathConfig}); } //This filter is disabled for this specific request, //return 'true' immediately to indicate that the filter will not process the request //and let the request/response to continue through the filter chain: return true; } ... protected boolean preHandle(ServletRequest request, ServletResponse response) throws Exception { if (this.appliedPaths == null || this.appliedPaths.isEmpty()) { if (log.isTraceEnabled()) { log.trace("appliedPaths property is null or empty. This Filter will passthrough immediately."); } return true; } for (String path : this.appliedPaths.keySet()) { // If the path does match, then pass on to the subclass implementation for specific checks //(first match 'wins'): if (pathsMatch(path, request)) { log.trace("Current requestURI matches pattern '{}'. Determining filter chain execution...", path); Object config = this.appliedPaths.get(path); return isFilterChainContinued(request, response, path, config); } } //no path matched, allow the request to go through: return true; }
无论在什么时候被调用, onAccessDenied 于
HttpAuthenticationFilter的实现的最终目的都是执行支持当前 Filter 创建的AuthenticationToken的Realm的 doGetAuthenticationInfo 获取认证信息. 期间在 securityManager 的 login 中, 会用其返回的AuthenticationInfo构建Subject(DelegatingSubject). -
[ ! ] Conclusion
在开发者实现的认证过滤器 (通常继承 AuthenticatingFilter) 中, 借助 AdviceFilter 实现的 “通知” 结构 (doFilterInternal),
-
首先会执行 preHandle:
AuthenticationFilter继承自PathMatchingFilter的实现, 在PathMatchingFilter的 preHandle 中会调用子类的 onPreHandle (用以判断过滤请求是否能继续) → 这个子类,在认证场景下, 就是
AccessControlFilteronPreHandle → 这个方法会执行两个逻辑:isAccessAllowed(request, response, mappedValue) || onAccessDenied(request, response, mappedValue);当前访问是否被允许 isAccessAllowed, 在当前场景下就是
AuthenticationFilter的 isAccessAllowed: 判断当前的请求是否是登陆请求或者当前Subject是否已经认证过 (Ref: PART A).@Override protected boolean isAccessAllowed(ServletRequest request, ServletResponse response, Object mappedValue) { /* * ~ 在父类的 isAccessAllowed 会判断当前 Subject 是否已经通过认证 * super.isAccessAllowed: * Subject subject = getSubject(request, response); * return subject.isAuthenticated() && subject.getPrincipal() != null; */ return super.isAccessAllowed(request, response, mappedValue) || (!isLoginRequest(request, response) && isPermissive(mappedValue)); }还有一个是当访问被拒时的逻辑 onAccessDenied (
HttpAuthenticationFilter), 在认证场景或是说在HttpAuthenticationFilter的实现中, onAccessDenied 用于处理未认证的请求, 具体逻辑会尝试进行一次登录 (成功会把 subject 的 authenticated 置为 true), 否则设置响应返回对应信息.protected boolean onAccessDenied(ServletRequest request, ServletResponse response) throws Exception { boolean loggedIn = false; //false by default or we wouldn't be in this method if (isLoginAttempt(request, response)) { // → AuthenticationFilter#executeLogin → DelegatingSubject#login loggedIn = executeLogin(request, response); } if (!loggedIn) { sendChallenge(request, response); } return loggedIn; } -
另外一个是在
AuthenticationFilter重写的接口AdviceFilter的 cleanup 方法, 用于在 finally 块中做一些收尾工作:@Override protected void cleanup(ServletRequest request, ServletResponse response, Exception existing) throws ServletException, IOException { // ~ 如果抛出 UnauthenticatedException, 再次尝试登陆 if (existing instanceof UnauthenticatedException || (existing instanceof ServletException && existing.getCause() instanceof UnauthenticatedException)) { try { onAccessDenied(request, response); existing = null; } catch (Exception e) { existing = e; } } super.cleanup(request, response, existing); }
-
特别注意: 认证过滤器实际上也被
AbstractShiroFilter持有的FilterChainResolver和FilterChainManager管理 ← 这是上一篇博文的内容 ↓.protected void doFilterInternal(ServletRequest servletRequest, ServletResponse servletResponse, final FilterChain chain) throws ServletException, IOException { Throwable t = null; try { final ServletRequest request = prepareServletRequest(servletRequest, servletResponse, chain); final ServletResponse response = prepareServletResponse(request, servletResponse, chain); final Subject subject = createSubject(request, response); subject.execute(new Callable() { public Object call() throws Exception { updateSessionLastAccessTime(request, response); // ~ 借助 FilterChainResolver 获取对应的 FilterChain executeChain(request, response, chain); return null; } }); ... } ... protected void executeChain(ServletRequest request, ServletResponse response, FilterChain origChain) throws IOException, ServletException { FilterChain chain = getExecutionChain(request, response, origChain); chain.doFilter(request, response); } ... protected FilterChain getExecutionChain(ServletRequest request, ServletResponse response, FilterChain origChain) { FilterChain chain = origChain; FilterChainResolver resolver = getFilterChainResolver(); if (resolver == null) { return origChain; } FilterChain resolved = resolver.getChain(request, response, origChain); ... }
以上就是整个登陆流程. 接下来看授权流程 ↓.
PART C / 授权流程
接下来我们看看 Shiro 的授权逻辑. 早在上一篇博文中, 在我们分析 DefaultWebSecurityManager 在什么时候被使用的时候, 就描述了在 Shiro 中, 存在一个名为 AuthorizationAttributeSourceAdvisor 类. 这个类存在于 shiro-spring-boot-starter 中, 于配置类 ShiroAnnotationProcessorAutoConfiguration 中被注入到 Spring 容器中:
@Configuration
@ConditionalOnProperty(name = "shiro.annotations.enabled", matchIfMissing = true)
public class ShiroAnnotationProcessorAutoConfiguration extends AbstractShiroAnnotationProcessorConfiguration {
    ...
    @Bean
    @ConditionalOnMissingBean
    @Override
    public AuthorizationAttributeSourceAdvisor authorizationAttributeSourceAdvisor(SecurityManager securityManager) {
        return super.authorizationAttributeSourceAdvisor(securityManager);
    }
}
来简单看看这个 “Advisor” ↓.
AuthorizationAttributeSourceAdvisor
这是一个以 “编程式” 方式实现的通知类. 从层级图 (↓) 可以看到, AuthorizationAttributeSourceAdvisor 间接实现了接口 org.springframework.aop.Pointcut 以及 org.springframework.aop.PointcutAdvisor (org.springframework.aop.Advisor):
-
Advisor: 这是一个持有 Advice 和 “过滤器” 的基础通知接口 (其中 Advice 来自 aopalliance, 一个联合开源项目定义的通知顶层标准接口).
- Advice getAdvice(): 返回这个切面的通知 (可以是一个拦截器, 一个前置通知等)
- boolean isPerInstance(): 返回一个布尔, 确定通知是否和某一个特定的实例关联
-
PointcutAdvisor: 继承了 Advisor, 定义了一个和切点 (Pointcut) 有关的 Advisor. 我们知道 Spring 大体上有两种 Advisor: 一个是 PointcutAdvisor, 另外一个是 IntroductionAdvisor (只能应用于类级别的拦截).
- Pointcut getPointcut(): 获取这个通知类的切入点.
-
Pointcut: Spring 的切入点抽象. 一个切入点由
ClassFilter和MethodMatcher组成.
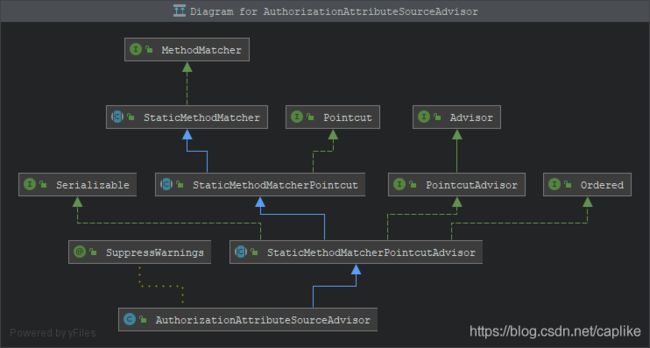
再回到AuthorizationAttributeSourceAdvisor, 在自动配置类将其注入到容器中的同时, 将开发者定义的 securityManager (DefaultWebSecurityManager) 也设置到了 Advisor 中, 在ShiroAnnotationProcessorAutoConfiguration的父类AbstractShiroAnnotationProcessorConfiguration中:
protected AuthorizationAttributeSourceAdvisor authorizationAttributeSourceAdvisor(SecurityManager securityManager) {
    AuthorizationAttributeSourceAdvisor advisor = new AuthorizationAttributeSourceAdvisor();
    advisor.setSecurityManager(securityManager);
    return advisor;
}
而在 AuthorizationAttributeSourceAdvisor 的构造函数中, 将一个名为 AopAllianceAnnotationAuthorizingMethodInterceptor 的实例设置为了 Advice, 从名字可以知道这是一个方法拦截器 (型) 通知.
public AuthorizationAttributeSourceAdvisor() {
    setAdvice(new AopAllianceAnnotationsAuthorizingMethodInterceptor());
}
AopAllianceAnnotationsAuthorizingMethodInterceptor
这是一个基于方法的拦截器, 同时有基于注解鉴权的能力 (查看下面的层级图 ↓).
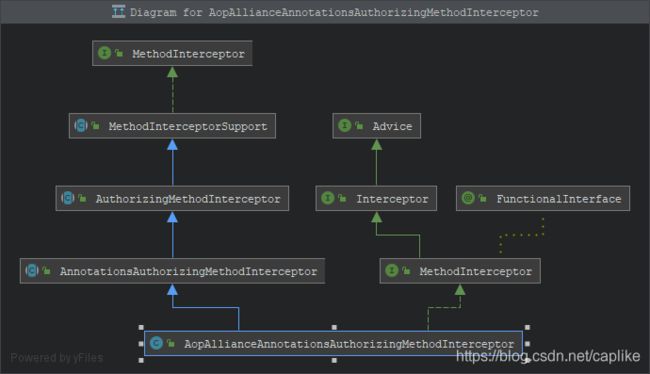
AopAllianceAnnotationsAuthorizingMethodInterceptor 实现了 MethodInterceptor 的 invoke, 同时设置了 5 个方法拦截器, 并传入了一个 SpringAnnotationResolver 的引用 (这是一个 “注解解析器”, 提供了获取指定方法调用上指定注解的能力):
public class AopAllianceAnnotationsAuthorizingMethodInterceptor extends AnnotationsAuthorizingMethodInterceptor implements MethodInterceptor {
    public AopAllianceAnnotationsAuthorizingMethodInterceptor() {
        List<AuthorizingAnnotationMethodInterceptor> interceptors = new ArrayList<AuthorizingAnnotationMethodInterceptor>(5);
        //use a Spring-specific Annotation resolver - Spring's AnnotationUtils is nicer than the
        //raw JDK resolution process.
        AnnotationResolver resolver = new SpringAnnotationResolver();
        //we can re-use the same resolver instance - it does not retain state:
        interceptors.add(new RoleAnnotationMethodInterceptor(resolver));
        interceptors.add(new PermissionAnnotationMethodInterceptor(resolver));
        interceptors.add(new AuthenticatedAnnotationMethodInterceptor(resolver));
        interceptors.add(new UserAnnotationMethodInterceptor(resolver));
        interceptors.add(new GuestAnnotationMethodInterceptor(resolver));
        setMethodInterceptors(interceptors);
    }
    ...
    public Object invoke(MethodInvocation methodInvocation) throws Throwable {
        org.apache.shiro.aop.MethodInvocation mi = createMethodInvocation(methodInvocation);
        return super.invoke(mi);
    }
}
从下图可以看到, 这 5 个方法拦截器都继承了抽象类 AuthorizingAnnotationMethodInteceptor (重写了 org.apache.shiro.aop.MethodInterceptor 的 invoke 方法, 在执行),
public abstract class AuthorizingAnnotationMethodInterceptor extends AnnotationMethodInterceptor {
    ...
    public Object invoke(MethodInvocation methodInvocation) throws Throwable {
        // ~ 目标方法标注了指定注解的断言方法
        assertAuthorized(methodInvocation);
        return methodInvocation.proceed();
    }

    public void assertAuthorized(MethodInvocation mi) throws AuthorizationException {
        try {
            ((AuthorizingAnnotationHandler)getHandler()).assertAuthorized(getAnnotation(mi));
        } catch(AuthorizationException ae) {
            // Annotation handler doesn't know why it was called, so add the information here if possible.
            // Don't wrap the exception here since we don't want to mask the specific exception, such as
            // UnauthenticatedException etc.
            if (ae.getCause() == null) ae.initCause(new AuthorizationException("Not authorized to invoke method: " + mi.getMethod()));
            throw ae;
        }
    }
    ...
}
↑ 代码 assertAuthorized 用于在真正调用目标方法之前, 执行访问控制的检查. 可以这么说: AuthorizingAnnotationMethodInteceptor 是一个 AnnotationMethodInteceptor, 同时提供了在方法被允许调用之前, 进行访问控制检查的能力.

↑ 这 5 个方法拦截器的实现是相对 “对称的”:
-
均可以接收一个
AnnotationResovler(SpringAnnotationResovler) 用于获取指定注解对象. -
同时每一个 *[RoleAnnotation|PermissionAnnotation|AuthenticatedAnnotation|UserAnnotation|GuestAnnotation]*MethodInteceptor 也都内部持有了一个 *[RoleAnnotation|PermissionAnnotation|AuthenticatedAnnotation|UserAnnotation|GuestAnnotation]*Handler:

这几个 Handler 都继承了抽象类AuthorizingAnnotationHandler, 这是一个提供了进行鉴权 (访问控制) 操作的注解处理类. 它有一个名为 assertAuthorized 的抽象方法, 供子类 (也就是 *[RoleAnnotation|PermissionAnnotation|AuthenticatedAnnotation|UserAnnotation|GuestAnnotation]*Handler) 实现. 从上面 AuthorizingAnnotationMethodInterceptor 的源码片段可以看到, 这个基于注解的授权方法拦截器本质上, 就是通过调用 RoleAnnotation|PermissionAnnotation|AuthenticatedAnnotation|UserAnnotation|GuestAnnotation]*MethodInteceptor 持有的 *[RoleAnnotation|PermissionAnnotation|AuthenticatedAnnotation|UserAnnotation|GuestAnnotation]*Handler 的 assertAuthorized 方法来鉴权的.
PermissionAnnotationMethodInterceptor
接下来, 我们以 PermissionAnnotationMethodInterceptor 为例, 介绍下 AuthorizingAnnotationMethodInterceptor 的工作方式.
首先, 这是一个基于 “许可” 的方法拦截器, 它 “响应” @RequiresPermissions 注解, 并检查请求的 Subject 是否被允许调用当前方法. 它的内部实现注入了一个名为 PermissionAnnotationHandler 的处理类.
// ~ PermissionAnnotationHandler 的核心方法, 继承自超类 AuthorizingAnnotationHandler
public void assertAuthorized(Annotation a) throws AuthorizationException {
    if (!(a instanceof RequiresPermissions)) return;

    RequiresPermissions rpAnnotation = (RequiresPermissions) a;
    String[] perms = getAnnotationValue(a);
    Subject subject = getSubject();

    if (perms.length == 1) {
        subject.checkPermission(perms[0]);
        return;
    }
    if (Logical.AND.equals(rpAnnotation.logical())) {
        getSubject().checkPermissions(perms);
        return;
    }
    if (Logical.OR.equals(rpAnnotation.logical())) {
        // Avoid processing exceptions unnecessarily - "delay" throwing the exception by calling hasRole first
        boolean hasAtLeastOnePermission = false;
        for (String permission : perms) if (getSubject().isPermitted(permission)) hasAtLeastOnePermission = true;
        // Cause the exception if none of the role match, note that the exception message will be a bit misleading
        if (!hasAtLeastOnePermission) getSubject().checkPermission(perms[0]);
    }
}
以上代码也很好理解, 其余注解以及其处理类也都是类似的处理方式 (通过 Subject 委托 securityManager 最终通过 Authorizer 执行鉴权, 之前的内容已经介绍过这一点), 此处就不再赘述了. (简要过程: PermissionAnnotationHandler#assertAuthorized - DelegatingSubject#checkPermissions - AuthorizingSecurityManager#checkPermissions - ModularRealmAuthorizer#checkPermissions - checkPermission - isPermitted - AuthorizingRealm#isPermitted - isPermitted - getAuthorizationInfo - doGetAuthorizationInfo - WildcardPermission#implies). 其中 Subject 是通过 SecurityUtils.getSubject() 获得.
[ ! ] Conclusion
下面摘录其他 4 个 Handler 的 assertAuthorized:
public void assertAuthorized(Annotation a) throws AuthorizationException {
    if (a instanceof RequiresGuest && getSubject().getPrincipal() != null) {
        throw new UnauthenticatedException("Attempting to perform a guest-only operation.  The current Subject is not a guest (they have been authenticated or remembered from a previous login).  Access denied.");
    }
}
public void assertAuthorized(Annotation a) throws AuthorizationException {
    if (a instanceof RequiresUser && getSubject().getPrincipal() == null) {
        throw new UnauthenticatedException("Attempting to perform a user-only operation.  The current Subject is not a user (they haven't been authenticated or remembered from a previous login).  Access denied.");
    }
}
public void assertAuthorized(Annotation a) throws UnauthenticatedException {
    if (a instanceof RequiresAuthentication && !getSubject().isAuthenticated() ) {
        throw new UnauthenticatedException( "The current Subject is not authenticated.  Access denied." );
    }
}
public void assertAuthorized(Annotation a) throws AuthorizationException {
    if (!(a instanceof RequiresRoles)) return;
    RequiresRoles rrAnnotation = (RequiresRoles) a;
    String[] roles = rrAnnotation.value();
    if (roles.length == 1) {
        getSubject().checkRole(roles[0]);
        return;
    }
    if (Logical.AND.equals(rrAnnotation.logical())) {
        getSubject().checkRoles(Arrays.asList(roles));
        return;
    }
    if (Logical.OR.equals(rrAnnotation.logical())) {
        // Avoid processing exceptions unnecessarily - "delay" throwing the exception by calling hasRole first
        boolean hasAtLeastOneRole = false;
        for (String role : roles) if (getSubject().hasRole(role)) hasAtLeastOneRole = true;
        // Cause the exception if none of the role match, note that the exception message will be a bit misleading
        if (!hasAtLeastOneRole) getSubject().checkRole(roles[0]);
    }
}
然后, 最后的最后, 我们来总结一下 Shiro 的鉴权 (访问控制) 流程:
一开始, 于 shiro-spring-boot-starter 中的自动配置类: org.apache.shiro.spring.boot.autoconfigure.ShiroAnnotationProcessorAutoConfiguration 中, Shiro 将开发者注入到容器中的 Bean: securityManager 作为构造 AuthorizationAttributeSourceAdvisor 的参数.
- org.apache.shiro.spring.security.interceptor.AuthorizationAttributeSourceAdvisor 这是基于方法的切面 (MethodMatcher & Pointcut) 通知器 (PointcutAdvisor).
- 其中, “通知 Advice” 是
AopAllianceAnnotationsAuthorizingMethodInterceptor(构造AuthorizationAttributeSourceAdvisor的时候默认置入); - “切面 Pointcut” (org.springframework.aop.Pointcut):
- classFilter 是
AuthorizationAttributeSourceAdvisor的超类自身: org.springframework.aop.support.StaticMethodMatcherPointcut, 默认是 ClassFilter.True. 意思是匹配所有类. - methodMatcher 也是自身, 其接口方法 matches 实现于 AuthorizationAttributeSourceAdvisor 中, 实现为匹配标注了 RequiresPermissions.class, RequiresRoles.class, RequiresUser.class, RequiresGuest.class, RequiresAuthentication.class 的方法.
- classFilter 是
- 其中, “通知 Advice” 是
↑ 在通知 org.apache.shiro.spring.security.interceptor.AopAllianceAnnotationsAuthorizingMethodInterceptor 中, 针对通知类响应的 5 个注解, 分别配置了对应的 5 个方法拦截器, 每个拦截器都持有了一个用于获取当前调用标注的匹配注解的注解解析器 AnnotationResolver 和匹配注解的鉴权处理类 AuthorizingAnnotationHandler.
- 鉴权处理类根据各个注解稍有不同, 但是核心都是获取当前 Subject, 调用其对应的鉴权方法 (具体参照上一篇文章).
- 鉴权失败会抛出 AuthorizationException.
Conclusion
以上就是本篇的全部内容. 我们介绍了认证和授权的流程. 后续文章也许将着眼于编码级个性化设置…
~ TBC ~
Reference
- Understanding Subjects in Apache Shiro