react全家桶实战(千峰教育)
说明:本笔记为本人基于千锋教育2022版React全家桶教程_react零基础入门到项目实战完整版的学习笔记,知识点不清或不全,可以到视频教程中学习
文章目录
-
-
- 一、安装create-react-app,新建react项目
-
- 1、安装脚手架create-react-app
- 2、新建项目后,官方建议把/src文件内容全部删除,然后自己重新写
- 二、react组件
-
- 1、jsx = js + xml
- 2、类组件/函数组件
- 3、组件的样式-class和style绑定方式
- 4、事件绑定
- 5、ref
- 6、diff算法,
- 7、富文本内容展示
- 8、请求数据axios和fetch
- 9、平滑滚动插件better-scroll
- 10、父子传值props、props-type
- 11、子传父
- 12、非父子通信
- 13、受控组件/非受控组件
- 14、插槽
- 15、react生命周期
- 16、PureComponent
- 18、函数组件和hooks
-
- 1)useEffect和useLayoutEffect区别?
- 2)useEffect和useLayoutEffect
- 3)useCalback
- 4)useMemo(类似vue的computed)、useRef
- 5)useContext
- 6)useReducer
- 7)自定义hooks
- 三、路由react-router-dom(v5)
-
- 1、路由安装和简单使用(一级二级路由、重定向、404)
- 2、嵌套路由
- 3、编程式
- 4、路由拦截/守卫
- 5、路由模式
- 6、withRouter
- 四、反向代理
- 五、cssModule
- 六、flux和redux (了解)
-
- 3、安装redux
- 4、使用
- 5、createStore原理
- 6、reducer扩展
- 7、中间件redux-thunk和redux-promise
- 8、Redux DevTool Extension 浏览器调试插件
- 9、扩展小知识:纯函数
- 七、react-redux
-
- 1、react-redux的安装和使用
- 2、HOC和context在react-redux底层中的应用
- 3、react-redux持久化
- 八、immutable
-
- 1、浅拷贝和深拷贝
- 2、immutable
- 九、redux-saga
- 十、Ant Design组件库(pc端)
- 十一、Ant Design mobile组件库(移动端)
- 十二、Mobx(了解,后面有mobx-react)
-
- 1、Mobx是什么?
- 2、observable和autorun
- 3、严格模式、action、runInAction
- 十三、Mobx-react
- 十四、TS
-
- 1、什么是typescript?
- 2、typescript的基础:基本类型、数组、对象、类+接口
- 3、创建typescript项目
- 4、TS类组件
- 4、TS函数组件
- 5、TS路由
- 6、redux
- 十五、tyled-components
- 十六、DvaJS
- 十七、umi
-
- 1、umi是什么
- 2、umi项目构建
- 3、路由
- 4、Mock和跨域
- 5、dva集成(models)
- 十八、路由react-router-dom(v6)
-
- 1、v6与v5的区别
- 2、创建项目、安装路由
- 3、定义路由
-
- 方式一
- 方式二:useRoutes定义路由表(推荐)
- 4、路由跳转和传参(函数组件)
- 5、withRouter封装(类组件的路由跳转和获取路由传参)
- 6、声明式导航和编程式导航
- 7、路由拦截/路由守卫
- 8、路由懒加载封装
- 十九、react冷门知识
-
- 1、portal 传送门
- 2、react懒加载(lazy和suspense)
- 3、forwardRef
- 4、memo
- 二十、项目实战
-
一、安装create-react-app,新建react项目
1、安装脚手架create-react-app
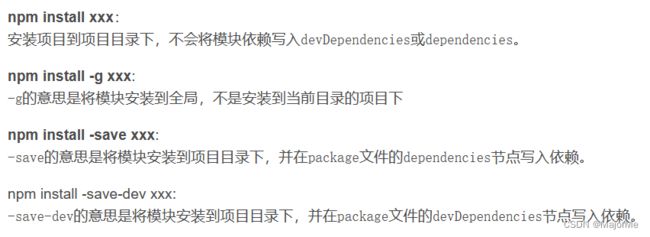
npm install -g create-react-app
或者不想全局安装create-react-app,可以直接使用如下命令,安装暂时的脚手架,则以后每次用的话就会使用最新版的create-react-app脚手架
npx create-react-app project-name
project-name为自定义项目名字,注意小写
扩展知识nrm管理镜像,在视频后半部分
2、新建项目后,官方建议把/src文件内容全部删除,然后自己重新写
新建index.js,这个整个项目的入口文件
二、react组件
1、jsx = js + xml
2、类组件/函数组件
函数组件没有状态,但是react 16.8加了hook,可以仿生命周期
jsx:内部js逻辑用一对花括号{}
类组件
import React from 'react';
class MyClass extends React.Component {
    constructor(props) {
        super(props)
        this.state = {
          name: 'myReact'
        }
    }
    render() {
      return (
       // jsx内容
       <div>{this.state.name}</div>
      )
    }
}
export default MyClass
函数组件
function MyClass () {
  return (
    // jsx内容
  );
}
export default MyClass
3、组件的样式-class和style绑定方式
import styles from './style.css' // 导入css模块,webpack支持(脚手架已经帮配置好了)
// 1、jsx内容 style={{}}第一个花括号是用来转义,第二个花括号就是style样式对象
// 2、class选择器,要用className
<div className="styles.xxx" style={{color: red}}>{this.state.name}</div>
4、事件绑定
import React from 'react';
class MyClass extends React.Component {
    constructor(props) {
        super(props)
        this.state = {
        }
    }
    name = 'qmz'
    handleClik = () => {
      console.log('hello', this.a)
    }
    render() {
      return (
       // 方式1 逻辑少的时候推荐
       <button onClick={() => {console.log('hello')} }>click1</button>

       // 方式2 若handleClik为非箭头函数,则需要bind绑定this,否则this.a报错, 不推荐
       // <button onClick={this.handleClik.bind(this) }>click2</button>

       // 方式3 推荐(前提是handleClik为箭头函数)
       <button onClick={this.handleClik }>click2</button>

       // 方式4 比较推荐 this指向问题
       <button onClick={() => this.handleClik() }>click2</button>
      )
    }
}
export default MyClass
注意:react事件不会绑定在具体的某个标签中<>,而是采用事件代理模式
5、ref
绑定表单或者html标签元素,则拿到真实dom
绑定组件标签,则拿到组件对象
import React from 'react';
class MyClass extends React.Component {
    handleClik = () => {
      console.log('this.myRef:',this.myRef)
      console.log('this.myRef.value:', this.myRef.value)
    }
    render() {
      return (
       // 使用ref={node => this.xxxRef=node}绑定
       <input ref={node => this.xxxRef=node} />
       <button onClick={this.handleClik }>click2</button>
      )
    }
}
export default MyClass
6、diff算法,
有状态更新,则新建虚拟dom,然后根据key来比较,标记差异的地方,再更新真实dom
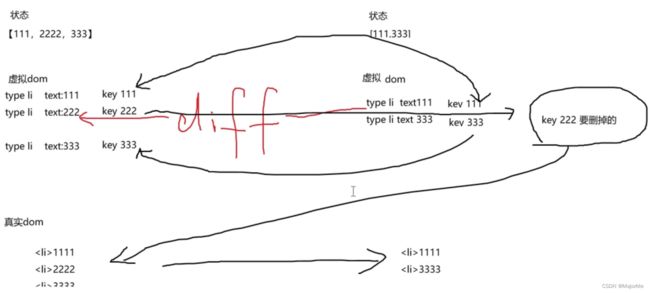 面试:涉及新增和删除,为了列表的复用和重排,设置key唯一标识值(列表理想key应该为item.id),提高性能
7、富文本内容展示
<span dangerouslySetInnerHTML={_html: UEditorText(富文本内容)} />
8、请求数据axios和fetch
(1)安装axios
npm install axios
(2)请求接口
    // axios请求电影院数据(已下请求cores后台允许跨域)
    import axios from 'axios' // 引入axios
    getCinemaList =() => {
        const self = this
        axios({
            // url: "http://localhost:3000/data.json", // 这个路径则取的是public文件夹内的data.json
            url: "https://m.maizuo.com/gateway?cityId=110100&ticketFlag=a&k=7406159",
            headers: {
                'X-Client-Info': '{"a":"3000","cn":"1002","v":"5.0.4","e":"16395416565231270166529","bc":"110100"}',
                'X-Host': "mall.film-ticket.cinema.list"
            }
        }).then(res => {
            console.log('res:', res)
            if(res.status == 200){
                console.log("啦啦啦:", res.data.data)
            }
        }).catch(error => console.log('error:', error))
    }
    this.getCinemaList()
或者fetch(好像react自带)直接用
    // axios请求电影院数据
    getCinemaList =() => {
        const self = this
        fetch("https://m.maizuo.com/gateway?cityId=110100&ticketFlag=a&k=7406159", { // 默认get请求
            headers: {
                'X-Client-Info': '{"a":"3000","cn":"1002","v":"5.0.4","e":"16395416565231270166529","bc":"110100"}',
                'X-Host': "mall.film-ticket.cinema.list"
            }
        }).then(res => { // 第一个then不是用户需要的数据,通过json()转换
            console.log('res:', res)
            return res.json();
        }).then(res => {
            console.log('res:', res)
            if(res.status == 0){
                console.log("啦啦啦:", res.data)
                self.setState({
                    cinemaList: res.data?.cinemas,
                    showCinemaList: res.data?.cinemas,
                })
            }
        }).catch(error => console.log('error:', error))
    }
    this.getCinemaList()
9、平滑滚动插件better-scroll
- 安装
npm install better-scroll
- 使用
import BetterScroll from ‘better-scroll’ // 引入better-scroll new
new BetterScroll(“.classxxx”)
import React from 'react';
import BetterScroll from 'better-scroll' // 引入better-scroll

class Cinema extends React.Component {
    constructor(props) {
        super(props)
        this.state = {
            dataList: []
        }
    }
    componentDidMount() {
        this.setState({
            dataList: [12,233,43434,213123,12312,12,3123,123132,213,123,23,4,23,23,12,12,423],
        }, ()=> {
            // 拿到数据,渲染了dom后才能获取要平滑滚动的容器.cinemaWrap
            new BetterScroll(".cinemaWrap")
        })
    }

    render() {
        const { dataList } = this.state
        return (
            <div className='cinemaWrap' style={{height:'200px',width:'200px', overflow:'auto'}}>
                {dataList.length > 0 && dataList.map((item,index) => {
                    return (
                        <div key={index}>{item}</div>
                    )
                })}
            </div>
        )
    }
}
10、父子传值props、props-type
// 父组件
import React from 'react';
import Child from './Child.js';

export default class Father extends React.Component {
    constructor(props) {
        super(props)
        this.state = {
            flag: true,
            age: 3,
            name: 'qmz',
            list:[1,2]
        }
    }
    render() {
        const { flag, age, name, list } = this.state
        return (
            <div>
              {/* 属性传值  */}
              <Child flag={flag} age={age} name={name} list={list} />
            </div>
        )
    }
}
子组件通过this.props接收父组件传值
// 子组件Child
import React from 'react';
import Types from 'prop-types ';

export default class Child extends React.Component {
    constructor(props) {
        super(props)
    }
    static propTypes = { // 定义props属性类型,校验传值类型
      flag: Types.boolean,
      age: Types.number,
      name: Types.string,
      list: Types.array
    }

    static defaultProps = { // 定义props默认值
      flag: false,
      age: 18,
      name: 'zx',
      list: []
    }

    render() {
        const { flag, age, name } = this.props
        return (
            <div>
            {flag &&
            <>
              <div>age-{age}</div>
              <div>age-{name}</div>
            </>
            </div>
        )
    }
}

// 函数组件就只能这种写法了
/* Child.propTypes = { // 类属性,在类里面用,static定义
 flag: Types.boolean,
 age: Types.number,
 name: Types.string,
 list: Types.array
} */
扩展知识:类属性和对象属性
class Test = {
  static a = 1 // 类属性
  b = 100 // 对象属性
}
console.log(Test.a, Test.b) // 1 undefined
// 对象属性需要创建对象实例才能访问
const TestObj = new Test
 console.log(Test.a, Test.b) // 1 100
11、子传父
// 父组件
import React from 'react';
import Child from './Child.js';

export default class Father extends React.Component {
    constructor(props) {
        super(props)
    }
    childClick = (value) => {
      console.log("耶耶耶")
    }
    render() {
        const { flag, age, name, list } = this.state
        return (
            <div>
              {/* 父给子传一个方法,子组件可以触发父组件方法 */}
              <Child event={this.childClick } />
            </div>
        )
    }
}
子组件通过this.props接收父组件传值
// 子组件Child
import React from 'react';
import Types from 'prop-types ';

export default class Child extends React.Component {
    constructor(props) {
        super(props)
    }

    render() {
        return (
            <div>
              <button onClick={() => this.props.event("成功啦~")}>click</button>
            </div>
        )
    }
}

// 函数组件就只能这种写法了
/* Child.propTypes = { // 类属性,在类里面用,static定义
 flag: Types.boolean,
 age: Types.number,
 name: Types.string,
 list: Types.array
} */
扩展知识:类属性和对象属性
class Test = {
  static a = 1 // 类属性
  b = 100 // 对象属性
}
console.log(Test.a, Test.b) // 1 undefined
// 对象属性需要创建对象实例才能访问
const TestObj = new Test
 console.log(Test.a, Test.b) // 1 100
12、非父子通信
三种方式:状态提升、发布订阅模式/redux、context
1)状态提升
通过父组件作为中间人,适合同亲兄弟组件间通信
- 定义桥梁bus
// bus.js
var bus = {
    list: [],
    // 订阅
    subscribe(callback) {
        this.list.push(callback)
    },
    // 发布
    public(value) {
        this.list.forEach(callback => {
            callback && callback(value)

        })
    }

}
// bus.subscribe((value)=>{
//     console.log('订阅1', value)
// })

// bus.subscribe(()=>{
//     console.log('订阅2')
// })

// bus.public('Miss you')

export default bus
- 模拟订阅的组件
import React from 'react';
import Bus from '../components/bus.js'; // 引入 Bus

export default class ComOne extends React.Component {
    constructor(props) {
        super(props)
        this.state = {
            // valueFromComTwo: 'Master of none'
        }

        Bus.subscribe((value) => {
            console.log(value) // 发布一个小可爱
            // this.setState({valueFromComTwo: value})
        })
    }

    render() {
        return (
            <div>{this.state.valueFromComTwo}</div>
        )
    }
}
- 模拟发布的组件
import React from 'react';
import Bus from '../components/bus.js'; // 引入 Bus

export default class ComTWO extends React.Component {
    render() {
        return (
            <div>
                <button onClick={() => {Bus.public('发布一个小可爱')}}>add</button>
            </div>
        )
    }
}
3)context方案(这种方式基本不用)
import React from 'react';

const GlobalContext =  React.createContext() // 创建上下文

// 父组件(供应商)
export default class father extends React.Component {
    constructor(props) {
        super(props)
        this.state = {
            count: 0
        }
    }

    // “消费者2”可以调用这个方法,count++,然后在“消费者1”中展示
    testEvent = () => {
        this.setState({count: this.state.count+1})
    }

    render() {
        return (
            // 供应商用<GlobalContext.Provider>包裹消费者,通过valu属性/方法传给消费者
            <GlobalContext.Provider value={{
                count: this.state.count,
                testEvent:() => this.testEvent()
            }}>
                <div>
                    <ComOne />
                    <ComTWO />
                </div>
            </GlobalContext.Provider>
        )
    }
}

// 消费者1
class ComOne extends React.Component {
    constructor(props) {
        super(props)
    }

    render() {
        return (
            <GlobalContext.Consumer>
                {
                    value => (
                        <div style={{width:'100px',height:'100px',border:'1px solid green'}}>
                            <div>我是消费者1</div>
                            <div>count-{value.count}</div>
                        </div>
                    )
                }
            </GlobalContext.Consumer>
        )
    }
}


// 消费者2
class ComTWO extends React.Component {
    render() {
        return (
            <GlobalContext.Consumer>
                {
                    value => (
                        <div style={{width:'100px',height:'100px',border:'1px solid red'}}>
                            <div>我是消费者2</div>
                            <button onClick={()=> value?.testEvent()}>click</button>
                        </div>
                    )
                }
            </GlobalContext.Consumer>
        )
    }
}
13、受控组件/非受控组件
例如表单input的值,与状态没有绑定,取值的时候通过表单或者ref获取值,相反,表单元素与组件状态绑定,则为受控
受控组件最好用无状态组件(函数组件),通过函数传参来控制子组件
但是有表单域的组件,最好还是用非受控组件(类组件,然后父组件用ref操作子组件),不然很麻烦
14、插槽
在父组件中,在子组件的标签内放内容,则子组件里面的模板里面可以用this.props.children获取
插槽:
为了复用
一定程度减少父传子
import React from 'react';

export default class father extends React.Component {
   clickxxx = () => {
     // 可以减少父子组件通信
   }
    render() {
        return (
            <Child>
                <div>111</div>
                <div>222</div>
                <button onClick={() => this.clickxxx}>click</button>
            </Child>
        )
    }
}

class Child extends React.Component {
    render() {
        return (
            <div>
                {
                    this.props.children
                }
            </div>
        )
    }
}
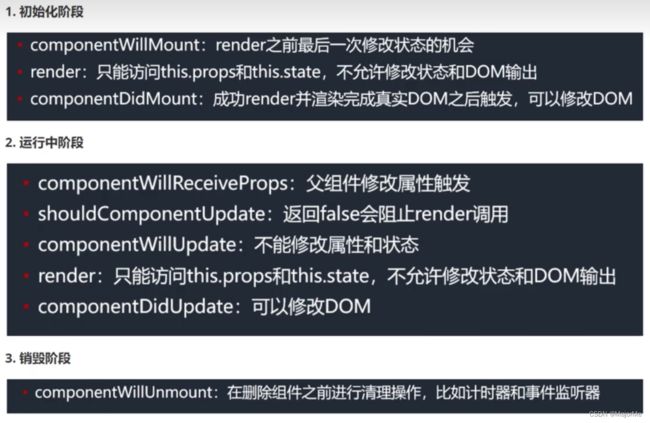
15、react生命周期
(1) 适合在componentDidMount中做的事情:
1)请求数据推荐写在
2)订阅函数调用
3)setInterval
4)基于创建完的dom进行初始化。例如betterScroll(2) react16.2后componentWillMount就废弃了,fiber优化diff算法
(3) componentWillReceiveProps(nextProps),最先获得父组件传来的值,
(4) shouldComponentUpdate(nextProps, nextState), 主要性能优化,控制是否更新组件
(5) componentWillUnmount销毁前,可以做什么?比如要销毁组件用有设置window.resize监听事件,则组件销毁后window监听不会消失,所以要在销毁前手动取消监听(window.resize=null)
新生命周期
- getDerivedStateFromProps(nextProps, nextState)
import React from 'react';

export default class father extends React.Component {
    state = {
        name: 'qmz'
    }
    // 初始化会执行 相当于componentWillMount
    // 更新会执行 相当于componentWillUpdate
    // 应用 props传值频繁更新,可以把props值转为state值(return),避免重复触发渲染 多次异步
    // 注意:不要在getDerivedStateFromProps里写异步
    static getDerivedStateFromProps(nextProps, nextState) {
        // console.log(this) // this为undefined,因为getDerivedStateFromProps是类属性(静态属性),不能读取this
        return { // 规定要返回数据,和state进行合并更新
            name: nextProps.name, // state中有同名的name,则覆盖
            age: 18, // state中没有age属性,则新增到state中
            type: nextState.type,
        }
    }

    // 配合getDerivedStateFromProps使用(属性更新时,在return中返回),可以拿到更新后的最新状态属性
    componentDidUpdate(preProps, preState) {
        // 假设父组件传来type,type在getDerivedStateFromProps中转为state的属性,当type切换/变化时,请求对应数数据,否则返回,避免重复请求数据
        console.log('preState:', preState)
        if(preState.type === this.state.type) {
            return
        } else {
            console.log('异步请求')
        }
    }

    render() {
        return <button onClick={()=> this.setState({type: 2})}>切换Type</button>
    }
}
- getSnapShotBeforeUpdate
在render和componentDidUpdate之间,案例看千峰视频
    getSnapshotBeforeUpdate() {
        const snapShot = 100 // 更新前的快照,可以在componentDidUpdate第三个参数拿到这个快照
        return snapShot
    }

    componentDidUpdate(preProps, preState, snapShot) {
        console.log('snapShot:', snapShot) // 100
    }
16、PureComponent
- react更新性能优化:自动(PureComponent)、手动(shouldComponentUpdate)
- PureComponent会自动对比状态属性(props或者state),没有变化则不更新,不用的话就要手动在shouldComponentUpdate中判断,如果状态属性频繁变化,则用PureComponent则效率不高
18、函数组件和hooks
函数组件没有自身状态,也没有this,需要使用hooks来实现保存state属性,或者模拟周期函数功能
常用hooks:useState、useEffect/useLayoutEffect、useCllback、useMemo、useRef、useReduce
1)useEffect和useLayoutEffect区别?
useLayoutEffect相当于类组件中的componentDidMount和componentDidUpdate一致,在react完成DOM更新后马上同步调用的代码,会阻塞页面渲染,而useEffect是在整个页面渲染完之后才会执行,则相当于组件函数继承pureComponent
官方建议优先使用useEffect,在实际使用时想要避免页面抖动(在useEffect中修改DOM有可能出现),可以把修改DOM的操作放到useLayoutEffect中,这些DOM的修改和react做出的更改会被一起一次性渲染到屏幕,只有一次回流,重绘的代价
2)useEffect和useLayoutEffect
import React, { useState, useEffect, useLayoutEffect } from 'react';

 function Test(props) {
    // const [xxx, setXxx] =  useState('初始值') // xxx为属性名,setXxx为修改属性方法
    const [flag, setFlag] =  useState(false)
    const [list, setList] =  useState(['img1', 'img2', 'img3'])

    const deleteItem = (index) => {
        list.splice(index, 1)
        setList([...list])
        if(list.length === 0) {
            setFlag(true)
        }
    }

    // useEffect根据第二个传参决定执行时机
    useEffect(() => {
        console.log('1、不传参')
    }) // 监听所以状态属性,只要有变化就执行

    useEffect(() => {
        console.log('2、传空数组')
        return () => { // return函数相当于componentWillUnMount
            console.log('组件销毁前')
            // 应用案例: 组件销毁前取消页面window监听事件、或者清除计时器
            // window.resize = null
            // clearInterval(timer)

        }
    }, []) // 只执行一次,相当于类组件的componentDidMount, 但是如果return一个回调函数,则在组件销毁前执行return的回调函数

    useEffect(() => {
        console.log('3、传非空数组')
    }, [props.xxx, list]) // 监听参数(props的或者state的),有变化就执行


    return (
        <div style={{width:'200px',height:'200px', border:'1px solid red'}}>
            <p style={{color:'red'}}>Test组件</p>
            <ul>
            {
                list.map((item, index) => {
                    return (
                        <li key={item}>{item}<button style={{marginLeft:'10px'}} onClick={() => deleteItem(index)}>删除</button></li>
                    )
                })
            }
            </ul>
            {
                flag && <div>暂无数据</div>
            }

        </div>
    )
}

export default Test
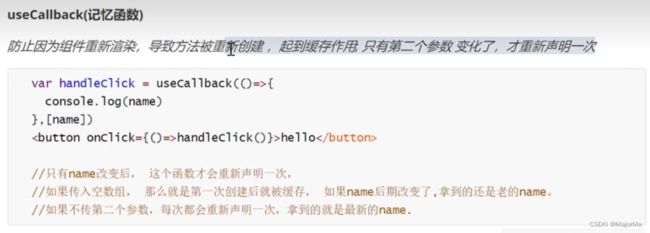
3)useCalback
4)useMemo(类似vue的computed)、useRef
import React, { useState, useMemo, useRef } from 'react';

export default function Test2(props) {
    const [inputVal, setInputVal] = useState('')
    const inputRef = useRef() // 1、ref可以绑定dom或者组件
    const list = useRef(['手抓饭','汉堡','螺蛳粉','煲仔饭','披萨','曲奇','饼干','三明治','蛋糕','巧克力']) // 2、ref也可以用来缓存变量,使用xxxRef.current操作该变量

    const memoList = useMemo(() => { // 如果搜索框值inputVal变化,则根据inputVal过滤list并返回结果
        if(inputVal == '') {
            return list.current
        } else {
            return list.current.filter(item => {
                return item.includes(inputVal)
            })
        }
    }, [inputVal]) // 相当于vuer的computed,返回一个计算值

    return (
        <div className='content'>
            <div>
                <input ref={inputRef} value={inputVal} onChange={e => setInputVal(e.target.value)} />
                <button onClick={() => this.search()}>搜索</button>
                <div>
                    <ul>
                    {
                        memoList.length > 0 && memoList.map(item =>
                            <li key={item}>{item}</li>
                        )
                    }
                    </ul>
                </div>
            </div>
        </div>
    )
}
5)useContext
import React, { useState, useContext } from 'react';
const GlobalContext = React.createContext() // 创建上下文

// 选项子项
function FoodItem(props) {
    const context =  useContext(GlobalContext) // 引入上下文GlobalContext
    return (
        <div onClick={() => context.click(props.item)} style={{background: context.currentId === props.item.id ? 'red' : '',width:'100%'}}>
            {props.item.name}
        </div>
    )
}

// 详情
function FoodDetail() {
    const context =  useContext(GlobalContext) // 引入上下文GlobalContext
    return (
        <div style={{width:'300px', height:'200px', marginLeft:'50px', border:'1px solid green'}}>
            <p>详情:</p>
            {context.foodDetail}
        </div>
    )
}

export default function Father() {
    const [currentId, setCurrentId] =  useState(5) // 选中的选项id
    const [foodDetail, setFoodDetail] =  useState('巧克力~~~') // 选中的选项详情
    const list = [{
        id: 1,
        name: '手抓饭',
        des: "牛肉粒、胡萝卜、油、盐、鸡蛋,多点油,胡萝卜素溶于油,胡萝卜黄色的油包裹粒粒分明的米饭,好吃!!!"
    }, {
        id: 2,
        name: '螺蛳粉',
        des: "螺蛳粉干泡20分钟,放入酱包大火煮六分钟,最后放入醋、酸笋和酸豆角、腐竹和花生、还有少量辣椒油,完成!!!"
    }, {
        id: 3,
        name: '煲仔饭',
        des: "炒菜,放多点水炒出酱汁,然后酱汁和菜放入泡了半个小时的米中,按煮饭键,半个小时后就变成了香喷喷的煲仔饭~~~"
    }, {
        id: 4,
        name: '披萨',
        des: "披萨~~~"
    }, {
        id: 5,
        name: '巧克力',
        des: "巧克力~~~"
    }]

    // 选中某个食物
    const clickItem = (item) => {
        setCurrentId(item.id)
        setFoodDetail(item.des)
    }

    return (
        <GlobalContext.Provider
        value={{
            currentId,
            foodDetail,
            click: (item) => clickItem(item)
        }}>
            <div className='content'>
                <div>
                    <div style={{width:'100%',display:"flex"}}>
                        <ul style={{ width:'100px', border:'1px solid red',margin:0,padding:0, listStyle:'none'}}>
                            <li style={{fontWeight:700,marginBottom:'20px'}}>请选择</li>
                        {
                            list.map(item =>
                                <li style={{cursor:'pointer'}} key={item.id}>
                                    <FoodItem item={item} />
                                </li>
                            )
                        }
                        </ul>
                        <div>
                            <FoodDetail />
                        </div>
                    </div>
                </div>
            </div>
        </GlobalContext.Provider>
    )
}
6)useReducer
useReducer配置useContext,类似redux原理,这里纯当练手,实际开发使用redux
import React, { useContext, useReducer} from 'react';
const GlobalContext = React.createContext() // 创建上下文

var initState = {
    a: 'A',
    b: 'B',
}

const reducer = function(preState, action) {
    const newState = {...preState}
    switch(action.type){
        case 'changeA': newState.a = action.value; break;
        case 'changeB': newState.b = action.value; break;
        default: break;
    }
    return newState
}

export default function Test4(props) {
    const [state, dispatch] = useReducer(reducer, initState) // useReducer必须在函数(组件)里面使用

    return (
        <GlobalContext.Provider
        value={{
            state,
            dispatch
        }}>
            <div>
                <Child1 />
                <Child2 />
                <Child3 />
            </div>
        </GlobalContext.Provider>
    )
}

function Child1() {
    const { dispatch } = useContext(GlobalContext) // 获取上下文中的dispatch
    return (
        <div style={{border:'1px solid green'}}>
            <button onClick={() => dispatch({ type: 'changeA', value: 'A变了'})}>changeA</button>
            <button onClick={() => dispatch({type: 'changeB', value: 'B变了'})}> changeB</button>
        </div>
    )
}

function Child2() {
    const { state } = useContext(GlobalContext) // 获取上下文中的state
    return (
        <div style={{border:'1px solid red'}}>
            {state.a}
        </div>
    )
}

function Child3() {
    const { state } = useContext(GlobalContext) // 获取上下文中的state
    return (
        <div style={{border:'1px solid blue'}}>
            {state.b}
        </div>
    )
}
7)自定义hooks
- 案例
import React, { useState, useMemo, useRef } from 'react';

// 自定义定义hooks
// 当某个逻辑复用率很高,则可以抽出来封装成hooks
function useFilter(list, value) {
    const showList = useMemo(() => {
        if(value === '') {
            return list
        } else {
            return list.filter(item => {
                return item.includes(value)
            })
        }
    }, [list, value])
    console.log('showList:', showList)
    return showList
}

function Test2(props) {
    const [inputVal, setInputVal] = useState('')
    const inputRef = useRef() // 1、ref可以绑定dom或者组件
    const list = ['广州荔湾','广州天河','广州花都','佛山顺德','中山石歧','中山小榄','深圳龙岗','深圳福田']

    const showList = useFilter(list, inputVal) // 使用自定义hook

    return (
        <div className='content'>
            <div>
                <input ref={inputRef} value={inputVal} onChange={() => setInputVal(inputRef.current.value)} />
                <button onClick={() => setInputVal(inputRef.current)}>搜索</button>
                <div>
                    {
                        showList.map(item =>
                            <div key={item}>{item}</div>
                        )
                    }
                </div>
            </div>
        </div>
    )
}

export default Test2
三、路由react-router-dom(v5)
v6版本
1、路由安装和简单使用(一级二级路由、重定向、404)
- 安装路由(这里使用5版本,也可以去React Router官网参考其他版本)
npm install react-router-dom@5
- 引入使用
// 引入HashRouter, Route, Switch, Redirect
import { HashRouter, Route, Switch, Redirect } from 'react-router-dom';
import Films from './file/Films';
import Cinemas from './file/Cinemas';
import Center from './file/Center';
import NotFound from './NotFound.js'; // 404页面

export default function App() {
  return (
    <div className="App">
        <HashRouter>
          <Switch>
            <Route path="/films" component={Films}></Route>
            <Route path='/cinemas' component={Cinemas}></Route>
            <Route path='/center' component={Center}></Route>
            {/* 默认模糊匹配,重定向到/films,要用Switch包裹,不然会有问题 */}
            <Redirect from='/' to="/films" exact />
            {/* 上面路由都找不到,就会匹配NotFound,前提是上面重定向要精确匹配 即加上exact属性 */}
            <Route component={NotFound}></Route>
          </Switch>
        </HashRouter>
    </div>
  );
}
2、嵌套路由
3、编程式
千峰视频教程
- 原生
// 声明式
<a href="#/films">点击跳转index页面</a>
// 编程式
location.href="#/films"
- react路由、跳转方式、获取路由参数
声明式
<NavLink to="/films" activeClassName="active">电影</NavLink>
编程式
// 1、动态路由传参 当需要复制路由分享页面,则需要这种方式
props.history.push(`/films/filmDetail/${item.filmId}`) // 获取路由参数方式 props.match.params.filmId

// 2、query传参
props.history.push({
    pathname: '/films/filmDetail',
    query: {
        filmId: item.filmId // 获取路由参数方式 props.location.query.filmId
    }
})

// 3、state传参
props.history.push({
    pathname: '/films/filmDetail',
    state: {
        filmId: item.filmId // 获取路由参数方式 props.location.state.filmId
    }
})
4、路由拦截/守卫
<Route path="/films/filmDetail/:filmId" component={FilmDetail}></Route>
// 相当于
<Route path="/films/filmDetail/:filmId" render={() =><FilmDetail />}></Route>

// 那么拦截逻辑可以放在回调函数里面
<Route path="/films/filmDetail/:filmId" render={() => {是否已登录?<FilmDetail /> : <Redirect to="/login" />}}></Route>
<Route path="/login" component={Login}></Route>
5、路由模式
两种路由模式:HashRouter 和 BrowserRouter,导入的时候可以重命名
// 导入时可以用as重命名为Router,这样的话,以后万一要改路由模式,直接在import的地方改就好
import { HashRouter as Router } from 'react-router-dom';
// 假如要改路由模式,直接把HashRouter改为BrowserRouter,重命名Router不变,省去麻烦
 ...
<Router>
    <Switch>
        <Route path='/films/nowPlaying' component={NowPlaying}></Route>
        <Route path="/films/commingSoon" component={CommingSoon}></Route>
    </Switch>
</Router>
...
注意 \color{red}{注意} 注意:BrowserRouter没有#的路径,美观,但是会以这个路由向后端发起页面请求,后端没有对应路径,就会404,这样的话要和后台说清楚(教程说的我没明白,,,)。
HashRouter就不会,就会对应加载组件
6、withRouter
<Route path="/films/filmDetail/:filmId" component={FilmDetail}></Route>
// 解析为
class Route extends React.component {
    constructor(props) {
        super(props)
    }
    render() {
        var MyComponent = this.props.component
        return <div>
            <MyComponent history={this.props.history} match={this.props.match} />
        </div>
    }
}
// 然而render方式,直接render,则在FilmDetail里面的props就为空对象
<Route path="/films/filmDetail/:filmId" render={() =><FilmDetail />}></Route>
// 所以需要传props
<Route path="/films/filmDetail/:filmId" render={() =><FilmDetail {...props} />}></Route>
假设组件没有用直接包裹,则props里面的路由信息为空,则可以用withRouter高阶函数
import { withRouter } from 'react-router-dom';

function FilmItem(props) {
    const toDetail = () => {
        props.history.push(`/films/filmDetail/${props.filmId}`) // 使用withRouter转换才可以拿到props.history.push方法
    }
    return (
        <div onClick={() => toDetail()}>
            {props.name}
        </div>
    )
}

export default withRouter(FilmItem)
四、反向代理
只有反向代理的跨域方式不需要后台配合
- 安装
npm install http-proxy-middleware
- 安装后新建文件setupProxy.js(注意修改后需要重启项目才会启动服务器)
// src/setupProxy.js
const { createProxyMiddleware } = require("http-proxy-middleware")

module.exports = function(app) {
    app.use(
        '/ajax',
        createProxyMiddleware({
            target: 'https://i.maoyan.com',
            changeOrigin: true
        })
    )

    app.use(
        '/api',
        createProxyMiddleware({
            target: 'https://i.maoyan.com',
            changeOrigin: true
        })
    )
}

import React, { useState, useEffect } from 'react';
import axios from 'axios'

export default function CommingSoon(props) {
    const [list, setList] = useState([])

    useEffect(() => {
        // 如请求接口 https://i.maoyan.com/ajax/comingList?ci=20&limit=10&movieIds=&token=&optimus_uuid=4210D9B07AA011ED9D6E4B7AD83E9EA6C89D70A2672D4B1FA5CFA366FA0DE402&optimus_risk_level=71&optimus_code=10
        axios({
            url: "/ajax/comingList?ci=20&limit=10&movieIds=&token=&optimus_uuid=4210D9B07AA011ED9D6E4B7AD83E9EA6C89D70A2672D4B1FA5CFA366FA0DE402&optimus_risk_level=71&optimus_code=10",
        })
        .then(res => {
            console.log('res:', res)
            if(res.status == 200){
                setList(res.data?.coming)
            }
        }).catch(error => console.log('error:', error))

    }, [])

    return (
        <div className='content'>
            <p>即将上映</p>
    )
}
五、cssModule
.css文件,会引入到index.html中,如果各个.css文件里面有相同的选择器名字,会被最后引入的覆盖,所以可以改成.module.css文件格式,然后使用className={styles.xxx}:
六、flux和redux (了解)
注意:本文主要用于理解 r e d u x 原理,实际 r e a c t 项目开发使用 r e a c t − r e d u x (下一章) \color{red}{注意:本文主要用于理解redux原理,实际react项目开发使用react-redux(下一章)} 注意:本文主要用于理解redux原理,实际react项目开发使用react−redux(下一章)
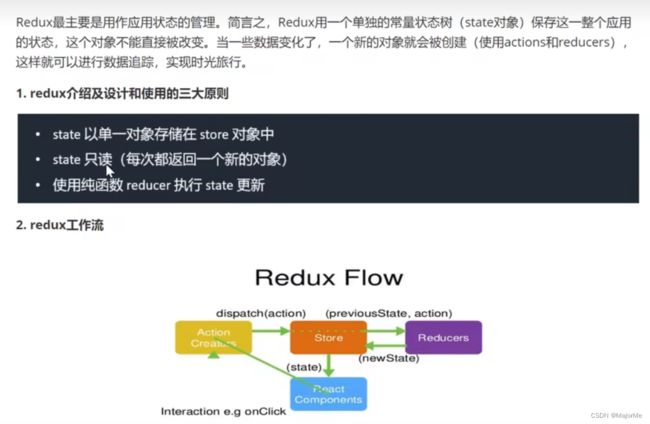
flux是一个模式一个思想,不是一个框架,它的实现有15中,其中之一就是redux,redux基于js的,与react无关,react、vue、angular都可以引入使用,后面有专门为react设计的react-redux。
3、安装redux
npm install redux
4、使用
- 创建redux文件夹src/redux、和文件src/redux/store.js
import { createStore } from "redux";

const reducer = (preState={show:false}, action) => { // {show:false}为store的初始值
    const newState = {...preState}
    switch(action.type) {
        case 'hidden': newState.show = false; return newState;
        case 'show': newState.show = true; return newState;
        default: break;
    }
    return preState
}
const store = createStore(reducer)
// store.getState 获取状态对象
// store.subscribe 订阅
// store.dispatch 发布

export default store
- 在组件中使用
// 订阅store.subscribe、取消订阅
import store from './redux/store'
...
useEffect(() => {
    var unsubscribe = store.subscribe(() => { // dispatch后这里会执行
      const storeObj = store.getState() // 获取store {show: true/false }
      console.log('storeObj :', storeObj)
    })
    return unsubscribe() // 取消订阅
}, [])
...
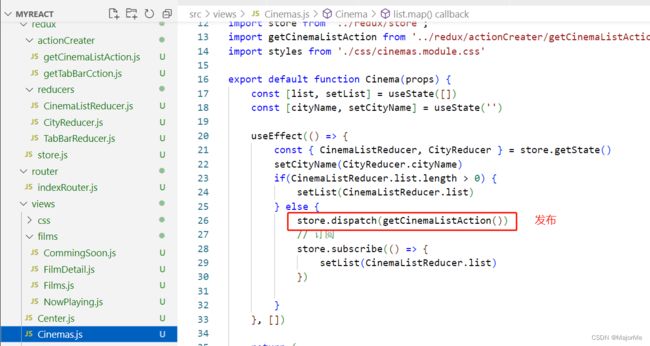
// 发布store.dispatch
import store from './redux/store'
...
useEffect(() => {
        console.log('props:', props)
        setFilmId(props.match?.params?.filmId)
        store.dispatch({
            type: 'show'
        })
        return () => { // 销毁前
            store.dispatch({
                type: 'hidden'
            })
        }
    }, [])
...
5、createStore原理
// import { createStore } from "redux;

const reducer = (preState={show:true}, action={}) => {
    const newState = {...preState}
    switch(action.type) {
        case 'changeShow': newState.show = action.payload?.show; return newState;
        default: break
    }
    return preState
}

// const store = createStore (reducer)
const store = createMyStore(reducer) // 和上面createStore实现一样

export default store

// 模拟封装createStore
function  createMyStore(reducer) {
    var list = []
    var state = reducer()

    function subscribe(callback) {
        list.push(callback)
    }
    function dispatch(action) {
        state = reducer(state, action)
        for(var i in list) {
            list[i] && list[i]()
        }
    }
    function getState() {
        return state
    }
    return {subscribe, dispatch, getState}
}
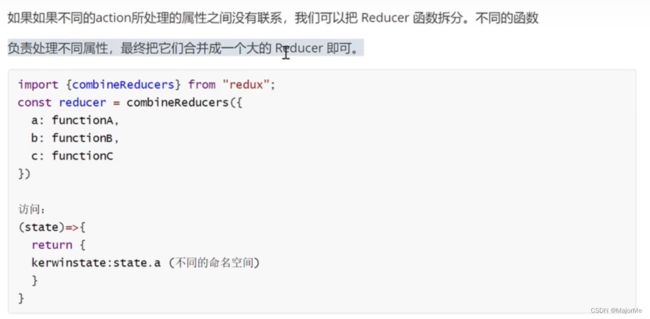
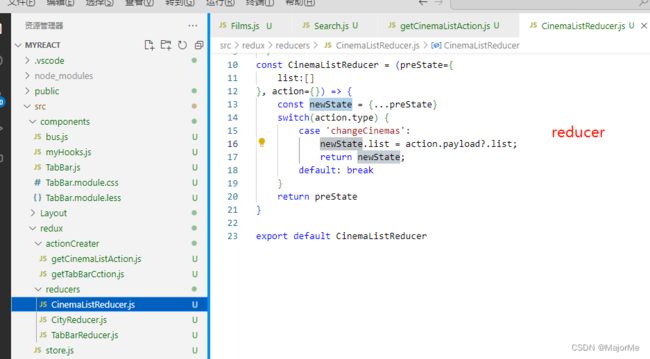
6、reducer扩展
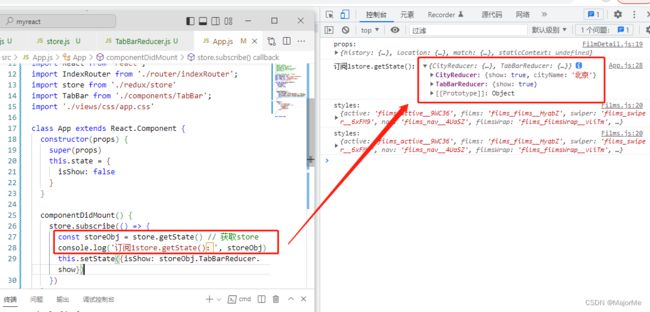
store.getState拿到的状态对象格式:
7、中间件redux-thunk和redux-promise
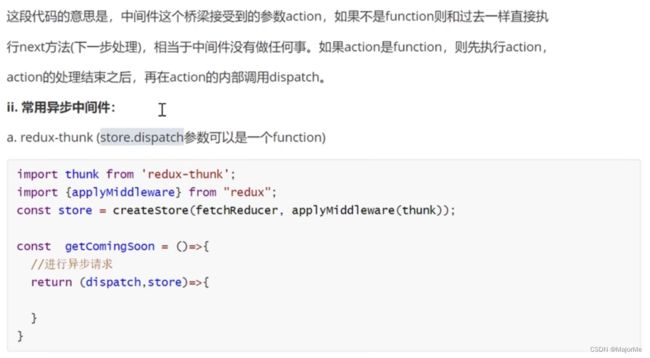
npm install redux-thunk
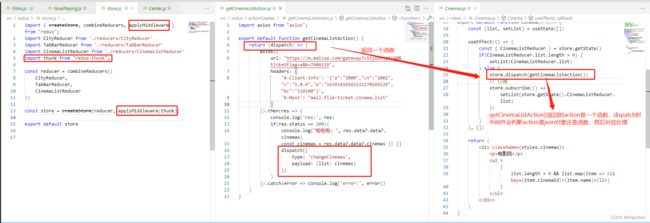
- 使用中间件
- 安装redux-promise
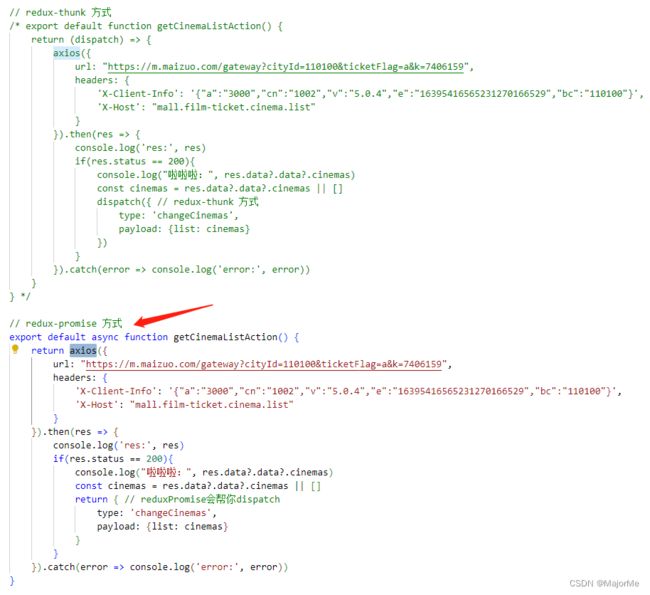
npm install redux-promise
8、Redux DevTool Extension 浏览器调试插件
-
redux浏览器工具
插件下载和使用说明请参考https://github.com/zalmoxisus/redux-devtools-extension
9、扩展小知识:纯函数
纯函数同时满足两个条件:1、对外界没有副作用 2、同样的输入得到同样的输出
- 非纯函数举例
// 非纯函数,因为会改变传进去的对象值,即影响了函数外面的东西,就是副作用
function test(obj) {
    obj.name = 'qmz'
}
var person = {name: '啦啦啦'}
test(person)

// 非纯函数,因为即使输入值一样,结果都是随机的变化
function test2(num) {
    return num + Math.random()
}
test(person)
- 纯函数举例
// 纯函数
function test(obj) {
    const newObj = {...obj}
    newObj.name = 'qmz'
    return newObj
}
var person = {name: '啦啦啦'}
test(person)
七、react-redux
终于来了!上一章太煎熬了
1、react-redux的安装和使用
- 安装
npm install react-redux
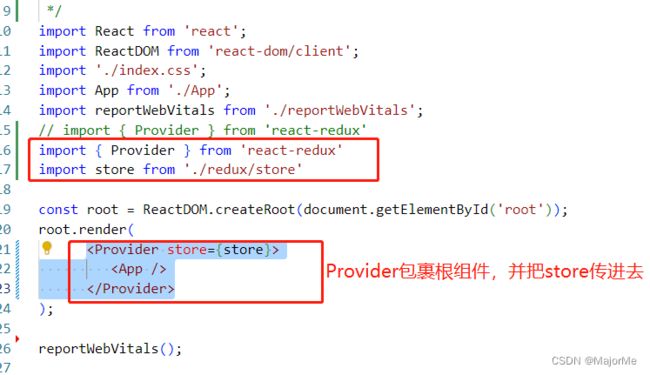
- Provider包裹在最外面,传store,里面所有组件可以使用connect获取store
- connect(mapStateToProps, mapDispatchToProps)(conponentxxx);
使用案例:
import React, { useState, useEffect } from 'react';
import { connect } from 'react-redux'
// import store from '../../redux/store'
// import { hide, show } from '../../redux/actionCreater/getTabBarCction'

function FilmDetail(props) {
    const [filmId, setFilmId] = useState('')
    useEffect(() => {
        console.log('props:', props)
        setFilmId(props.match?.params?.filmId)
        // store.dispatch(hide())
        props.hide()
        return () => { // 销毁前
            // store.dispatch(show())
            props.show()
        }
    }, [])

    return <div>电影详情:{props.detail}</div>
}

// 通过connect,组件内可以直接props.hide),相当于之前的dispatch(hide()),两种方式,自行选择
const mapDispatchToProps = {
    hide() {
        return {
            type: 'tabBar',
            payload: {show: false}
        }
    },
    show() {
        return {
            type: 'tabBar',
            payload: {show: true}
        }
    }
}

// connect 通过两个参数:mapStateToProps 、mapDispatchToProps,就省去手动subscribe和dispatch
export default connect(state=> { // state是之前通过store.getState()拿到的值
    return {
        detail: state.detail // 在FilmDetail组件中可以通过props.detail拿到
        //...state // ...state可以拿到所有状态
    }
}, mapDispatchToProps)(FilmDetail)
2、HOC和context在react-redux底层中的应用
1)connect是HOC,即高阶组件
2)Provider,可以让容器组件拿到state,使用了context
connect自定义
function myconnect(cb, obj) {
    var value = cb()
    return (MyComponent) => {
        return (props) => {
            return (
                <div>
                    <MyComponent {...props} {...value} {...obj} />
                </div>
            )
        }
    }
}
3、react-redux持久化
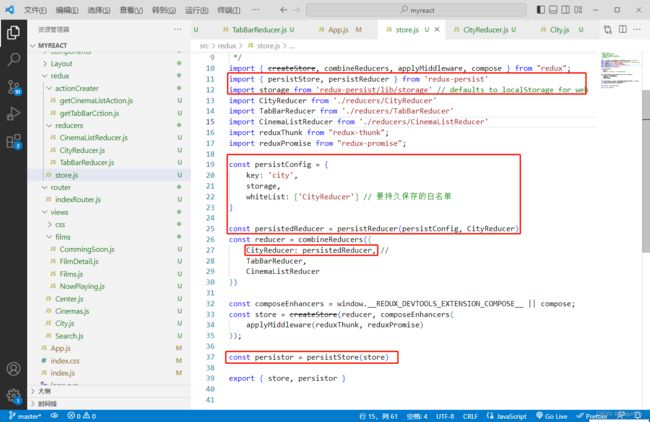
那些固定的数据可以缓存到localStorage中,比如卖座购买电影平台中,城市列表数据可以持久缓存,电影院列表或者电影列表不适合(因为会更新变化)
https://github.com/rt2zz/redux-persist
- 安装
npm install redux-persist
八、immutable
1、浅拷贝和深拷贝
浅复制和深复制的区别在于,浅复制只复制引用到新的列表中(引用可以理解为地址),不会创建新对象。而深复制创建新的对象,并把对象保存在新的地址中。浅复制和深复制对可变和不可变序列的影响是不一样的。对可变序列的浅复制会带来意想不到的结果。
- 浅拷贝
1)引用类型直接复制
obj1 = {a: '111', b: '222'}
obj2 = obj1
obj2.c = '333'
console.log(obj1) // {a: '111', b: '222', c: '333'}
2)复杂的数据结构,…解构方式(Object.assign),只是比浅拷贝更深一层,arr仍只是拷贝了引用,还是浅拷贝
obj1 = {a: '111', arr: [1,2,3]}
obj2 = {...obj1} // 或者Object.assign(obj2, obj1)
obj2.arr.push(4)
console.log(obj1) // {a: '111', arr: [1,2,3,4]}
- 深拷贝
1)延展操作符(…),缺点:只能深克隆一层,第二层的引用依然指向原来的位置
obj1 = {a: '111', b: '222'}
obj2 = {...obj1}
obj2.c = '333'
console.log(obj1, obj2) // {a: '111', b: '222'} {a: '111', b: '222', c: '333'}
2)JSON.parse(JSON.stringify())方式,缺点:无法复制function,或不适应存在属性值为undefined的对象或,无法适用全部场景
obj1 = {a: '111', arr: [1,2,3]}
obj2 = JSON.parse(JSON.stringify(obj1))
obj2.arr.push(4)
console.log(obj1) // {a: '111', arr: [1,2,3,4]}
3)deep copy方式 递归一层层赋值,缺点:性能不好,占内存
// deepCopy深克隆
function deepCopy(value) {
	if(value instanceof Function)return value
    else if (value instanceof Array) {
        var newValue = []
        for (let i = 0; i < value.length; ++i) newValue[i] = deepCopy(value[i])
        return newValue
    } else if (value instanceof Object) {
        var newValue = {}
        for (let i in value) newValue[i] = deepCopy(value[i])
        return newValue
    } else return value
}
4)immutable解决上面两个深拷贝的缺点
2、immutable
- 安装
npm install immutable
- Map方法(转化对象类型)
 important { Map } from 'immutable'

 const obj = {name: 'qmz', age: 100}
 const oldImmuObj = Map(obj)

 // 修改属性值 .set
 const newImmuObj = oldImmuObj.set("name", "you")

 // 获取值immutable
 // 方式1: .get
 // console.log(oldImmuObj.get('name'), newImmuObj.get('name')) // qmz you
 // 方式2:将immutable转化为普通对象
 // console.log(oldImmuObj.toJS(), newImmuObj.toJS()) // {name: 'qmz', age: 100} {name: 'you', age: 100}
console.log(‘oldImmuObj:’, oldImmuObj, ‘newImmuObj:’, newImmuObj) 打印如下:
Map()方法只能转化第一层,对象内嵌套的引用类型,得一层层转化(且当了解,后面用fromJS一次性转化):
 important { Map } from 'immutable'
 const obj1 = {name: 'qmz', child: {name: 'baby', age: 1}}
 const obj2 = {name: 'qmz', child: Map({name: 'baby', age: 1})}
 console.log(obj1, obj2)
- List方法(转化数组类型)
 important { List} from 'immutable'

 const arr = [1,2,3]

 // 转化为immutable类型
 const oldArr = List(arr)

 // List的增删改和普通数组Array的方法一样:push、concat、map、splice等方法
 const newArr1 = oldArr.push(4)
 const newArr2 = oldArr.concat([4,5,6])
 console.log(oldArr, newArr1, newArr2) // 打印对比一下

 // toJS()方法转为普通数组
 console.log(newArr2.toJS()) // [1,2,3,4.5,6]
- fromJS方法(复杂结构一键式转化)
使用方法
var obj = {
    name: 'major',
    location: {
        province: '广东',
        city: '广州'
    },
    favor: ['跳舞', '骑行', '逛街']
}

// 1、fromJS和toJS相互一次性转换
var objImmu = fromJS(obj)
// 相当于
/*
const objImmu = Map({
    name: 'major',
    location: Map({
        province: '广东',
        city: '广州'
    }),
    favor: List(['跳舞', '骑行', '逛街'])
}) */
console.log('objImmu:', objImmu)
console.log('objImmu.toJS():', objImmu.toJS()) // 转成普通对象(obj)格式

// 2、修改方法:setIn、updateIn
objImmu = objImmu.setIn(['name'],'major变啦') // 相当于 obj.name = 'major变啦'
objImmu = objImmu.setIn(['location', 'city'],'深圳') // 相当于 obj.location.city = '深圳'
objImmu = objImmu.setIn(['favor', 0],'爵士舞') // 相当于 obj.favor[0] = '爵士舞'
objImmu = objImmu.updateIn(['favor'], arr => arr.splice(2, 1)) // 相当于 obj.favor.splice(2, 1))
console.log('objImmu:', objImmu)
react表单应用案例:
import React from 'react';
import {
    Form,
    Button,
  } from 'antd-mobile'
import { fromJS } from 'immutable';

export default class Center extends React.Component {
    constructor(props) {
        super(props);
        this.state = {
            info: fromJS({
                name: 'major',
                location: {
                    province: '广东',
                    city: '广州'
                },
                favor: ['跳舞', '骑行', '逛街']
            })
        }
    }

    render() {
        const { info } = this.state
        return (
            <div>
                <Form
                onFinish={null}
                footer={null}
                >
                    <Form.Item
                    name='姓名'
                    label='姓名'
                    rules={[{ required: false}]}
                    >
                        <span>{info.get('name')}</span>
                        {/* info.setIn(['name'],'major变啦') 相当于 info.name='major变啦' */}
                        <button onClick={() => this.setState({info: info.setIn(['name'],'major变啦')})}>修改</button>
                    </Form.Item>
                    <Form.Item name='address' label='地址'>
                        <div>
                            省份:{info.get('location').get('province')}
                        </div>
                        <div>
                            城市:{info.get('location').get('city')}
                            {/* info.setIn(['city', 'province'],'深圳') 相当于 info.city.province='深圳' */}
                            <button onClick={() => this.setState({info: info.setIn(['city', 'province'],'深圳')})}>
                                修改
                            </button>
                        </div>
                    </Form.Item>
                    <Form.Item name='address' label='地址'>
                        <div>
                            {info.get('favor').map((item,index) => {
                                return(
                                <div>
                                    {item}
                                    {/* info.setIn(['favor', index], `${item}变啦`) 相当于 info.favor[index]=`${item}变啦` */}
                                    <button onClick={() => this.setState({info: info.setIn(['favor', index], `${item}变啦`)})}>
                                        修改
                                    </button>
                                    {/* info.setIn(['favor', index], `${item}变啦`) 相当于 info.favor=info.favor.splice(index, 1) */}
                                    <button onClick={() => this.setState({info: info.updateIn(['favor'], arr => arr.splice(index, 1))})}>
                                        删除
                                    </button>
                                </div>
                                )
                            })}
                        </div>
                    </Form.Item>
                </Form>
            </div>
        )
    }
}
效果
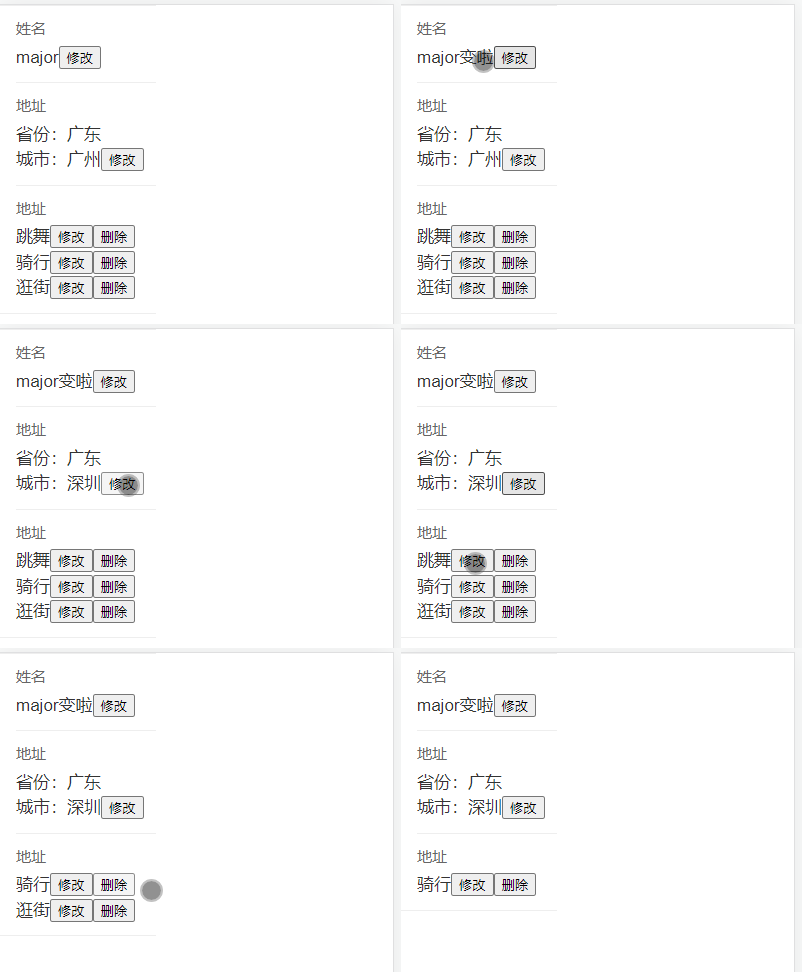
immutable在react-redux中的使用案例:
TabBarReducer.js
import { fromJS } from "immutable";
const TabBarReducer = (preState={
    show:true,
    obj: {name: undefined, list: [1,2,3]}
}, action={}) => {
    // const newState =JSON.parse(JSON.stringify(preState)) // preState对象有可能存在undefined值的属性,该方式不可行
    // const newState = {...preState} 当preState对象结构比较复杂,考虑用fromJS()方法,额,尴尬,事实证明好像{...preState}方式也没有问题,还更方便,可以react-redux有用吧
    let newState = fromJS(preState)
    switch(action.type) {
        case 'tabBar':
            // newState.show = action.payload?.show;
            // return newState;
            return newState.set('show:', action.payload?.show).toJS(); // 记得转成普通返回
        case 'delete':
            // newState.obj.list.splice(action.payload.index, 1);
            // return newState;
            return newState.updateIn(['obj', 'list'], (arr) => arr.splice(action.payload.index, 1)).toJS();
        default: break
    }
    return preState
}

export default TabBarReducer
import React from 'react';
import { connect } from 'react-redux';

class Center extends React.Component {
    constructor(props) {
        super(props);
    }
    render() {
        const { TabBarReducer } = this.props
        return (
            <div>
                {TabBarReducer.obj.list.map((item,index) => <div key={index}>项目{item}</div>)}
                <button onClick={() => this.props.dispatch({type: 'add', payload: {num: TabBarReducer.obj.list.length+1}})}>
                    add
                </button>
            </div>
        )
    }
}

export default connect(state => {
    return { TabBarReducer: state.TabBarReducer }
})(Center)
九、redux-saga
在saga中,全局监听器和接收器使用Generator(es6)函数和saga自身的一些辅助函数实现对整个流程的管控,主要是管理异步的,异步的action放在saga中,sage中走完异步拿到数据后再发一个action到reducer修改全局状态
- readux-sage是基于generator函数的,先了解Generator函数有助于了解后面的redux-sage
*标记这是一个Generator函数,.next()开始执行,遇到yield停止,下一次.next()继续执行,
function *fun() {
    console.log('111');
    yield "输出-111"; // yield的值传给下一次next
    console.log('222');
    yield "输出-222";
    console.log('333');
    yield "输出-333";
}
const test = fun(); // 生成一个迭代器
const gen1 = test.next(); // 返回一个对象{value,done},value是yield返回的值,done表示是否完成所有迭代
console.log('gen1:', gen1);
const gen2 = test.next();
console.log('gen2:', gen2);
const gen3 = test.next();
console.log('gen3:', gen3);
function getData1() {
        return new Promise((resolve, reject) => {
            setTimeout(() => {
                console.log('1')
                resolve('111')
            }, 1000)
        })
    }
    function getData2() {
        return new Promise((resolve, reject) => {
            setTimeout(() => {
                console.log('2')
                resolve('222')
            }, 1000)
        })
    }
    function getData3() {
        return new Promise((resolve, reject) => {
            setTimeout(() => {
                console.log('3')
                resolve('333')
            }, 1000)
        })
    }

    function *gen() // 生成器函数
        const f1 = yield getData1()
        const f2 = yield getData2(f1) // 假设getData2依赖f1
        const f3 = yield getData3(f2)
        console.log(f3)
    }

    function run(fn) { // 传入生成器,自动执行
        const g = fn()
        function next(data) {
            const result = g.next(data)
            if(result.done) {
                return result.value
            }
            result.value.then(res => {
                next(res)
            })
        }
        next()
    }
    run(gen)
- 安装redux-saga
npm install redux-saga
- 基础使用
// store.js
import { createStore, applyMiddleware } from "redux"; // action异步请求,需要中间件applyMiddleware
import createSagaMiddleware from "redux-saga";
import { reducer } from "./reducer";

const SagaMiddleware = createSagaMiddleware()
const store = createStore(reducer, applyMiddleware(SagaMiddleware))

export default store
 // reducer.js
const reducer = (preState={
    list: []
}, action={}) => {
    const newState = {...preState}
    switch(action.type) {
        case 'change-list': newState.list = action.payload; return newState;
        default: break;
    }
    return preState;
}

export default { reducer }
之前学了的用于异步请求的中间件有的redux-thunk、redux-promise,可以对比一下
案例1:
// saga.js
import { take, fork, put, call} from 'redux-saga/effects'

function *watchSaga() {
    while(true) {
        // take监听组件发来的action
        yield take('get-list');
        // fork非阻塞调用的形式执行fn,take后马上执行fork
        yield fork(getList)
    }
}

function *getList() {
    // call发出异步请求
    let res = yield call(getListAction) // 阻塞式调用fn
    // put发出新的action
    yield put({
        type: 'change-list',
        payload: res
    })
}

function getListAction() {
    return new Promise((resolve, reject) => {
        setTimeout(() => {
            resolve([1, 2, 3])
        }, 2000)
    })
}
export default watchSaga
案例2:一个异步依赖另外一个异步返回结果
// saga.js
import { take, fork, put, call} from 'redux-saga/effects'

function *watchSaga() {
    while(true) {
        // take监听组件发来的action
        yield take('get-list');
        // fork非阻塞调用的形式执行fn,take后马上执行fork
        yield fork(getList)
    }
}

function *getList() {
    // call发出异步请求
    let res1 = yield call(getListAction1)
    let res2 = yield call(getListAction2, res1) // 假设getListAction2依赖res1
    // put发出新的action
    yield put({
        type: 'change-list',
        payload: res2
    })
}

function getListAction1() {
    return new Promise((resolve, reject) => {
        setTimeout(() => {
            resolve([1, 2, 3])
        }, 2000)
    })
}
function getListAction2(data) {
    return new Promise((resolve, reject) => {
        setTimeout(() => {
            resolve([..data, 4, 5, 6]) // 返回 [1,2,3,4,5,6]
        }, 2000)
    })
}
export default watchSaga
在组件中测试效果
import React from 'react';
import store from './redux/store'

export default class Test extends React.Component {
    render() {
        return (
            <div>
                <button
                onClick={() => {
                    if(store.getState().list.length === 0) {
                        console.log('获取数据')
                        store.dispatch({
                            type: 'get-list'
                        })
                    } else {
                        console.log('获取过了,走缓存')
                        console.log(store.getState().list)
                    }
                }}
                >
                    获取数据
                </button>
            </div>
        )
    }
}
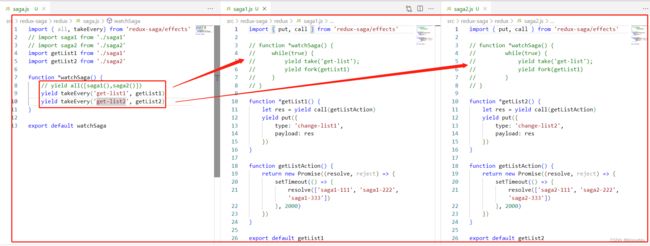
- 多个saga
方式一: 使用all方法
 方式二: 使用takeEvery
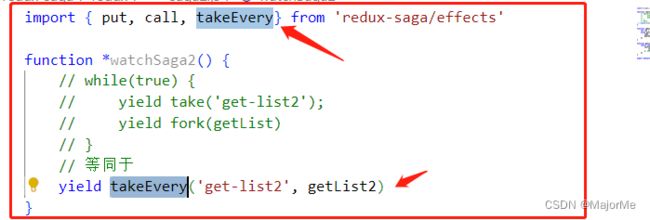 所以可以什么saga可以改为
react冷门知识
十、Ant Design组件库(pc端)
Ant Design of React官网
- 安装
npm install antd --save
- 引入使用就可以用了,参考官方文档就好
import { Layout, Menu } from ‘antd’;
十一、Ant Design mobile组件库(移动端)
Ant Design mobilet官网
- 安装
npm install --save antd-mobile
- 安装图标
npm install --save antd-mobile-icons
import React, { useState } from 'react';
import { withRouter } from 'react-router-dom';
import { TabBar } from 'antd-mobile' // 引入TabBar组件
import { MovieOutline, AppOutline, UserOutline } from 'antd-mobile-icons' // 引入图标
import styles from './TabBar.module.css'
function Tabbar(props) {
const [current, setCurrent] = useState('/films')
const tabs = [
{
key: '/films',
title: '电影',
icon: (active) =>
active ? <MovieOutline color='var(--adm-color-primary)' /> : <MovieOutline />, var(--adm-color-primary)' 蓝色
},
{
key: '/cinemas',
title: '电影院',
icon: (active) =>
active ? > : <UserOutline />,
}
]
// 切换TabBar,value为key值
const tabChange = (value) => {
setCurrent(value)
props.history.push(value)
}
return (
<div className={styles.tabBar}>
<TabBar activeKey={current} onChange={tabChange}>
{tabs.map(item => (
<TabBar.Item key={item.key} icon={item.icon} title={item.title} />
))}
</TabBar>
</div>
)
}
export default withRouter(Tabbar)
- 案例2:List列表组件和InfiniteScroll无限滚动
import React, { useState, useRef } from 'react';
import { List, InfiniteScroll, Image } from 'antd-mobile'
import axios from 'axios'
import styles from '../css/films.module.css'

export default function NowPlaying() {
    const [list, setList] = useState([])
    const [hasMore, setHasMore] = useState(true) // 是否加载更多
    const count = useRef(1) // 不在和html模板展示的一般用useRef
    async function loadMore() { // 加载数据 第一次渲染会执行这里,就不需要在useEffect里执行了
        count.current++
        setHasMore(false)
        axios({
            // url: "http://localhost:3000/films.json",
            url: `https://m.maizuo.com/gateway?cityId=110100&pageNum=${count.current}&pageSize=10&type=1&k=1886067`,
            headers: {
                'X-Client-Info': '{"a":"3000","ch":"1002","v":"5.2.0","e":"16395416565231270166529","bc":"110100"}',
                'X-Host': "mall.film-ticket.film.list"
            }
        })
        .then(res => {
            console.log('正在上映res:', res)
            if(res.status === 200 && res.data.data && res.data.data.films && res.data.data.films.length > 0) {
                console.log('res.data.data:', res.data.data)
                setList([...list,...res.data.data.films])
                setHasMore(true)
            }
        }).catch(error => console.log('error:', error))
    }

    return (
        <div className={styles.nowPlaying}>
            <List>
            {list.map(item => (
                <List.Item
                key={item.filmId}
                prefix={
                    <Image
                    src={item.poster}
                    width={80}
                    />
                }
                description={
                    <div>
                        {item.grade ? <div>观众评分:{item.grade}</div> : <div style={{visibility:"hidden"}} /> }
                        <div>主演:{item.actor}</div>
                        <div>{item.nation} | {item.runtime}</div>
                    </div>
                }
                >
                {item.name}
                </List.Item>
            ))}
            </List>
            <InfiniteScroll loadMore={loadMore} hasMore={hasMore} />
        </div>
    )
}
十二、Mobx(了解,后面有mobx-react)
1、Mobx是什么?
npm install mobx@5
2、observable和autorun
- 观察简单数据类型:observable.box()
import { observable, autorun } from 'mobx'; // 引入
// 初始化
var num = observable.box(0)
var name = observable.box('jennie')

// 监听:autorun(callback), 监听callback依赖的值,初始化和值改变的时候执行callback
autorun(() => { // 监听num
    console.log('num初始化时和一秒的时候打印:', num.get()) // 会打印两次:初始化时、一秒后
})
autorun(() => { //  // 监听num、name,其中一个修改都会打印
    console.log('num、name:', num.get(), name.get()) // 打印三次:初始化时、一秒后、两秒后
})

// 修改: 修改后对应的autorun执行回调函数
setTimeout(() => {
    num.set(10)
}, 1000);

setTimeout(() => {
    name.set('lisa')
}, 2000);
- 观察对象类型:observable.map()
import { observable, autorun } from 'mobx';
// 初始化
const obj = observable.map({
    num: 0,
    name: 'jennie',
})

// 监听
autorun(() => { // 监听num
    console.log('num', obj.get('num')) // 打印两次:初始化时、一秒后
})
autorun(() => { // 监听num、name
    console.log('num、name:', num.get(), name.get()) // 打印三次:初始化时、一秒后、两秒后
})
// 修改
setTimeout(() => {
    obj.set('num', 10)
}, 1000);

setTimeout(() => {
    obj.set('name','lisa')
}, 2000);
省略.map简化写法
import { observable, autorun } from 'mobx';
const obj = observable({
    num: 0,
    name: 'jennie',
})
//修改值和取值都可以直接obj.xxx
autorun(() => {
    console.log('num', obj.name ))
})
obj.name = 'lisa'
- 观察数组类型
   import { observable, autorun } from 'mobx';
   const arr = observable([1,2,3])

   autorun(() => { // 监听arr
       console.log('arr[0]:', arr[0]) // 会打印三次:初始化时、一秒后、两秒后
   })

   setTimeout(() => {
       arr[0] = '111'
   }, 1000)

   setTimeout(() => {
       arr[1] = '222'
   }, 2000)
3、严格模式、action、runInAction
新建store的两种写法(如下代码),写法二简洁(要安装相应和配置相应的babel插件才能支持)
// store.js
import { action, observable, configure, runInAction } from 'mobx'
configure({enforceActions: 'always'})
// always:严格模式,必须写action
// never:可以不写action
// 建议always,防止任意地方修改值,降低不确定性

// 写法一
const store = observable({
    data: [],
    isShow: true,
    async setData() { // action 只能影响正在运行的函数,而无法影响当前函数调用的异步操作
        const data = await getData() // 假设getData为异步请求,并返回数据
        runInAction(() => { // runInAction 解决异步问题
            this.data = data
        })
    },
    showSecret() { this.isShow = true },
    hideSecret() { this.isShow = false }
}, {
    // 标记方法是action类型,专门修改可观察的value
    setData: action,
    showSecret: action,
    hideSecret: action,
})

// 写法二:面向对象写法
// mobx6已经不支该写法了
/* class Store {
    @observable isShow = true;
    @action showSecret = () => { this.isShow = true };
    @action hideSecret = () => { this.isShow = false };
    @action setData = async () => {
        const data = await  getData()
        runInAction(() => {
            this.data = data
        })
    },
}
const store = new Store()
*/

export default store
在组件中使用
import React from 'react';
import store from './mobx/store.js'
import { autorun } from 'mobx';
...
// 注意:autorun在组件销毁的时候要取消订阅,否则换页面,下一次进来,又会重新订阅一次,并且上次的订阅还会存在,会累积,和redux的subscribe订阅类似
useEffect(() => {
    if(store.data.length === 0) {
        store.setData() // 请求数据
    }
    const autorun1 = autorun(() => { // 监听/订阅store.isShow
        console.log('store.isShow:', store.isShow)
    })
    const autorun2 = autorun(() => { // 监听/订阅store.data
        console.log('store.data:', store.data)
    })
    return () => {  // autorun要在组件销毁前取消订阅
        autorun1()
        autorun2()
    }
}, [])

const handClick = () => {
    if(store.isShow) {
        store.hideSecret()
    } else {
        store.showSecret()
    }
}
...
十三、Mobx-react
Mobx-react省去了订阅autorun和import store
- 安装
npm install mobx-react@5
和redux-react类似,用Provider标签包裹根组件,给内部组件提供store全局上下文
// index.js
import { Provider } from 'mobx-react'
import store from './mobx/store.js'
...
  <Provider store={store}>
            <App />
  </Provider>
...
- 在类组件中的使用
使用inject、observer修饰类组件,然后类组件就可以通过this.props.store获取值或者action,也不需要autorun来订阅了
import React, { useEffect, useState } from 'react';
import { inject, observer } from 'mobx-react'
import { render } from 'react-dom';

@inject('store')
@observer // 要放在类组件声明的上面
class MyComponent extends React.Component {
    constructor(props) {
        super(props)
        this.state={}
    }
    componentDidMount() {
        console.log(this.props.store) // 拿到<Provider store={store}>传入的store
        if(store.isShow) {
            store.hideSecret()
        } else {
            store.showSecret()
        }
    }
    getDerivedStateFromProps(nextProps, nextState) {
        return {
            isShow: nextProps.store.isShow
        }
    }
...
export default MyComponent
- 在函数组件中的使用(不推荐使用,本来mobx-react就是面向对象的,最开始针对类组件设计的)
在jsx中使用来监听/订阅状态,里面关联的状态有改变就执行回调函数
import store from './mobx/store.js'
import { Observer } from 'mobx-react'

export default function MyComponent() {
        return (
            <div>
                <Observer>
                {
                    // Observer监听store.list,有变化就会执行这个回调
                    () => store.list.map(item => {...})
                }
                </Observer>

            </div>
        )
}
十四、TS
1、什么是typescript?
Typescript的定位是静态类型语言,在写代码阶段就能检查错误,而非运行阶段
类型系统是最好的文档,增加了代码的可读性和可维护性
有一定学习成本,需要理解接口(Interface)、泛型(Generics)、类(Class)等,ts最好被编译成js
非typescript项目编写需要安装TypeScript库才能支持.ts文件,该库还包含TypeScript编译器,也称为 tsc
直接使用脚手架新建typescript项目,就包含了typescript库和依赖,也不需要单独配置了
2、typescript的基础:基本类型、数组、对象、类+接口
// 1、基本类型
var a:string = 'qmz'
var b:boolean = false
var c:any = 1

/* ------------------------------------------------------------- */

// 2、数组
var arr1:number[] = [1, 2, 3, 4] // 数组内的值必须是number类型
// 或泛型方式
var arr1:Array<number> = [1, 2, 3, 4] //  数组内的值必须是number类型

var arr2:(string | number)[] = ['1', 2, '3', 4] // 数组内的值可以是number或者string类型
// 泛型方式
var arr2:Array<string | number> = ['1', 2, '3', 4] // 数组内的值可以是number或者string类型

var arr3:any[] = ['1', 2, '3', null] // 数组内的值可以是任意类型

/* ------------------------------------------------------------- */

// 3、对象
// 定义接口,来约束对象内部属性类型
interface Obj {
    name: string,
    age: number,
    location?: 'shenzhen', // 可选(可有可无)
    [proName: string]: any, // 可自定义不确定属性
    getString: (a: any) => string
}

var info:Obj = {
    name: 'major',
    age: 3,
    getString: (a:any) => a.toString()
}

/* ------------------------------------------------------------- */

// 4、函数
/* function test(a:string, b:number, c?:any) {
} */

interface Fun{
    (a:string, b:string, c?:any):string // 约束函数的传参属性名和类型,函数要返回string
}
var test2:Fun = function test1(a:string, b:string, c:string):string {
    return a.substring(0,1) + b.substring(0,1)
}

/* ------------------------------------------------------------- */

// 5、类
class Bus {
    public name:string = '' // 公共属性,public可以省略
    private list: any = [] // 私有属性,不能继承给孩子
    protected age: number = 3 // 受保护的,可继承给孩子
    // private state: object = {}
    subscrib(cb: any) {
        this.list.push(cb)
    }
    dispatch() {
        this.list.forEach((cb:any) => {
            cb && cb()
        });
    }
}

class Chil extends Bus{
    fun() {
        console.log(this.name, this.age)
    }
}

var obj = new Bus()
obj.subscrib(() => {
})
console.log(obj.name)

/* ------------------------------------------------------------- */

// 6、类 + 接口 接口用来规范类

interface Ifun { // 定义接口
    getName: () => string
}

class A implements Ifun { // 实现接口,对象A中必须要有getName函数
    a() {}
    getName() { return 'AAA'}
}

class B implements Ifun {
    b() {}
    getName() { return 'BBB'}
}

function init(obj:Ifun){ // 约束init接受的参数必须是实现了Ifun接口的对象
    obj.getName()
}

var objA = new A()
var objB = new B()

init(objA)
init(objB)
3、创建typescript项目
使用create-react-app脚手架创建项目,my-app是项目名字
–template typescript是指加载typescript模板,也就是创建基于typescript的项目
create-react-app my-app --template typescript
或者使用临时使用脚手架create-react-app安装
npx create-react-app react-ts --template typescript
新建项目的里面的文件是.tsx,它可以兼容ts代码(就好像jsx是js的扩展,jsx兼容js)

4、TS类组件
// .tsx
import React from 'react';
interface IProps{ // 约束props的属性
    name:string,
}
interface IState{ // 约束state的属性
    text:string
}
class Todolist extends React.Component<IProps,IState> {
    constructor(props:any) {
        super(props)
        this.state = {
            text: '' // text属性值必须是字符串,否则报错
        }
    }

    // createRef的泛型要和绑定的元素对应
    inputRef = React.createRef<HTMLInputElement>() // 绑定input元素,对应泛型为HTMLInputElement
    divRef = React.createRef<HTMLDivElement>() // 绑定div元素,对应泛型为HTMLDivElement

    handleClick = () => {
        // console.log(this.inputRef.current.value) // 直接this.inputRef.current.value会报错,因为current初始值为null
        // console.log(this.inputRef.current?.value) // 方法一 使用?判断
        console.log((this.inputRef.current as HTMLInputElement).value) // 方法二 使用ts断言方式
    }
    render() {
        return (
            <div>
                {/* 非受控组件方式要注意创建ref和获取值的方式 */}
                <input ref={this.inputRef} />
                <button onClick={() => this.handleClick()}>click</button>
                {/* 前面用IProps约束了props属性,取值的时候会校验属性名,如果写错会提示(比如不小心写成this.props.nam,就会提示props没有nam这个属性) */}
                <div ref={this.divRef}>{this.props.name}</div>
            </div>
        )
    }
}
4、TS函数组件
import React, { useState, useRef } from 'react';

export default function Test() {
    const [name, setName] = useState('major') // 隐式类型string ,也可以显示const [name, setName] = useState<string>('major')
    const inputRef = useRef<HTMLInputElement>(null) // 注意要传个null,不传会报错
    return (
        <div>
            <input ref={inputRef} />
            <button onClick={() => setName((inputRef.current as HTMLInputElement).value)}>click</button>
            <Child name={name} />
        </div>
    )
}

interface IProps { // 定义接口,约束props
    name: string
}

// props类型约束有下面两种方式
const Child = (props: IProps) => { // 方式一
    return <div>{props.name}</div>
}

// 使用React.FC<> 麻烦,还是上面方式方便
/* const Child: React.FC<IProps> = (props) => { // 方式二
    return <div>{props.name}</div>
} */
5、TS路由
- 安装路由
npm install react-router-dom@5
- 安装@types/react-router-dom,路由声明文档,@types是npm的一个分支,用来存放*.d.ts文件
import React from 'react';
import { HashRouter as Router, Switch, Route, Redirect } from 'react-router-dom' // 不安装会报错
import Film from '../views/Film';
import Cinema from '../views/Cinema';

export default class IndexRouter extends React.Component {
    render() {
        return (
            <HashRouter>
                <Switch>
                    <Route path='/film' component={Film}></Route>
                    <Route path='/cinema' component={Cinema}></Route>
                    <Redirect path='/' to='/film'></Redirect>
                </Switch>
            </HashRouter>
        )
    }
}
- RouteComponentProps
当组件里面有动态路由(跳转路由)时,需要RouteComponentProps来约束props
import { RouteComponentProps} from 'react-router-dom';

class Films extends React.Component<RouteComponentProps, any>
...
this.props.history.push('/xxx') // 倘若不用RouteComponentProps,则会在this.props.history的地方报错
...
还可以
import { RouteComponentProps} from 'react-router-dom';
interface IParam {
    myId: string
}
class Films extends React.Component<RouteComponentProps<IParam >, any>
...
console.log(this.props.match.params.myId)
...
6、redux
import { createStore } from "redux";
interface IAction {
    type: string
}
const reducer = (preState={show:true}, action:IAction) => {
    const newState = {...preState}
    switch(action.type) {
        case 'hidden': newState.show = false; return newState;
        case 'show': newState.show = true; return newState;
        default: break;
    }
    return preState
}
const store = createStore(reducer)

export default store
十五、tyled-components
- 安装
npm install styled-components
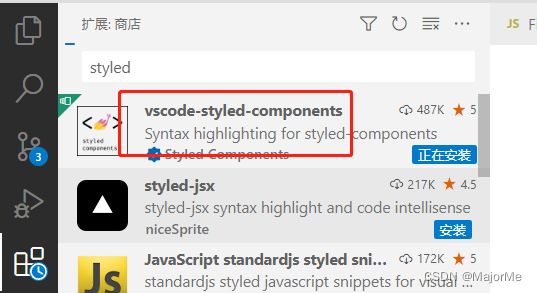
vscod可以安装插件vscode-styled-components,用styled写css的时候会帮助提示
- 基本
import React from 'react';
import styled from 'styled-components'

export default class Center extends React.Component {
    render() {
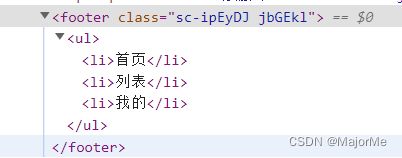
        const StyledFooter = styled.footer`
        position: fixed;
        bottom: 0;
        ul{ // 里面的可以像less那样写
            list-style: none;
            li {
                flex: 1;
                & :hover {
                    background: red;
                }
            }
        }`

        return (
            <div>
                <StyledFooter>
                    <ul>
                        <li>首页</li>
                        <li>列表</li>
                        <li>我的</li>
                    </ul>
                </StyledFooter>
            </div>
        )
    }
}
- 透传
import React from 'react';
import styled from 'styled-components'

export default class Center extends React.Component {
render() {
        const StyledInput = styled.input`
        border-radius: 4px;
        border: 1px solid red;
        }`

        return (
            <div>
                {/* 透传 传给StyledInput的属性,最后也会传到input */}
                <StyledInput  placeholder='请输入' />
            </div>
        )
    }
- 自定义属性
import React from 'react';
import styled from 'styled-components'

export default class Center extends React.Component {
    render() {
        const StyledDiv = styled.div`
        background: ${props => props.bg || 'silver'}; // 在回调函数中获取自定义属性值
        width:50px;
        height:50px;
        }`
        return (
            <div>
                {/* 自定义属性bg */}
                <StyledDiv />
                <StyledDiv bg="red" />
                <StyledDiv bg="yellow" />
            </div>
        )
    }
}
- 扩展(styled可当高阶函数使用)
import React from 'react';
import styled from 'styled-components'

export default class Center extends React.Component {
    render() {
        const StyledChild = styled(child)` // styled可当高阶函数使用
        width:50px;
        height:50px;
        background: green;
        }`
        return <div><StyledChild /></div>
    }
}
function child(props) {
    return <div className={props.className} /> // 注意要加上 className={props.className}
}
十六、DvaJS
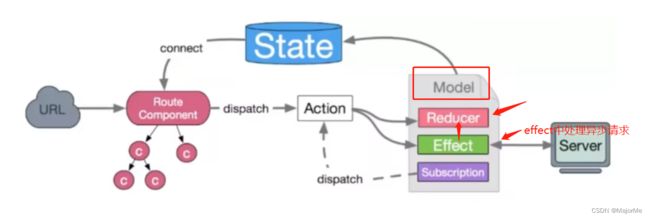
dva首先是一个机遇redux和redux-saga的数据流方案,然后为了简化开发体验,dva还额外内置了react-router和fetch,所以也可以理解为一个轻量级应用框架,下一章学的umi会集成dva。
路由功能和react-router-dom一样
// 用dva后
import { HashRouter, Route, Switch, Redirect, withRouter } from 'dva/router';
import { connect } from 'dva';
// src/models/maizuo.js
import { requireList} from '../services/maizuoService'
export default {
    namespace: 'maizuo', // 命名空间
    state: {
        isShow: true,
        list: []
    },
    subscriptions: {
      setup({ dispatch, history }) {
        console.log('初始化')
      },
    },
    // redux-saga 处理异步
    effects: {
      // *getList(action, obj)
      *getList({ payload, callback }, { call, put }) {
        const res = yield call(requireList) // 异步请求数据
        callback && callback(res) // dispatch中设置回调可以拿到数据
        yield put({ type: 'saveList', payload: res.data.cinemas });
      },
    },

    reducers: {
        handleShow(state, action) {
            return {...state, isShow: action.payload.show}
        },
        saveList(state, action) {
            return { ...state, detail: action.payload };
        },
    },
  };
在组件中发起dispatch
import React from 'react';
import { connect } from 'dva' // 和之前的react-redux一样的connect功能,并且dva省去了provider

class Testextends React.Component {
    componentDidMount() {
        this.props.dispatch({
            type:'maizuo/handleShow',
            payload: {show: false}
        })
        this.props.dispatch({
            type: 'maizuo/getList',
            callback: (res) => {
                console.log('qmz-res:', res)
            }
        })
    }
    componentWillUnmount() {
        this.props.dispatch({
            type:'maizuo/handleShow',
            payload: {show: true}
        })
    }
    render() {
        return <div>...</div>
    }
}
export default connect(state => {return {...state}})(Test)
- 跨域
//  .webpackrc
 {
    "proxy": {
        "/api": {
            "target": "https://xx.xxx.com",
            "changeOrigin": true
        }
    }
}
十七、umi
1、umi是什么
umi是一个可插拔的企业级react应用框。umi以路由为基础,支持类next.js的约定式路由,以及各种进阶的路由功能,并以此进行功能扩展,比如支持路由的按需加载。umi在约定式路由的功能层面更新nuxt.js一些(anyway, 我都不知道是啥)

2、umi项目构建
umi官网
- 安装pnpm(官方推荐)、creact-umi脚手架、
npm install pnpm -g // ,安装失败则试试npm cache clean -f清空缓存再试
- 新建项目文件夹
mkdir myapp-umi && cd myapp-umi // 建个空文件夹(项目名称)
- 构建项目
在上面新建的目录下执行下面命令构建项目(下面三种方式结果是一样的,创建项目后要npm install安装依赖)
npx @umijs/create-umi-app // 视频教程用这种
yarn create @umijs/umi-app
npm create @umijs/umi-app
3、路由
// .umirc.ts
import { defineConfig } from 'umi';
export default defineConfig({
  nodeModulesTransform: {
    type: 'none',
  },
  // routes: [ // 注释掉就默认是约定是路由
  //   { path: '/', component: '@/pages/index' },
  // ],
  fastRefresh: {},
});
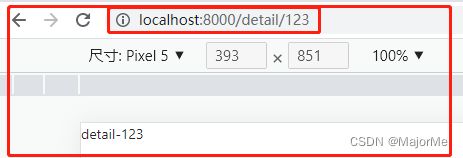
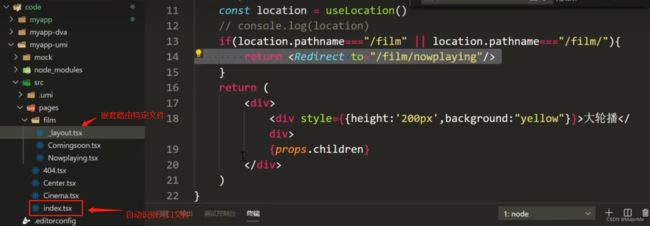
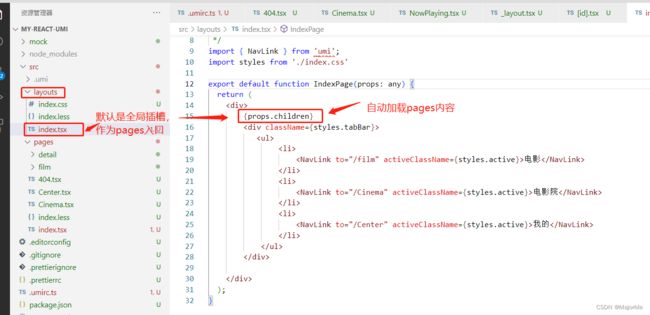
约定式路由在pages文件下(一级路由)的文件夹、文件都自动生成路由,文件夹则需要配置_layout.tsx来实现嵌套路由
 -
-
声明式导航
 -
-
动态路由
// 跳详情
  const toDetail = (filmId: string | number) => {
    props.history.push(`/detail/${filmId}`); // 跳到[id].tsx页面
  };
4、Mock和跨域
//  .umirc.ts
import { defineConfig } from 'umi';
export default defineConfig({
  nodeModulesTransform: {
    type: 'none',
  },
  proxy: { // 反向代理
    "/api": {
      target: 'https://i.maoyan.com',
      changeOrigin: true
    }
  }
});
import { useEffect } from 'react';
export default function Cinema() {
  useEffect(() => {
    fetch('/api/mmdb/movie/v3/list/hot.json?ct=%E5%B9%BF%E5%B7%9E&ci=20&channelId=4')
    .then(res => res.json())
    .then(res => {
      console.log('res-:', res)
    })
  },[])
  return <div>cinema</div>;
5、dva集成(models)
dva集成
按照目录约定注册model(models文件夹),无需手动app.model
文件名即namespace,可以省去model到处的namespace key
无需手写router.js,交给umi除了,支持model和component的按需加载
内置query-string除了,无需再手动解码和编码
内置query-loading和dva-immer,其中dva-immer需通过配置开启(简化reducer编写)
- models
在src/下新建文件夹models
// src/models/cinemaModel.js
export default {
    namespace: 'cinema', // 可以省略,省略的话会以文件名为命名空间
    state: {
        cinemaList: [],
    },

    effects: {
        *getCinemaList({ payload, callback },{call, put}) {
            const res = yield call(getCinemas, payload.cityId) // call的第一个参数是异步请求数据,第二个参数是传给第一个参数的传参
            console.log('res--', res)
            callback && callback(res)
            if(res.data && res.data.cinemas) {
                put({type:'changeCinemas', payload: {cinemaList:res.data.cinemas}})
            }
        }
    },

    reducers: {
        changeCinemas(state, action) {
            return {
                ...state,
                cinemaList: [...action.payload.cinemaList],
            }
        }
    }
}

async function getCinemas(cityId) {
    console.log('cityId-', cityId)
    const res = await fetch(`https://m.maizuo.com/gateway?cityId=${cityId}&ticketFlag=a&k=7406159`, {
      headers: {
        'X-Client-Info':
          '{"a":"3000","cn":"1002","v":"5.0.4","e":"16395416565231270166529","bc":"110100"}',
        'X-Host': 'mall.film-ticket.cinema.list',
      },
    })
      .then((res) => {
        return res.json();
      })
      .then((res) => {
        console.log('fetch--res--', res)
        return res
      })
      .catch((error) => console.log('error:', error));
      return res
}
connect的使用
import { useState, useEffect } from 'react';
import { connect } from 'dva'; // 引入connect
function Cinema(props:any) {
  const [list, setList] = useState([])
  useEffect(() => {
    if(props.cinemaList.length > 0) {
      setList(props.cinemaList)
    } else {
      props.dispatch({
        type: 'cinema/getCinemaList',
        payload: {
          cityId: props.cityId
        },
        callback: (res:any) => {
          if(res.data && res.data.cinemas) {
            setList(res.data.cinemas)
          }
        }
      })
    }
  }, []);
  return <div>...</div>
}
/* export default connect((state) => ({
  ...state.city,
  cinemaList: state.cinema.cinemaList,
  loading: state.loading.effects['cinema/getCinemaList']
})
)(Cinema); */
// 或直接解构所需要的model
export default connect(({ city, cinema, loading }) => ({ // city、cinema分别是自定义的命名空间,loading是框架提供的(固定存在)
  ...city,
  cinemaList: cinema.cinemaList,
  loading: loading.effects['cinema/getCinemaList'] // loading.global(当前异步请求状态)
})
)(Cinema);
十八、路由react-router-dom(v6)
1、v6与v5的区别
特性变更 path:与当前页面对应的URL匹配
element:新增,用于决定路由匹配时,渲染哪个组件。代替,v5的component和render。
代替了 让路由嵌套更简单 useNavigate代替useHistory
移除了的activeClassName和activeStyle
钩子useRoutes代替react-router-config
2、创建项目、安装路由
npx create-react-app project-name //  创建一个新的项目 project-name为自定义的项目名字
cnpm install react-router-dom // 会安装当前最新的"react-router-dom": "^6.6.1",
3、定义路由
方式一
import { BrowserRouter as Router, Routes, Route, Navigate } from "react-router-dom";
import React from 'react';
import Film from "../views/Film";
import NotFound from "../views/NotFound";
import NowPlaying from "../views/films/NowPlaying";
import ComingSoon from "../views/films/ComingSoon";
import FilmDetail from "../views/FilmDetail";
export default function MyRoute(props) {
return (
<Router>
<Routes>
{/* index用于嵌套路由,仅匹配父亲路径时,设置渲染的组件解决当嵌套路由有多个子路由但本身无法确认默认渲染哪个子路由的时候,可以增加index属性来指定默认路由。index路由和其他路由不同的地方是它没有path属性,他和父路由共享一个路径 */}
{/* } /> */ }
{/* 路由嵌套 */}
<Route path='/films' element={<Film/>}>
<Route path='' element={<Navigate to='/films/nowPlaying' />} />{/* 默认NowPlaying */}
<Route path='nowPlaying' element={<NowPlaying/>} />{/* 相当于} /> */ }
<Route path='comingSoon' element={<ComingSoon/>} />
</Route>
{/* 动态路由 */}
<Route path='/films/filmDetail:filmId' element={<FilmDetail/>} />
{/* *万能匹配,定义的路由匹配不上的时候就走这里 */}
{/* 方式二:useRoutes定义路由表(推荐)
import React from 'react';
import { Navigate, useRoutes } from "react-router-dom";
import Film from "../views/Film";
import NotFound from "../views/NotFound";
import NowPlaying from "../views/films/NowPlaying";
import ComingSoon from "../views/films/ComingSoon";
import FilmDetail from "../views/FilmDetail";

export default function MyRoute(props) {
    const routes = useRoutes([{
        path: '/films',
        element: <Film />,
        children: [{
            path: '',
            element: <Navigate to='/films/nowPlaying' />
        },{
            path: '/films/nowPlaying',
            element: <NowPlaying />
        },{
            path: 'comingSoon',
            element: <ComingSoon />
        }]
    },
    {
        path: '/films/filmDetail/:filmId',
        element: <FilmDetail />
    },
    {
        path: '/',
        element: <Navigate to='/films' />
    },
    {
        path: '*',
        element: <NotFound />
    }])
    return routes
嵌套路由插槽
import React from 'react';
import { Outlet } from 'react-router-dom';
export default function Film() {
    return (
        <div>
            {/* 嵌套路由的插槽 */}
            <Outlet />
        </div>
    )
}
4、路由跳转和传参(函数组件)
...
<Route path='/page1' element={<Page1/>} /> // 非动态路由
<Route path='/page2/:id' element={<Page2/>} /> // 动态路由
...
useNavigate 跳转路由
import { useNavigate } from 'react-router-dom';
const navigate = useNavigate()
...
navigate(`/page1?id=${name}`)
navigate(`/page2/${id}`) // 动态路由
...
useSearchParams、searchParams 获取路由参数
import { useSearchParams, useParams } from 'react-router-dom';
...
// useSearchParams:获取非动态路由参数
const [params, setParams] = useSearchParams() // setSearchParams用于修改当前路由参数
console.log(searchParams.get('name'))

// useParams :获取动态路由参数
const params = useParams()
console.log(params.id)
...
5、withRouter封装(类组件的路由跳转和获取路由传参)
v6版本路由丢弃了withRouter,假设要用类组件,需要实现v5路由的withRouter功能,可以自行封装一个withRouter高阶组件
 // withRouter.js
import React, { useState } from 'react';
import { useNavigate, useParams, useLocation } from 'react-router-dom';
export default function WithRouter(Conponent) {
    const push = useNavigate()
    const match = useParams()
    const location = useLocation()
    return function(props) {
        return <Conponent {...props} history={{push, match, location}} />
    }
}
使用WithRouter
import React from 'react';
import WithRouter from '../../components/withRouter';
class NowPlaying extends React.Component {
    constructor(props) {
        super(props)
    }
    ...
    // 跳转this.props.history.push
    toDetail = () => {
        this.props.history.push('/xxx/xxx')
    }
    ...
}
export default WithRouter(NowPlaying)
6、声明式导航和编程式导航
7、路由拦截/路由守卫
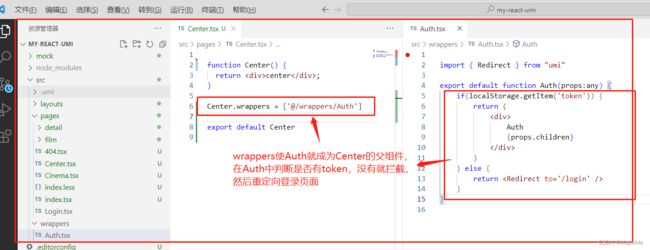
<Route path='/center' element={isAuth() ? <Center/> : <Navigate to='/login' />} />

function isAuth() { return localStorage.getItem('token') }
或者把权限判断和跳转封装到一个组件中
<Route path='/center' element={<AuthComponent><Center/></AuthComponent>} />

function AuthComponent(children) {
    const isLogin = localStorage.getItem('token')
    return isLogin ? children : <Navigate to='./login' />
}
8、路由懒加载封装
十九、react冷门知识
1、portal 传送门
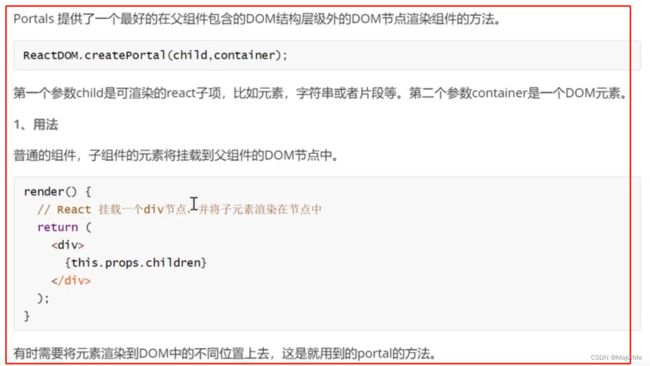
实现把组件挂载到某个节点中,比如模态弹窗可以挂到根节点
// 不管在哪里引用组件PortalDialog,它都渲染在body上
import { createPortal } from 'react-dom'
import './index.css'

export default class PortalDialog extends React.Component {
    render() {
        return createPortal(
            <div className='dialog'>
                <div className='box'>dialog</div>
            </div>
        , document.body)
    }
}
// index.css
.dialog {
  position: fixed;
  top: 0;
  left: 0;
  width: 100%;
  height: 100%;
  background: rgba(0, 0, 0, 0.7);
  display: flex;
  justify-content: center;
  align-items: center;
}
.dialog .box {
  width: 300px;
  height: 300px;
  background: white;
}
2、react懒加载(lazy和suspense)
react-lazy实现原理
webpack解析到该文件的时候,会自动进行代码分割(Code
Splitting),分割成一个文件,当使用到这个文件的时候这段代码才会异步加载
import React, { Component, Suspense } from 'react';
// 使用React.lazy()动态加载组件
const NowPlaying = React.lazy(() => import('./NowPlaying'))
const ComingSoon = React.lazy(() => import('./ComingSoon'))

class App extends Component {
    constructor(props) {
        super(props)
        this.state = {
            type: 1
        }
    }
    render() {
        return (
            <div>
                <button onClick={() => this.setState({type: 1})}>nowPlaying</button>
                <button onClick={() => this.setState({type: 2})}>ComingSoon</button>
                <Suspense fallback={<div>loadin...</div>}>
                    {this.state.type === 1 ?
                    <NowPlaying />
                    :
                    <ComingSoon />
                    }
                </Suspense>

            </div>
        )
    }
}

export default App
3、forwardRef
import React, { Component, forwardRef } from 'react';
export default class App extends Component {
    constructor(props) {
        super(props)
        this.state = {
            type: 1
        }
    }
    inputRef = React.createRef()  // 直接可以拿到Child组件内部的input
    render() {
        return (
            <div>
                <button onClick={() => {
                    this.inputRef.current.value='';
                    this.inputRef.current.focus()}}
                >获取焦点</button>
                <Child ref={this.inputRef} />
            </div>
        )
    }
}
const Child = forwardRef((props, ref) => {
    return (<div style={{background:'red'}}>
        <input ref={ref} defaultValue="默认的啦啦啦" />
    </div>)
})
4、memo
memo和pureComponent一样,可以使组件仅当props发生改变的时候重新渲染,从而达到优化性能,他们的区别是pureComponent用于类组件,memo用于function组件
用法:
import React, { Component, memo } from 'react';
export default class App extends Component {
    constructor(props) {
        super(props)
        this.state = {
            name: 'major'
        }
    }
    render() {
        return (
            <div>
                <button onClick={() => this.setState({name:'lisa'})}>点击</button>
                <Child ref={this.inputRef} />
            </div>
        )
    }
}
/*
const Child = () => { // 父组件每次点击,Child都会重新渲染
    console.log('Child render')
    return <div>水电费</div>
} */
const Child = memo(() => { // 使用memo就只渲染一
    console.log('Child render')
    return <div>水电费</div>
})
二十、项目实战
新闻发布后台管理系统实战react + axios + react-router(v6) + react-redux + Ant Design + json-server


