Spring5-事务详解
文章目录
- 1. 事务的概念
- 2. 事务的特性
- 3. 转账案例演示
-
- 3.1 创建表并添加记录
- 3.2 非事务的Service和Dao
- 3.3 为什么要使用事务
- 3.4 传统方式如何使用事务
- 4. Spring事务管理
-
- 4.1 Spring事务管理API
- 4.2 基于注解方式实现声明式事务管理【最常用】
-
- 4.2.1 配置文件中创建事务管理器
- 4.2.2 配置文件中开启事务注解
- 4.2.3 在Service 类或 Service类指定方法上添加事务注解
- 4.2.4 声明式事务管理的参数配置
-
- 4.2.4.1 `propagation`:事务的传播行为
- 4.2.4.2 `ioslation`:事务的隔离级别
- 4.2.4.3 `timeout`:超时时间
- 4.2.4.4 `readOnly`:是否只读
- 4.2.4.5 `rollbackFor`:回滚
- 4.2.4.6 `noRollbackFor`:不回滚
- 4.2.5 完全使用注解实现声明式事务管理【重点】
- 4.3 基于xml配置文件方式实现声明式事务管理
-
- 4.3.1 配置事务管理器
- 4.3.2 配置通知
- 4.3.3 配置切入点和切面
1. 事务的概念
事务是数据库操作的最基本的单元,是逻辑上的一组操作,这些操作要么都成功,要么因为其中一个操作的失败而所有操作都失败。
事务的经典场景:银行转账
事件:A转账100元给B
操作1:A总金额少100元
操作2:B总金额多100元
这两个操作如果被设置为一个事务,那么他们要么都成功,要么都失败。
2. 事务的特性
原子性:事务的操作要么都成功,一个失败都失败
一致性:事务操作之前和操作之后,数据库都必须处于一致性状态,资源的总量不变
隔离性:在多事务操作时,事务之间互不影响
持久性:事务一旦提交,则表中数据发生的变化是永久的
3. 转账案例演示
现在我们通过银行转账的案例,来演示一下Spring 中事务的使用,下面是实现该业务的Service 和 Dao 两个层的实现逻辑。

3.1 创建表并添加记录
创建一个银行账户表:
CREATE TABLE t_account (
id VARCHAR(20) PRIMARY KEY,
`username` VARCHAR(50),
money INT
)
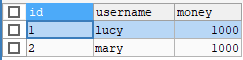
INSERT INTO t_account VALUES(1, 'lucy', 1000)
INSERT INTO t_account VALUES(2, 'mary', 1000)
3.2 非事务的Service和Dao
我们要在Service 中注入Dao,在Dao 中注入 jdbcTemplate,在jdbcTemplate 中注入DataSource
首先,开启组件扫描,完成JdbcTemplate 和数据库连接池的创建及依赖注入
<beans xmlns="http://www.springframework.org/schema/beans"
       xmlns:xsi="http://www.w3.org/2001/XMLSchema-instance"
       xmlns:context="http://www.springframework.org/schema/context"
       xsi:schemaLocation="http://www.springframework.org/schema/beans http://www.springframework.org/schema/beans/spring-beans.xsd
                             http://www.springframework.org/schema/context http://www.springframework.org/schema/context/spring-context.xsd">


<context:component-scan base-package="com.zju.spring5">context:component-scan>


<bean id="dataSource" class="com.alibaba.druid.pool.DruidDataSource" destroy-method="close">
    <property name="url" value="jdbc:mysql://localhost:3306/user_db"/>
    <property name="username" value="root"/>
    <property name="password" value="000420"/>
    <property name="driverClassName" value="com.mysql.jdbc.Driver"/>
bean>


<bean id="jdbcTemplate" class="org.springframework.jdbc.core.JdbcTemplate">

    <property name="dataSource" ref="dataSource"/>
bean>
beans>
创建UserDao 接口,注意这里只是演示事务的思想,函数命名传参写的不是很规范
package com.zju.spring5.dao;

public interface UserDao {

    // 多钱的方法
    public void addMoney();
    // 少钱的方法
    public void reduceMoney();
}
创建UserDaoImpl 实现类
package com.zju.spring5.dao;

import org.springframework.beans.factory.annotation.Autowired;
import org.springframework.jdbc.core.JdbcTemplate;
import org.springframework.stereotype.Repository;

@Repository
public class UserDaoImpl implements UserDao {

    // 注入jdbcTemplate
    @Autowired
    private JdbcTemplate jdbcTemplate;

    @Override
    public void addMoney() {
        String sql = "update t_account set money = money + ? where username = ?";
        jdbcTemplate.update(sql, 100, "mary");
    }

    @Override
    public void reduceMoney() {
        String sql = "update t_account set money = money - ? where username = ?";
        jdbcTemplate.update(sql, 100, "lucy");
    }
}
然后再写出 Service 类
package com.zju.spring5.service;

import com.zju.spring5.dao.UserDao;
import org.springframework.beans.factory.annotation.Autowired;
import org.springframework.stereotype.Service;

@Service
public class UserService {

    // 注入Dao
    @Autowired
    private UserDao userDao;

    // 转账的操作
    public void transferAccount() {
        // lucy 少100
        userDao.reduceMoney();

        // mary 多100
        userDao.addMoney();
    }
}
最后编写测试类:
package com.zju.spring5.test;

import com.zju.spring5.service.UserService;
import org.junit.Test;
import org.springframework.context.ApplicationContext;
import org.springframework.context.support.ClassPathXmlApplicationContext;

public class TestAccount {

    @Test
    public void testAccount() {
        ApplicationContext context = new ClassPathXmlApplicationContext("bean.xml");
        UserService userService = context.getBean("userService", UserService.class);
        userService.transferAccount();
    }
}
运行后,数据库结果为:

3.3 为什么要使用事务
现在乍一看,好像我们不需要事务也可以完成银行转账的业务。但是如果发生这么一种情况:在lucy 钱少了以后,代码突然报错,这时候还没有执行到 mary钱多的这一个语句,那么此时就会出现lucy 钱少了,但是mary 钱没有多这么一种情况,会破坏数据的一致性。
我们在 Service 层中模拟异常:
package com.zju.spring5.service;

import com.zju.spring5.dao.UserDao;
import org.springframework.beans.factory.annotation.Autowired;
import org.springframework.stereotype.Service;

@Service
public class UserService {

    // 注入Dao
    @Autowired
    private UserDao userDao;

    // 转账的操作
    public void transferAccount() {
        // lucy 少100
        userDao.reduceMoney();

        // 模拟异常
        int i = 1 / 0;

        // mary 多100
        userDao.addMoney();
    }
}
此时再次执行测试代码,运行结果为:
十一月 23, 2021 10:03:53 上午 com.alibaba.druid.support.logging.JakartaCommonsLoggingImpl info
信息: {dataSource-1} inited

java.lang.ArithmeticException: / by zero
....
此时数据库结果为:

我们可以看到此时钱数发生了异常,系统中少了100块钱。
因此,我们必须要使用数据库的事务功能,解决该问题。
3.4 传统方式如何使用事务
如果按照传统的方式jdbc connection方式,我们需要执行如下几步操作:
第一步:开启事务
第二步:进行正常的业务操作
第三步:没有异常,提交事务
第四步:若有异常,进行回滚
// 转账的操作
public void transferAccount() {
    try {
        // 1. 开启事务

        // 2. 进行正常的业务操作

        // lucy 少100
        userDao.reduceMoney();

        // 模拟异常
        int i = 1 / 0;

        // mary 多100
        userDao.addMoney();

        // 3. 没有异常,提交事务
    } catch (Exception e) {
        // 4. 发生异常,进行回滚
    }
}
现在Spring 给我们提供了更加便捷的框架,可以更加方便的帮助我们使用事务。
4. Spring事务管理
事务,一般来说都是添加到JavaEE三层结构的Service 层中。
Spring 进行事务管理的操作有两种操作:编程式事务管理 和 声明式事务管理。一般来说我们都是使用 声明式事务管理,因为编程式事务管理很不方便。
什么是编程式事务管理?就是我们在3.4 节中代码块中的注释部分,我们需要在每一个需要实现事务操作的方法中都要通过这4个步骤去实现事务,显得很臃肿和不方便。因此我们在Spring 中都是通过声明式事务管理去实现事务。
在Spring 中进行声明式事务管理,底层使用到了AOP:面向切面编程
4.1 Spring事务管理API
Spring 提供了一个接口PlatformTransactionManager,代表事务管理器。
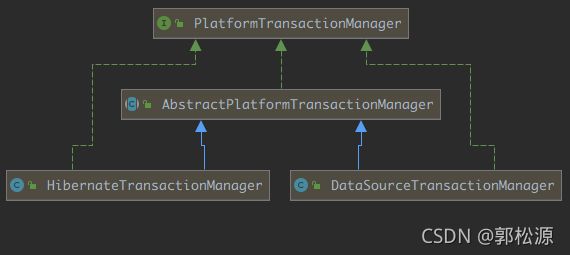
我们可以将PlatformTransactionManager 理解为一个顶层接口,接口中针对不同的JDBC框架提供了不同的实现类,如果整合的是 JdbcTemplate、MyBatis 框架则使用DataSourceTransactionManager 实现类,如果整合的是 Hibernate框架则使用 HibernateTransactionManager 实现类。
我们后面使用Spring 配置事务管理时需要使用其实现类进行操作。
4.2 基于注解方式实现声明式事务管理【最常用】
4.2.1 配置文件中创建事务管理器
<beans xmlns="http://www.springframework.org/schema/beans"
       xmlns:xsi="http://www.w3.org/2001/XMLSchema-instance"
       xmlns:context="http://www.springframework.org/schema/context"
       xsi:schemaLocation="http://www.springframework.org/schema/beans http://www.springframework.org/schema/beans/spring-beans.xsd
                             http://www.springframework.org/schema/context http://www.springframework.org/schema/context/spring-context.xsd">


    <context:component-scan base-package="com.zju.spring5">context:component-scan>


    <bean id="dataSource" class="com.alibaba.druid.pool.DruidDataSource" destroy-method="close">
        <property name="url" value="jdbc:mysql://localhost:3306//user_db"/>
        <property name="username" value="root"/>
        <property name="password" value="000420"/>
        <property name="driverClassName" value="com.mysql.jdbc.Driver"/>
    bean>


    <bean id="jdbcTemplate" class="org.springframework.jdbc.core.JdbcTemplate">

        <property name="dataSource" ref="dataSource"/>
    bean>


    <bean id="transactionManager" class="org.springframework.jdbc.datasource.DataSourceTransactionManager">

        <property name="dataSource" ref="dataSource"/>
    bean>
beans>
4.2.2 配置文件中开启事务注解
在Spring 配置文件中引入名称空间 tx,然后开启事务的注解:
<beans xmlns="http://www.springframework.org/schema/beans"
       xmlns:xsi="http://www.w3.org/2001/XMLSchema-instance"
       xmlns:context="http://www.springframework.org/schema/context"
       xmlns:tx="http://www.springframework.org/schema/tx"
       xsi:schemaLocation="http://www.springframework.org/schema/beans http://www.springframework.org/schema/beans/spring-beans.xsd
                             http://www.springframework.org/schema/context http://www.springframework.org/schema/context/spring-context.xsd
                             http://www.springframework.org/schema/tx http://www.springframework.org/schema/tx/spring-tx.xsd">


    <context:component-scan base-package="com.zju.spring5">context:component-scan>


    <bean id="dataSource" class="com.alibaba.druid.pool.DruidDataSource" destroy-method="close">
        <property name="url" value="jdbc:mysql://localhost:3306//user_db"/>
        <property name="username" value="root"/>
        <property name="password" value="000420"/>
        <property name="driverClassName" value="com.mysql.jdbc.Driver"/>
    bean>


    <bean id="jdbcTemplate" class="org.springframework.jdbc.core.JdbcTemplate">

        <property name="dataSource" ref="dataSource"/>
    bean>


    <bean id="transactionManager" class="org.springframework.jdbc.datasource.DataSourceTransactionManager">

        <property name="dataSource" ref="dataSource"/>
    bean>


    <tx:annotation-driven transaction-manager="transactionManager">tx:annotation-driven>
beans>
4.2.3 在Service 类或 Service类指定方法上添加事务注解
@Transactional 注解可以添加在类上面,也可以添加在方法上面。
如果将@Transactional 注解添加在类上面,这个类中的所有方法都添加上了事务。
如果将@Transactional 注解添加在某一个方法上面,则仅仅是在该方法上面添加上了事务。
package com.zju.spring5.service;

import com.zju.spring5.dao.UserDao;
import org.springframework.beans.factory.annotation.Autowired;
import org.springframework.stereotype.Service;
import org.springframework.transaction.annotation.Transactional;

@Service
@Transactional
public class UserService {

    // 注入Dao
    @Autowired
    private UserDao userDao;

    // 转账的操作
    public void transferAccount() {
        // lucy 少100
        userDao.reduceMoney();

        // 模拟异常
        int i = 1 / 0;

        // mary 多100
        userDao.addMoney();
    }

}
加上注解之后,如果方法执行失败,那么数据库自动恢复到函数执行之前的状态。
现在,我们再次运行测试代码:依然会报错
十一月 23, 2021 2:40:27 下午 com.alibaba.druid.support.logging.JakartaCommonsLoggingImpl info
信息: {dataSource-1} inited

java.lang.ArithmeticException: / by zero

Process finished with exit code -1
但是查看数据表,对扣钱的操作并没有执行,事务已经自动回滚。
4.2.4 声明式事务管理的参数配置
我们刚刚通过注解方式在类上添加了@Transactional 注解,完成了一个声明式事务注解配置的案例。其实,我们还可以在这个注解里面配置事务的相关参数。
4.2.4.1 propagation:事务的传播行为
不同事务方法之间进行调用,这个过程中事务是如何进行管理的。
事务方法:对数据库表数据能够造成变化的操作,即增、删、改操作。
传播行为是指多个事务方法之间调用会产生什么影响,即:一个有@Transactional注解的事务方法,调用一个没有@Transactional 注解的事务方法如何操作?或者一个没有@Transactional注解的事务方法调用一个有@Transactional注解的事务方法该如何操作?或者两个都有@Transactional注解的事务方法之间调用该如何处理?
针对这个属性的设置,请参考文章【看完就明白_spring事务的7种传播行为】
Spring中,事务的传播行为默认为@Transaction(propagation = Propagation.REQUIRED)
4.2.4.2 ioslation:事务的隔离级别
多事务操作之间可能会产生如下的三个问题:脏读、不可重复读、虚读。
脏读:一个未提交的事务A读取到了另一个未提交的事务B对数据的修改。
不可重复读:一个未提交的事务A读取到了另一个已提交的事务B对数据的修改。
虚读:一个未提交的事务A读取到了另一个已提交的事务B增加的数据。
通过设置事务的隔离性,就可以解决上述三个问题:

我们可以通过形如@Transaction(propagation = Propagation.REQUIRED, isolation = Isolation.REPEATABLE_READ)设置。
MySQL数据库默认的隔离级别就是Isolation.REPEATABLE_READ
4.2.4.3 timeout:超时时间
超时时间是指:设置事务从开始经过多长时间后必须要提交,如果超时则自动进行回滚。
Spring 中事务超时时间默认值为 -1,表示没有超时时间上限。设置事件默认以秒为单位。
例如:@Transaction(timeout = 5, propagation = Propagation.REQUIRED, isolation = Isolation.REPEATABLE_READ)
4.2.4.4 readOnly:是否只读
readOnly 默认值为 false:表示当前事务可以进行查询操作,也可以进行增加、修改、删除操作。
若设置 readOnly 为 true:则表示当前事务只可以执行查询操作。
4.2.4.5 rollbackFor:回滚
rollbackFor:可以设置当哪些类型的异常发生时,事务自动进行回滚。
4.2.4.6 noRollbackFor:不回滚
noRollbackFor:可以设置当哪些类型的异常发生时,事务不用进行回滚。
4.2.5 完全使用注解实现声明式事务管理【重点】
使用配置类来替代xml 配置文件。
注意:在配置类中创建Bean对象,直接写一个Xxxx getXxxxx(Yyyyyy 注入的其他对象)方法,加上@Bean 注解即可,它会根据注入的对象的类型,自动推断。
package com.zju.spring5.config;

import com.alibaba.druid.pool.DruidDataSource;
import org.springframework.context.annotation.Bean;
import org.springframework.context.annotation.ComponentScan;
import org.springframework.context.annotation.Configuration;
import org.springframework.jdbc.core.JdbcTemplate;
import org.springframework.jdbc.datasource.DataSourceTransactionManager;
import org.springframework.transaction.annotation.EnableTransactionManagement;

import javax.sql.DataSource;

@Configuration
@ComponentScan(basePackages = "com.zju.spring5")
@EnableTransactionManagement // 表示开启事务
public class TxConfig {

    // 创建数据库连接池
    @Bean
    public DruidDataSource getDruidDataSource() {
        DruidDataSource dataSource = new DruidDataSource();
        dataSource.setDriverClassName("com.mysql.jdbc.Driver");
        dataSource.setUrl("jdbc:mysql://localhost:3306/user_db");
        dataSource.setUsername("root");
        dataSource.setPassword("000420");
        return dataSource;
    }

    // 创建JdbcTemplate 对象
    @Bean
    public JdbcTemplate getJdbcTemplate(DataSource dataSource) {
        // 通过函数传参方式到IOC 容器中,根据DataSource类型,自动找到dataSource
        JdbcTemplate jdbcTemplate = new JdbcTemplate();
        // 注入DataSource
        jdbcTemplate.setDataSource(dataSource);
        return jdbcTemplate;
    }

    // 创建事务管理器对象
    @Bean
    public DataSourceTransactionManager getDataSourceTransactionManager(DataSource dataSource) {
        // 通过函数传参方式到IOC 容器中,根据DataSource类型,自动找到dataSource
        DataSourceTransactionManager dataSourceTransactionManager = new DataSourceTransactionManager();
        dataSourceTransactionManager.setDataSource(dataSource);
        return dataSourceTransactionManager;
    }
}
编写一个测试类,可以正常执行,这里不再附上。
@Test
public void testAccountConfig() {
    ApplicationContext context = new AnnotationConfigApplicationContext(TxConfig.class);
    UserService userService = context.getBean("userService", UserService.class);
    userService.transferAccount();
}
4.3 基于xml配置文件方式实现声明式事务管理
配置文件方式实现事务本质利用的是AOP,它是将事务看做是对原本方法的一种增强。
4.3.1 配置事务管理器
<bean id="transactionManager" class="org.springframework.jdbc.datasource.DataSourceTransactionManager">

    <property name="dataSource" ref="dataSource"/>
bean>
4.3.2 配置通知
<tx:advice id="txadvice">

    <tx:attributes>

        <tx:method name="transferAccount" propagation="REQUIRED" isolation="DEFAULT"/>
    tx:attributes>
tx:advice>
4.3.3 配置切入点和切面
<aop:config>

    <aop:pointcut id="pt" expression="execution(* com.zju.spring5.service.UserService.*(..))"/>

    <aop:advisor advice-ref="txadvice" pointcut-ref="pt">aop:advisor>
aop:config>
以上,就完成了所有的配置,配置文件如下:
<beans xmlns="http://www.springframework.org/schema/beans"
       xmlns:xsi="http://www.w3.org/2001/XMLSchema-instance"
       xmlns:context="http://www.springframework.org/schema/context"
       xmlns:tx="http://www.springframework.org/schema/tx" xmlns:aop="http://www.springframework.org/schema/aop"
       xsi:schemaLocation="http://www.springframework.org/schema/beans http://www.springframework.org/schema/beans/spring-beans.xsd
                             http://www.springframework.org/schema/context http://www.springframework.org/schema/context/spring-context.xsd
                             http://www.springframework.org/schema/tx http://www.springframework.org/schema/tx/spring-tx.xsd http://www.springframework.org/schema/aop https://www.springframework.org/schema/aop/spring-aop.xsd">


    <context:component-scan base-package="com.zju.spring5">context:component-scan>


    <bean id="dataSource" class="com.alibaba.druid.pool.DruidDataSource" destroy-method="close">
        <property name="url" value="jdbc:mysql://localhost:3306/user_db"/>
        <property name="username" value="root"/>
        <property name="password" value="000420"/>
        <property name="driverClassName" value="com.mysql.jdbc.Driver"/>
    bean>


    <bean id="jdbcTemplate" class="org.springframework.jdbc.core.JdbcTemplate">

        <property name="dataSource" ref="dataSource"/>
    bean>


    <bean id="transactionManager" class="org.springframework.jdbc.datasource.DataSourceTransactionManager">

        <property name="dataSource" ref="dataSource"/>
    bean>


    <tx:advice id="txadvice">

        <tx:attributes>

            <tx:method name="transferAccount" propagation="REQUIRED" isolation="DEFAULT"/>
        tx:attributes>
    tx:advice>


    <aop:config>

        <aop:pointcut id="pt" expression="execution(* com.zju.spring5.service.UserService.*(..))"/>

        <aop:advisor advice-ref="txadvice" pointcut-ref="pt">aop:advisor>
    aop:config>
beans>