- C#实现AES-CBC加密工具类(含完整源码及使用教程)
WangMing_X
C#实现各种功能工具集c#AES-CBC加密
一、AES-CBC加密应用场景AES(AdvancedEncryptionStandard)作为全球公认的安全加密标准,广泛使用在以下场景:API通信加密:保护HTTP接口传输的敏感数据(如身份令牌、支付信息)文件安全存储:加密本地配置文件、数据库连接字符串等用户隐私保护:加密存储密码、身份证号等PII(个人身份信息)跨平台数据交换:与Java/Python等其他语言实现的加密系统互通物联网设备通
- Python真经:筑基开光篇
zzzzjflzdvkk
python开发语言
第一章:灵脉筑基Python真经乃跨三界之法,无论Windows、Linux、MacOSX,抑或云端秘境、移动外域,皆可开辟灵脉,筑基修炼。修士欲入此道,须先探查本命灵台是否已结Python丹种。可于终端秘境中掐诀念咒,输入「python」真言,若有金光浮现,则显其丹种品阶;若无回应,便是灵脉未开,需行筑基之法。第二章:天机阁取经灵脉之源修士当登临「天机阁」此乃Python真经本源之地。阁中藏有最
- Spring Boot实战:MySQL与Redis数据一致性深度解析与代码实战
黑猫Teng
springbootmysqlredis
SpringBoot实战:MySQL与Redis数据一致性深度解析与代码实战一、数据一致性问题概述二、常见解决方案三、选择合适的解决方案四、总结在SpringBoot开发中,MySQL作为关系型数据库,提供了强大的数据存储和查询能力;而Redis作为内存数据库,以其高速读写性能成为缓存层的首选。然而,当这两者共同服务于一个系统时,如何确保它们之间的数据一致性,成为了一个不可忽视的问题。本文将深入探
- laravel中 firstOrNew(), firstOrCreate(), updateOrInsert(), updateOrCreate() 方法的区别和实现原理
Amber_37
laravelphp
在Laravel中,firstOrNew,firstOrCreate,updateOrInsert,和updateOrCreate是用于处理数据库记录的常用方法,每个方法有其特定的用途和行为。下面是它们的主要区别和工作原理:1.firstOrNew目的:该方法主要用于查找数据库中与给定属性相匹配的第一条记录,如果找不到,则创建一个新的模型实例(但不会立即保存到数据库)。返回值:返回一个Eloque
- mysql 查询后, 不存在则插入记录, 但是在高并发时容易导致重复插入, 有什么解决办法吗
Amber_37
mysql数据库
在高并发场景下,为了避免因并发请求导致的重复插入问题,可以采用以下几种策略:使用INSERT...ONDUPLICATEKEYUPDATE:利用MySQL提供的ONDUPLICATEKEYUPDATE语句,可以在尝试插入数据时,如果发现唯一键(如主键或唯一索引)冲突,即数据已存在,自动转为执行更新操作。确保无论多少并发请求同时到达,只要涉及的关键字段值相同,只会执行一次插入或更新操作。INSERT
- 【经验总结】 PostgreSQL的COALESCE 函数用法
Xcong_Zhu
学习笔记postgresql数据库
COALESCE函数在PostgreSQL中是一个非常有用的函数,它不仅可以用来自动替换NULL值,还可以用于多种其他场景。COALESCE函数接受一系列的参数,并返回第一个非NULL的参数值。如果所有参数都是NULL,那么COALESCE函数将返回NULL。以下是一些COALESCE函数的常见用途:提供默认值:当你查询数据库时,如果某个字段可能包含NULL值,但你希望显示一个默认值,可以使用CO
- Linux基础指令详解:掌握Linux系统的必备技能
幻梦织者
linux服务器运维
Linux基础指令详解:掌握Linux系统的必备技能一、Linux基础指令概述二、基础指令详解1.**ls**2.**cd**3.**pwd**4.**mkdir**5.**rmdir**6.**rm**7.**cp**8.**mv**9.**cat**10.**more**和**less**11.**chmod**12.**chown**13.**df**14.**du**15.**ps**16
- 知识库全链路交互逻辑
賢843
软件测试理论基础python
阶段顺序URL输入→网络连接→前端请求→后端处理→数据库交互→数据返回→前端渲染→连接关闭阶段1:用户输入URL用户行为:在浏览器地址栏输入`https://knowledge.com/search?keyword=金融趋势`浏览器动作:“浏览器解析URL:协议补全:若用户省略协议,浏览器自动添加https://(若网站支持HTTPS)字符转义:对中文、空格等特殊字符编码(如金融趋势→%E9%
- SQL Server数据库基于SQL性能优化
王小工
数据库数据库sql性能优化
以下是SQLServer数据库SQL性能优化的实战策略,综合高频优化场景与核心技巧:一、索引优化1.合理创建索引对WHERE、JOIN、ORDERBY常用字段创建索引,优先选择选择性高的列(如唯一性高的字段)。使用聚集索引(ClusteredIndex)优化范围查询和排序操作,非聚集索引(Non-clusteredIndex)用于单列或组合列查询。避免在频繁更新的列上创建过多索引,以平衡读
- Milvus 本地Ollama向量化markdown文件
慌雨
milvus数据库
提示:文章写完后,目录可以自动生成,如何生成可参考右边的帮助文档文章目录前言代码测试注意前言提示:这里可以添加本文要记录的大概内容:我在局域网内安装了milvus服务,现在需要把一个文件夹里所有的markdown文档都向量化到milvus数据库中。所用的切分方法是langchain中自带的markdown按照标题切分,且带有标题的metadata,非常清晰。但是用langchain提供的milvu
- 轻松掌握:Milvus向量数据库部署与RAG使用技巧
威研威语
人工智能数据库milvus数据库人工智能RAG
Milvus简介Milvus是一款开源的向量数据库,由Zilliz开发并维护,适合用于机器学习和人工智能领域。是一款专为处理向量查询而设计的数据库,Milvus能够对万亿级向量进行索引。Milvus官网:https://milvus.io/Milvus中文文档:https://www.milvus-io.com/Milvus部署环境准备Linux操作系统Docker19.03或更高版本Docker
- T-SQL语言的物联网
尤宸翎
包罗万象golang开发语言后端
T-SQL语言在物联网中的应用引言物联网(InternetofThings,IoT)是一个迅猛发展的领域,它将各种物理设备通过互联网连接起来,实现数据的实时采集和分析。随着物联网技术的不断发展,数据的规模和复杂性急剧提升,这对数据存储、处理和分析提出了更高的要求。在众多数据库编程语言中,T-SQL(Transact-SQL)以其强大而灵活的特性,成为物联网数据管理和分析中一种重要的工具。本文将探讨
- 微信小程序点餐系统的设计与实现(开题报告+源码+论文)_在线点餐外卖系统设计与实现文献
2301_82243979
程序员微信小程序小程序
二.技术环境jdk版本:1.8及以上ide工具:Eclipse或者IDEA,微信小程序开发工具数据库:mysql5.7(必须5.7)编程语言:Javajava框架:ssmmaven:3.6.1详细技术:HTML+CSS+JAVA+SSM+MYSQL+VUE+MAVEN+微信开发工具三.功能设计本基于微信小程序的外卖点餐系统的设计与实现有管理员,外卖员,餐厅,用户共四个角色。管理员功能有个人中心,外
- 征程 6 基于 Linux 和 Node-Locked License 配置 DSP 开发环境
自动驾驶算法
说明:该文档以征程6上使用的Q8DSP安装为例,同样的步骤在征程5上使用方法类似只是征程6使用的DSP为VP61.获取所需文件在配置征程6的DSP开发环境前,您需要获取以下文件:标准工具链发布包部分(请联系地平线项目对接人获取)OpenExplorer算法工具链Docker镜像OpenExplorer算法工具链交付包(OE包中提供了大量示例,包括DSP示例)OpenExplorer算法工具链中文文
- centos7升级openssh9.8
weixin_43806846
运维
前言处理新发布的CVE-2024-6387关于openssh的漏洞,升级openssh到9.8版本。一、升级准备?确认系统版本[root@CentOS7~]#uname-aLinuxCentOS73.10.0-1160.el7.x86_64#1SMPMonOct1916:18:59UTC2020x86_64x86_64x86_64GNU/Linux[root@CentOS7~]#cat/etc/c
- linux系统的加固,防火墙,弱口令的梳理
weixin_43806846
安全加固
防火墙开启防火墙:systemctlstartfirewalldsystemctlenablefirewalld弱口令opensslrand-base648>/root/.passwd#生成随机密码,保存至/root/.passwd,保存好root密码后,可以删除此文件cat/root/.passwd|passwdroot--stdin#更改root密码禁止root账号远程登录系统,并修改ssh默
- MySQL的基本使用
咖啡の猫
mysql数据库
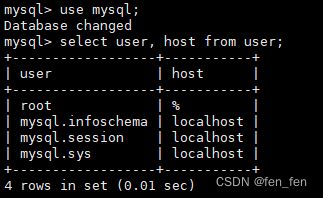
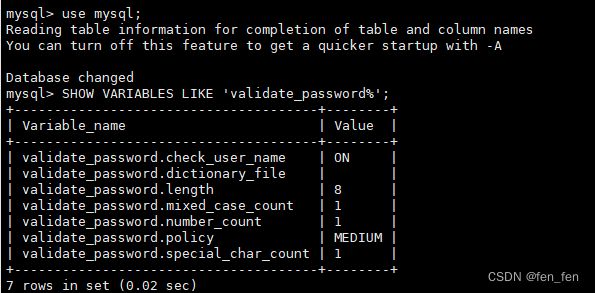
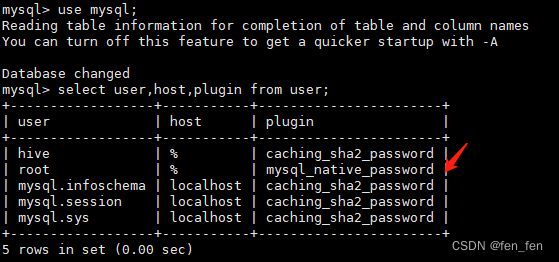
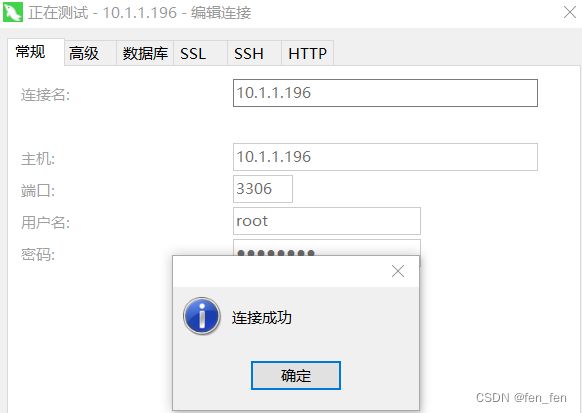
MySQL作为最流行的关系型数据库管理系统之一,被广泛应用于各种规模的应用程序中。无论是构建小型个人项目还是大型企业级应用,掌握MySQL的基础使用对于开发者来说都是必不可少的技能。本文将带你从零开始,学习如何使用MySQL进行基本的数据操作。一、连接到MySQL服务器在开始任何操作之前,首先需要确保你已经安装并运行了MySQL服务器,并且能够通过客户端工具或命令行接口连接到它。使用命令行连接:打
- Linux关闭swap分区操作[适用于CDH报警等]
NBA首席形象大使阿坤
大数据运维和开发#大数据集群linux运维hadoop
1.查看swap分区挂载路径(没卵用)swapon-s2.设置配置文件的swap配置echo“vm.swappiness=0”>/etc/sysctl.conf3.设置内存中的swap状态。有时候配置文件为0,但集群或服务仍然使用了swap分区,可能原因就是内存没有同步配置echo“0”>/proc/sys/vm/swappiness4.生效配置sysctl-p5.将/etc/fstab文件中所有
- SQL必知必会40-SQLite:为什么微信用SQLite存储聊天记录?
程序员zhi路
MYSQL专栏sqlsqlitejvm
我在上一篇文章中讲了WebSQL,当我们在Chrome、Safari和Firefox等浏览器客户端中使用WebSQL时,会直接操作SQLite。实际上SQLite本身是一个嵌入式的开源数据库引擎,大小只有3M左右,可以将整个SQLite嵌入到应用中,而不用采用传统的客户端/服务器(Client/Server)的架构。这样做的好处就是非常轻便,在许多智能设备和应用中都可以使用SQLite,比如微信就
- 25年大数据开发省赛样题第一套,离线数据处理答案
Tometor
大数据sparkscala
省赛样题一,数据抽取模块这一模块的作用是从mysql抽取数据到ods层进行指标计算,在题目中要求进行全量抽取,并新增etl-date字段进行分区,日期为比赛前一天importorg.apache.spark.sql.SparkSessionimportjava.util.PropertiesobjectTask1{defmain(args:Array[String]):Unit={valspark
- Mybatis的基本使用
学c真好玩
mybatis
MyBatis简介MyBatis用于持久层框架,持久层是对数据库操作的部分,前版本iBatis由Apache软件基金组织进行更名并维护。特点:简化数据库的操作SQL映射灵活(半ORM框架)支持高级映射易于集成维护配置动态SQL缓存机制功能:替代JDBC,JDBC是java中提供的用于操作数据库的技术及方案数据库的连接控制难。连接池SQL语句硬编码。将sql语句存放到xml配置文件中参数传递问题。提
- html5使用本地sqlite数据库
小祁爱编程
sqlitehtml5bigdata
html5使用本地sqlite数据库本地数据库概述在HTML5中,大大丰富了客户端本地可以存储的内容,添加了很多功能将原本必须要保存在服务器上的数据转为保存在客户端本地,从而大大提高了Web应用程序性能,减轻了服务器的负担,使用Web时代重新回到了“客户端为重、服务器端为轻”的时代。HTML5中内置了两种本地数据库,一种是SQLite,一种是indexedDBSQLite数据库使用操作本地数据库的
- VSCode 2025最新后端开发必备插件汇总(必备插件合集,Python、Java、Go等语言)
Code_流苏
实用软件与高效工具vscodepythonjava后端开发必备插件合集
前言:作为微软推出的轻量级跨平台编辑器,VSCode凭借智能代码补全、远程开发、Git集成等核心功能,已成为后端开发者首选工具。其强大的插件生态更是覆盖了主流后端语言支持、代码质量优化、性能分析等全场景需求。名人说:博观而约取,厚积而薄发。——苏轼《稼说送张琥》创作者:Code_流苏(CSDN)(一个喜欢古诗词和编程的Coder)目录一、语言支持类插件二、代码质量和格式化工具三、数据库工具四、AP
- MySQL 事务的隔离级别
重生之我在成电转码
javamysql事务
MySQL事务的隔离级别定义了多个事务并发执行时,如何防止相互影响。隔离级别越高,数据一致性越强,但并发性能可能降低。四种事务隔离级别MySQL提供4种事务隔离级别(从低到高):隔离级别脏读(DirtyRead)不可重复读(Non-repeatableRead)幻读(PhantomRead)1.读未提交(ReadUncommitted)❌可能发生❌可能发生❌可能发生2.读已提交(ReadCommi
- ollama官方安装包
哈拉少12
人工智能
一、官方安装包基本信息最新版本Windows版:v0.6.0.0(国内镜像版,大小999.8M)Linux版:v0.6.0(官方版,大小1.59G)macOS版:支持通过官网直接下载(版本号与Windows/Linux同步)支持平台桌面端:Windows(Win7及以上)、Linux(x86_64/ARM64)、macOS容器化部署:支持Docker(需配合DockerDesktop)
- nvm的使用汇总
柒柒钏
小知识点安装教程NVM
nvm的使用汇总在Linux中安装nvm使用nvm安装Node.js一些特殊用法总结在Linux中安装nvm运行以下命令,用来下载并执行nvm的安装脚本:curl-o-https://raw.githubusercontent.com/nvm-sh/nvm/v0.40.0/install.sh|bash注意:v0.40.0是截至2023年的最新稳定版本。如果需要其他版本,请替换为对应的版本号。安装
- Linux中如何终止进程?这三种办法要刻在脑子里
wljslmz
Linux技术linux运维服务器
在Linux中,进程是程序运行时的实例。简单来说,每当你启动一个应用(比如Firefox浏览器或一个脚本),系统就会为它创建一个进程,并分配一个唯一的编号——进程ID(简称PID)。通过这个PID,系统知道该如何管理和调度它。但进程并非总是乖乖听话。以下几种情况,可能让你不得不挥起“终结者”之手:无响应:程序卡死,窗口一动不动,怎么点都没反应。资源霸占:某个进程狂吃CPU或内存,让系统慢如蜗牛。任
- 主流架构模式全景解析:微服务 vs SOA vs 单体架构的终极抉择指南
Eqwaak00
分布式系统设计实战科技微服务架构
一、架构演进史:从巨石到微粒的进化之路(图示:1970s单体→2000sSOA→2010s微服务→2020s云原生)二、三大架构模式深度拆解2.1单体架构(MonolithicArchitecture)核心特征graphTDA[单体应用]-->B[用户界面]A-->C[业务逻辑]A-->D[数据访问]B-->E[Web/移动端]C-->F[订单处理]C-->G[支付处理]D-->H[MySQL]D
- MySQL主从复制架构原理及部署(work)
只想按时下班
Mysqlmysql数据库memcached
文章目录一、原理1、什么是MySQL主从复制2、MySQL主从复制应用场景3、MySQL主从复制架构及原理4、MySQLbinlog日志三种模式二、主从复制配置搭建1、MySQL8二进制安装2、主从复制配置3、测试主从复制三、二进制日志管理说明四、MySQL主从复制常见问题1、从库binlog落后主库binlog?2、主库update,从库迟迟没有更新3、主从复制延时配置(从库配置)4、主从复制故
- Mysql 主从复制架构
百里自来卷
mysql架构数据库
MySQL主从复制(Master-SlaveReplication)是一种常见的数据库架构,广泛用于提高数据库的可扩展性、读写分离以及数据备份和容灾恢复。主从复制架构中,一个MySQL实例作为主库(Master),负责处理所有的写操作,而一个或多个从库(Slave)从主库复制数据,并负责处理读操作。主库(Master):主库负责处理数据库的所有写操作(如INSERT、UPDATE和DELETE),
- 如何用ruby来写hadoop的mapreduce并生成jar包
wudixiaotie
mapreduce
ruby来写hadoop的mapreduce,我用的方法是rubydoop。怎么配置环境呢:
1.安装rvm:
不说了 网上有
2.安装ruby:
由于我以前是做ruby的,所以习惯性的先安装了ruby,起码调试起来比jruby快多了。
3.安装jruby:
rvm install jruby然后等待安
- java编程思想 -- 访问控制权限
百合不是茶
java访问控制权限单例模式
访问权限是java中一个比较中要的知识点,它规定者什么方法可以访问,什么不可以访问
一:包访问权限;
自定义包:
package com.wj.control;
//包
public class Demo {
//定义一个无参的方法
public void DemoPackage(){
System.out.println("调用
- [生物与医学]请审慎食用小龙虾
comsci
生物
现在的餐馆里面出售的小龙虾,有一些是在野外捕捉的,这些小龙虾身体里面可能带有某些病毒和细菌,人食用以后可能会导致一些疾病,严重的甚至会死亡.....
所以,参加聚餐的时候,最好不要点小龙虾...就吃养殖的猪肉,牛肉,羊肉和鱼,等动物蛋白质
- org.apache.jasper.JasperException: Unable to compile class for JSP:
商人shang
maven2.2jdk1.8
环境: jdk1.8 maven tomcat7-maven-plugin 2.0
原因: tomcat7-maven-plugin 2.0 不知吃 jdk 1.8,换成 tomcat7-maven-plugin 2.2就行,即
<plugin>
- 你的垃圾你处理掉了吗?GC
oloz
GC
前序:本人菜鸟,此文研究学习来自网络,各位牛牛多指教
1.垃圾收集算法的核心思想
Java语言建立了垃圾收集机制,用以跟踪正在使用的对象和发现并回收不再使用(引用)的对象。该机制可以有效防范动态内存分配中可能发生的两个危险:因内存垃圾过多而引发的内存耗尽,以及不恰当的内存释放所造成的内存非法引用。
垃圾收集算法的核心思想是:对虚拟机可用内存空间,即堆空间中的对象进行识别
- shiro 和 SESSSION
杨白白
shiro
shiro 在web项目里默认使用的是web容器提供的session,也就是说shiro使用的session是web容器产生的,并不是自己产生的,在用于非web环境时可用其他来源代替。在web工程启动的时候它就和容器绑定在了一起,这是通过web.xml里面的shiroFilter实现的。通过session.getSession()方法会在浏览器cokkice产生JESSIONID,当关闭浏览器,此
- 移动互联网终端 淘宝客如何实现盈利
小桔子
移動客戶端淘客淘寶App
2012年淘宝联盟平台为站长和淘宝客带来的分成收入突破30亿元,同比增长100%。而来自移动端的分成达1亿元,其中美丽说、蘑菇街、果库、口袋购物等App运营商分成近5000万元。 可以看出,虽然目前阶段PC端对于淘客而言仍旧是盈利的大头,但移动端已经呈现出爆发之势。而且这个势头将随着智能终端(手机,平板)的加速普及而更加迅猛
- wordpress小工具制作
aichenglong
wordpress小工具
wordpress 使用侧边栏的小工具,很方便调整页面结构
小工具的制作过程
1 在自己的主题文件中新建一个文件夹(如widget),在文件夹中创建一个php(AWP_posts-category.php)
小工具是一个类,想侧边栏一样,还得使用代码注册,他才可以再后台使用,基本的代码一层不变
<?php
class AWP_Post_Category extends WP_Wi
- JS微信分享
AILIKES
js
// 所有功能必须包含在 WeixinApi.ready 中进行
WeixinApi.ready(function(Api) {
// 微信分享的数据
var wxData = {
&nb
- 封装探讨
百合不是茶
JAVA面向对象 封装
//封装 属性 方法 将某些东西包装在一起,通过创建对象或使用静态的方法来调用,称为封装;封装其实就是有选择性地公开或隐藏某些信息,它解决了数据的安全性问题,增加代码的可读性和可维护性
在 Aname类中申明三个属性,将其封装在一个类中:通过对象来调用
例如 1:
//属性 将其设为私有
姓名 name 可以公开
- jquery radio/checkbox change事件不能触发的问题
bijian1013
JavaScriptjquery
我想让radio来控制当前我选择的是机动车还是特种车,如下所示:
<html>
<head>
<script src="http://ajax.googleapis.com/ajax/libs/jquery/1.7.1/jquery.min.js" type="text/javascript"><
- AngularJS中安全性措施
bijian1013
JavaScriptAngularJS安全性XSRFJSON漏洞
在使用web应用中,安全性是应该首要考虑的一个问题。AngularJS提供了一些辅助机制,用来防护来自两个常见攻击方向的网络攻击。
一.JSON漏洞
当使用一个GET请求获取JSON数组信息的时候(尤其是当这一信息非常敏感,
- [Maven学习笔记九]Maven发布web项目
bit1129
maven
基于Maven的web项目的标准项目结构
user-project
user-core
user-service
user-web
src
- 【Hive七】Hive用户自定义聚合函数(UDAF)
bit1129
hive
用户自定义聚合函数,用户提供的多个入参通过聚合计算(求和、求最大值、求最小值)得到一个聚合计算结果的函数。
问题:UDF也可以提供输入多个参数然后输出一个结果的运算,比如加法运算add(3,5),add这个UDF需要实现UDF的evaluate方法,那么UDF和UDAF的实质分别究竟是什么?
Double evaluate(Double a, Double b)
- 通过 nginx-lua 给 Nginx 增加 OAuth 支持
ronin47
前言:我们使用Nginx的Lua中间件建立了OAuth2认证和授权层。如果你也有此打算,阅读下面的文档,实现自动化并获得收益。SeatGeek 在过去几年中取得了发展,我们已经积累了不少针对各种任务的不同管理接口。我们通常为新的展示需求创建新模块,比如我们自己的博客、图表等。我们还定期开发内部工具来处理诸如部署、可视化操作及事件处理等事务。在处理这些事务中,我们使用了几个不同的接口来认证:
&n
- 利用tomcat-redis-session-manager做session同步时自定义类对象属性保存不上的解决方法
bsr1983
session
在利用tomcat-redis-session-manager做session同步时,遇到了在session保存一个自定义对象时,修改该对象中的某个属性,session未进行序列化,属性没有被存储到redis中。 在 tomcat-redis-session-manager的github上有如下说明: Session Change Tracking
As noted in the &qu
- 《代码大全》表驱动法-Table Driven Approach-1
bylijinnan
java算法
关于Table Driven Approach的一篇非常好的文章:
http://www.codeproject.com/Articles/42732/Table-driven-Approach
package com.ljn.base;
import java.util.Random;
public class TableDriven {
public
- Sybase封锁原理
chicony
Sybase
昨天在操作Sybase IQ12.7时意外操作造成了数据库表锁定,不能删除被锁定表数据也不能往其中写入数据。由于着急往该表抽入数据,因此立马着手解决该表的解锁问题。 无奈此前没有接触过Sybase IQ12.7这套数据库产品,加之当时已属于下班时间无法求助于支持人员支持,因此只有借助搜索引擎强大的
- java异常处理机制
CrazyMizzz
java
java异常关键字有以下几个,分别为 try catch final throw throws
他们的定义分别为
try: Opening exception-handling statement.
catch: Captures the exception.
finally: Runs its code before terminating
- hive 数据插入DML语法汇总
daizj
hiveDML数据插入
Hive的数据插入DML语法汇总1、Loading files into tables语法:1) LOAD DATA [LOCAL] INPATH 'filepath' [OVERWRITE] INTO TABLE tablename [PARTITION (partcol1=val1, partcol2=val2 ...)]解释:1)、上面命令执行环境为hive客户端环境下: hive>l
- 工厂设计模式
dcj3sjt126com
设计模式
使用设计模式是促进最佳实践和良好设计的好办法。设计模式可以提供针对常见的编程问题的灵活的解决方案。 工厂模式
工厂模式(Factory)允许你在代码执行时实例化对象。它之所以被称为工厂模式是因为它负责“生产”对象。工厂方法的参数是你要生成的对象对应的类名称。
Example #1 调用工厂方法(带参数)
<?phpclass Example{
- mysql字符串查找函数
dcj3sjt126com
mysql
FIND_IN_SET(str,strlist)
假如字符串str 在由N 子链组成的字符串列表strlist 中,则返回值的范围在1到 N 之间。一个字符串列表就是一个由一些被‘,’符号分开的自链组成的字符串。如果第一个参数是一个常数字符串,而第二个是type SET列,则 FIND_IN_SET() 函数被优化,使用比特计算。如果str不在strlist 或st
- jvm内存管理
easterfly
jvm
一、JVM堆内存的划分
分为年轻代和年老代。年轻代又分为三部分:一个eden,两个survivor。
工作过程是这样的:e区空间满了后,执行minor gc,存活下来的对象放入s0, 对s0仍会进行minor gc,存活下来的的对象放入s1中,对s1同样执行minor gc,依旧存活的对象就放入年老代中;
年老代满了之后会执行major gc,这个是stop the word模式,执行
- CentOS-6.3安装配置JDK-8
gengzg
centos
JAVA_HOME=/usr/java/jdk1.8.0_45
JRE_HOME=/usr/java/jdk1.8.0_45/jre
PATH=$PATH:$JAVA_HOME/bin:$JRE_HOME/bin
CLASSPATH=.:$JAVA_HOME/lib/dt.jar:$JAVA_HOME/lib/tools.jar:$JRE_HOME/lib
export JAVA_HOME
- 【转】关于web路径的获取方法
huangyc1210
Web路径
假定你的web application 名称为news,你在浏览器中输入请求路径: http://localhost:8080/news/main/list.jsp 则执行下面向行代码后打印出如下结果: 1、 System.out.println(request.getContextPath()); //可返回站点的根路径。也就是项
- php里获取第一个中文首字母并排序
远去的渡口
数据结构PHP
很久没来更新博客了,还是觉得工作需要多总结的好。今天来更新一个自己认为比较有成就的问题吧。 最近在做储值结算,需求里结算首页需要按门店的首字母A-Z排序。我的数据结构原本是这样的:
Array
(
[0] => Array
(
[sid] => 2885842
[recetcstoredpay] =&g
- java内部类
hm4123660
java内部类匿名内部类成员内部类方法内部类
在Java中,可以将一个类定义在另一个类里面或者一个方法里面,这样的类称为内部类。内部类仍然是一个独立的类,在编译之后内部类会被编译成独立的.class文件,但是前面冠以外部类的类名和$符号。内部类可以间接解决多继承问题,可以使用内部类继承一个类,外部类继承一个类,实现多继承。
&nb
- Caused by: java.lang.IncompatibleClassChangeError: class org.hibernate.cfg.Exten
zhb8015
maven pom.xml关于hibernate的配置和异常信息如下,查了好多资料,问题还是没有解决。只知道是包冲突,就是不知道是哪个包....遇到这个问题的分享下是怎么解决的。。
maven pom:
<dependency>
<groupId>org.hibernate</groupId>
<ar
- Spark 性能相关参数配置详解-任务调度篇
Stark_Summer
sparkcachecpu任务调度yarn
随着Spark的逐渐成熟完善, 越来越多的可配置参数被添加到Spark中来, 本文试图通过阐述这其中部分参数的工作原理和配置思路, 和大家一起探讨一下如何根据实际场合对Spark进行配置优化。
由于篇幅较长,所以在这里分篇组织,如果要看最新完整的网页版内容,可以戳这里:http://spark-config.readthedocs.org/,主要是便
- css3滤镜
wangkeheng
htmlcss
经常看到一些网站的底部有一些灰色的图标,鼠标移入的时候会变亮,开始以为是js操作src或者bg呢,搜索了一下,发现了一个更好的方法:通过css3的滤镜方法。
html代码:
<a href='' class='icon'><img src='utv.jpg' /></a>
css代码:
.icon{-webkit-filter: graysc