springboot实现异步任务,定时任务和邮件发送
目录
创建springboot工程并导入依赖
1.异步任务
2.定时任务
3.邮箱发送
创建springboot工程并导入依赖
            org.springframework.boot
            spring-boot-starter-mail


            org.springframework.boot
            spring-boot-starter-test
            test


            org.springframework.boot
            spring-boot-starter-web
1.异步任务
创建一个hello方法
service层的代码如下:
package com.li.service;

import org.springframework.stereotype.Service;

@Service
public class AsyncService {

    public void hello()  {
        try {
            Thread.sleep(3000);
        } catch (InterruptedException e) {
            e.printStackTrace();
        }
        System.out.println("数据处理中。。。");
    }
}
当代码执行hello方法时会等待三秒后再后台输出:数据处理中。。。
controller层代码:
package com.li.controller;

import com.li.service.AsyncService;
import org.springframework.beans.factory.annotation.Autowired;
import org.springframework.web.bind.annotation.RequestMapping;
import org.springframework.web.bind.annotation.RestController;

@RestController
public class AsyncController {

    @Autowired
    AsyncService asyncService;

    @RequestMapping("/hello")
    public String hello(){
        asyncService.hello();
        return "OK";
    }
}
当浏览器输入:http://localhost:8080/hello
后,会等待三秒然后再屏幕上显示OK。

为了不让他在运行的时候继续等待,把他变成异步任务。
2.修改service层代码,在hello方法上添加注解@Async
    @Async
    public void hello()  {
        try {
            Thread.sleep(3000);
        } catch (InterruptedException e) {
            e.printStackTrace();
        }
        System.out.println("数据处理中。。。");
    }
在springboot启动类上添加注解@EnableAsync
@EnableAsync    //开启异步注解功能
@SpringBootApplication
public class Springboot09TestApplication {

    public static void main(String[] args) {
        SpringApplication.run(Springboot09TestApplication.class, args);
    }

}- @EnableXXX 是开启xxx功能
- @EnableAsync //开启异步注解功能
- @Async :说明该方法是异步方法
现在再次启动

输入网址后发现,先显示OK,然后,后台在显示数据处理中。。。
同步
前一个任务结束后在执行后一个任务,程序执行的顺序和任务的排列顺序是一致的。同步的做法例如:一边吃饭吃完饭才能睡觉
异步
在做一件事的时候,因为这个任务花费时间比较长,在做这件事的时候,还可以去做另一件事,比如一边吃饭一边听音乐
本质区别:这条流水线上的各个流程的执行顺序不同
同步任务指的是:主线程上的任务排队执行
异步任务指的是:不进入主线程,而是进入一个"任务队列"的任务,当主线程中的任务执行完,才会从任务队列中取出异步任务放入主线程执行
2.定时任务
在service层创建类 ScheduledService 代码如下:
package com.li.service;

import org.springframework.scheduling.annotation.Scheduled;
import org.springframework.stereotype.Service;

@Service
public class ScheduledService {
    //秒 分 时 日 月 星期
    @Scheduled(cron = "* * * * * *")
    public void hello2(){
        System.out.println("hello,这个方法被执行了");
    }
}
cron中的6个*代表:秒 分 时 日 月 星期
在启动类上加入注解:@EnableScheduling
- TaskScheduler 任务调度者
- TaskExecutor 任务执行者
- @EnableScheduling 开启定时功能的注解
- @Scheduled(cron = "* * * * * *") 定时方法
将ScheduledService 代码其修改为:
    @Scheduled(cron = "0/2 * * * * *")
    public void hello2(){
        System.out.println("hello,这个方法被执行了");
    }
表示每2秒执行一次这个方法,运行效果:
定时任务,顾名思义就是在某个时间中执行的任务。
- 0/2 * 17 * * 0-7 星期1-7的17点每2秒执行一次
- 0/2 * * * * 5 周五每2秒执行一次
- * * * ? * ? 等价于* * * * * * 每秒执行一次
3.邮箱发送
application.properties配置文件中加入如下代码:
#qq邮箱
[email protected]
# 密码必须是授权码 注意授权码获取之后要点击确定
spring.mail.password=vwnfjrkkeepejdai
#主机 一般smtp开头 qq邮箱九qq.com 163邮箱九163.com
spring.mail.host=smtp.qq.com
# 开启加密验证  一般只有qq有或者其他大厂有
spring.mail.properties.mail.smtp.enable=true
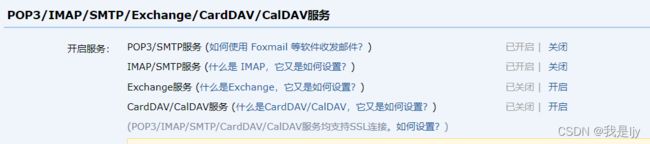
qq获取授权码需要在qq邮箱中的设置-->账户,开启服务,如图,这样第三方登录就可以同通过授权码进行登录
在测试类中编写一个简单的邮件如下代码,自己给自己发邮件。
    @Autowired
    JavaMailSenderImpl mailSender;

    @Test
    void contextLoads() {
        //一个简单的邮件
        SimpleMailMessage mailMessage = new SimpleMailMessage();
        mailMessage.setSubject("主题");   //主题
        mailMessage.setText("这是一个文本");    //文本
        mailMessage.setTo("[email protected]");     //收件人
        mailMessage.setFrom("[email protected]");   //服务器   发件人

        mailSender.send(mailMessage);   //发送
}- setSubject(); 代表主题
- setText(); 代表文本
- setTo(); 代表收件人
- setFrom(); 代表发件人,发件人必须和配置文件中的qq号对应
执行测试方法后:

邮件被接受到了
编写一个复杂的邮件:
@Test
void contextLoads2() throws MessagingException {
//一个复杂的邮件
MimeMessage mimeMessage = mailSender.createMimeMessage();
//组装
MimeMessageHelper helper = new MimeMessageHelper(mimeMessage,true);
//正文
helper.setSubject("你好");
helper.setText("hello
",true);
//附件
helper.addAttachment("1.jpg",new File("C:\\Users\\lenovo\\Desktop\\1.jpg"));
helper.setTo("[email protected]");
helper.setFrom("[email protected]");
mailSender.send(mimeMessage);
}- setText("",true); 在组装的后面加上true后文本就可以识别thml标签了
- setaddAttachment("",File); 代表要发送的附件
执行该方法后接收到了这个邮件

总结
实现的任务的方法不止一种,这里只写了部分,以上就是springboot实现任务的方法之一。