nestjs学习
nestjs学习
前期准备
安装好 nods.js(>= 10.13.0)
npm -v
7.x.x.

node -v
14.17.x
还要安装mongoDB
安装问题
npm i -g @nestjs/cli
报警告
npm WARN optional SKIPPING OPTIONAL DEPENDENCY: fsevents@~2.3.2 (node_modules\@nestjs\cli\node_modules\chokidar\node_modules\fsevents):
npm WARN notsup SKIPPING OPTIONAL DEPENDENCY: Unsupported platform for [email protected]: wanted {"os":"darwin","arch":"any"} (current: {"os":"win32","arch":"x64"})
npm WARN [email protected] requires a peer of ajv@^6.9.1 but none is installed. You must install peer dependencies yourself.
fsevents 为mac系统 可以不予处理。第三个警告 ajv模块需要ajv@^6.9.1但没有安装
npm i agv
nest new test
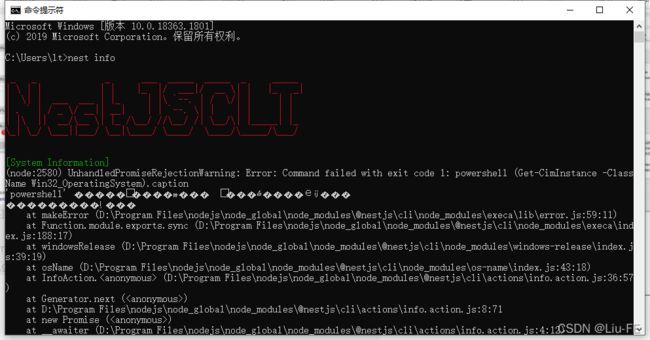
报错:
nest : 无法将“nest”项识别为 cmdlet、函数、脚本文件或可运行程序的名称。请检查名称的拼写,如果包括路径,请确保路径正确,然后再试一次。
所在位置 行:1 字符: 1
+ nest new project-first
+ ~~~~
    + CategoryInfo          : ObjectNotFound: (nest:String) [], CommandNotFoundException
    + FullyQualifiedErrorId : CommandNotFoundException
解决方法
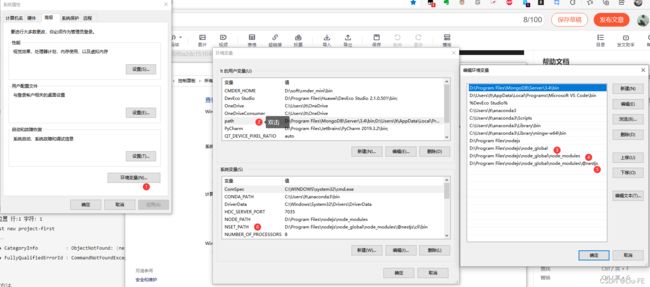
用户变量和系统环境变量添加nestjs的安装路径即可。
nest new test
将会创建一个test的目录,安装node_modules和一些其他样本文件,并将创建一个src目录目录中包含几个核心文件
npm run start
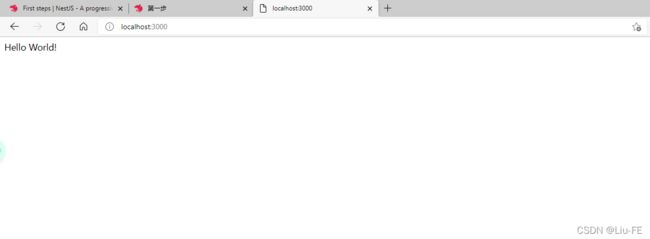
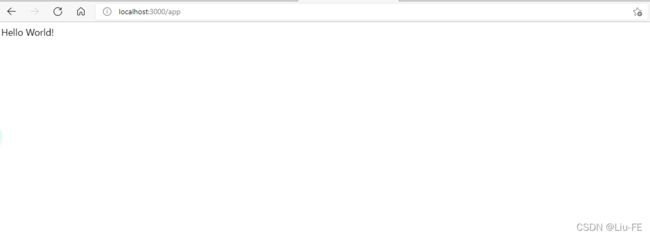
此命令启动 HTTP 服务监听定义在 src/main.ts 文件中定义的端口号。在应用程序运行后, 打开浏览器并访问 http://localhost:3000/。 你应该看到 Hello world! 信息。
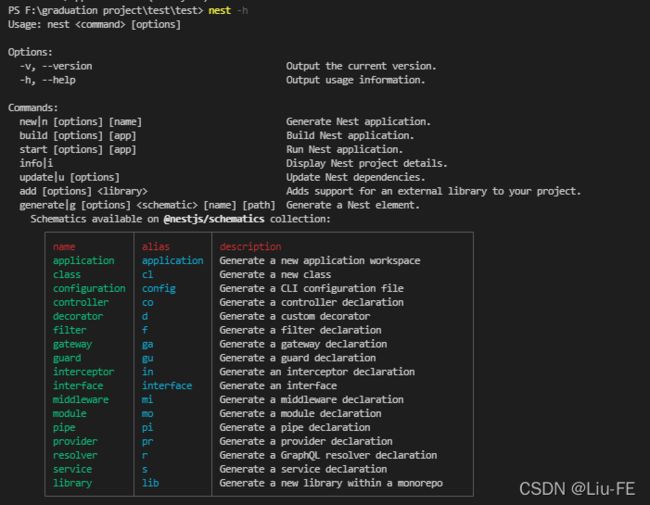
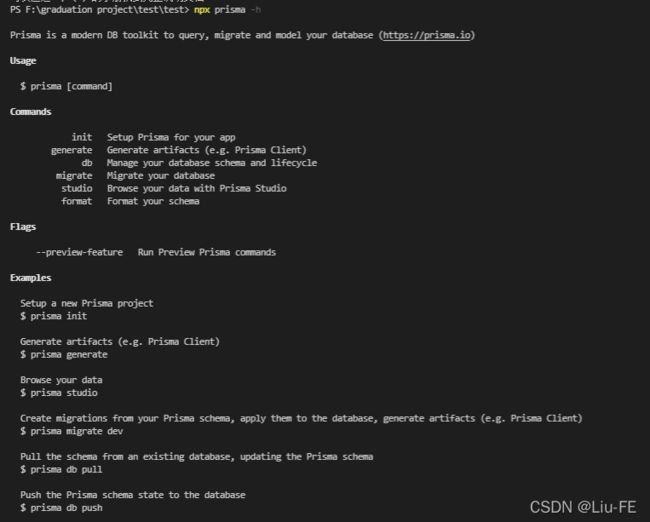
这里是nest --help 和 nest g --help 参数指令界面,其中工程指令主要涉及controller service 等。
使用NVM(nvm是node的包管理工具) 管理nodejs,方便进行版本切换和依赖包管理
控制区–网页跳转
控制器负责处理传入的请求和向客户端返回响应。
这里我们先熟悉一下,对app.controller进行一定的改写
app.controller.ts
import { Controller, Get, Param, Query } from '@nestjs/common';
import { query } from 'express';
import { AppService } from './app.service';

@Controller('app')
export class AppController {
  constructor(private readonly appService: AppService) {}


  //监听get请求
  @Get()
  getHello(): string {
    return this.appService.getHello();
  }
  @Get('/demo')
  demoFun(){
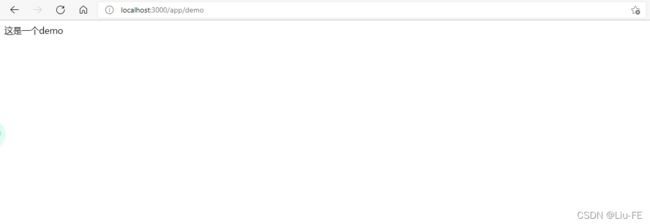
    return '这是一个demo';
  }

  @Get('/:id')
  getOneById(
    @Param()
    param,
    @Query()
    query,
    ){
      return '这是第二次测试'+param.id;
    };

}
测试图片
这些我们自己生成一个users的控制器
nest g co [name] --no-spec //快捷生成控制器指令且不生成测试文件,可以从帮助处得知。
nest g co users --no-spec
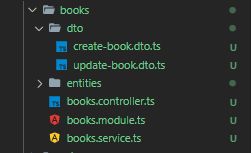
生成一个名字为 users 的控制器, 其中会生成一个name文件夹,文件夹下会有name.controller.ts文件
![]()
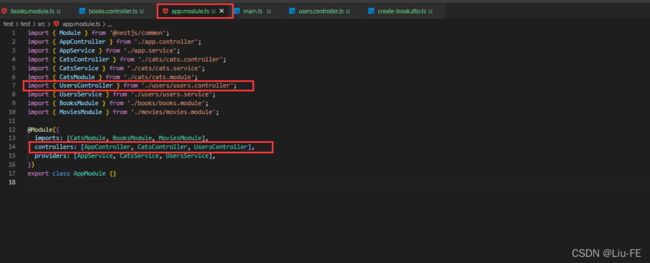
同时在app.module.ts根模块文件中,也引入了userscontroller。由于会自动引入路由关系,所以大大减少了开发时间和代码错误问题。
这个users控制器我们之后有用。
提供者–服务
生成一个users的服务
nest g s [name] --no-spec //快捷生成服务指令且不生成测试文件
nest g s users --no-spec
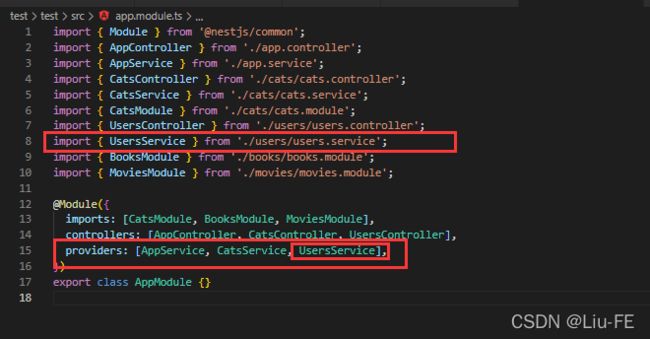
同样的app根模块进行了自动引入服务。同时对服务进行一定的内容添加,这里我们加入了用户数组,并进行查看函数的添加。
users.service.ts
import { Injectable } from '@nestjs/common';


const people = [
{
    id:1,
    name:'user-1',
},
{
    id:2,
    name:'user-2',
},
{
    id:3,
    name:'user-3',
},
{
    id:4,
    name:'user-4',
},
];


@Injectable()
export class UsersService {
    loadAll(){
        return people;
    }

    findOne(id){
        return people.find((item) => item.id == id);
    }
}
users.controller.ts
import { Controller, Get, Param } from '@nestjs/common';
import { UsersService } from './users.service';

@Controller('users')
export class UsersController {

    constructor(private readonly usersService:UsersService){

    }
    @Get()
    loadData(){
        return this.usersService.loadAll();
    }

    @Get(':id')
    getOne( @Param() params){
        return this.usersService.findOne(params.id);
    }


}
快速生成CRUD
CRUD generator-nestjs官方参看文档

nest g resource命令不仅仅生成所有Nestjs构件模块(模块,服务,控制器类)也生成实体类,DTO类和测试(.spec)文件。
如下是一个生成的控制器 (REST API):
@Controller('users')
export class UsersController {
  constructor(private readonly usersService: UsersService) {}

  @Post()
  create(@Body() createUserDto: CreateUserDto) {
    return this.usersService.create(createUserDto);
  }

  @Get()
  findAll() {
    return this.usersService.findAll();
  }

  @Get(':id')
  findOne(@Param('id') id: string) {
    return this.usersService.findOne(+id);
  }

  @Put(':id')
  update(@Param('id') id: string, @Body() updateUserDto: UpdateUserDto) {
    return this.usersService.update(+id, updateUserDto);
  }

  @Delete(':id')
  remove(@Param('id') id: string) {
    return this.usersService.remove(+id);
  }
}
它也自动生成了所有CRUD终端占位符(REST API路径,GraphQL查询和编译,微服务和WebSocket网关的消息订阅器)–一键所有内容。
下面我们进行上手一下。
nest g res books --no-spec
app.module.ts
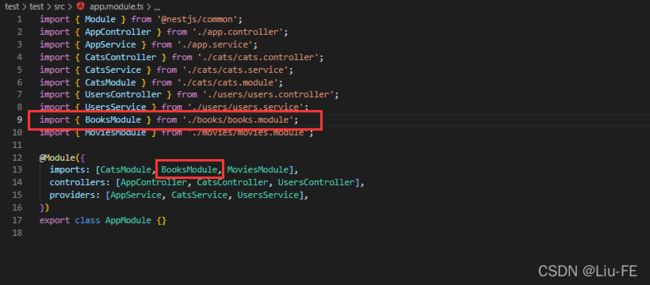
app根模块也自动引入了books模块。
books.controller.ts
import { Controller, Get, Post, Body, Patch, Param, Delete } from '@nestjs/common';
import { BooksService } from './books.service';
import { CreateBookDto } from './dto/create-book.dto';
import { UpdateBookDto } from './dto/update-book.dto';

@Controller('books')
export class BooksController {
  constructor(private readonly booksService: BooksService) {}

  //增加
  @Post()
  create(@Body() createBookDto: CreateBookDto) {
    return this.booksService.create(createBookDto);
  }

  //查看全部
  @Get()
  findAll() {
    return this.booksService.findAll();
  }

  //查看‘id’
  @Get(':id')
  findOne(@Param('id') id: string) {
    return this.booksService.findOne(+id);
  }


  //更新修改
  @Patch(':id')
  update(@Param('id') id: string, @Body() updateBookDto: UpdateBookDto) {
    return this.booksService.update(+id, updateBookDto);
  }

  //删除
  @Delete(':id')
  remove(@Param('id') id: string) {
    return this.booksService.remove(+id);
  }
}
books.module.ts
import { Module } from '@nestjs/common';
import { BooksService } from './books.service';
import { BooksController } from './books.controller';

@Module({
  controllers: [BooksController],
  providers: [BooksService]
})
export class BooksModule {}
books控制器
books.service.ts
import { Injectable } from '@nestjs/common';
import { CreateBookDto } from './dto/create-book.dto';
import { UpdateBookDto } from './dto/update-book.dto';

@Injectable()
export class BooksService {
  create(createBookDto: CreateBookDto) {
    return 'This action adds a new book';
  }

  findAll() {
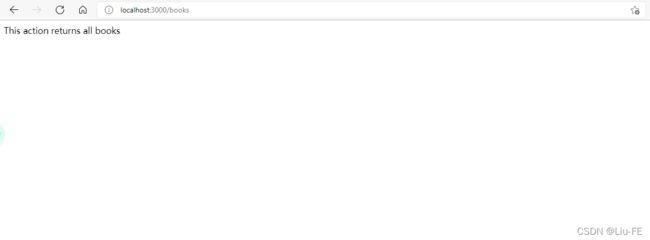
    return `This action returns all books`;
  }

  findOne(id: number) {
    return `This action returns a #${id} book`;
  }

  update(id: number, updateBookDto: UpdateBookDto) {
    return `This action updates a #${id} book`;
  }

  remove(id: number) {
    return `This action removes a #${id} book`;
  }
}
books的提供者
create-book.dto.ts
export class CreateBookDto {
    name:string;
    author:string;
    price:string;

}
book资源属性
测试图片
这里快速生成一个CRUD的资源就可以了,我之后又生成了一个movies的CRUD资源库。将在之后又用。
生成接口文档–swagger
OpenAPI nestjs官方参看文档
这里我们直接参考官方文档安装swagger,使用express(默认使用平台)
npm install --save @nestjs/swagger swagger-ui-express
这里根据官方文档我们队main.ts文件进行引入swagger和对启动项进行一定的改写
man.ts
import { NestFactory } from '@nestjs/core';
import { AppModule } from './app.module';
import { SwaggerModule, DocumentBuilder } from '@nestjs/swagger';
import { UsersService } from './users/users.service';

declare const module: any;

async function bootstrap() {
  const app = await NestFactory.create(AppModule);

  const options = new DocumentBuilder()
    .setTitle('我的接口文档')
    .setDescription('这个接口文档我是自动生成的')
    .setVersion('1.0.0')
    .addTag('all')
    .build();
  const document = SwaggerModule.createDocument(app, options);
  SwaggerModule.setup('docs', app, document);//访问文档的时候,直接访问/docs

  await app.listen(3000);

  if (module.hot) {
    module.hot.accept();
    module.hot.dispose(() => app.close());
  }
}
bootstrap();
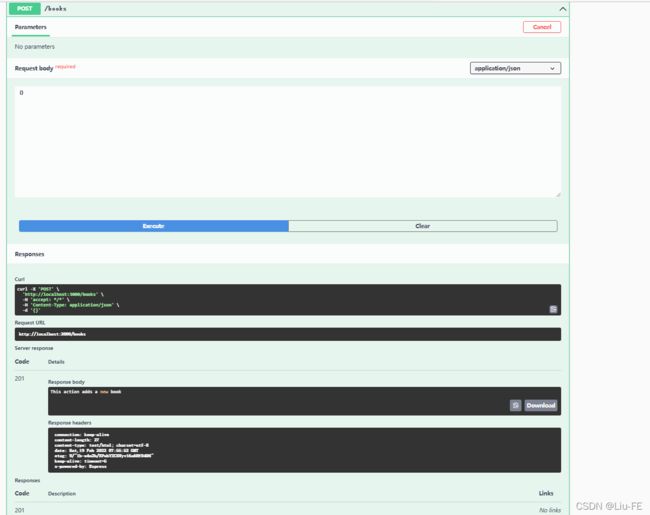
这里我们进行run app后,进行测试。浏览器输入http://localhost:3000/docs/

可以看到我们的接口文档是可以进行操作的。
对接数据库–Prisma
prisma–nestjs官方参看文档
prisma 官方网址
Prisma是一个开放源代码的节点ORM。js和打字脚本。它被用作编写普通SQL或使用其他数据库访问工具(如SQL查询生成器(如knex.js)或ORMs(如TypeORM和Sequelize))的替代方法。Prisma目前支持PostgreSQL、MySQL、SQL Server、SQLite和MongoDB(预览版)。
虽然Prisma可以与普通JavaScript一起使用,但它支持TypeScript,并提供了一种超越TypeScript生态系统中其他ORM的类型安全级别。
我们进行安装相关依赖。(这里我们需要在一个nest项目中进行安装依赖)
npm install prisma --save-dev
这里我们使用的数据库为sqlite
npx prisma init --datasource-provider sqlite


初始化prisma,创建一个prisma文件(数据库表结构)。这里还需要进行安装一个prisma插件进行打开schema.prisma文件
schema.prisma
// This is your Prisma schema file,
// learn more about it in the docs: https://pris.ly/d/prisma-schema

generator client {
  provider = "prisma-client-js"
}

datasource db {
  provider = "sqlite"
  url      = env("DATABASE_URL")
}
//提供者 sqlite  url 数据库配置文件链接

model user{
  id String  @id @unique @default(uuid())
  userName String @unique @map("user_name")
  password String @default("")
  nickName String @default("") @map("nick_name")
  createdAT DateTime @default(now()) @map("created_at")
  updatedAT DateTime @updatedAt @map("updated_at")

  @@map("users")
}

model book{
  id String  @id @unique @default(uuid())
  title String @default("")
  author String @default("")
  price Float @default(0)
  @@map("books")
}
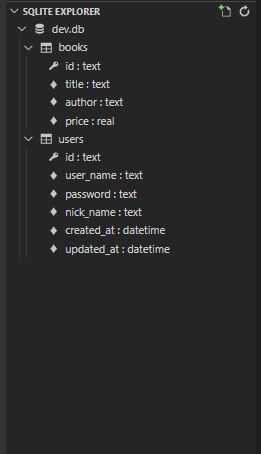
npx prisma db push
生成一个数据库

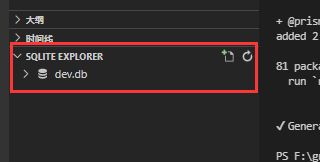
这里需要安装sqlite插件进行打开dev.db。
打开dev.db步骤F1选择SQLite:OpenData base,之后选择要打开的数据库文件就可以了。
prisma使用数据库-nest官方文档
这里我们需要生成一个prisma.service 文件,进行使用数据库。
nest g s prisma --no-spec
prisma.service.ts
import { INestApplication, Injectable, OnModuleInit } from '@nestjs/common';
import { PrismaClient } from '@prisma/client';

@Injectable()
export class PrismaService extends PrismaClient
  implements OnModuleInit {

  async onModuleInit() {
    await this.$connect();
  }

  async enableShutdownHooks(app: INestApplication) {
    this.$on('beforeExit', async () => {
      await app.close();
    });
  }
}
之后books进行路由引入和服务改写。
books.module.ts
import { Module } from '@nestjs/common';
import { BooksService } from './books.service';
import { BooksController } from './books.controller';
import { PrismaService } from 'src/prisma/prisma.service';

@Module({
  controllers: [BooksController],
  providers: [BooksService,PrismaService]
})
export class BooksModule {}
books.service.ts
import { Injectable } from '@nestjs/common';
import { PrismaService } from 'src/prisma/prisma.service';
import { CreateBookDto } from './dto/create-book.dto';
import { UpdateBookDto } from './dto/update-book.dto';

@Injectable()
export class BooksService {

constructor (private readonly prismaService:PrismaService){}

  create(createBookDto: CreateBookDto) {
    return this.prismaService.book.create({
      data:createBookDto,
    });
  }

  findAll() {
    return this.prismaService.book.findMany({where: { } });
  }

  findOne(id: string) {
    return this.prismaService.book.findUnique({
      where:{
        id,
      }
    });
  }

  update(id: string, updateBookDto: UpdateBookDto) {
    return this.prismaService.book.update({
      where: { id },
      data:updateBookDto,
    });
  }

  remove(id: string) {
    return this.prismaService.book.delete({where: { id } });
  }
}
books.controller.ts
import { Controller, Get, Post, Body, Patch, Param, Delete } from '@nestjs/common';
import { BooksService } from './books.service';
import { CreateBookDto } from './dto/create-book.dto';
import { UpdateBookDto } from './dto/update-book.dto';

@Controller('books')
export class BooksController {
  constructor(private readonly booksService: BooksService) {}

  //增加
  @Post()
  create(@Body() createBookDto: CreateBookDto) {
    return this.booksService.create(createBookDto);
  }

  //查看全部
  @Get()
  findAll() {
    return this.booksService.findAll();
  }

  //查看‘id’
  @Get(':id')
  findOne(@Param('id') id: string) {
    return this.booksService.findOne(id);
  }


  //更新修改
  @Patch(':id')
  update(@Param('id') id: string, @Body() updateBookDto: UpdateBookDto) {
    return this.booksService.update(id, updateBookDto);
  }

  //删除
  @Delete(':id')
  remove(@Param('id') id: string) {
    return this.booksService.remove(id);
  }
}
create-book.dto.ts
import { ApiProperty } from "@nestjs/swagger";

export class CreateBookDto {
    @ApiProperty({
        description:'标题',
    })
    title:string;
    @ApiProperty({
        description:'作者',
    })
    author:string;
    @ApiProperty({
        description:'价格',
    })
    price:number;

}
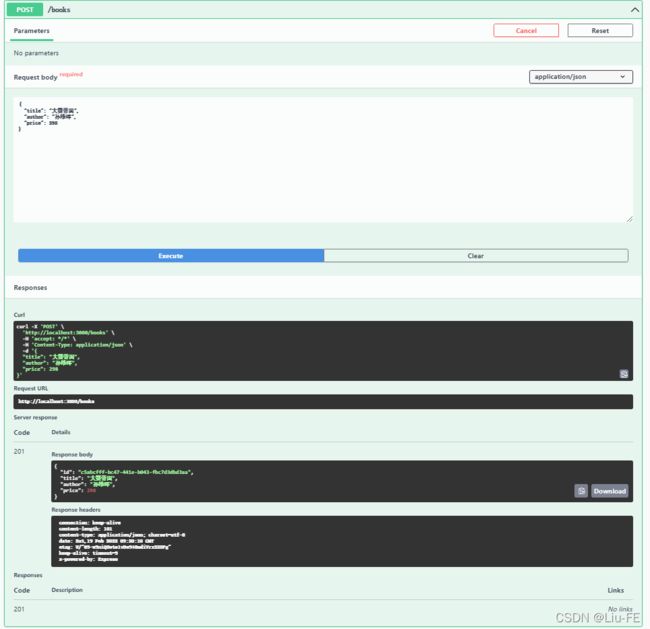
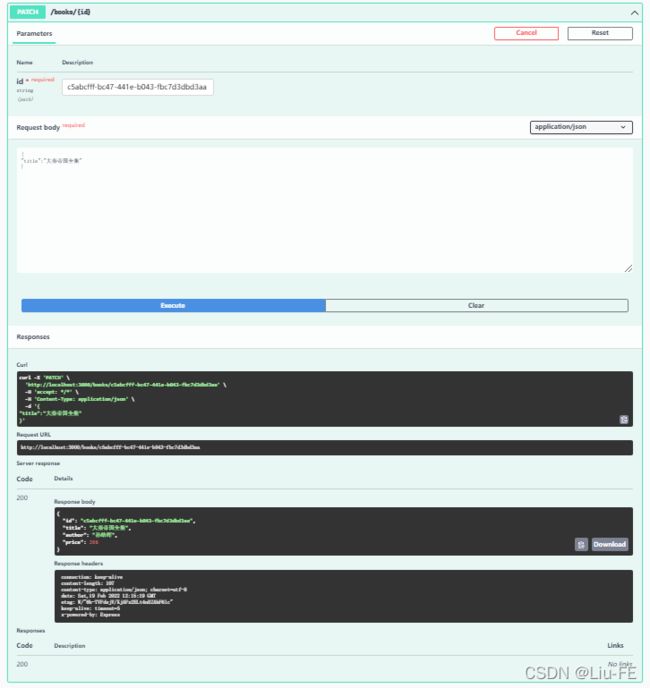
测试
输出数据统一管理–拦截器
拦截器–nestjs官方文档
拦截器具有一系列有用的功能,这些功能受面向切面编程(AOP)技术的启发。它们可以:
- 在函数执行之前/之后绑定额外的逻辑
- 转换从函数返回的结果
- 转换从函数抛出的异常
- 扩展基本函数行为
- 根据所选条件完全重写函数 (例如, 缓存目的)
生成一个全局回复的拦截器
nest g in all-response --no-spec
all-response.interceptor.ts
import { CallHandler, ExecutionContext, Injectable, NestInterceptor } from '@nestjs/common';
import { Observable, map } from 'rxjs';

@Injectable()
export class AllResponseInterceptor implements NestInterceptor {
  intercept(context: ExecutionContext, next: CallHandler): Observable<any> {
    return next.handle().pipe(
      map( (data) => {
      return {
        data,
        success:true,
        errorMessage:'',
      };
    }),
    );
  }
}
main.ts
import { NestFactory } from '@nestjs/core';
import { AppModule } from './app.module';
import { SwaggerModule, DocumentBuilder } from '@nestjs/swagger';
import { UsersService } from './users/users.service';
import { AllResponseInterceptor } from './all-response.interceptor';

declare const module: any;

async function bootstrap() {
  const app = await NestFactory.create(AppModule);

  app.useGlobalInterceptors(new AllResponseInterceptor());  //使用自定义的全局拦截器对数据做处理


//https://docs.nestjs.com/openapi/introduction 配置接口文档
  const options = new DocumentBuilder()
    .setTitle('我的接口文档')
    .setDescription('这个接口文档我是自动生成的')
    .setVersion('1.0.0')
    .addTag('all')
    .build();
  const document = SwaggerModule.createDocument(app, options);
  SwaggerModule.setup('docs', app, document);//访问文档的时候,直接访问/api

  await app.listen(3000);

  if (module.hot) {
    module.hot.accept();
    module.hot.dispose(() => app.close());
  }
}
bootstrap();


//https://docs.nestjs.com/recipes/prisma prisma数据库的使用说明
客户端输入验证
管道符–nestjs官方文档
管道是具有 @Injectable() 装饰器的类。管道应实现 PipeTransform 接口。
管道有两个类型:
- 转换:管道将输入数据转换为所需的数据输出
- 验证:对输入数据进行验证,如果验证成功继续传递; 验证失败则抛出异常;
Nest 自带八个开箱即用的管道,即
- ValidationPipe
- ParseIntPipe
- ParseBoolPipe
- ParseArrayPipe
- ParseUUIDPipe
- DefaultValuePipe
- ParseEnumPipe
- ParseFloatPipe
这里我们使用class-validator,首先我们进行安装依赖包。
npm i --save class-validator class-transformer
create-book.dto.ts
import { ApiProperty } from "@nestjs/swagger";
import { IsNotEmpty } from "class-validator";

export class CreateBookDto {
    @ApiProperty({
        description:'标题',
    })
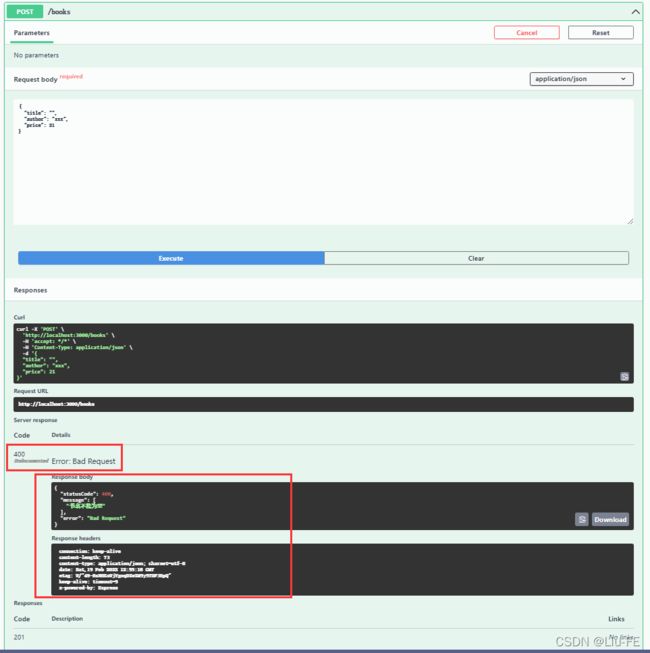
    @IsNotEmpty({ message: '书名不能为空'})
    title:string;
    @ApiProperty({
        description:'作者',
    })
    author:string;
    @ApiProperty({
        description:'价格',
    })
    price:number;

}
main.ts
import { NestFactory } from '@nestjs/core';
import { AppModule } from './app.module';
import { SwaggerModule, DocumentBuilder } from '@nestjs/swagger';
import { UsersService } from './users/users.service';
import { AllResponseInterceptor } from './all-response.interceptor';
import { ValidationPipe } from '@nestjs/common';

declare const module: any;

async function bootstrap() {
  const app = await NestFactory.create(AppModule);

  app.useGlobalInterceptors(new AllResponseInterceptor());  //使用自定义的全局拦截器对数据做处理
  app.useGlobalPipes(new ValidationPipe());                 //使用自定义的全局验证管道符


//https://docs.nestjs.com/openapi/introduction 配置接口文档
  const options = new DocumentBuilder()
    .setTitle('我的接口文档')
    .setDescription('这个接口文档我是自动生成的')
    .setVersion('1.0.0')
    .addTag('all')
    .build();
  const document = SwaggerModule.createDocument(app, options);
  SwaggerModule.setup('docs', app, document);//访问文档的时候,直接访问/api

  await app.listen(3000);

  if (module.hot) {
    module.hot.accept();
    module.hot.dispose(() => app.close());
  }
}
bootstrap();


//https://docs.nestjs.com/recipes/prisma prisma数据库的使用说明
测试
异常处理–过滤器
异常过滤器–nestjs官方文档
内置的异常层负责处理整个应用程序中的所有抛出的异常。当捕获到未处理的异常时,最终用户将收到友好的响应。
开箱即用,此操作由内置的全局异常过滤器执行,该过滤器处理类型 HttpException(及其子类)的异常。每个发生的异常都由全局异常过滤器处理, 当这个异常无法被识别时 (既不是 HttpException 也不是继承的类 HttpException ) , 用户将收到以下 JSON 响应:
{
    "statusCode": 500,
    "message": "Internal server error"
}
首先生成一个过滤器
nest g f any-exception --no -spec
any-exception.filter.ts
import { ArgumentsHost, Catch, ExceptionFilter, HttpException, HttpStatus } from '@nestjs/common';

@Catch()
export class AnyExceptionFilter<T> implements ExceptionFilter {
  catch(exception: any, host: ArgumentsHost) {
    const ctx = host.switchToHttp();
    const response = ctx.getResponse();
    const request = ctx.getRequest();

    const status =
      exception instanceof HttpException
        ? exception.getStatus()
        : HttpStatus.INTERNAL_SERVER_ERROR;

    response.status(status).json({
      statusCode: status,
      timestamp: new Date().toISOString(),
      path: request.url,
      errorMessage: exception?.message,
      data:{},
      success: false,
    });
  }
}
main.ts
import { NestFactory } from '@nestjs/core';
import { AppModule } from './app.module';
import { SwaggerModule, DocumentBuilder } from '@nestjs/swagger';
import { UsersService } from './users/users.service';
import { AllResponseInterceptor } from './all-response.interceptor';
import { ValidationPipe } from '@nestjs/common';
import { AnyFilesInterceptor } from '@nestjs/platform-express';
import { AnyExceptionFilter } from './any-exception.filter';

declare const module: any;

async function bootstrap() {
  const app = await NestFactory.create(AppModule);

  app.useGlobalInterceptors(new AllResponseInterceptor());  //使用自定义的全局拦截器对数据做处理
  app.useGlobalPipes(new ValidationPipe());                 //使用自定义的全局验证管道符
  app.useGlobalFilters(new AnyExceptionFilter());           //使用自定义的全局拦截器  对服务器所有的错误作为统一处理


//https://docs.nestjs.com/openapi/introduction 配置接口文档
  const options = new DocumentBuilder()
    .setTitle('我的接口文档')
    .setDescription('这个接口文档我是自动生成的')
    .setVersion('1.0.0')
    .addTag('all')
    .build();
  const document = SwaggerModule.createDocument(app, options);
  SwaggerModule.setup('docs', app, document);//访问文档的时候,直接访问/api

  await app.listen(3000);

  if (module.hot) {
    module.hot.accept();
    module.hot.dispose(() => app.close());
  }
}
bootstrap();


//https://docs.nestjs.com/recipes/prisma prisma数据库的使用说明
用户登录验证–中间件
中间件–nestjs官方文档
中间件是在路由处理程序 之前 调用的函数。 中间件函数可以访问请求和响应对象,以及应用程序请求响应周期中的 next() 中间件函数。 next() 中间件函数通常由名为 next 的变量表示。
Nest 中间件实际上等价于 express 中间件。 下面是Express官方文档中所述的中间件功能:
中间件函数可以执行以下任务:
- 执行任何代码。
- 对请求和响应对象进行更改。
- 结束请求-响应周期。
- 调用堆栈中的下一个中间件函数。
- 如果当前的中间件函数没有结束请求-响应周期, 它必须调用 next() 将控制传递给下一个中间件函数。否则,请求将被挂起。
您可以在函数中或在具有 @Injectable() 装饰器的类中实现自定义 Nest中间件。 这个类应该实现 NestMiddleware 接口, 而函数没有任何特殊的要求。 让我们首先使用类方法实现一个简单的中间件功能。
生成一个中间件(无测试文件)
nest g mi validate-login --no-spec
npm i cookie-parser
validate-login.middleware.ts
import { Injectable, NestMiddleware, UnauthorizedException } from '@nestjs/common';

@Injectable()
export class ValidateLoginMiddleware implements NestMiddleware {
  use(req: any, res: any, next: () => void) {
    if(req.cookies.token){
      next();
    }
    else{
      //cookie异常时直接抛出
      throw new UnauthorizedException();
    }

  }
}
main.ts
import { NestFactory } from '@nestjs/core';
import { AppModule } from './app.module';
import { SwaggerModule, DocumentBuilder } from '@nestjs/swagger';
import { UsersService } from './users/users.service';
import { AllResponseInterceptor } from './all-response.interceptor';
import { ValidationPipe } from '@nestjs/common';
import { AnyExceptionFilter } from './any-exception.filter';
import * as cookieParser from 'cookie-parser';

declare const module: any;

async function bootstrap() {
  const app = await NestFactory.create(AppModule);

  app.useGlobalInterceptors(new AllResponseInterceptor());  //使用自定义的全局拦截器对数据做处理
  app.useGlobalPipes(new ValidationPipe());                 //使用自定义的全局验证管道符
  app.useGlobalFilters(new AnyExceptionFilter());           //使用自定义的全局拦截器  对服务器所有的错误作为统一处理
  app.use(cookieParser()); //使用cookie格式化插件


//https://docs.nestjs.com/openapi/introduction 配置接口文档
  const options = new DocumentBuilder()
    .setTitle('我的接口文档')
    .setDescription('这个接口文档我是自动生成的')
    .setVersion('1.0.0')
    .addTag('all')
    .build();
  const document = SwaggerModule.createDocument(app, options);
  SwaggerModule.setup('docs', app, document);//访问文档的时候,直接访问/api

  await app.listen(3000);

  if (module.hot) {
    module.hot.accept();
    module.hot.dispose(() => app.close());
  }
}
bootstrap();


//https://docs.nestjs.com/recipes/prisma prisma数据库的使用说明
这是我们访问movies时,由于我们使用了路由验证,便会401访问失败。
这里我们写一个登录界面。将token进行写入。
app.controller.ts
import { Body,Controller, Get, Param, Post, Query, Res } from '@nestjs/common';
import { query } from 'express';
import { AppService } from './app.service';
import { Response} from 'express'

@Controller('app')
export class AppController {
  constructor(private readonly appService: AppService) {}


  //监听get请求
  @Get()
  getHello(): string {
    return this.appService.getHello();
  }

  @Post('/login')
  login(@Body() user, @Res({passthrough:true}) response: Response){
    response.cookie('token','xiaohei', { httpOnly: true});
    return user;
  }


  @Get('/demo')
  demoFun(){
    return '这是一个demo';
  }

  @Get('/:id')
  getOneById(
    @Param()
    param,
    @Query()
    query,
    ){
      return '这是一次测试'+param.id;
    };

}
前端代码测试接口调用
main.ts
import { NestFactory } from '@nestjs/core';
import { AppModule } from './app.module';
import { SwaggerModule, DocumentBuilder } from '@nestjs/swagger';
import { UsersService } from './users/users.service';
import { AllResponseInterceptor } from './all-response.interceptor';
import { ValidationPipe } from '@nestjs/common';
import { AnyExceptionFilter } from './any-exception.filter';
import * as cookieParser from 'cookie-parser';


declare const module: any;

async function bootstrap() {
  const app = await NestFactory.create(AppModule);

  app.useGlobalInterceptors(new AllResponseInterceptor());  //使用自定义的全局拦截器对数据做处理
  app.useGlobalPipes(new ValidationPipe());                 //使用自定义的全局验证管道符
  app.useGlobalFilters(new AnyExceptionFilter());           //使用自定义的全局拦截器  对服务器所有的错误作为统一处理
  app.use(cookieParser()); //使用cookie格式化插件
  app.enableCors({ origin: true ,credentials: true}); //允许跨域和传递cookie


//https://docs.nestjs.com/openapi/introduction 配置接口文档
  const options = new DocumentBuilder()
    .setTitle('我的接口文档')
    .setDescription('这个接口文档我是自动生成的')
    .setVersion('1.0.0')
    .addTag('all')
    .build();
  const document = SwaggerModule.createDocument(app, options);
  SwaggerModule.setup('docs', app, document);//访问文档的时候,直接访问/api

  await app.listen(3000);

  if (module.hot) {
    module.hot.accept();
    module.hot.dispose(() => app.close());
  }
}
bootstrap();


//https://docs.nestjs.com/recipes/prisma prisma数据库的使用说明
问题
vscode中开发调试nestjs无法热加载
热重载–nestjs官方参看文档
但webpack 网页更新缓慢,需要在vscode中多次保存或者等待几十秒才可以网页更新,且增加或者删除模块时会出现连接错误情况。目前还是需要重新编译和run start:dev
在开发过程中,不小心删除文件,导致ts没有在 dist/src 文件夹中编译
stack-overflow类似问题解决方案
npm run prebuild
进行重新编译即可解决问题。

