springboot整合线程池
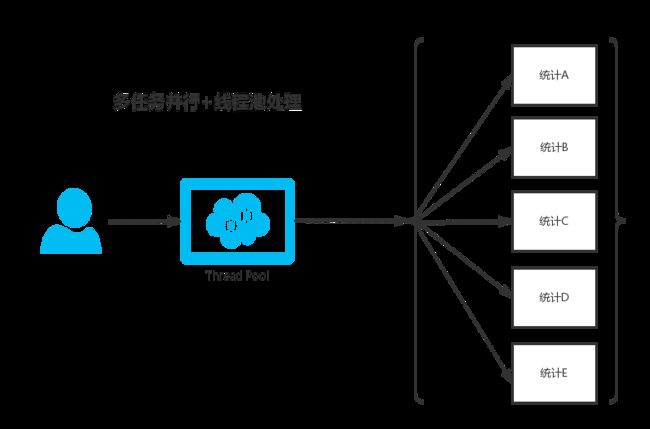
最近项目中做到一个关于批量发短信的业务,如果用户量特别大的话,不能使用单线程去发短信,只能尝试着使用多任务来完成!我们的项目使用到了方式二,即Future的方案

Java 线程池
Java通过Executors提供四种线程池,分别为:
newCachedThreadPool创建一个可缓存线程池,如果线程池长度超过处理需要,可灵活回收空闲线程,若无可回收,则新建线程。
newFixedThreadPool 创建一个定长线程池,可控制线程最大并发数,超出的线程会在队列中等待。
newScheduledThreadPool 创建一个定长线程池,支持定时及周期性任务执行。
newSingleThreadExecutor 创建一个单线程化的线程池,它只会用唯一的工作线程来执行任务,保证所有任务按照指定顺序(FIFO, LIFO, 优先级)执行。
优点
重用存在的线程,减少对象创建、消亡的开销,性能佳。
可有效控制最大并发线程数,提高系统资源的使用率,同时避免过多资源竞争,避免堵塞。
提供定时执行、定期执行、单线程、并发数控制等功能。
- 1
- 2
- 3
- 4
- 5
- 6
- 7
- 8
- 9
- 10
- 11
方式一(CountDownLatch)
public class StatsDemo {
    final static SimpleDateFormat sdf = new SimpleDateFormat(
            "yyyy-MM-dd HH:mm:ss");

    final static String startTime = sdf.format(new Date());

    /**
     * IO密集型任务  = 一般为2*CPU核心数(常出现于线程中:数据库数据交互、文件上传下载、网络数据传输等等)
     * CPU密集型任务 = 一般为CPU核心数+1(常出现于线程中:复杂算法)
     * 混合型任务  = 视机器配置和复杂度自测而定
     */
    private static int corePoolSize = Runtime.getRuntime().availableProcessors();
    /**
     * public ThreadPoolExecutor(int corePoolSize,int maximumPoolSize,long keepAliveTime,
     *                           TimeUnit unit,BlockingQueue workQueue)
     * corePoolSize用于指定核心线程数量
     * maximumPoolSize指定最大线程数
     * keepAliveTime和TimeUnit指定线程空闲后的最大存活时间
     * workQueue则是线程池的缓冲队列,还未执行的线程会在队列中等待
     * 监控队列长度,确保队列有界
     * 不当的线程池大小会使得处理速度变慢,稳定性下降,并且导致内存泄露。如果配置的线程过少,则队列会持续变大,消耗过多内存。
     * 而过多的线程又会 由于频繁的上下文切换导致整个系统的速度变缓——殊途而同归。队列的长度至关重要,它必须得是有界的,这样如果线程池不堪重负了它可以暂时拒绝掉新的请求。
     * ExecutorService 默认的实现是一个无界的 LinkedBlockingQueue。
     */
    private static ThreadPoolExecutor executor  = new ThreadPoolExecutor(corePoolSize, corePoolSize+1, 10l, TimeUnit.SECONDS,
            new LinkedBlockingQueue(1000));

    public static void main(String[] args) throws InterruptedException {
        CountDownLatch latch = new CountDownLatch(5);
        //使用execute方法
          executor.execute(new Stats("任务A", 1000, latch));
          executor.execute(new Stats("任务B", 1000, latch));
          executor.execute(new Stats("任务C", 1000, latch));
          executor.execute(new Stats("任务D", 1000, latch));
          executor.execute(new Stats("任务E", 1000, latch));
        latch.await();// 等待所有人任务结束
        System.out.println("所有的统计任务执行完成:" + sdf.format(new Date()));
    }

    static class Stats implements Runnable  {
        String statsName;
        int runTime;
        CountDownLatch latch;

        public Stats(String statsName, int runTime, CountDownLatch latch) {
            this.statsName = statsName;
            this.runTime = runTime;
            this.latch = latch;
        }

        public void run() {
            try {
                System.out.println(statsName+ " do stats begin at "+ startTime);
                //模拟任务执行时间
                Thread.sleep(runTime);
                System.out.println(statsName + " do stats complete at "+ sdf.format(new Date()));
                latch.countDown();//单次任务结束,计数器减一
            } catch (InterruptedException e) {
                e.printStackTrace();
            }
        }
    }
}
- 1
- 2
- 3
- 4
- 5
- 6
- 7
- 8
- 9
- 10
- 11
- 12
- 13
- 14
- 15
- 16
- 17
- 18
- 19
- 20
- 21
- 22
- 23
- 24
- 25
- 26
- 27
- 28
- 29
- 30
- 31
- 32
- 33
- 34
- 35
- 36
- 37
- 38
- 39
- 40
- 41
- 42
- 43
- 44
- 45
- 46
- 47
- 48
- 49
- 50
- 51
- 52
- 53
- 54
- 55
- 56
- 57
- 58
- 59
- 60
- 61
- 62
- 63
结果
方式二(Future)
重点是和springboot整合,采用注解bean方式生成ThreadPoolTaskExecutor
@Bean
//spring依赖包
import org.springframework.scheduling.concurrent.ThreadPoolTaskExecutor;
@Configuration
public class GlobalConfig {

    /**
     * 默认线程池线程池
     *
     * @return Executor
     */
    @Bean
    public ThreadPoolTaskExecutor defaultThreadPool() {
        ThreadPoolTaskExecutor executor = new ThreadPoolTaskExecutor();
        //核心线程数目
        executor.setCorePoolSize(16);
        //指定最大线程数
        executor.setMaxPoolSize(64);
        //队列中最大的数目
        executor.setQueueCapacity(16);
        //线程名称前缀
        executor.setThreadNamePrefix("defaultThreadPool_");
        //rejection-policy:当pool已经达到max size的时候,如何处理新任务
        //CALLER_RUNS:不在新线程中执行任务,而是由调用者所在的线程来执行
        //对拒绝task的处理策略
        executor.setRejectedExecutionHandler(new ThreadPoolExecutor.CallerRunsPolicy());
        //线程空闲后的最大存活时间
        executor.setKeepAliveSeconds(60);
        //加载
        executor.initialize();
        return executor;
    }
}
- 1
- 2
- 3
- 4
- 5
- 6
- 7
- 8
- 9
- 10
- 11
- 12
- 13
- 14
- 15
- 16
- 17
- 18
- 19
- 20
- 21
- 22
- 23
- 24
- 25
- 26
- 27
- 28
- 29
- 30
- 31
- 32
使用
//通过注解引入配置
@Resource(name = "defaultThreadPool")
private ThreadPoolTaskExecutor executor;
- 1
- 2
- 3
                        //使用Future方式执行多任务
                        //生成一个集合
                        List futures = new ArrayList<>();

                        //获取后台全部有效运营人员的集合
                        List adminUserDOList = adminManagerService.GetUserToSentMsg(null);

                        for (AdminUserMsgResponse response : adminUserDOList) {
                            //并发处理
                            if (response.getMobile() != null) {
                                Future future = executor.submit(() -> {
                                    //发送短信
                                    mobileMessageFacade.sendCustomerMessage(response.getMobile(), msgConfigById.getContent());
                                });
                                futures.add(future);
                            }
                        }

                      //查询任务执行的结果
                       for (Future future : futureList) {
                            while (true) {//CPU高速轮询:每个future都并发轮循,判断完成状态然后获取结果,这一行,是本实现方案的精髓所在。即有10个future在高速轮询,完成一个future的获取结果,就关闭一个轮询
                     if (future.isDone()&& !future.isCancelled()) {//获取future成功完成状态,如果想要限制每个任务的超时时间,取消本行的状态判断+future.get(1000*1, TimeUnit.MILLISECONDS)+catch超时异常使用即可。
                         Integer i = future.get();//获取结果
                        System.out.println("任务i="+i+"获取完成!"+new Date());
                        list.add(i);
                        break;//当前future获取结果完毕,跳出while
                    } else {
                        Thread.sleep(1);//每次轮询休息1毫秒(CPU纳秒级),避免CPU高速轮循耗空CPU---》新手别忘记这个
                    }
                }
             }
- 1
- 2
- 3
- 4
- 5
- 6
- 7
- 8
- 9
- 10
- 11
- 12
- 13
- 14
- 15
- 16
- 17
- 18
- 19
- 20
- 21
- 22
- 23
- 24
- 25
- 26
- 27
- 28
- 29
- 30
- 31