自动化运维-Ansible(redhat 8)
在控制节点安装Ansible
redhat 8自带python 3;如果没有安装,需要自行安装
- 查看是否安装python3
[root@localhost ~]# yum list installed|grep platform-python
模块依赖问题

 问题 1: conflicting requests
  - nothing provides module(perl:5.26) needed by module perl-DBD-SQLite:1.58:8010020190322125518:073fa5fe-0.x86_64
 问题 2: conflicting requests
  - nothing provides module(perl:5.26) needed by module perl-DBI:1.641:8010020190322130042:16b3ab4d-0.x86_64
platform-python.x86_64                             3.6.8-15.1.el8                                     @anaconda
platform-python-coverage.x86_64                    4.5.1-7.el8                                        @AppStream
platform-python-pip.noarch                         9.0.3-15.el8                                       @anaconda
platform-python-setuptools.noarch                  39.2.0-5.el8
- 关闭防火墙
[root@localhost ~]# systemctl disable --now firewalld
Removed /etc/systemd/system/multi-user.target.wants/firewalld.service.
Removed /etc/systemd/system/dbus-org.fedoraproject.FirewallD1.service.
- 关闭selinux
[root@localhost ~]# setenforce 0
[root@localhost ~]# sed -i 's|enforcing|diabled|g' /etc/selinux/config
- 更改主机名
[root@Ansibleconsole ~]# hostnamectl set-hostname Ansibleconsole
- 安装网络源以及epel源
wget -O /etc/yum.repos.d/CentOS-Base.repo https://mirrors.aliyun.com/repo/Centos-8.repo
sed -i 's|$relesever|8|g' /etc/yum.repo.d/*
yum install -y https://mirrors.aliyun.com/epel/epel-release-latest-8.noarch.rpm
sed -i 's|^#baseurl=https://download.fedoraproject.org/pub|baseurl=https://mirrors.aliyun.com|' /etc/yum.repos.d/epel*
sed -i 's|^metalink|#metalink|' /etc/yum.repos.d/epel*
- 安装ansible
yum install -y ansible
ansible --version
- 查看当前版本
[root@Ansibleconsole yum.repos.d]# ansible --version
ansible 2.9.11
  config file = /etc/ansible/ansible.cfg
  configured module search path = ['/root/.ansible/plugins/modules', '/usr/share/ansible/plugins/modules']
  ansible python module location = /usr/lib/python3.6/site-packages/ansible
  executable location = /usr/bin/ansible
  python version = 3.6.8 (default, Oct 11 2019, 15:04:54) [GCC 8.3.1 20190507 (Red Hat 8.3.1-4)]
#config file=ansible主配置文件绝对路径
#configure module search path=ansible相关配置模块存放路径
#ansible python module location=本地python模块路径
#executable location=ansible命令的绝对路径
- 通过使用setup模块验证localhost上的ansible_python_version
[root@Ansibleconsole ~]# ansible -m setup localhost | grep ansible_python_version
        "ansible_python_version": "3.6.8",
部署Ansible
构建ansible清单
定义清单
- 定义清单Ansible将要管理的一批主机。这些主机也可以分配到组中,以进行集中管理。组可以包含子
组,主机也可以是多个组的成员。清单还可以设置应用到它所定义的主机和组的变量。 - 可以通过两种方式定义主机清单。静态主机清单可以通过文本文件定义。动态主机清单可以根据需要使
用外部信息提供程序通过脚本或其他程序来生成。
使用定义的静态清单指定受管理的主机
- 静态清单文件是指定Ansible目标受管主机的文本文件。可以使用多种不同的格式编写此文件,包括INI
样式或YAML。 - 在最简单的形式中。INI样式的静态清单文件是受管主机的主机名或IP地址的列表,每行一个:
alpha.example.org
beta.example.org
192.168.1.100
[root@Ansibleconsole ~]# cd /etc/ansible/
[root@Ansibleconsole ansible]# ll
总用量 24
-rw-r--r--. 1 root root 19985 7月  21 20:33 ansible.cfg
-rw-r--r--. 1 root root  1016 7月  21 20:33 hosts
drwxr-xr-x. 2 root root     6 7月  21 20:33 roles
[root@Ansibleconsole ansible]# vim hosts
hosts文件解读:
- 指定的主机既可以用IP地址表示又可以用域名表示
## green.example.com
## blue.example.com
## 192.168.100.1
## 192.168.100.10
- 可以根据不同主机安装的服务类型划分成组
## [webservers]
## alpha.example.org
## beta.example.org
## 192.168.1.100
## 192.168.1.110
- 可以用通配符指定多台主机
## ## www[001:006].example.com	这里意为:www.1.example.com到www.6.example.com的主机
## db-[99:101]-node.example.com 这里意为:db-99-node.example.com到db-101-node.example.com的主机
验证清单
[root@Ansibleconsole ansible]# ansible 192.168.72.4 --list-hosts
  hosts (1):
    192.168.72.4
- 倘若主机地址不存在于hosts文件中
[root@Ansibleconsole ansible]# ansible 192.168.72.2 --list-hosts
[WARNING]: provided hosts list is empty, only localhost is available. Note that the implicit localhost does not match
'all'
[WARNING]: Could not match supplied host pattern, ignoring: 192.168.72.2
  hosts (0):
- 检测清单组
[root@Ansibleconsole ansible]# ansible test --list-hosts
  hosts (3):
    192.168.72.4
    192.168.72.6
    192.168.72.8
- 如果清单中含有名称相同的主机和主机组,
ansible命令将显示警告并以主机作为其目标。主机组则被
忽略。 - 应对这种情况的方法有多种,其中最简单的是确保主机组不使用与清单中主机相同的名称。
覆盖清单位置
- /etclansible/hosts文件被视为系统的默认静态清单文件。不过,通常的做法是不使用该文件,而是在
Ansible配置文件中为清单文件定义一个不同的位置。 - 通常情况下
/etc/ansible/ansible.cfg将默认清单文件路径更改为自己建立的清单文件路径
[root@Ansibleconsole ansible]# vim ansible.cfg
再创建对应的文件
[root@Ansibleconsole ansible]# touch /etc/ansible/inventory
更改了ansible.cfg后原来hosts中的配置不再生效了;原因是新建的inventory文件是空的
[root@Ansibleconsole ansible]# ansible test --list-hosts
[WARNING]: provided hosts list is empty, only localhost is available. Note that the implicit localhost does not match
'all'
[WARNING]: Could not match supplied host pattern, ignoring: test
  hosts (0):
向inventory中写入IP地址
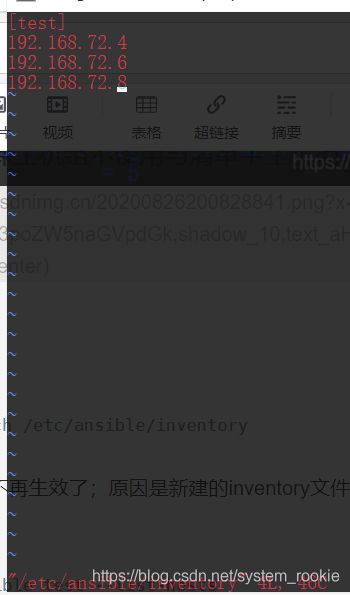
再次查看test清单组;由结果可知现在有效的清单文件为inventory
[root@Ansibleconsole ansible]# ansible test --list-hosts
  hosts (3):
    192.168.72.4
    192.168.72.6
    192.168.72.8
- 查看没有加入到清单组的主机
[root@Ansibleconsole ansible]# ansible ungrouped --list-hosts
  hosts (2):
    172.11.10.2
    172.11.10.5
管理配置文件
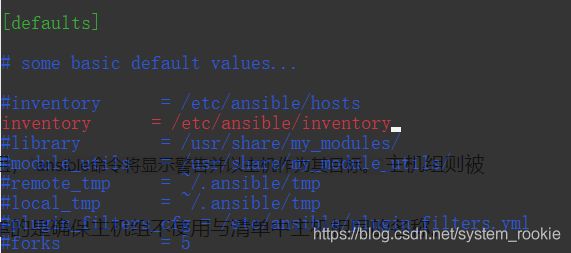
ansible配置文件默认目录:/etc/ansible/ansible.cfg
[defaults]			#默认配置

# some basic default values...

#inventory      = /etc/ansible/hosts
inventory      = /etc/ansible/inventory
#library        = /usr/share/my_modules/
#module_utils   = /usr/share/my_module_utils/
#remote_tmp     = ~/.ansible/tmp
#local_tmp      = ~/.ansible/tmp
#plugin_filters_cfg = /etc/ansible/plugin_filters.yml
#forks          = 5
#poll_interval  = 15
#sudo_user      = root
#ask_sudo_pass = True
#ask_pass      = True
#transport      = smart
#remote_port    = 22
#module_lang    = C
#module_set_locale = False

[inventory] #清单文件配置
#enable inventory plugins, default: 'host_list', 'script', 'auto', 'yaml', 'ini', 'toml'
enable_plugins = host_list, virtualbox, yaml, constructed		#允许使用插件;默认注释

#ignore these extensions when parsing a directory as inventory source
ignore_extensions = .pyc, .pyo, .swp, .bak, ~, .rpm, .md, .txt, ~, .orig, .ini, .cfg, .retry	#当目录解析为目录源时,忽略这些扩展;默认注释

#ignore files matching these patterns when parsing a directory as inventory source
ignore_patterns=			#当将目录解析为目录源时,忽略匹配这些模式的文件;默认注释

#If 'true' unparsed inventory sources become fatal errors, they are warnings otherwise.
unparsed_is_failed=False	#如果未解析的库存源的“true”成为致命错误,则它们是否则的警告;默认注释

[privilege_escalation]		#权限设置
become=True					#是否选用特权指定
become_method=sudo			#是否使用sudo
become_user=root			#是否使用Root用户指定
become_ask_pass=False		#登陆时是否需要输入密码
配置ansible
Ansible的配置文件是/etc/ansible/ansible.cfg
- 可以通过修改Ansible配置文件中的设置来自定义Ansible安装的行为。Ansible从控制节点上多个可能
的位置之一选择其配置文件。
使用/etc/ansible/ansible.cfg
ansible软件包提供一个基本的配置文件,它位于letc/ansible/ansible.cfg。如果找不到其他配置文件,则使用此文件。
使用~/.ansible.cfg
Ansible在用户的家目录中查找.ansible.cfg文件。如果存在此配置文件(~/ansible.cfg)并且当前工作目录中也没有ansible.cfg文件,则使用此配置取代/etc/ansible/ansible.cfg。
使用./ansible.cfg
如果执行ansible命令的目录中存在ansible.cfg文件,则使用它,而不使用全局文件或用户的个人文件。这样,管理员可以创建一种目录结构,将不同的环境或项目存储在单独的目录中,并且每个目录包含为一组独特的设置而制定的配置文件
使用ANSIBLE_CONFIG环境变量
我们可以通过将不同的配置文件放在不同的目录中,然后从适当的目录执行Ansible命令,以此利用配置文件。但是,随着配置文件数量的增加,这种方法存在局限性并且难以管理。有一个更加灵活的选项,即通过ANSIBLE_CONFIG环境变量定义配置文件的位置。定义了此变量时,Ansible将使用变量所指定的配置文件,而不用上面提到的任何配置文件。ansible.cfg文件,则使用此配置取代/etc/ansible/ansible.cfg。
使用./ansible.cfg
配置文件优先级
ANSIBLE_CONFIG环境变量指定的任何文件将覆盖所有其他配置文件。如果没有设置该变量,则接下来检查运行ansible命令的目录中是否有ansible.cfg文件。如果不存在该文件,则检查用户的家目录是否有.ansible.cfg文件。只有在找不到其他配置文件时,才使用全局/etc/ansible/ansible.cfg文件。如果/etc/ansible/ansible.cfg配置文件不存在,Ansible包含它使用的默认值。
由于Ansible配置文件可以放入的位置有多种,因此Ansible当前使用哪一个配置文件可能会令人困惑。我们可以运行以下命令来清楚地确认所安装的Ansible版本以及正在使用的配置文件。
ansible --version
Ansible仅使用具有最高优先级的配置文件中的设置。即使存在优先级较低的其他配置文件,其设置也会被忽略,不会与选定配置文件中的设置结合。因此,如果你选择自行创建配置文件来取代全局/etc/ansible/ansible.cfg配置文件,就需要将该文件中所有需要的设置复制到自己的用户级配置文件中。用户组配置文件中未定义的设置将保持设为内置默认值,即使已在全局配置文件中设为某个其他值也是如此。
管理配置文件中的设置
Ansible配置文件由几个部分组成,每一部分含有以键值对形式定义的设置。部分的标题以中括号括起来。对于基本操作,请使用以下两部分:
- [defaults]部分设置Ansible操作的默认值
- [privilege_escalation]配置Ansible如何在受管主机上执行特权升级
例如,下面是典型的ansible.cfg文件:
[defaults]

# some basic default values...

#inventory      = /etc/ansible/hosts
inventory      = /etc/ansible/inventory
#library        = /usr/share/my_modules/
#module_utils   = /usr/share/my_module_utils/
#remote_tmp     = ~/.ansible/tmp
#local_tmp      = ~/.ansible/tmp
#plugin_filters_cfg = /etc/ansible/plugin_filters.yml
#forks          = 5
#poll_interval  = 15
#sudo_user      = root
#ask_sudo_pass = True
#ask_pass      = True
#transport      = smart
#remote_port    = 22
#module_lang    = C
#module_set_locale = False
Ansible配置
| 指令 | 描述 |
|---|---|
| inventory | 指定清单文件的路径。 |
| remote_user | 要在受管主机上登录的用户名。如果未指定则使用当前用户名 |
| ask_pass | 是否提示输入SSH密码。如果使用SSH公钥身份验证则可以是false |
| become | 连接后是否自动在受管主机上切换用户(通常切换为root)这也可以通过play来指定。 |
| become_method | 如何切换用户(通常为sudo,这也是默认设置,但可选择su) |
| become_use | 要在受管主机上切换到的用户(通常是root,这也是默认值) |
| become_ask_pass | 是否需要为become_method提示输入密码。默认为false。 |
配置连接
Ansible需要知道如何与其受管主机通信。更改配置文件的一个最常见原因是为了控制Ansible使用什么方法和用户来管理受管主机。需要的一些信息包括:
- 列出受管主机和主机组的清单的位置
- 要使用哪一种连接协议来与受管主机通信(默认为SSH),以及是否需要非标准网络端口来连接服务器
- 要在受管主机上使用哪一远程用户;这可以是root用户或者某一非特权用户
- 如果远程用户为非特权用户,Ansible需要知道它是否应尝试将特权升级为root以及如何进行升级(例如,通过sudo)
- 是否提示输入SSH密码或sudo密码以进行登录或获取特权
清单位置
在[defaults]部分中,inventory指令可以直接指向某一静态清单文件,或者指向含有多个静态清单文件和动态清单脚本的某一目录。
[defaults]
inventory = ./inventory
连接设置
默认情况下,Ansible使用SSH协议连接受管主机。控制Ansible如何连接受管主机的最重要参数在[defaults]部分中设置。
默认情况下,Ansible尝试连接受管主机时使用的用户名与运行ansible命令的本地用户相同。若要指定不同的远程用户,请将remote_user参数设置为该用户名。
如果为运行Ansible的本地用户配置了SSH私钥,使得它们能够在受管主机上进行远程用户的身份验证,则Ansible将自动登录。如果不是这种情况,可以通过设置指令ask_pass = true,将Ansible配置为提示本地用户输入由远程用户使用的密码。
[defaults]
inventory = ./inventory

remote_user = root
ask_pass = true
假设在使用一个Linux控制节点,并对受管主机使用OpenSSH,如果可以使用密码以远程用户身份登录,那么我们可以设置基于SSH密钥的身份验证,从而能够设置ask_pass = false。
第一步是确保在~/.ssh中为控制节点上的用户配置了SSH密钥对。并且使用ssh-copy-id命令将本地的公钥复制到受管主机中。此过程请参考文章openssh
升级特权
鉴于安全性和审计原因,Ansible可能需要先以非特权用户身份连接远程主机,然后再通过特权升级获得root用户身份的管理权限。这可以在Ansible配置文件的[privilege_escalation]部分中设置。
要默认启用特权升级,可以在配置文件中设置指令become = true。即使默认为该设置,也可以在运行临时命令或Ansible Playbook时通过各种方式覆盖它。(例如,有时候可能要运行一些不需要特权升级的任务或play。)
become_method指令指定如何升级特权。有多个选项可用,但默认为使用sudo。类似地,become_user指令指定要升级到的用户,但默认为root。
如果所选的become_method机制要求用户输入密码才能升级特权,可以在配置文件中设置become_ask_pass = true指令。
以下示例ansible.cfg文件假设你可以通过基于SSH密钥的身份验证以someuser用户身份连接受管主机,并且someuser可以使用sudo以root用户身份运行命令而不必输入密码:
[defaults]
inventory = ./inventory
remote_user = someuser
ask_pass = false

[privilege_escalation]
become = true
become_method = sudo
become_user = root
become_ask_pass = false
使用公钥私钥建立连接
在控制节点执行
[root@ansible_control ~]# ssh-keygen
Generating public/private rsa key pair.
Enter file in which to save the key (/root/.ssh/id_rsa):				#直接回车
Enter passphrase (empty for no passphrase): 							#回车
Enter same passphrase again: 											#回车
Your identification has been saved in /root/.ssh/id_rsa.
Your public key has been saved in /root/.ssh/id_rsa.pub.
The key fingerprint is:
SHA256:VnOs2jZMC+ZrhlJr4fpT2GzkQnJDo/ZxrNRZFiiZJBI root@ansible_control
The key's randomart image is:
+---[RSA 3072]----+
|  E....o ...     |
|   . .* . o.     |
|     o = +o o    |
|    + * *. +     |
|   . * @S o      |
|      B+** .     |
|     o Bo *      |
|    . * oo .     |
|    .=.+.        |
+----[SHA256]-----+
[root@ansible_control ~]# ssh-copy-id [email protected]			#ssh-copy-id 用户名@受控主机IP地址/域名
/usr/bin/ssh-copy-id: INFO: Source of key(s) to be installed: "/root/.ssh/id_rsa.pub"
The authenticity of host '192.168.23.128 (192.168.23.128)' can't be established.
ECDSA key fingerprint is SHA256:vdTBLO1HN+1URrZjAQxoghxNzosGcdJNHPa596p5Hns.
Are you sure you want to continue connecting (yes/no/[fingerprint])? yes			#必须输入yes
/usr/bin/ssh-copy-id: INFO: attempting to log in with the new key(s), to filter out any that are already installed
/usr/bin/ssh-copy-id: INFO: 1 key(s) remain to be installed -- if you are prompted now it is to install the new keys
[email protected]'s password:

Number of key(s) added: 1

Now try logging into the machine, with:   "ssh '[email protected]'"
and check to make sure that only the key(s) you wanted were added.
非SSH连接
默认情况下,Ansible用于连接受管主机的协议设置为smart,它会确定使用SHH的最高效方式。可以通过多种方式将其设置为其他的值。
例如,默认使用SSH的规则有一个例外。如果目录中没有localhost,Ansible将设置一个隐式localhost条目以便允许运行以localhost为目标的临时命令和playbook。这一特殊清单条目不包括在all或ungrouped主机组中。此外,Ansible不使用smart SSH连接类型,而是利用默认的特殊local连接类型来进行连接。
ansible localhost --list-hosts
local连接类型忽略remote_user设置,并且直接在本地系统上运行命令。如果使用特权升级,它会在运行sudo时使用运行Ansible命令的用户,而不是remote_user。如果这两个用户具有不同的sudo特权,这可能会导致混淆。
如果你要确保像其他受管主机一样使用SSH连接localhost,一种方法是在清单中列出它。但是,这会将它包含在all和ungrouped组中,而你可能不希望如此。
另一种方法是更改用于连接localhost的协议。执行此操作的最好方法是为localhost设置ansible_connection主机变量。为此,你需要在运行Ansible命令的目录中创建host_vars子目录。在该子目录中,创建名为localhost的文件,其应含有ansible_connection: smart这一行。这将确保对localhost使用smart(SSH)连接协议,而非local。
你也可以通过另一种变通办法来使用它。如果清单中列有127.0.0.1,则默认情况下,将会使用smart来连接它。也可以创建一个含有ansible_connection: local这一行的host_vars/127.0.0.1文件,它会改为使用local。
配置文件注释
Ansible配置文件允许使用两种注释字符:井号或分号。
位于行开头的#号会注释掉整行。它不能和指令位于同一行中。
分号字符可以注释掉所在行中其右侧的所有内容。它可以和指令位于同一行中,只要该指令在其左侧。
运行临时命令(ad-hoc command)
使用临时命令可以快速执行单个Ansible任务,不需要将它保存下来供以后再次运行。它们是简单的在线操作,无需编写playbook即可运行。
临时命令对快速测试和更改很有用。例如,可以使用临时命令确保一组服务器上的/etc/hosts文件中存在某一特定的行。可以使用另一个临时命令在许多不同的计算机上高效的重启服务,或者确保特定的软件包为最新版本。
临时命令对于通过Ansible快速执行简单的任务非常有用。它们确实也存在局限,而且总体而言,要使用Ansible Playbook来充分发挥Ansible的作用。但在许多情形中,临时命令正是快速执行简单任务所需要的工具。
运行临时命令
Ansible运行临时命令的语法如下:
ansible host-pattern -m module [-a 'module arguments'] [-i inventory]
host-pattern参数用于指定在其上运行临时命令的受管主机。它可以是清单中的特定受管主机或主机组。也可以用后面的-i选项指定特定的清单而不使用默认清单。
-m选项将Ansible应在目标主机上运行的module名称作为参数。模块是为了实施任务而执行的小程序。一些模块不需要额外的信息,但其他模块需要使用额外的参数来指定其操作详情。-a选项以带引号字符串形式取这些参数的列表。
一种最简单的临时命令使用ping模块。此模块不执行ICMP ping,而是检查能否在受管主机上运行基于Python的模块。例如,以下临时命令确定清单中的所有受管主机能否运行标准的模块:
[root@localhost ~]# ansible all -m ping
172.16.103.131 | SUCCESS => {
    "ansible_facts": {
        "discovered_interpreter_python": "/usr/bin/python"
    },
    "changed": false,
    "ping": "pong"
}
......
- 测试Root用户登陆受管主机
将受管主机IP加入清单文件
[root@Ansibleconsole ~]# echo '192.168.72.4' > /etc/ansible/inventory
[root@Ansibleconsole ~]# ansible all --list-hosts
  hosts (1):
    192.168.72.4
如果只在清单文件中加入受管主机IP地址,会导致访问拒绝
[root@Ansibleconsole ~]# ansible 192.168.72.4 -m ping
The authenticity of host '192.168.72.4 (192.168.72.4)' can't be established.
ECDSA key fingerprint is SHA256:jraKZY+BP5xdCBUFfRVnMPYz96iH3YzTfd83GcKVbuY.
Are you sure you want to continue connecting (yes/no/[fingerprint])? yes
192.168.72.4 | UNREACHABLE! => {
    "changed": false,
    "msg": "Failed to connect to the host via ssh: Warning: Permanently added '192.168.72.4' (ECDSA) to the list of known hosts.\r\[email protected]: Permission denied (publickey,gssapi-keyex,gssapi-with-mic,password).",
    "unreachable": true
}
[root@Ansibleconsole ~]# ansible 192.168.72.4 -m ping
192.168.72.4 | UNREACHABLE! => {
    "changed": false,
    "msg": "Failed to connect to the host via ssh: [email protected]: Permission denied (publickey,gssapi-keyex,gssapi-with-mic,password).",
    "unreachable": true
}
必须在配置文件中加入ansible_password [root用户密码]
[root@Ansibleconsole ~]# tail /etc/ansible/inventory
192.168.72.4 ansible_password=123456
再次执行临时命令
[root@Ansibleconsole ~]# ansible 192.168.72.4 -m ping
192.168.72.4 | SUCCESS => {
    "ansible_facts": {
        "discovered_interpreter_python": "/usr/libexec/platform-python"
    },
    "changed": false,
    "ping": "pong"
}
Are you sure you want to continue connecting (yes/no/[fingerprint])? yes此前如果选择了yes后,在.ssh目录下会产生一个名为known_hosts的文件
[root@Ansibleconsole ~]# cat .ssh/known_hosts
192.168.72.4 ecdsa-sha2-nistp256 AAAAE2VjZHNhLXNoYTItbmlzdHAyNTYAAAAIbmlzdHAyNTYAAABBBDs1cmocgeZHejJhAH2POpinjXx5yPaSZC/ik9ISqQREcq2ly/y8kE/y1kVSYEdKKB3pWUuItinNTksQB6KWLgQ=
此文件记录的是主机192.168.72.4的指纹信息
- 测试普通用户登陆受管主机
在清单文件中加入普通用户名和用户名密码
[root@Ansibleconsole ~]# tail -1 /etc/ansible/inventory
192.168.72.4 ansible_user=wcl ansible_password=123
执行临时命令
[root@Ansibleconsole ~]# ansible 192.168.72.4 -m ping
192.168.72.4 | SUCCESS => {
    "ansible_facts": {
        "discovered_interpreter_python": "/usr/libexec/platform-python"
    },
    "changed": false,
    "ping": "pong"
}
如果用域名访问,需要在清单文件中加入ansible_host参数(记得在本地主机的hosts文件中加入域名与IP地址的对应关系)
cn.4.com ansible_host=192.168.72.4 ansible_password=123456
[root@Ansibleconsole ~]# ansible all -m ping
cn.4.com | SUCCESS => {
    "ansible_facts": {
        "discovered_interpreter_python": "/usr/libexec/platform-python"
    },
    "changed": false,
    "ping": "pong"
}
运行成功
使用临时命令通过模块来执行任务
Ansible模块在线文档:https://docs.ansible.com/ansible/latest/modules/modules_by_category.html
模块是临时命令用于完成任务的工具。Ansible提供了数百个能够完成不同任务的模块。通常我们可以查找一个经过测试的专用模块,作为标准安装的一部分来完成所需的任务。
ansible-doc -l命令可以列出系统上安装的所有模块。可以使用ansible-doc来按照名称查看特定模块的帮助文档,再查找关于模块将取什么参数作为选项的信息。例如以下命令显示ping模块的帮助文档,在帮助文档里面输入q命令表示退出:
ansible-doc ping
更多的模块信息请访问在线Ansible文档,网址:https://docs.ansible.com/ansible/latest/modules/modules_by_category.html。
Ansible常用模块
| 模块类别 | 模块 |
|---|---|
| 文件模块 | copy:将本地文件复制到受管主机 file:设置文件的权限和其他属性 lineinfile:确保特定行是否在文件中 synchronize:使用rsync同步内容 |
| 软件包模块 | package:使用操作系统本机的自动检测软件包管理器管理软件包 yum:使用yum管理软件包 apt:使用APT管理软件包 dnf:使用dnf管理软件包 gem:管理Ruby gem pip:从PyPI管理Python软件包 |
| 系统模块 | firewalld:使用firewalld管理防火墙 reboot:重启计算机 service:管理服务 user:添加、删除和管理用户帐户 |
| Net Tools模块 | get_url:通过HTTP、HTTPS或FTP下载文件 nmcli:管理网络 uri:与Web服务交互 |
- 使用临时命令添加普通用户
[root@Ansibleconsole ~]# ansible all -m user -a 'name=wei uid=7777 state=present'	#删除用户则将present改为absent
192.168.72.4 | CHANGED => {
    "ansible_facts": {
        "discovered_interpreter_python": "/usr/libexec/platform-python"
    },
    "changed": true,
    "comment": "",
    "create_home": true,
    "group": 7777,
    "home": "/home/wei",
    "name": "wei",
    "shell": "/bin/bash",
    "state": "present",
    "system": false,
    "uid": 7777
}
受管主机查看普通用户
[root@AnsibleClient1 ~]# id wei
id: “wei”:无此用户
[root@AnsibleClient1 ~]# id wei
uid=7777(wei) gid=7777(wei) 组=7777(wei)
- 通过控制节点给受管主机创建系统用户
[root@Ansibleconsole ~]# ansible cn.4.com -m user -a 'name=wcl system=yes create_home=false shell=/sbin/nologin state=present'
cn.4.com | CHANGED => {
    "ansible_facts": {
        "discovered_interpreter_python": "/usr/libexec/platform-python"
    },
    "append": false,
    "changed": true,
    "comment": "",
    "group": 1000,
    "home": "/home/wcl",
    "move_home": false,
    "name": "wcl",
    "shell": "/sbin/nologin",
    "state": "present",
    "uid": 1000
}
创建成功
在受管主机上运行任意命令
- 使用控制节点查看受管主机用户名
[root@Ansibleconsole ~]# ansible all -m command -a 'hostname'
192.168.72.4 | CHANGED | rc=0 >>
AnsibleClient1
这条命令为每个受管主机返回两行输出。第一行是状态报告,显示对其运行临时操作的受管主机名称及操作的结果。第二行是使用Ansible command模块远程执行的命令的输出。
若要改善临时命令输出的可读性和解析,管理员可能会发现使对受管主机执行的每一项操作具有单行输出十分有用。使用-o选项以单行格式显示Ansible临时命令的输出。
- 使用控制节点查看网络连接
[root@Ansibleconsole ~]# ansible all -m command -a 'ip addr'
192.168.72.4 | CHANGED | rc=0 >>
1: lo: <LOOPBACK,UP,LOWER_UP> mtu 65536 qdisc noqueue state UNKNOWN group default qlen 1000
    link/loopback 00:00:00:00:00:00 brd 00:00:00:00:00:00
    inet 127.0.0.1/8 scope host lo
       valid_lft forever preferred_lft forever
    inet6 ::1/128 scope host
       valid_lft forever preferred_lft forever
2: eth0: <BROADCAST,MULTICAST,UP,LOWER_UP> mtu 1500 qdisc fq_codel state UP group default qlen 1000
    link/ether 00:0c:29:77:28:45 brd ff:ff:ff:ff:ff:ff
    inet 192.168.72.4/24 brd 192.168.72.255 scope global noprefixroute eth0
       valid_lft forever preferred_lft forever
- 通过控制节点给受管主机挂载光驱
[root@Ansibleconsole ~]# ansible all -m command -a 'mount /dev/sr0 /mnt'
[WARNING]: Consider using the mount module rather than running 'mount'.  If you need to use command because mount is insufficient you can add 'warn: false' to this command task or set
'command_warnings=False' in ansible.cfg to get rid of this message.
192.168.72.4 | CHANGED | rc=0 >>
mount: /mnt: WARNING: device write-protected, mounted read-only.
#关于[WARNING]的警告消息可以通过
[root@Ansibleconsole ~]# ansible all -m command -a 'hostname' -o		#-o:单行显示
localhost | CHANGED | rc=0 | (stdout) Ansibleconsole
192.168.72.8 | CHANGED | rc=0 | (stdout) AnsibleClient3
cn.4.com | CHANGED | rc=0 | (stdout) AnsibleClient1
192.168.72.6 | CHANGED | rc=0 | (stdout) AnsibleClient2
注意:由于存在幂等的关系,所以如果已经执行成功了的命令再执行时只会显示执行成功状态,不会报错。
command模块允许管理员对受管主机快速执行远程命令。这些命令不是由受管主机上的shell加以处理。因此,它们无法访问shell环境变量,也不能执行重定向和管道等shell操作。
在命令需要shell处理的情形中,管理员可以使用shell模块。与command模块类似,可以在临时命令中将要执行的命令作为参数传递给该模块。Ansible随后对受管主机远程执行该命令。与command模块不同的是,这些命令将通过受管主机上的shell进行处理。因此,可以访问shell环境变量,也可以使用重定向和管道等操作。
以下示例演示了command与shell的区别。如果尝试使用这两个模块执行内建的Bash命令set,只有使用shell模块才会成功:
[root@Ansibleconsole ~]# ansible all -m command -a 'set'
192.168.72.4 | FAILED | rc=2 >>
[Errno 2] 没有那个文件或目录: b'set': b'set'
[root@Ansibleconsole ~]# ansible all -m shell -a 'set'
192.168.72.4 | CHANGED | rc=0 >>
BASH=/bin/sh
BASHOPTS=cmdhist:complete_fullquote:extquote:force_fignore:hostcomplete:interactive_comments:progcomp:promptvars:sourcepath
BASH_ALIASES=()
BASH_ARGC=()
BASH_ARGV=()
BASH_CMDS=()
BASH_EXECUTION_STRING=set
BASH_LINENO=()
BASH_SOURCE=()
BASH_VERSINFO=([0]="4" [1]="4" [2]="19" [3]="1" [4]="release" [5]="x86_64-redhat-linux-gnu")
BASH_VERSION='4.4.19(1)-release'
DBUS_SESSION_BUS_ADDRESS=unix:path=/run/user/0/bus
DIRSTACK=()
EUID=0
GROUPS=()
HOME=/root
HOSTNAME=AnsibleClient1
HOSTTYPE=x86_64
IFS='
'
LANG=zh_CN.UTF-8
LESSOPEN='||/usr/bin/lesspipe.sh %s'
LOGNAME=root
LS_COLORS='rs=0:di=38;5;33:ln=38;5;51:mh=00:pi=40;38;5;11:so=38;5;13:do=38;5;5:bd=48;5;232;38;5;11:cd=48;5;232;38;5;3:or=48;5;232;38;5;9:mi=01;05;37;41:su=48;5;196;38;5;15:sg=48;5;11;38;5;16:ca=48;5;196;38;5;226:tw=48;5;10;38;5;16:ow=48;5;10;38;5;21:st=48;5;21;38;5;15:ex=38;5;40:*.tar=38;5;9:*.tgz=38;5;9:*.arc=38;5;9:*.arj=38;5;9:*.taz=38;5;9:*.lha=38;5;9:*.lz4=38;5;9:*.lzh=38;5;9:*.lzma=38;5;9:*.tlz=38;5;9:*.txz=38;5;9:*.tzo=38;5;9:*.t7z=38;5;9:*.zip=38;5;9:*.z=38;5;9:*.dz=38;5;9:*.gz=38;5;9:*.lrz=38;5;9:*.lz=38;5;9:*.lzo=38;5;9:*.xz=38;5;9:*.zst=38;5;9:*.tzst=38;5;9:*.bz2=38;5;9:*.bz=38;5;9:*.tbz=38;5;9:*.tbz2=38;5;9:*.tz=38;5;9:*.deb=38;5;9:*.rpm=38;5;9:*.jar=38;5;9:*.war=38;5;9:*.ear=38;5;9:*.sar=38;5;9:*.rar=38;5;9:*.alz=38;5;9:*.ace=38;5;9:*.zoo=38;5;9:*.cpio=38;5;9:*.7z=38;5;9:*.rz=38;5;9:*.cab=38;5;9:*.wim=38;5;9:*.swm=38;5;9:*.dwm=38;5;9:*.esd=38;5;9:*.jpg=38;5;13:*.jpeg=38;5;13:*.mjpg=38;5;13:*.mjpeg=38;5;13:*.gif=38;5;13:*.bmp=38;5;13:*.pbm=38;5;13:*.pgm=38;5;13:*.ppm=38;5;13:*.tga=38;5;13:*.xbm=38;5;13:*.xpm=38;5;13:*.tif=38;5;13:*.tiff=38;5;13:*.png=38;5;13:*.svg=38;5;13:*.svgz=38;5;13:*.mng=38;5;13:*.pcx=38;5;13:*.mov=38;5;13:*.mpg=38;5;13:*.mpeg=38;5;13:*.m2v=38;5;13:*.mkv=38;5;13:*.webm=38;5;13:*.ogm=38;5;13:*.mp4=38;5;13:*.m4v=38;5;13:*.mp4v=38;5;13:*.vob=38;5;13:*.qt=38;5;13:*.nuv=38;5;13:*.wmv=38;5;13:*.asf=38;5;13:*.rm=38;5;13:*.rmvb=38;5;13:*.flc=38;5;13:*.avi=38;5;13:*.fli=38;5;13:*.flv=38;5;13:*.gl=38;5;13:*.dl=38;5;13:*.xcf=38;5;13:*.xwd=38;5;13:*.yuv=38;5;13:*.cgm=38;5;13:*.emf=38;5;13:*.ogv=38;5;13:*.ogx=38;5;13:*.aac=38;5;45:*.au=38;5;45:*.flac=38;5;45:*.m4a=38;5;45:*.mid=38;5;45:*.midi=38;5;45:*.mka=38;5;45:*.mp3=38;5;45:*.mpc=38;5;45:*.ogg=38;5;45:*.ra=38;5;45:*.wav=38;5;45:*.oga=38;5;45:*.opus=38;5;45:*.spx=38;5;45:*.xspf=38;5;45:'
MACHTYPE=x86_64-redhat-linux-gnu
OPTERR=1
OPTIND=1
OSTYPE=linux-gnu
PATH=/usr/local/sbin:/usr/local/bin:/usr/sbin:/usr/bin
POSIXLY_CORRECT=y
PPID=3787
PS4='+ '
PWD=/root
SELINUX_LEVEL_REQUESTED=
SELINUX_ROLE_REQUESTED=
SELINUX_USE_CURRENT_RANGE=
SHELL=/bin/bash
SHELLOPTS=braceexpand:hashall:interactive-comments:posix
SHLVL=3
SSH_CLIENT='192.168.72.2 45892 22'
SSH_CONNECTION='192.168.72.2 45892 192.168.72.4 22'
SSH_TTY=/dev/pts/1
TERM=xterm-256color
UID=0
USER=root
XDG_RUNTIME_DIR=/run/user/0
XDG_SESSION_ID=18
_=/usr/libexec/platform-python
command和shell模块都要求受管主机上安装正常工作的Python。第三个模块是raw,它可以绕过模块子系统,直接使用远程shell运行命令。在管理无法安装Python的系统(如网络路由器)时,可以利用这个模块。它也可以用于将Python安装到主机上。
在大多数情况下,建议避免使用command、shell和raw这三个“运行命令”模块。
其他模块大部分都是幂等的,可以自动进行更改跟踪。它们可以测试系统的状态,在这些系统已处于正确状态时不执行任何操作。相反,以幂等方式使用“运行命令”模块要复杂得多。依靠它们,你更难以确信再次运行临时命令或playbook不会造成意外的失败。当shell或command模块运行时,通常会基于它是否认为影响了计算机状态而报告CHANGED状态。
有时候,“运行命令”模块是有用的工具,也是解决问题的好办法。如果确实需要使用它们,可能最好先尝试用command模块,只有在需要shell或raw模块的特殊功能时才利用它们(command偏向Ansible;shell偏向受管主机;raw偏向交换机路由器)。
配置临时命令的连接
受管主机连接和特权升级的指令可以在Ansible配置文件中配置,也可以使用临时命令中的选项来定义。使用临时命令中的选项定义时,它们将优先于Ansible配置文件中配置的指令。下表显示了与各项配置文件指令类同的命令行选项。
Ansible命令行选项
| 配置文件指令 | 命令行选项 |
|---|---|
| inventory | -i |
| remote_user | -u |
| become | –become、-b |
| become_method | –become-method |
| become_user | –become-user |
| become_ask_pass | –ask-become-pass、-K |
在使用命令行选项配置这些指令前,可以通过查询ansible --help的输出来确定其当前定义的值。
ansible --help
ansible常用模块
ping
[root@Ansibleconsole ~]# ansible all -m ping
192.168.72.4 | SUCCESS => {
    "ansible_facts": {
        "discovered_interpreter_python": "/usr/libexec/platform-python"
    },
    "changed": false,
    "ping": "pong"
}
command
command模块是ansible的默认模块
[root@Ansibleconsole ~]# ansible all -a 'cat /etc/fstab'
192.168.72.4 | CHANGED | rc=0 >>

#
# /etc/fstab
# Created by anaconda on Wed Aug 26 10:43:17 2020
#
# Accessible filesystems, by reference, are maintained under '/dev/disk/'.
# See man pages fstab(5), findfs(8), mount(8) and/or blkid(8) for more info.
#
# After editing this file, run 'systemctl daemon-reload' to update systemd
# units generated from this file.
#
/dev/mapper/rhel-root   /                       xfs     defaults        0 0
UUID=3ecd01b3-db3d-4382-80a1-dfa5da5bf0f4 /boot                   xfs     defaults        0 0
/dev/mapper/rhel-swap   swap                    swap    defaults        0 0
command模块有一个缺陷就是不能使用管道符和重定向功能。
raw
raw模块用于远程主机上执行命令,支持管道符和重定向
[root@Ansibleconsole ~]# ansible all -m raw -a 'echo "芜湖!起飞!!" > /root/test'
localhost | CHANGED | rc=0 >>

192.168.72.8 | CHANGED | rc=0 >>
Shared connection to 192.168.72.8 closed.

cn.4.com | CHANGED | rc=0 >>
Shared connection to 192.168.72.4 closed.

192.168.72.6 | CHANGED | rc=0 >>
Shared connection to 192.168.72.6 closed.
192.168.72.4

192.168.72.6

192.168.72.8

[root@Ansibleconsole ~]# ansible all -m raw -a 'ls /etc/ |grep yum'
localhost | CHANGED | rc=0 >>
yum
yum.conf
yum.repos.d

192.168.72.6 | CHANGED | rc=0 >>
yum
yum.conf
yum.repos.d
Shared connection to 192.168.72.6 closed.

192.168.72.8 | CHANGED | rc=0 >>
yum
yum.conf
yum.repos.d
Shared connection to 192.168.72.8 closed.

cn.4.com | CHANGED | rc=0 >>
yum
yum.conf
yum.repos.d
Shared connection to 192.168.72.4 closed.
shell
shell模块支持管道符和重定向功能
- 使用shell模块给受管主机设置光驱开机自启
[root@Ansibleconsole ~]# ansible all -m shell -a 'echo "/dev/sr0 /mnt iso9660 defaults 0 0" >> /etc/fstab'
localhost | CHANGED | rc=0 >>

192.168.72.6 | CHANGED | rc=0 >>

192.168.72.8 | CHANGED | rc=0 >>

cn.4.com | CHANGED | rc=0 >>
查看受管主机的/etc/fstab文件
192.168.72.4

192.168.72.6

192.168.72.8
![]()
[root@Ansibleconsole ~]# ansible all -m shell -a 'ls /etc/ | grep yum'
localhost | CHANGED | rc=0 >>
yum
yum.conf
yum.repos.d
cn.4.com | CHANGED | rc=0 >>
yum
yum.conf
yum.repos.d
192.168.72.6 | CHANGED | rc=0 >>
yum
yum.conf
yum.repos.d
192.168.72.8 | CHANGED | rc=0 >>
yum
yum.conf
yum.repos.d
scripts
用于在受控机上执行控制节点的脚本
- 在控制节点下创建一个脚本文件并
赋予执行权限
[root@Ansibleconsole ~]# cat /root/test.sh
#!/bin/bash
echo "hello world!
[root@Ansibleconsole ~]# chmod +x /root/test.sh
- 执行脚本
[root@Ansibleconsole ~]# ansible all -m script -a '/root/test.sh'			#之间输入脚本所在的绝对路径即可;不用加上/bin/bash
localhost | CHANGED => {
    "changed": true,
    "rc": 0,
    "stderr": "",
    "stderr_lines": [],
    "stdout": "hello world!\n",
    "stdout_lines": [
        "hello world!"
    ]
}
192.168.72.6 | CHANGED => {
    "changed": true,
    "rc": 0,
    "stderr": "Shared connection to 192.168.72.6 closed.\r\n",
    "stderr_lines": [
        "Shared connection to 192.168.72.6 closed."
    ],
    "stdout": "hello world!\r\n",
    "stdout_lines": [
        "hello world!"
    ]
}
cn.4.com | CHANGED => {
    "changed": true,
    "rc": 0,
    "stderr": "Shared connection to 192.168.72.4 closed.\r\n",
    "stderr_lines": [
        "Shared connection to 192.168.72.4 closed."
    ],
    "stdout": "hello world!\r\n",
    "stdout_lines": [
        "hello world!"
    ]
}
192.168.72.8 | CHANGED => {
    "changed": true,
    "rc": 0,
    "stderr": "Shared connection to 192.168.72.8 closed.\r\n",
    "stderr_lines": [
        "Shared connection to 192.168.72.8 closed."
    ],
    "stdout": "hello world!\r\n",
    "stdout_lines": [
        "hello world!"
    ]
}
template
template模板用于生成一个模板,并可以将其传输至远程主机上
- 将yum源传输至远程主机
创建源目录
[root@Ansibleconsole ~]# cp -a /etc/yum.
yum.conf     yum.repos.d/
[root@Ansibleconsole ~]# mkdir /root/yum
[root@Ansibleconsole ~]# cp -a /etc/yum.repos.d/CentOS-Base.repo /root/yum/
测试网络连通性,传输yum源
src=source源 dest=destination目的地
[root@Ansibleconsole ~]# ansible all -m ping
cn.4.com | SUCCESS => {
    "ansible_facts": {
        "discovered_interpreter_python": "/usr/libexec/platform-python"
    },
    "changed": false,
    "ping": "pong"
}
[root@Ansibleconsole ~]# ansible all -m template -a 'src=/root/yum/CentOS-Base.repo dest=/etc/yum.repos.d/'
cn.4.com | CHANGED => {
    "ansible_facts": {
        "discovered_interpreter_python": "/usr/libexec/platform-python"
    },
    "changed": true,
    "checksum": "ff9a9456ae8d34de0496ce35d699f90d992c81a7",
    "dest": "/etc/yum.repos.d/CentOS-Base.repo",
    "gid": 0,
    "group": "root",
    "md5sum": "6a3fd2cacd1631d6af05a54c50b0513a",
    "mode": "0644",
    "owner": "root",
    "size": 2395,
    "src": "/root/.ansible/tmp/ansible-tmp-1598580842.161987-6407-277315622980882/source",
    "state": "file",
    "uid": 0
}
[root@Ansibleconsole ~]# ansible all -m command -a 'ls /etc/yum.repos.d/'
cn.4.com | CHANGED | rc=0 >>
CentOS-Base.repo
redhat.repo
yum与dnf
用于安装或卸载软件包
由于redhat 7与redhat 8的python版本不同,所以建议对redhat 7的版本使用yum模块对redhat 8使用dnf模块
name=软件名 state=状态 present:表示安装(同样表示安装的还有installed、lasted;lasted表示安装最新版本) absent:表示卸载 (同样表示卸载的还有removed)
[root@Ansibleconsole ~]# ansible all -m dnf -a 'name=make state=present'
cn.4.com | CHANGED => {
    "ansible_facts": {
        "discovered_interpreter_python": "/usr/libexec/platform-python"
    },
    "changed": true,
    "msg": "",
    "rc": 0,
    "results": [
        "Installed: make-1:4.2.1-10.el8.x86_64"
    ]
}
[root@Ansibleconsole ~]# ansible all -m yum -a 'name=make state=absent'
cn.4.com | CHANGED => {
    "ansible_facts": {
        "discovered_interpreter_python": "/usr/libexec/platform-python"
    },
    "changed": true,
    "msg": "",
    "rc": 0,
    "results": [
        "Removed: make-1:4.2.1-10.el8.x86_64"
    ]
}
copy
与template模块用法相似
[root@Ansibleconsole ~]# ansible all -m copy -a 'src=/root/test.sh dest=/root/'
cn.4.com | CHANGED => {
    "ansible_facts": {
        "discovered_interpreter_python": "/usr/libexec/platform-python"
    },
    "changed": true,
    "checksum": "f3f7435d0a20eb859ff4b97bfb67c594fa71cf8c",
    "dest": "/root/test.sh",
    "gid": 0,
    "group": "root",
    "md5sum": "e9f6c05023d61dba208370895b7ebf87",
    "mode": "0644",
    "owner": "root",
    "size": 32,
    "src": "/root/.ansible/tmp/ansible-tmp-1598682518.4040148-9345-218483243973145/source",
    "state": "file",
    "uid": 0
}
group
受管主机用户组管理
用法与user模块类似:name=用户组名 state=状态(present创建、absent删除)gid=设置用户组id
[root@Ansibleconsole ~]# ansible all -m group -a 'name=wcl gid=1100 state=present'
cn.4.com | CHANGED => {
    "ansible_facts": {
        "discovered_interpreter_python": "/usr/libexec/platform-python"
    },
    "changed": true,
    "gid": 1100,
    "name": "wcl",
    "state": "present",
    "system": false
}
user
受管主机用户管理
用法与group模块相似:name=用户名 state=状态(presant:创建、absent:删除) uid=设置用户id
[root@Ansibleconsole ~]# ansible all -m user -a 'name=wcl uid=502 state=present'
cn.4.com | CHANGED => {
    "ansible_facts": {
        "discovered_interpreter_python": "/usr/libexec/platform-python"
    },
    "changed": true,
    "comment": "",
    "create_home": true,
    "group": 100,
    "home": "/home/wcl",
    "name": "wcl",
    "shell": "/bin/bash",
    "state": "present",
    "stderr": "正在创建信箱文件: 文件已存在\n",
    "stderr_lines": [
        "正在创建信箱文件: 文件已存在"
    ],
    "system": false,
    "uid": 502
}
- 使用user模块创建系统用户
[root@Ansibleconsole ~]# ansible all -m user -a 'name=chap system=yes state=present'
cn.4.com | CHANGED => {
    "ansible_facts": {
        "discovered_interpreter_python": "/usr/libexec/platform-python"
    },
    "changed": true,
    "comment": "",
    "create_home": true,
    "group": 501,
    "home": "/home/chap",
    "name": "chap",
    "shell": "/bin/bash",
    "state": "present",
    "system": true,
    "uid": 501
}
service
受管主机服务管理
需要配合shell模块使用,用shell模块查看服务状态,用service模块更改服务状态
name=服务名 state=状态(started:启动 reloaded:重新加载 restarted:重启 disabled:开机不自动启动) enabled=开机自启(是单独的一个参数)
- 使用shell模块查看受管主机状态
[root@Ansibleconsole ~]# ansible all -m shell -a 'systemctl status httpd'
cn.4.com | CHANGED | rc=0 >>
● httpd.service - The Apache HTTP Server
   Loaded: loaded (/usr/lib/systemd/system/httpd.service; enabled; vendor preset: disabled)
   Active: active (running) since Thu 2020-08-27 23:48:11 EDT; 1 day 2h ago
     Docs: man:httpd.service(8)
 Main PID: 8479 (httpd)
   Status: "Running, listening on: port 80"
    Tasks: 213 (limit: 4882)
   Memory: 30.0M
   CGroup: /system.slice/httpd.service
           ├─8479 /usr/sbin/httpd -DFOREGROUND
           ├─8481 /usr/sbin/httpd -DFOREGROUND
           ├─8482 /usr/sbin/httpd -DFOREGROUND
           ├─8483 /usr/sbin/httpd -DFOREGROUND
           └─8485 /usr/sbin/httpd -DFOREGROUND

8月 27 23:48:10 AnsibleClient1 systemd[1]: Starting The Apache HTTP Server...
8月 27 23:48:11 AnsibleClient1 httpd[8479]: AH00558: httpd: Could not reliably determine the server's fully qualified domain name, using fe80::20c:29ff:fe77:2845. Set the 'ServerName' directive globally to suppress this message
8月 27 23:48:11 AnsibleClient1 systemd[1]: Started The Apache HTTP Server.
8月 27 23:48:11 AnsibleClient1 httpd[8479]: Server configured, listening on: port 80
- 更改httpd服务的状态
[root@Ansibleconsole ~]# ansible all -m service -a 'name=httpd state=stopped'
cn.4.com | CHANGED => {
    "ansible_facts": {
        "discovered_interpreter_python": "/usr/libexec/platform-python"
    },
    "changed": true,
    "name": "httpd",
    "state": "stopped",
    "status": {
        "ActiveEnterTimestamp": "Thu 2020-08-27 23:48:11 EDT",
        "ActiveEnterTimestampMonotonic": "8259161433",
        "ActiveExitTimestampMonotonic": "0",
        "ActiveState": "active",
        "After": "sysinit.target system.slice -.mount basic.target tmp.mount remote-fs.target network.target systemd-journald.socket systemd-tmpfiles-setup.service nss-lookup.target httpd-init.service",
        "AllowIsolate": "no",
        "AmbientCapabilities": "",
        "AssertResult": "yes",
        "AssertTimestamp": "Thu 2020-08-27 23:48:10 EDT",
        "AssertTimestampMonotonic": "8258575300",
        "Before": "multi-user.target shutdown.target",
        "BlockIOAccounting": "no",
        "BlockIOWeight": "[not set]",
        "CPUAccounting": "no",
        "CPUQuotaPerSecUSec": "infinity",
        "CPUSchedulingPolicy": "0",
        "CPUSchedulingPriority": "0",
        "CPUSchedulingResetOnFork": "no",
        "CPUShares": "[not set]",
        "CPUUsageNSec": "[not set]",
        "CPUWeight": "[not set]",
        "CacheDirectoryMode": "0755",
        "CanIsolate": "no",
        "CanReload": "yes",
        "CanStart": "yes",
        "CanStop": "yes",
        "CapabilityBoundingSet": "cap_chown cap_dac_override cap_dac_read_search cap_fowner cap_fsetid cap_kill cap_setgid cap_setuid cap_setpcap cap_linux_immutable cap_net_bind_service cap_net_broadcast cap_net_admin cap_net_raw cap_ipc_lock cap_ipc_owner cap_sys_module cap_sys_rawio cap_sys_chroot cap_sys_ptrace cap_sys_pacct cap_sys_admin cap_sys_boot cap_sys_nice cap_sys_resource cap_sys_time cap_sys_tty_config cap_mknod cap_lease cap_audit_write cap_audit_control cap_setfcap cap_mac_override cap_mac_admin cap_syslog cap_wake_alarm cap_block_suspend",
        "CollectMode": "inactive",
        "ConditionResult": "yes",
        "ConditionTimestamp": "Thu 2020-08-27 23:48:10 EDT",
        "ConditionTimestampMonotonic": "8258575299",
        "ConfigurationDirectoryMode": "0755",
        "Conflicts": "shutdown.target",
        "ControlGroup": "/system.slice/httpd.service",
        "ControlPID": "0",
        "DefaultDependencies": "yes",
        "Delegate": "no",
        "Description": "The Apache HTTP Server",
        "DevicePolicy": "auto",
        "Documentation": "man:httpd.service(8)",
        "DynamicUser": "no",
        "Environment": "LANG=C",
        "ExecMainCode": "0",
        "ExecMainExitTimestampMonotonic": "0",
        "ExecMainPID": "8479",
        "ExecMainStartTimestamp": "Thu 2020-08-27 23:48:10 EDT",
        "ExecMainStartTimestampMonotonic": "8258576182",
        "ExecMainStatus": "0",
        "ExecReload": "{ path=/usr/sbin/httpd ; argv[]=/usr/sbin/httpd $OPTIONS -k graceful ; ignore_errors=no ; start_time=[n/a] ; stop_time=[n/a] ; pid=0 ; code=(null) ; status=0/0 }",
        "ExecStart": "{ path=/usr/sbin/httpd ; argv[]=/usr/sbin/httpd $OPTIONS -DFOREGROUND ; ignore_errors=no ; start_time=[Thu 2020-08-27 23:48:10 EDT] ; stop_time=[n/a] ; pid=8479 ; code=(null) ; status=0/0 }",
        "FailureAction": "none",
        "FileDescriptorStoreMax": "0",
        "FragmentPath": "/usr/lib/systemd/system/httpd.service",
        "GID": "[not set]",
        "GuessMainPID": "yes",
        "IOAccounting": "no",
        "IOSchedulingClass": "0",
        "IOSchedulingPriority": "0",
        "IOWeight": "[not set]",
        "IPAccounting": "no",
        "IPEgressBytes": "18446744073709551615",
        "IPEgressPackets": "18446744073709551615",
        "IPIngressBytes": "18446744073709551615",
        "IPIngressPackets": "18446744073709551615",
        "Id": "httpd.service",
        "IgnoreOnIsolate": "no",
        "IgnoreSIGPIPE": "yes",
        "InactiveEnterTimestampMonotonic": "0",
        "InactiveExitTimestamp": "Thu 2020-08-27 23:48:10 EDT",
        "InactiveExitTimestampMonotonic": "8258576225",
        "InvocationID": "54cd00d5eefc4094be19af071db355b0",
        "JobRunningTimeoutUSec": "infinity",
        "JobTimeoutAction": "none",
        "JobTimeoutUSec": "infinity",
        "KeyringMode": "private",
        "KillMode": "mixed",
        "KillSignal": "28",
        "LimitAS": "infinity",
        "LimitASSoft": "infinity",
        "LimitCORE": "infinity",
        "LimitCORESoft": "infinity",
        "LimitCPU": "infinity",
        "LimitCPUSoft": "infinity",
        "LimitDATA": "infinity",
        "LimitDATASoft": "infinity",
        "LimitFSIZE": "infinity",
        "LimitFSIZESoft": "infinity",
        "LimitLOCKS": "infinity",
        "LimitLOCKSSoft": "infinity",
        "LimitMEMLOCK": "16777216",
        "LimitMEMLOCKSoft": "16777216",
        "LimitMSGQUEUE": "819200",
        "LimitMSGQUEUESoft": "819200",
        "LimitNICE": "0",
        "LimitNICESoft": "0",
        "LimitNOFILE": "4096",
        "LimitNOFILESoft": "1024",
        "LimitNPROC": "3051",
        "LimitNPROCSoft": "3051",
        "LimitRSS": "infinity",
        "LimitRSSSoft": "infinity",
        "LimitRTPRIO": "0",
        "LimitRTPRIOSoft": "0",
        "LimitRTTIME": "infinity",
        "LimitRTTIMESoft": "infinity",
        "LimitSIGPENDING": "3051",
        "LimitSIGPENDINGSoft": "3051",
        "LimitSTACK": "infinity",
        "LimitSTACKSoft": "8388608",
        "LoadState": "loaded",
        "LockPersonality": "no",
        "LogLevelMax": "-1",
        "LogsDirectoryMode": "0755",
        "MainPID": "8479",
        "MemoryAccounting": "yes",
        "MemoryCurrent": "31465472",
        "MemoryDenyWriteExecute": "no",
        "MemoryHigh": "infinity",
        "MemoryLimit": "infinity",
        "MemoryLow": "0",
        "MemoryMax": "infinity",
        "MemorySwapMax": "infinity",
        "MountAPIVFS": "no",
        "MountFlags": "",
        "NFileDescriptorStore": "0",
        "NRestarts": "0",
        "Names": "httpd.service",
        "NeedDaemonReload": "no",
        "Nice": "0",
        "NoNewPrivileges": "no",
        "NonBlocking": "no",
        "NotifyAccess": "main",
        "OOMScoreAdjust": "0",
        "OnFailureJobMode": "replace",
        "PermissionsStartOnly": "no",
        "Perpetual": "no",
        "PrivateDevices": "no",
        "PrivateMounts": "no",
        "PrivateNetwork": "no",
        "PrivateTmp": "yes",
        "PrivateUsers": "no",
        "ProtectControlGroups": "no",
        "ProtectHome": "no",
        "ProtectKernelModules": "no",
        "ProtectKernelTunables": "no",
        "ProtectSystem": "no",
        "RefuseManualStart": "no",
        "RefuseManualStop": "no",
        "RemainAfterExit": "no",
        "RemoveIPC": "no",
        "Requires": "-.mount system.slice sysinit.target",
        "RequiresMountsFor": "/var/tmp",
        "Restart": "no",
        "RestartUSec": "100ms",
        "RestrictNamespaces": "no",
        "RestrictRealtime": "no",
        "Result": "success",
        "RootDirectoryStartOnly": "no",
        "RuntimeDirectoryMode": "0755",
        "RuntimeDirectoryPreserve": "no",
        "RuntimeMaxUSec": "infinity",
        "SameProcessGroup": "no",
        "SecureBits": "0",
        "SendSIGHUP": "no",
        "SendSIGKILL": "yes",
        "Slice": "system.slice",
        "StandardError": "inherit",
        "StandardInput": "null",
        "StandardInputData": "",
        "StandardOutput": "journal",
        "StartLimitAction": "none",
        "StartLimitBurst": "5",
        "StartLimitIntervalUSec": "10s",
        "StartupBlockIOWeight": "[not set]",
        "StartupCPUShares": "[not set]",
        "StartupCPUWeight": "[not set]",
        "StartupIOWeight": "[not set]",
        "StateChangeTimestamp": "Thu 2020-08-27 23:48:11 EDT",
        "StateChangeTimestampMonotonic": "8259215282",
        "StateDirectoryMode": "0755",
        "StatusErrno": "0",
        "StatusText": "Running, listening on: port 80",
        "StopWhenUnneeded": "no",
        "SubState": "running",
        "SuccessAction": "none",
        "SyslogFacility": "3",
        "SyslogLevel": "6",
        "SyslogLevelPrefix": "yes",
        "SyslogPriority": "30",
        "SystemCallErrorNumber": "0",
        "TTYReset": "no",
        "TTYVHangup": "no",
        "TTYVTDisallocate": "no",
        "TasksAccounting": "yes",
        "TasksCurrent": "213",
        "TasksMax": "4882",
        "TimeoutStartUSec": "1min 30s",
        "TimeoutStopUSec": "1min 30s",
        "TimerSlackNSec": "50000",
        "Transient": "no",
        "Type": "notify",
        "UID": "[not set]",
        "UMask": "0022",
        "UnitFilePreset": "disabled",
        "UnitFileState": "enabled",
        "UtmpMode": "init",
        "WantedBy": "multi-user.target",
        "Wants": "httpd-init.service",
        "WatchdogTimestamp": "Thu 2020-08-27 23:48:11 EDT",
        "WatchdogTimestampMonotonic": "8259161430",
        "WatchdogUSec": "0"
    }
}
使用临时命令安装并启动httpd服务
[root@Ansibleconsole ~]# ansible all -m shell -a 'systemctl status httpd'
cn.4.com | FAILED | rc=4 >>
Unit httpd.service could not be found.non-zero return code
[root@Ansibleconsole ~]# ansible all -m yum -a 'name=httpd state=installed'
cn.4.com | CHANGED => {
    "ansible_facts": {
        "discovered_interpreter_python": "/usr/libexec/platform-python"
    },
    "changed": true,
    "msg": "",
    "rc": 0,
    "results": [
        "Installed: httpd-2.4.37-21.module_el8.2.0+382+15b0afa8.x86_64",
        "Installed: httpd-filesystem-2.4.37-21.module_el8.2.0+382+15b0afa8.noarch",
        "Installed: mod_http2-1.11.3-3.module_el8.2.0+307+4d18d695.x86_64",
        "Installed: httpd-tools-2.4.37-21.module_el8.2.0+382+15b0afa8.x86_64",
        "Removed: httpd-filesystem-2.4.37-16.module+el8.1.0+4134+e6bad0ed.noarch",
        "Removed: httpd-tools-2.4.37-16.module+el8.1.0+4134+e6bad0ed.x86_64"
    ]
}
[root@Ansibleconsole ~]# ansible all -m service -a 'name=httpd state=started'
#由于返回结果太长此处省略
[root@Ansibleconsole ~]# ansible all -m shell -a 'systemctl status httpd'
cn.4.com | CHANGED | rc=0 >>
● httpd.service - The Apache HTTP Server
   Loaded: loaded (/usr/lib/systemd/system/httpd.service; disabled; vendor preset: disabled)
   Active: active (running) since Sat 2020-08-29 02:55:07 EDT; 1min 55s ago
     Docs: man:httpd.service(8)
 Main PID: 13853 (httpd)
   Status: "Running, listening on: port 80"
    Tasks: 213 (limit: 4882)
   Memory: 26.5M
   CGroup: /system.slice/httpd.service
           ├─13853 /usr/sbin/httpd -DFOREGROUND
           ├─13866 /usr/sbin/httpd -DFOREGROUND
           ├─13867 /usr/sbin/httpd -DFOREGROUND
           ├─13868 /usr/sbin/httpd -DFOREGROUND
           └─13869 /usr/sbin/httpd -DFOREGROUND

8月 29 02:55:02 AnsibleClient1 systemd[1]: Starting The Apache HTTP Server...
8月 29 02:55:07 AnsibleClient1 httpd[13853]: AH00558: httpd: Could not reliably determine the server's fully qualified domain name, using fe80::20c:29ff:fe77:2845. Set the 'ServerName' directive globally to suppress this message
8月 29 02:55:07 AnsibleClient1 systemd[1]: Started The Apache HTTP Server.
8月 29 02:55:07 AnsibleClient1 httpd[13853]: Server configured, listening on: port 80
playbook
Playbook是以YAML格式编写的文本文件,通常使用扩展名yml保存。Playbook使用空格字符缩进来表示其数据结构。YAML对用于缩进的空格数量没有严格的要求,但有两个基本的规则:
- 处于层次结构中同一级别的数据元素(例如同一列表中的项目)必须具有相同的缩进量。
- 如果项目属于其他项目的子项,其缩进量必须大于父项
只有空格字符可用于缩进,不允许使用tab键。约定俗成的缩进量一般是一级2个空格。
Playbook开头的一行由三个破折号(—)组成,这是文档开始标记。其末尾可能使用三个圆点(…)作为文档结束标记,尽管在实践中这通常会省略。
playbook编写语法和执行
---										#顶格“---”为项目开头
- name: play to setup web server		#项目名称:以"-"开头,空一格写"name:";可以根据需要随便编写。
  hosts: webservers						#受管主机:与name平齐;可以编写清单文件中的主机组,也可以写主机域名,也可以写具体的IP地址
  tasks:								#任务:与name平齐;task中的内容用来执行项目中的具体操作
  - name: latest httpd version installed		#任务名称:以“-”开头并且与task平齐,空一格写“name:”;可以根据任务需要随意编写
    yum:										#需要使用的模块:与name平齐
      name: httpd									#具体参数ad-hoc command中-a ‘’中的参数
      state: latest

  - name: service is enabled					#任务2
    service:									#模块2
      name: httpd									#具体参数
      enabled: true
[root@Ansibleconsole playdemo]# cat http.yml
---
- name: play to install http
  hosts: cn.4.com
  tasks:
         - name: latest httpd version installed
           yum:
             name: httpd
             state: present
         - name: service is enabled
           service:
             name: httpd
             enabled: true
playbook是一个.yml结尾的文件,本身是不存在的;需要手动创建
- 先创建一个存放playdemo的目录
[root@Ansibleconsole ~]# mkdir /root/playdemo
- 再创建一个playbook文件
---
- name: play to install http
  hosts: cn.4.com
  tasks:
         - name: latest httpd version installed
           yum:
             name: httpd
             state: present
         - name: service is enabled
           service:
             name: httpd
             enabled: true
         - name: service is started
           service:
             name: httpd
             state: started
- 再用
ansible-playbook命令执行
[root@Ansibleconsole playdemo]# ansible-playbook http.yml

PLAY [play to install http] *****************************************************************************************************************************************************************

TASK [Gathering Facts] **********************************************************************************************************************************************************************
ok: [cn.4.com]

TASK [latest httpd version installed] *******************************************************************************************************************************************************
ok: [cn.4.com]

TASK [service is enabled] *******************************************************************************************************************************************************************
changed: [cn.4.com]

PLAY RECAP **********************************************************************************************************************************************************************************
cn.4.com                   : ok=3    changed=1    unreachable=0    failed=0    skipped=0    rescued=0    ignored=0
使用playbook给受控主机安装httpd服务并配置虚拟主机
- 编写配置虚拟主机需要的变量:/root/playdemo/vars/temp.yml
port_name1: 80
port_name2: 81
dir_name1: wcl
dir_name2: wei
- 编写虚拟主机配置模板:/root/playdemo/temp/httpd-vhosts.conf
# Virtual Hosts
#
# Required modules: mod_log_config
# If you want to maintain multiple domains/hostnames on your
# machine you can setup VirtualHost containers for them. Most configurations
# use only name-based virtual hosts so the server doesn't need to worry about
# IP addresses. This is indicated by the asterisks in the directives below.
#
# Please see the documentation at
# block.
#
<VirtualHost *:{{ port_name1 }}>
DocumentRoot "/var/www/html/{{ dir_name1 }}"
ServerName {{dir_name1}}.example.com
ErrorLog "/var/log/httpd/{{ dir_name1 }}/{{ dir_name1 }}.example.com-error_log"
CustomLog "/var/log/httpd/{{ dir_name1 }}/{{ dir_name1 }}.example.com-access_log" common
</VirtualHost>
Listen {{ port_name2 }}
<VirtualHost *:{{ port_name2 }}>
DocumentRoot "/var/www/html/{{ dir_name2 }}"
ServerName {{ dir_name2 }}.example.com
ErrorLog "/var/log/httpd/{{ dir_name2 }}/{{ dir_name2 }}.example.com-error_log"
CustomLog "/var/log/httpd/{{ dir_name2 }}/{{ dir_name2 }}.example.com-access_log" common
</VirtualHost>
- 编写playbook:/root/playdemo/http.yml
---
- name: play to install httpd
  hosts: 192.168.72.6
  vars_files:
    - vars/servicevars.yml
  tasks:
  - name: httpd installed
    yum:
      name: "{{variable_name}}"
      state: present
  - name: httpd enabled
    service:
      name: "{{variable_name}}"
      enabled: True
  - name: httpd started
    service:
      name: "{{variable_name}}"
      state: started
  - name: mkdir /var/www/html/wcl
    shell: mkdir /var/www/html/wcl
  - name: mkdir /var/www/html/wei
    shell: mkdir /var/www/html/wei
  - name: echo wcl/index.html
    shell: echo "芜湖!起飞!!" > /var/www/html/wcl/index.html
  - name: echo wei/index.html
    shell: echo "holy shit" > /var/www/html/wei/index.html


- name: the vhosts.conf for 192.168.72.6
  hosts: 192.168.72.6
  vars_files:
    - vars/temp.yml
  tasks:
  - name: test
    template:
      src: /root/playdemo/temp/httpd-vhosts.conf
      dest: /etc/httpd/conf.d/
- 检查playbook语法
[root@Ansibleconsole ~]# ansible-playbook --syntax-check /root/playdemo/http.yml

playbook: /root/playdemo/http.yml
- 检查playbook可执行性
[root@Ansibleconsole ~]# ansible-playbook -C /root/playdemo/http.yml

PLAY [play to install httpd] ****************************************************************************************************************************************************************

TASK [Gathering Facts] **********************************************************************************************************************************************************************
ok: [192.168.72.6]

TASK [httpd installed] **********************************************************************************************************************************************************************
ok: [192.168.72.6]

TASK [httpd enabled] ************************************************************************************************************************************************************************
ok: [192.168.72.6]

TASK [httpd started] ************************************************************************************************************************************************************************
ok: [192.168.72.6]

TASK [mkdir /var/www/html/wcl] **************************************************************************************************************************************************************
skipping: [192.168.72.6]

TASK [mkdir /var/www/html/wei] **************************************************************************************************************************************************************
skipping: [192.168.72.6]

TASK [echo wcl/index.html] ******************************************************************************************************************************************************************
skipping: [192.168.72.6]

TASK [echo wei/index.html] ******************************************************************************************************************************************************************
skipping: [192.168.72.6]

PLAY [the vhosts.conf for 192.168.72.6] *****************************************************************************************************************************************************

TASK [Gathering Facts] **********************************************************************************************************************************************************************
ok: [192.168.72.6]

TASK [test] *********************************************************************************************************************************************************************************
ok: [192.168.72.6]

PLAY RECAP **********************************************************************************************************************************************************************************
192.168.72.6               : ok=6    changed=0    unreachable=0    failed=0    skipped=4    rescued=0    ignored=0
- 执行playbook
[root@Ansibleconsole ~]# ansible-playbook /root/playdemo/http.yml

PLAY [play to install httpd] ****************************************************************************************************************************************************************

TASK [Gathering Facts] **********************************************************************************************************************************************************************
ok: [192.168.72.6]

TASK [httpd installed] **********************************************************************************************************************************************************************
ok: [192.168.72.6]

TASK [httpd enabled] ************************************************************************************************************************************************************************
ok: [192.168.72.6]

TASK [httpd started] ************************************************************************************************************************************************************************
ok: [192.168.72.6]

TASK [mkdir /var/www/html/wcl] **************************************************************************************************************************************************************
[WARNING]: Consider using the file module with state=directory rather than running 'mkdir'.  If you need to use command because file is insufficient you can add 'warn: false' to this
command task or set 'command_warnings=False' in ansible.cfg to get rid of this message.
changed: [192.168.72.6]

TASK [mkdir /var/www/html/wei] **************************************************************************************************************************************************************
changed: [192.168.72.6]

TASK [echo wcl/index.html] ******************************************************************************************************************************************************************
changed: [192.168.72.6]

TASK [echo wei/index.html] ******************************************************************************************************************************************************************
changed: [192.168.72.6]

PLAY [the vhosts.conf for 192.168.72.6] *****************************************************************************************************************************************************

TASK [Gathering Facts] **********************************************************************************************************************************************************************
ok: [192.168.72.6]

TASK [test] *********************************************************************************************************************************************************************************
changed: [192.168.72.6]

PLAY RECAP **********************************************************************************************************************************************************************************
192.168.72.6               : ok=10   changed=5    unreachable=0    failed=0    skipped=0    rescued=0    ignored=0
- 在
本地hosts文件中加上IP地址与虚拟主机URL的对应关系:C:\Windows\system32\drivers\etc\hosts
192.168.72.6	wcl.example.com
192.168.72.6	wei.example.com
- 测试配置结果
wcl.example.com

wei.example.com:81

编写多个playbook并测查语法和可执行性
- 在同一个文件中编写多个playbook
[root@Ansibleconsole ~]# cat /root/playdemo/http.yml
---
- name: play to install httpd
  hosts: cn.4.com
  tasks:
    - name: httpd installed
      yum:
          name: httpd
          state: installed
    - name: service is enabled
      service:
          name: httpd
          enabled: true
    - name: service is started
      service:
          name: httpd
          state: started

- name: play to install httpd
  hosts: 192.168.72.6
  tasks:
    - name: httpd installed
      yum:
          name: httpd
          state: installed
    - name: service is enabled
      service:
          name: httpd
          enabled: true
    - name: service is started
      service:
          name: httpd
- 通过执行
ansible-playbook --syntax-check检查语法是否合格
语法正确情况下:
[root@Ansibleconsole ~]# ansible-playbook --syntax-check /root/playdemo/http.yml

playbook: /root/playdemo/http.yml
语法出错时:
[root@Ansibleconsole ~]# ansible-playbook --syntax-check /root/playdemo/http.yml
ERROR! We were unable to read either as JSON nor YAML, these are the errors we got from each:
JSON: Expecting value: line 1 column 1 (char 0)

Syntax Error while loading YAML.
  mapping values are not allowed in this context

The error appears to be in '/root/playdemo/http.yml': line 26, column 14, but may
be elsewhere in the file depending on the exact syntax problem.

The offending line appears to be:

    - name:service is enabled
      service:
             ^ here
- 通过执行
ansible-playbook -C检查文件可执行性(此命令仅检查文件执行情况不会执行文件中playbook)
[root@Ansibleconsole ~]# ansible-playbook  -C /root/playdemo/http.yml

PLAY [play to install httpd] ****************************************************************************************************************************************************************

TASK [Gathering Facts] **********************************************************************************************************************************************************************
ok: [cn.4.com]

TASK [httpd installed] **********************************************************************************************************************************************************************
ok: [cn.4.com]

TASK [service is enabled] *******************************************************************************************************************************************************************
ok: [cn.4.com]

TASK [service is started] *******************************************************************************************************************************************************************
ok: [cn.4.com]

PLAY [play to install httpd] ****************************************************************************************************************************************************************

TASK [Gathering Facts] **********************************************************************************************************************************************************************
ok: [192.168.72.6]

TASK [httpd installed] **********************************************************************************************************************************************************************
ok: [192.168.72.6]

TASK [service is enabled] *******************************************************************************************************************************************************************
changed: [192.168.72.6]

TASK [service is started] *******************************************************************************************************************************************************************
ok: [192.168.72.6]

PLAY RECAP **********************************************************************************************************************************************************************************
192.168.72.6               : ok=4    changed=1    unreachable=0    failed=0    skipped=0    rescued=0    ignored=0
cn.4.com                   : ok=4    changed=0    unreachable=0    failed=0    skipped=0    rescued=0    ignored=0
#正常情况下之后有ok与changed选项后面有数字变化;其他选项都应该是0
出现错误时:
[root@Ansibleconsole ~]# ansible-playbook  -C /root/playdemo/http.yml

PLAY [play to install httpd] ****************************************************************************************************************************************************************

TASK [Gathering Facts] **********************************************************************************************************************************************************************
ok: [cn.4.com]

TASK [httpd installed] **********************************************************************************************************************************************************************
ok: [cn.4.com]

TASK [service is enabled] *******************************************************************************************************************************************************************
ok: [cn.4.com]

TASK [service is started] *******************************************************************************************************************************************************************
ok: [cn.4.com]

PLAY [play to install httpd] ****************************************************************************************************************************************************************

TASK [Gathering Facts] **********************************************************************************************************************************************************************
fatal: [192.168.72.6]: UNREACHABLE! => {"changed": false, "msg": "Failed to connect to the host via ssh: ssh: connect to host 192.168.72.6 port 22: Connection timed out", "unreachable": true}

PLAY RECAP **********************************************************************************************************************************************************************************
192.168.72.6               : ok=0    changed=0    unreachable=1    failed=0    skipped=0    rescued=0    ignored=0
cn.4.com                   : ok=4    changed=0    unreachable=0    failed=0    skipped=0    rescued=0    ignored=0
#如果failed和unreachable选项有数字变化,说明执行过程出现错误;这里是因为我没有将192.168.72.6这台机器开机导致出现unreachable
playbook中的远程用户和特权升级
设置远程用户的方法有两种:
- 在配置文件中
/etc/ansible/ansible.cfg设置
# default user to use for playbooks if user is not specified
# (/usr/bin/ansible will use current user as default)
#remote_user = root

在配置文件中找到这段,将"remote_user"取消注释;后面设置root用户或普通用户
- 在playbook中加上
remote_user参数
---
- name: play to install httpd
  hosts: cn.4.com
  remote_user: root
  tasks:
    - name: httpd installed
      yum:
          name: httpd
          state: installed
    - name: service is enabled
      service:
          name: httpd
          enabled: true
    - name: service is started
      service:
          name: httpd
          state: started
测试执行成功:
[root@Ansibleconsole ~]# ansible-playbook -C /root/playdemo/http.yml

PLAY [play to install httpd] ****************************************************************************************************************************************************************

TASK [Gathering Facts] **********************************************************************************************************************************************************************
ok: [cn.4.com]

TASK [httpd installed] **********************************************************************************************************************************************************************
ok: [cn.4.com]

TASK [service is enabled] *******************************************************************************************************************************************************************
ok: [cn.4.com]

TASK [service is started] *******************************************************************************************************************************************************************
ok: [cn.4.com]

PLAY [play to install httpd] ****************************************************************************************************************************************************************

TASK [Gathering Facts] **********************************************************************************************************************************************************************
ok: [192.168.72.6]

TASK [httpd installed] **********************************************************************************************************************************************************************
ok: [192.168.72.6]

TASK [service is enabled] *******************************************************************************************************************************************************************
changed: [192.168.72.6]

TASK [service is started] *******************************************************************************************************************************************************************
ok: [192.168.72.6]

PLAY RECAP **********************************************************************************************************************************************************************************
192.168.72.6               : ok=4    changed=1    unreachable=0    failed=0    skipped=0    rescued=0    ignored=0
cn.4.com                   : ok=4    changed=0    unreachable=0    failed=0    skipped=0    rescued=0    ignored=0
特权升级
Ansible也提供额外的关键字,从而在playbook内定义特权升级参数。become布尔值关键字可用于启用或禁用特权升级,无论它在Ansible配置文件中的定义为何。它可取yes或true值来启用特权升级,或者取no或false值来禁用它。
特权升级同样可以通过配置文件和playbook参数两种办法设置:
- 在配置文件里修改
[privilege_escalation]
#become=True
#become_method=sudo
#become_user=root
#become_ask_pass=False
become=True:启用特权升级		become_method=sudo:以sudo的方式进行特权升级
- 在playbook中直接加上
become
---
- hosts: 192.168.72.6
  remote_user: wei
  become: True

  tasks:
    - name: test
      lineinfile:
        path: /etc/hosts
        line: '10.10.10.10 www.wcl.com'
        state: present
[root@Ansibleconsole ~]# ansible-playbook -C /root/playdemo/test.yml -K
BECOME password:

PLAY [192.168.72.6] *************************************************************************************************************************************************************************

TASK [Gathering Facts] **********************************************************************************************************************************************************************
fatal: [192.168.72.6]: FAILED! => {"ansible_facts": {}, "changed": false, "failed_modules": {"setup": {"ansible_facts": {"discovered_interpreter_python": "/usr/libexec/platform-python"}, "failed": true, "module_stderr": "Shared connection to 192.168.72.6 closed.\r\n", "module_stdout": "\r\n我们信任您已经从系统管理员那里了解了日常注意事项。\r\n总结起来无外乎这三点:\r\n\r\n    #1) 尊重别人的隐私。\r\n    #2) 输入前要先考虑(后果和风险)。\r\n    #3) 权力越大,责任越大。\r\n\r\n\r\nwei 不在 sudoers 文件中。此事将被报告。\r\n", "msg": "MODULE FAILURE\nSee stdout/stderr for the exact error", "rc": 1}}, "msg": "The following modules failed to execute: setup\n"}

PLAY RECAP **********************************************************************************************************************************************************************************
192.168.72.6               : ok=0    changed=0    unreachable=0    failed=1    skipped=0    rescued=0    ignored=0

#这里并不是playbook中编写出现了错误,而是普通用户没有执行此任务的权限
在受控主机上编辑visudo文件给普通用户授权
[root@AnsibleClient2 home]# visudo
## Allow root to run any commands anywhere
root    ALL=(ALL)       ALL
wei     ALL=(ALL)       NOPASSWD: ALL
NOPASSWD表示不询问密码;在普通用户使用sudo执行管理员命令时会被询问用户密码,加上这个参数后就不会有询问了。(冒号后面一定要加上空格)
执行成功
[root@Ansibleconsole ~]# ansible-playbook -C /root/playdemo/test.yml

PLAY [192.168.72.6] *************************************************************************************************************************************************************************

TASK [Gathering Facts] **********************************************************************************************************************************************************************
ok: [192.168.72.6]

TASK [test] *********************************************************************************************************************************************************************************
changed: [192.168.72.6]

PLAY RECAP **********************************************************************************************************************************************************************************
192.168.72.6               : ok=2    changed=1    unreachable=0    failed=0    skipped=0    rescued=0    ignored=0
查找本地文档
- 查看所有的模块
ansible-doc -l
- 查看指定的模块
[root@Ansibleconsole ~]# ansible-doc yum
- 还可以配合
grep命令搜索模块
[root@Ansibleconsole ~]# ansible-doc -l | grep template
- ansible-doc命令还提供-s选项,它会生成示例输出,可以充当如何在playbook在使用特定模块的示范
[root@Ansibleconsole ~]# ansible-doc -s yum
官方文档:https://docs.ansible.com/ansible/latest/user_guide/
使用ansible-doc命令可以查找和了解如何使用模块。尽管command、shell和raw模块的用法可能看似简单,但在可能时,应尽量避免在playbook中使用它们因为它们可以取胜任意命令,因此使用这些模块时很容易写出非幂等的playbook。
playbook编写规范
- YAML注释
注释也可以用于提高可读性。在YAML中,编号或井号字符(#)右侧的所有内容都是注释。如果注释的左侧有内容,请在该编号符号的前面加一个空格。
remote_user: root # httpd远程连接y登陆用户
- YAML字符串
YAML中的字符串通常不需要放在引号里,即使字符串中包含空格。字符串可以用双引号或单引号括起。
this is a string

'It's a string'

"It's a string"
- YAML字典
下面是一个简单的字典形式:
  become: True
  become_method: sudo
  become_user: wei
- YAML列表
最简单的列表如下:
  hosts:
    - 192.168.72.4
    - 192.168.72.6
    - 192.168.72.8
列表也有以中括号括起的内联格式,如下所示:
hosts: [192.168.72.4,192.168.72.6,192.168.72.8]
- 过时的“键=值” playbook简写
某些playbook可能使用较旧的简写方法,通过将模块的键值对放在与模块名称相同的行上来定义任务。例如,你可能会看到这种语法:
- name: httpd installed
  yum: name=httpd state=installed
- name: service is enabled
  service: name=httpd enabled=true
- name: service is started
  service: name=httpd state=started
通常我们应避免简写形式,而使用普通形式。
普通形式的行数较多,但更容易操作。任务的关键字垂直堆叠,更容易区分。阅读play时,眼睛直接向一扫视,左右运动较少。而且,普通语法是原生的YAML。
管理变量
Ansible变量简介
Ansible支持利用变量来存储值,并在Ansible项目的所有文件中重复使用这些值。这可以简化项目的创建和维护,并减少错误的数量。
通过变量,可以轻松地在Ansible项目中管理给定环境的动态值。例如,变量可能包含下面这些值:
- 要创建的用户
- 要安装的软件包
- 要重新启动的服务
- 要删除的文件
- 要从互联网检索的存档
命名变量
变量的名称必须以字母开头,并且只能包含字母、数字和下划线。
| 无效变量名 | 有效的变量名 |
|---|---|
| web server | web_server |
| remote.file | remote_file |
| 1st file | file_1 file1 |
| remoteserver$1 | remote_server_1 remote_server1 |
定义变量
可以在Ansible项目中的多个位置定义变量。不过,这些变量大致可简化为三个范围级别
- 全局范围:从命令行或ansible配置文件设置的变量(命令行设置的变量优先级高于配置文件)
- play范围:在playbook和相关结构中设置的变量
- 主机范围:由清单文件、事实收集或注册的任务,在主机组和个别主机上设置的变量
清单文件变量、playbook变量、命令行变量之间的优先级比较:
相同一个变量,playbook定义的变量优先级高于清单文件;命令行定义的变量优先级高于playbook定义的变量
playbook中的变量
---
- hosts: 192.168.72.6
  vars:
    package_name: httpd
  tasks:
    - name: vars test
      yum:
        name: "{{package_name}}"
        state: present
在playbook中定义变量
在playbook中有两种定义变量的方法:
- 直接在playbook中定义
 ---
- hosts: 192.168.72.6
  vars:
    package_name: httpd
  tasks:
    - name: vars test
      yum:
        name: "{{package_name}}"
        state: present
- 将需要定义的变量单独写成一个文件,然后在playbook中通过
vars_files和- 文件相对路径/文件名的方式引用变量
定义变量:
variable_name: httpd
在playbook中引用变量:
---
- hosts: 192.168.72.6
  vars_files:
    - vars/vars.yml
  tasks:
    - name: vars test
      yum:
        name: "{{package_name}}"
        state: present
注意:- vars/vars.yml是一个相对路径;如果要用文件定义变量的方法,最好在playbook的同级目录建立一个专门存放变量文件的目录;这样可以保证在引用变量时使用的是相对路径,且方便管理
playbook使用变量的案例
- 定义变量文件:/root/playdemo/vars/users.yml
user: wei
- playbook:/root/playdemo/test.yml
---
- name: useradd for 192.168.72.4
  hosts: 192.168.72.4
  vars_files:
    - vars/users.yml
  tasks:
    - name: username
      user:
        name: "{{user}}"
        home: /home/wei
        state: present
主机变量和组变量
直接应用于主机的清单变量分为两在类:
- 主机变量,应用于特定主机
- 组管理,应用于一个主机组或一组主机组中的所有主机
主机变量优先于组变量,但playbook中定义的变量的优先级比这两者更高。
若要定义主机变量和组变量,一种方法是直接在清单文件中定义。这是较旧的做法,不建议采用,但你可能会在未来的工作当中遇到。
- 主机变量:
192.168.72.6 ansible_user=wei ansible_password=123456
- 主机组变量:
[servers]
192.168.72.6 ansible_password=123456
192.168.72.4 ansible_password=123456
[servers:vars]
user=wei
- 定义servers组的user组变量,该组由两个主机组成,每个主机组有两个服务器:
[servers1]
node1.example.com
node2.example.com

[servers2]
node3.example.com
node4.example.com

[servers:children]
servers1
servers2

[servers:vars]
user=joe
此做法存在一些缺点,它使得清单文件更难以处理,在同一文件中混合提供了主机和变量信息,而且采用的也是过时的语法。
使用目录填充主机和组变量
定义主机和主机组的变量的首选做法是在与清单文件或目录相同的工作目录中,创建group_vars和host_vars两个目录。这两个目录分别包含用于定义组变量和主机变量的文件。
建议的做法是使用host_vars和group_vars目录定义清单变量,而不直接在清单文件中定义它们。
为了定义用于servers组的组变量,需要创建名为group_vars/servers的YAML文件,然后该文件的内容将使用与playbook相同的语法将变量设置为值:
- 主机变量/主机组变量的一般架构
这样方便管理不同的主机或主机组
[root@Ansibleconsole server]# tree
.
├── files
├── group_vars
├── host_vars
│   └── 192.168.72.4
└── inventory
group_vars和host_vars是用于存放主机组变量和主机变量的两个目录
这里host_vars/192.168.72.4是一个主机变量文件,其中的ansible_password: 123456是主机变量
[root@Ansibleconsole server]# cat host_vars/192.168.72.4
ansible_password: 123456

[root@Ansibleconsole server]# cat inventory
192.168.72.4

即使在inventory中没有设置ansible_password也可以与受控主机成功连接

[root@Ansibleconsole server]# ansible -i inventory 192.168.72.4 -m ping
192.168.72.4 | SUCCESS => {
    "ansible_facts": {
        "discovered_interpreter_python": "/usr/libexec/platform-python"
    },
    "changed": false,
    "ping": "pong"
}
使用命令行覆盖变量
- 在文件中定义的变量
[root@Ansibleconsole server]# cat /root/playdemo/vars/users.yml
user_name: wei
- 在playbook中引用该变量
[root@Ansibleconsole server]# cat /root/playdemo/test.yml
---
- name: useradd for 192.168.72.6
  hosts: 192.168.72.6
  vars_files:
    - vars/users.yml
  tasks:
    - name: username
      user:
        name: "{{ user_name }}"
        home: /home/wei
        state: present
      register: result
    - debug: var=result
- 使用命令行覆盖playbook中的变量
[root@Ansibleconsole server]# ansible-playbook /root/playdemo/test.yml -e "user_name=wcl"

PLAY [useradd for 192.168.72.6] ****************************************************************************************

TASK [Gathering Facts] *************************************************************************************************
ok: [192.168.72.6]

TASK [username] ********************************************************************************************************
changed: [192.168.72.6]

TASK [debug] ***********************************************************************************************************
ok: [192.168.72.6] => {
    "result": {
        "changed": true,
        "comment": "",
        "create_home": true,
        "failed": false,
        "group": 1001,
        "home": "/home/wei",
        "name": "wcl",
        "shell": "/bin/bash",
        "state": "present",
        "stderr": "useradd:警告:此主目录已经存在。\n不从 skel 目录里向其中复制任何文件。\n",
        "stderr_lines": [
            "useradd:警告:此主目录已经存在。",
            "不从 skel 目录里向其中复制任何文件。"
        ],
        "system": false,
        "uid": 1001
    }
}

PLAY RECAP *************************************************************************************************************
192.168.72.6               : ok=3    changed=1    unreachable=0    failed=0    skipped=0    rescued=0    ignored=0
可以看出,即使在playbook中引用的变量,使用ansible-playbook -e可以重新定义变量并覆盖之前的定义;同时也说明了命令行定义变量比playbook定义的变量具有更高的优先级
需要注意的是,使用命令行重新定义的变量必须与playbook定义的变量为同一个变量(例如我这里使用的都是user_name)
还可以使用@接文件名的方式进行覆盖
- 清单文件中不加
ansible_password变量
[root@Ansibleconsole ~]# cat /etc/ansible/inventory
192.168.72.6
- 设置变量文件
[root@Ansibleconsole ~]# cat /server/host_vars/all
ansible_password: 123456
- 使用
@/server/host_vars/all前后对比
[root@Ansibleconsole ~]# ansible 192.168.72.6 -m ping
192.168.72.6 | UNREACHABLE! => {
    "changed": false,
    "msg": "Failed to connect to the host via ssh: [email protected]: Permission denied (publickey,gssapi-keyex,gssapi-with-mic,password).",
    "unreachable": true
}
[root@Ansibleconsole ~]# ansible 192.168.72.6 -e @/server/host_vars/all -m ping
192.168.72.6 | SUCCESS => {
    "ansible_facts": {
        "discovered_interpreter_python": "/usr/libexec/platform-python"
    },
    "changed": false,
    "ping": "pong"
}
可以看出,如果不指向变量文件,同时清单中也没用ansible_password变量根本无法连通
使用数组作为变量
client:
  192.168.72.6
    ansible_password: 123456
使用已注册变量捕获命令输出
可以使用register语句捕获命令输出。输出保存在一个临时变量中,然后在playbook中可用于调试用途或者达成其他目的,例如基于命令输出的特定配置。
  register: install_result  将之前执行的结果注册为一个变量,这个变量的名字叫install_result(名字可以以自定义)
- debug: var=install_result 将变量的内容打印
- 例:
playbook的编写
---
- name: useradd for 192.168.72.4
  hosts: 192.168.72.4
  vars_files:
    - vars/users.yml
  tasks:
    - name: username
      user:
        name: "{{user}}"
        home: /home/wei
        state: present
      register: result
    - debug: var=result
playbook的执行测试
[root@Ansibleconsole ~]# ansible-playbook  -C /root/playdemo/test.yml

PLAY [useradd for 192.168.72.4] *************************************************************************************************************************************************************

TASK [Gathering Facts] **********************************************************************************************************************************************************************
ok: [192.168.72.4]

TASK [username] *****************************************************************************************************************************************************************************
ok: [192.168.72.4]

TASK [debug] ********************************************************************************************************************************************************************************
ok: [192.168.72.4] => {
    "result": {
        "append": false,
        "changed": false,
        "comment": "",
        "failed": false,
        "group": 1000,
        "home": "/home/wei",
        "move_home": false,
        "name": "wei",
        "shell": "/bin/bash",
        "state": "present",
        "uid": 1000
    }
}

PLAY RECAP **********************************************************************************************************************************************************************************
192.168.72.4               : ok=3    changed=0    unreachable=0    failed=0    skipped=0    rescued=0    ignored=0
管理机密
Ansible Vault
Ansible可能需要访问密码或API密钥等敏感数据,以便能配置受管主机。通常,此信息可能以纯文本形式存储在清单变量或其他Ansible文件中。但若如此,任何有权访问Ansible文件的用户或存储这些Ansible文件的版本控制系统都能够访问此敏感数据。这显示存在安全风险。
Ansible提供的Ansible Vault可以加密和解密任何由Ansible使用的结构化数据文件。若要使用Ansible Vault,可通过一个名为ansible-vault的命令行工具创建、编辑、加密、解密和查看文件。Ansible Vault可以加密任何由Ansible使用的结构化数据文件。这可能包括清单变量、playbook中含有的变量文件、在执行playbook时作为参数传递的变量文件,或者Ansible角色中定义的变量。
创建加密文件
- 直接创建一个加密文件
[root@Ansibleconsole host_vars]# ansible-vault create key.yml
New Vault password: 123456
Confirm New Vault password: 123456
#实际操作中输入的密码是不显示的
- 先创建一个存放密码的文件,再通过存放密码的文件创建一个加密文件
[root@Ansibleconsole host_vars]# cat pass
123456
[root@Ansibleconsole host_vars]# ansible-vault create --vault-password-file=./pass test
[root@Ansibleconsole host_vars]# cat test
$ANSIBLE_VAULT;1.1;AES256
61393034333636336461373338313939316531366361616635666238616237633933633539323431
3365343637646638303535376462303265313337663635610a663165353837303463316335396434
33633266633830363534643530623135646531646530643230666231323363333935346136303631
6164626437303132620a326266376462623864626465303736353431666462323464353737653539
61613833393835666435316466346533353936323639353233326166653931653237
查看加密文件
输入加密密码或者输入加密文件中的密码都可以成功查看加密文件内容
[root@Ansibleconsole host_vars]# ansible-vault view test
Vault password:
test
编辑现有的加密文件
要编辑现有的加密文件,Ansible Vault提供了ansible-vault edit filename命令。此命令将文件解密为一个临时文件,并允许编辑。保存时,它将复制其内容并删除临时文件。
对加密文件进行编辑也要输入加密密码
[root@Ansibleconsole host_vars]# ansible-vault view test
Vault password:
test
[root@Ansibleconsole host_vars]# ansible-vault edit test
Vault password:
[root@Ansibleconsole host_vars]# ansible-vault view test
Vault password:
test
123456
edit子命令始终重写文件,因此只应在进行更改时使用它。要查看文件的内容而不进行更改时,应使用view子命令。
加密现有的文件
要加密已存在的文件,请使用ansible-vault encrypt filename命令。此命令可取多个欲加密文件的名称作为参数。
[root@Ansibleconsole host_vars]# ansible-vault encrypt 192.168.72.6
New Vault password:
Confirm New Vault password:
Encryption successful
使用–output=OUTPUT_FILE选项,可将加密文件保存为新的名称。只能通过–output选项使用一个输入文件。
解密现有的文件
现有的加密文件可以通过ansible-vault decrypt filename命令永久解密。在解密单个文件时,可使用–output选项以其他名称保存解密的文件。
在输入加密密码后才能解密
[root@Ansibleconsole host_vars]# ansible-vault decrypt 192.168.72.6
Vault password:
Decryption successful
更改加密文件的密码
使用ansible-vault rekey filename命令更改加密文件的密码。此命令可一次性更新多个数据文件的密钥。它将提示提供原始密码和新密码。
[root@Ansibleconsole host_vars]# ansible-vault rekey test
Vault password:
New Vault password:
Confirm New Vault password:
Rekey successful
在使用vault密码文件时,请使用–new-vault-password-file选项:
[root@Ansibleconsole host_vars]# ansible-vault rekey --vault-password-file=pass test
New Vault password:
Confirm New Vault password:
Rekey successful
注意:这里首先要用旧的加密文件,设置新的加密密码;新的加密密码应是新加密文件中的内容
playbook和ansible vault
如果清单文件中没有引用ansible_password变量,并且变量文件被加密的情况下是无法与受管主机连通的
[root@Ansibleconsole host_vars]# ansible-vault encrypt 192.168.72.6
New Vault password:
Confirm New Vault password:
Encryption successful
[root@Ansibleconsole host_vars]# cd ..
[root@Ansibleconsole server]# ansible 192.168.72.6 -i inventory -m ping
ERROR! Attempting to decrypt but no vault secrets found
在这种情况下,需要用到--vault-id @prompt选项来指定加密文件
[root@Ansibleconsole server]# ansible 192.168.72.6 --vault-id @prompt -i inventory -m ping
Vault password (default):
192.168.72.6 | SUCCESS => {
    "ansible_facts": {
        "discovered_interpreter_python": "/usr/libexec/platform-python"
    },
    "changed": false,
    "ping": "pong"
}
此选项同样适用于playbook的执行
---
- name: test
  hosts: 192.168.72.6
  client['192.168.72.6']['ansible_password']
  tasks:
  - name: test
    ping:
[root@Ansibleconsole server]# ansible-playbook test.yml --vault-id @prompt -C
Vault password (default):

PLAY [test] *********************************************************************************************************************************************************************************

TASK [Gathering Facts] **********************************************************************************************************************************************************************
ok: [192.168.72.6]

TASK [test] *********************************************************************************************************************************************************************************
ok: [192.168.72.6]

PLAY RECAP **********************************************************************************************************************************************************************************
192.168.72.6               : ok=2    changed=0    unreachable=0    failed=0    skipped=0    rescued=0    ignored=0
还可以在@前面加上标记
[root@Ansibleconsole server]# ansible-playbook /root/playdemo/test.yml --vault-id 6@prompt -C
Vault password (6):
也可以使用ANSIBLE_VAULT_PASSWORD_FILE环境变量,指定密码文件的默认位置。
从Ansible2.4开始,可以通过ansible-playbook使用多个Ansible Vault密码。要使用多个密码,需要将多个–vault-id或–vault-password-file选项传递给ansible-playbook命令。
ansible-playbook --vault-id one@prompt --vault-id two@prompt site.yml
管理事实
ansible事实
Ansible事实是Ansible在受管主机上自动检测到的变量。事实中包含有与主机相关的信息,可以像play中的常规变量、条件、循环或依赖于从受管主机收集的值的任何其他语句那样使用。
为受管主机收集的一些事实可能包括:
-
主机名称
-
内核版本
-
网络接口
-
IP地址
-
操作系统版本
-
各种环境变量
-
CPU数量
-
提供的或可用的内存
-
可用磁盘空间
借助事实,可以方便地检索受管主机的状态,并根据该状态确定要执行的操作。例如: -
可以根据含有受管主机当前内核版本的事实运行条件任务,以此来重启服务器
-
可以根据通过事实报告的可用内存来自定义MySQL配置文件
-
可以根据事实的值设置配置文件中使用的IPv4地址
通常,每个play在执行第一个任务之前会先自动运行setup模块来收集事实。
查看为受管主机收集的事实的一种方式是,运行一个收集事实并使用debug模块显示ansible_facts变量值的简短playbook。
用debug取出受管主机的所有事实
---
- name: ansible_facts
  hosts: 192.168.72.4
  tasks:
    - name: facts
      debug:
        var: ansible_facts

[root@Ansibleconsole ~]# ansible-playbook /root/playdemo/test.yml
下表显示了可能从受管节点收集的并可在playbook中使用的一些事实:
Ansible事实的示例
| 事实 | 变量 |
|---|---|
| 短主机名 | ansible_facts[‘hostname’] |
| 完全限定域名 | ansible_facts[‘fqdn’] |
| IPv4地址 | ansible_facts[‘default_ipv4’][‘address’] |
| 所有网络接口的名称列表 | ansible_facts[‘interfaces’] |
| /dev/vda1磁盘分区的大小 | ansible_facts[‘devices’][‘vda’][‘partitions’][‘vda1’][‘size’] |
| DNS服务器列表 | ansible_facts[‘dns’][‘nameservers’] |
| 当前运行的内核版本 | ansible_facts[‘kernel’] |
如果变量的值为散列/字典类型,则可使用两种语法来获取其值。比如:
- ansible_facts[‘default_ipv4’][‘address’]也可以写成ansible_facts.default_ipv4.address
- ansible_facts[‘dns’][‘nameservers’]也可以写成ansible_facts.dns.nameservers
用debug取出受管主机的IP地址
---
- name: ansible_facts
  hosts: 192.168.72.4
  tasks:
    - name: facts
      debug:
        var: ansible_facts['default_ipv4']['address']


[root@Ansibleconsole ~]# ansible-playbook /root/playdemo/test.yml

PLAY [ansible_facts] ***********************************************************

TASK [Gathering Facts] *********************************************************
ok: [192.168.72.4]

TASK [facts] *******************************************************************
ok: [192.168.72.4] => {
    "ansible_facts['default_ipv4']['address']": "192.168.72.4"
}

PLAY RECAP *********************************************************************
192.168.72.4               : ok=2    changed=0    unreachable=0    failed=0    skipped=0    rescued=0    ignored=0
ansible事实作为变量注入
在Ansible2.5之前,事实是作为前缀为字符串ansible_的单个变量注入,而不是作为ansible_facts变量的一部分注入。例如,ansible_facts[‘distribution’]事实会被称为ansible_distribution。
许多较旧的playbook仍然使用作为变量注入的事实,而不是在ansible_facts变量下创建命名空间的新语法。我们可以使用临时命令来运行setup模块,以此形式显示所有事实的值。以下示例中使用一个临时命令在受管主机172.16.103.129上运行setup模块:
ansible 172.16.103.129 -m setup
选定的Ansible事实名称比较
| ansible_facts形式 | 旧事实变量形式 |
|---|---|
| ansible_facts[‘hostname’] | ansible_hostname |
| ansible_facts[‘fqdn’] | ansible_fqdn |
| ansible_facts[‘default_ipv4’][‘address’] | ansible_default_ipv4[‘address’] |
| ansible_facts[‘interfaces’] | ansible_interfaces |
| ansible_facts[‘devices’][‘vda’][‘partitions’][‘vda1’][‘size’] | ansible_devices[‘vda’][‘partitions’][‘vda1’][‘size’] |
| ansible_facts[‘dns’][‘nameservers’] | ansible_dns[‘nameservers’] |
| ansible_facts[‘kernel’] | ansible_kernel |
利用register将address注册为变量,再用debug输出
---
- name: ansible_facts
  hosts: 192.168.72.4
  tasks:
    - name: facts
      shell: echo {{ ansible_facts['default_ipv4']['address'] }}
      register: ipaddress
    - debug:                #另一种写法:- debug: var=ipaddress
        var: ipaddress

[root@Ansibleconsole ~]# ansible-playbook /root/playdemo/test.yml

PLAY [ansible_facts] ***********************************************************

TASK [Gathering Facts] *********************************************************
ok: [192.168.72.4]

TASK [facts] *******************************************************************
changed: [192.168.72.4]

TASK [debug] *******************************************************************
ok: [192.168.72.4] => {
    "ipaddress": {
        "changed": true,
        "cmd": "echo 192.168.72.4",
        "delta": "0:00:00.003906",
        "end": "2020-09-03 01:16:29.740414",
        "failed": false,
        "rc": 0,
        "start": "2020-09-03 01:16:29.736508",
        "stderr": "",
        "stderr_lines": [],
        "stdout": "192.168.72.4",
        "stdout_lines": [
            "192.168.72.4"
        ]
    }
}

PLAY RECAP *********************************************************************
192.168.72.4               : ok=3    changed=1    unreachable=0    failed=0    skipped=0    rescued=0    ignored=0
目前,Ansible同时识别新的事实命名系统(使用ansible_facts)和旧的2.5前“作为单独变量注入的事实”命名系统。
将Ansible配置文件的[default]部分中inject_facts_as_vars参数设置为False,可关闭旧命名系统。默认设置目前为True。
inject_facts_as_vars的默认值在Ansible的未来版本中可能会更改为False。如果设置为False,则只能使用新的ansible_facts.*命名系统引用Ansible事实。所以建议大家一开始就要适应这种方式。
在/etc/ansible/ansible.cfg中将此选项取消注释并改为False就可以取消旧版本的变量写inject_facts_as_vars = False
- 如果playbook中再此出现旧版本的变量命名,则会报错
[root@Ansibleconsole ~]# ansible-playbook -i /server/inventory /root/playdemo/test.yml

PLAY [192.168.72.4] ************************************************************

TASK [Gathering Facts] *********************************************************
ok: [192.168.72.4]

TASK [test] ********************************************************************
fatal: [192.168.72.4]: FAILED! => {"msg": "The task includes an option with an undefined variable. The error was: 'ansible_hostname' is undefined\n\nThe error appears to be in '/root/playdemo/test.yml': line 6, column 7, but may\nbe elsewhere in the file depending on the exact syntax problem.\n\nThe offending line appears to be:\n\n  tasks:\n    - name: test\n      ^ here\n"}

PLAY RECAP *********************************************************************
192.168.72.4               : ok=1    changed=0    unreachable=0    failed=1    skipped=0    rescued=0    ignored=0
关闭事实收集
有时我们不想为play收集事实。这样做的原因可能有:
- 不准备使用任何事实
- 希望加快play速度
- 希望减小play在受管主机上造成的负载
- 受管主机因为某种原因无法运行setup模块
- 需要安装一些必备软件后再收集事实
以上种种原因导致我们可能想要永久或暂时关闭事实收集的功能,要为play禁用事实收集功能,可将gather_facts关键字设置为no:
---
- hosts: 192.168.72.4
  vars_files:
    - password
  gather_facts: no
  tasks:
    - name: register and loop
      shell: "echo Ionia {{ item }}"
      loop:
        - High conservation
        - Being immortal
      register: result

    - name: print result
      debug:
        msg: >
          "Send out the message : {{ item }}"
      loop: "{{ result['results'] }}"
临时关闭事实收集再打开
---
- hosts: 192.168.72.4
  vars_files:
    - myhost
  gather_facts: no      #临时关闭事实收集
  tasks:
    - name: setup module
      setup:            #再通过setup模块打开事实收集
    - name: test
      shell: echo {{ ansible_hostname }}
创建自定义事实
除了使用系统捕获的事实外,我们还可以自定义事实,并将其本地存储在每个受管主机上。这些事实整合到setup模块在受管主机上运行时收集的标准事实列表中。它们让受管主机能够向Ansible提供任意变量,以用于调整play的行为。
自定义事实可以在静态文件中定义,格式可为INI文件或采用JSON。它们也可以是生成JSON输出的可执行脚本,如同动态清单脚本一样。
有了自定义事实,我们可以为受管主机定义特定的值,供play用于填充配置文件或有条件地运行任务。动态自定义事实允许在play运行时以编程方式确定这些事实的值,甚至还可以确定提供哪些事实。
默认情况下,setup模块从各受管主机的/etc/ansible/facts.d目录下的文件和脚本中加载自定义事实。各个文件或脚本的名称必须以.fact结尾才能被使用。动态自定义事实脚本必须输出JSON格式的事实,而且必须是可执行文件。
以下是采用INI格式编写的静态自定义事实文件。INI格式的自定义事实文件包含由一个部分定义的顶层值,后跟用于待定义的事实的键值对:
[packages]
web_package = httpd
db_package = mariadb-server
[users]
user1 = root
user2 = wei
同样的事实可能以JSON格式提供。以下JSON事实等同于以上示例中INI格式指定的事实。JSON数据可以存储在静态文本文件中,或者通过可执行脚本输出到标准输出:
{
 "packages": {
   "web_package": "httpd",
   "db_package": "mariadb-server"
 },
 "users": {
    "user1": "root",
    "user2": "wei"
 }
}
在控制节点编写playbook:
---
- hosts: 192.168.72.4
  vars_files:
    - password
  tasks:
    - name: test client1.fact
      debug:
        msg: >
          {{ ansible_facts['ansible_local']['client1json']['packages']['web_package'] }}
执行测试:
[root@Ansibleconsole ~]# ansible-playbook /root/playdemo/test.yml -C

PLAY [192.168.72.4] ************************************************************

TASK [Gathering Facts] *********************************************************
ok: [192.168.72.4]

TASK [test client1.fact] *******************************************************
ok: [192.168.72.4] => {
    "msg": "httpd\n"
}

PLAY RECAP *********************************************************************
192.168.72.4               : ok=2    changed=0    unreachable=0    failed=0    skipped=0    rescued=0    ignored=0
使用魔法变量
一些变量并非事实或通过setup模块配置,但也由Ansible自动设置。这些魔法变量也可用于获取与特定受管主机相关的信息。
最常用的有四个:
| 魔法变量 | 说明 |
|---|---|
| hostvars | 包含受管主机的变量,可以用于获取另一台受管主机的变量的值。如果还没有为受管主机收集事实,则它不会包含该主机的事实。 |
| group_names | 列出当前受管主机所属的所有组 |
| groups | 列出清单中的所有组和主机 |
| inventory_hostname | 包含清单中配置的当前受管主机的主机名称。因为各种原因有可能与事实报告的主机名称不同 |
魔法变量hostvars:
[root@Ansibleconsole ~]# ansible 192.168.72.4 -m debug -a "var=hostvars['ansible_password']"
192.168.72.4 | SUCCESS => {
    "hostvars['ansible_password']": ""
}
关于魔法变量文档:https://docs.ansible.com/ansible/latest/reference_appendices/special_variables.html#special-variables