ShardingSphere 云上实践:开箱即用的 ShardingSphere-Proxy 集群
本次 Apache ShardingSphere 5.1.2 版本更新为大家带来了三大全新功能,其中之一即为使用 ShardingSphere-Proxy chart 在云环境中快速部署一套 ShardingSphere-Proxy 集群,本篇将带大家详细了解该项功能。
1
背景和痛点
在云原生的环境下,一个应用可以在多个不同环境中进行批量的部署,使用原始的 yaml 进行重用,部署到新环境中也是困难重重。
可以看到,在进行 Kubernetes 软件部署时,我们面临下述问题:
如何管理,编辑和更新这些分散的 Kubernetes 应用配置文件?
如何把一套的相关配置文件作为一个应用进行管理?
如何分发和复用 Kubernetes 的应用配置?
在迁移 Apache ShardingSphere-Proxy 从 Docker 或者虚拟机到 Kubernetes 环境下,也存在上述这些问题。
由于 Apache ShardingSphere-Proxy 的灵活性特点,在一个集群中可能需要多个 Apache ShardingSphere-Proxy 副本。传统部署方式下,需要针对每一个副本进行单独的部署文件配置。没有版本化管理的部署方式,在升级过程中,也面临着不能快速回滚,影响应用稳定性的风险。
在现在的企业中,集群也不只是只有一个,在多集群中进行复用配置,并且保证生产和测试集群的配置保持一致,保证测试的正确性,也是没有版本化管理的传统部署方式面临的另一大难题之一。
2
设计目标
由于 Apache ShardingSphere-Proxy 首次官方正式支持在云上进行标准化部署,对于部署方式的考虑就变得尤为重要。需要考虑到用户的易用性,复用的便捷性,对后续版本的兼容性,在调研了 Kubernetes 现有的几种部署方式后,我们最终选择了使用 Helm 对 Apache ShardingSphere-Proxy 制作一个 chart 提供给用户,使其能够对 Apache ShardingSphere-Proxy 部署进行管理,使其能够版本化,可复用。
3
设计内容
Helm 管理名为 chart 的 Kubernetes 包的工具,Helm 可以做以下的事情:
从头开始创建新的 chart
将 chart 打包成归档(tgz)文件
与存储 chart 的仓库进行交互
在现有的 Kubernetes 集群中安装和卸载 chart
管理与 Helm 一起安装的 chart 的发布周期
使用 Helm 去构建 Apache ShardingSphere-Proxy 云上部署 chart,将大大简化用户在 Kubernetes 环境下部署的复杂度,并且可以使 Apache ShardingSphere-Proxy 在多个环境之间进行快速复制。
由于现阶段,Apache ShardingSphere-Proxy 的部署依赖注册中心,在 Apache ShardingSphere-Proxy chart 中也同时对 ZooKeeper 集群的部署进行支持,这样给用户提供了一个一站式、开箱即用的体验。只需要执行一条命令,即可在 Kubernetes 中部署一个带有治理节点的 Apache ShardingSphere-Proxy 集群,并且可以依托于 Kubernetes 的功能,对治理节点数据进行持久化。
4
实战指南
在 5.1.2 文档中提供了 quick start(https://shardingsphere.apache.org/document/current/cn/user-manual/shardingsphere-proxy/startup/helm/) 使用默认的配置文件进行 Apache ShardingSphere-Proxy 集群部署,下面我们将使用源码进行安装,详细地对其中的配置进行说明并实战在 Kubernetes 集群中部署一个 Apache ShardingSphere-Proxy 集群。
环境准备
在部署之前,我们需要准备环境。Apache ShardingSphere-Proxy charts 需要以下环境:
Kubernetes 集群 1.18+
kubectl 1.18+
Helm 3.8.0+
以上需要在实战之前进行安装配置。
charts 源码准备
在仓库(https://shardingsphere.apache.org/charts/)中下载 Apache ShardingSphere-Proxy charts:
helm repo add shardingsphere https://shardingsphere.apache.org/charts
 helm pull shardingsphere/apache-shardingsphere-proxy
 tar -zxvf apache-shardingsphere-proxy-1.1.0-chart.tgz
 cd apache-shardingsphere-proxy
Apache ShardingSphere-Proxy charts 配置
配置 values.yaml 文件
将:
governance:
   ...
   zookeeper:
     replicaCount: 1
   ...
 compute:
   ...
   serverConfig: ""
改为:
governance:
   ...
   zookeeper:
     replicaCount: 3
   ...
 compute:
   ...
   serverConfig:
     authority:
       privilege:
         type: ALL_PRIVILEGES_PERMITTED
       users:
       - password: root
         user: root@%
     mode:
       overwrite: true
       repository:
         props:
           maxRetries: 3
           namespace: governance_ds
           operationTimeoutMilliseconds: 5000
           retryIntervalMilliseconds: 500
           server-lists: "{{ printf \"%s-zookeeper.%s:2181\" .Release.Name .Release.Namespace }}"
           timeToLiveSeconds: 600
         type: ZooKeeper
       type: Cluster
⚠️:保持缩进
剩余配置请查看文档配置一项(https://shardingsphere.apache.org/document/current/cn/user-manual/shardingsphere-proxy/startup/helm/#%E9%85%8D%E7%BD%AE%E9%A1%B9)
安装 Apache ShardingSphere-Proxy & ZooKeeper 集群
现在的文件夹层级为:
helm
 ├── apache-shardingsphere-proxy
 ...
 |   |
 │   └── values.yaml
 └── apache-shardingsphere-proxy-1.1.0-chart.tgz
回到 helm 文件夹,进行安装 Apache ShardingSphere-Proxy & ZooKeeper 集群。
helm install shardingsphere-proxy apache-shardingsphere-proxy
在集群的 default 命名空间下,部署了 ZooKeeper & Apache ShardingSphere-Proxy 集群:
简单功能测试
使用 kubectl forward 进行本地调试:
kubectl port-forward service/shardingsphere-proxy-apache-shardingsphere-proxy 3307:3307创建后端数据库 Database:
使用 MySQL client 进行连接并使用 DistSQL 添加数据源:
mysql -h 127.0.0.1 -P 3307 -uroot -proot
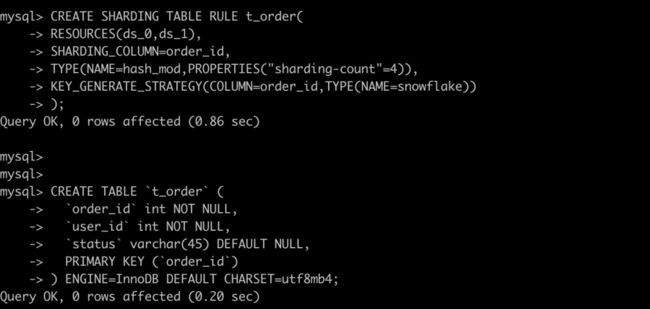
创建规则
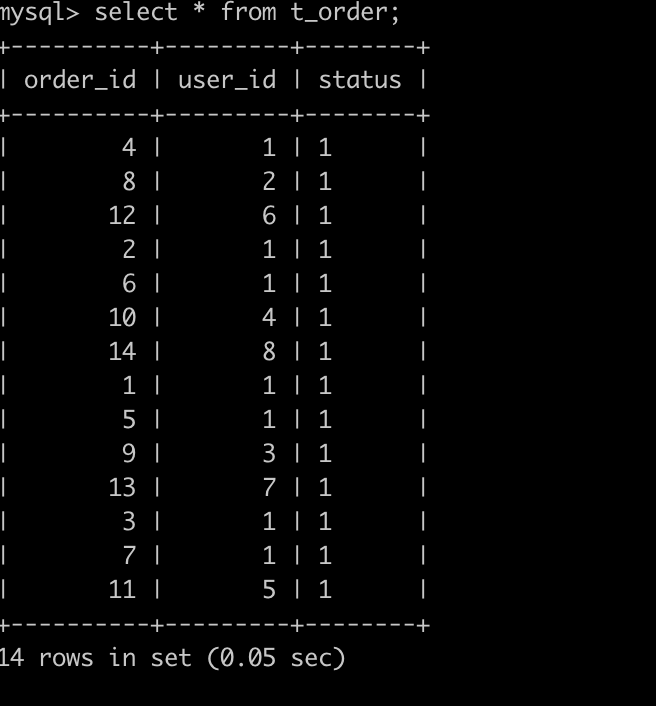
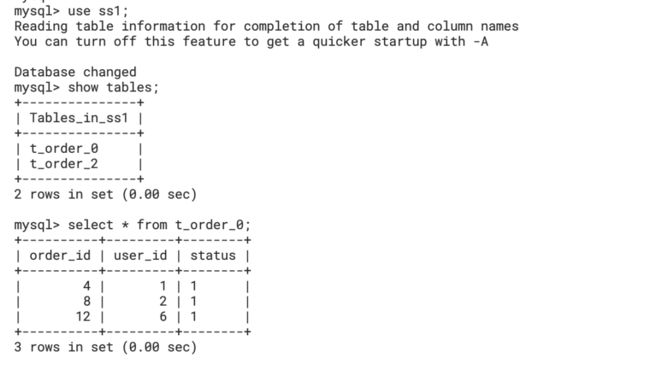
写入数据,查询结果
升级
使用 Helm 可以快速对 Apache ShardingSphere-Proxy 进行升级。
helm upgrade shardingsphere-proxy apache-shardingsphere-proxy
回滚
如果升级过程中出错,可以使用 helm rollback 命令对已经升级的 release 进行快速回滚。
helm rollback shardingsphere-proxy
清理
在体验完成后,可以使用 helm uninstall 命令对 release 快速进行清理:
helm uninstall shardingsphere-proxy
Helm 安装的资源将被全部删除。
5
结语
使用 Apache ShardingSphere-Proxy charts 可以在 Kubernetes 集群中快速部署一套 Apache ShardingSphere-Proxy 集群进行使用,简化了运维人员在迁移 Apache ShardingSphere-Proxy 至 Kubernetes 环境下复杂的配置 yaml 的过程。加上了版本化管理后,可以轻松的对 Apache ShardingSphere-Proxy 集群进行部署、升级、回归和清理。未来我们还会对 Apache ShardingSphere-Proxy chart 进行继续迭代和完善,欢迎大家持续关注。
点击阅读原文链接查看教学视频。


