windows下使用microsoft、intel、gnu不同编译器利用cmake和vscode对c++和fortran程序进行编译和调试
windows下使用microsoft、intel、gnu不同编译器利用cmake和vscode对c++和fortran程序进行编译和调试
由于编译器支持特性、编译后程序运行速度、安装使用便捷程度等的不同,我们往往会安装多种不同的编译器。对于c++语言主要的编译器有:microsoft、intel、gnu等,对于fortran语言则更多,包括gnu、intel、pgi等等。不同的编译器在一个系统下,往往需要利用一些手段进行区分,比如环境变量的临时设置等方式,便于区别使用。
本文介绍一下对于同一个程序利用不同的编译器进行编译的不同方法。
1. 编译器准备
本文介绍主要针对c++和fortran,但以c++为例,fortran的方式是类似的。
c++程序可以采用3种编译器:microsoft、intel、gnu。
其中前两种编译器的安装在【前文】 介绍过了,这里不再说明。
GNU编译器在windows最常用的是mingw和cygwin。这里我们使用【mingw-w64】。几年前mingw-w64主要下载的工具是【MingW-W64-builds工具】。但近今年维护似乎不再持续,而转向msys2了。所以下载msys2【下载地址】 即可。msys2用法参考其【官网】 。需要注意的是,下载安装msys2后只有msys2支持环境,编译工具需要另外下载,打开msys2命令行,输入如下命令下载编译工具:
pacman -S --needed base-devel mingw-w64-x86_64-toolchain
编译器下载完成后,需要将工具所在路径加入系统路径,如:
D:\msys64\mingw64\bin
在命令行下使用命令path或者env可以看到该路径已经加入了系统路径中。

注意:如果是在msys2提供的命令行下工作,那么可以修改home下的.bashrc文件,将mingw的地址加入到msys2的系统目录中,比如:
export PATH="/mingw64/bin/:$PATH"
如此每次打开msys2命令行就能找到g++等工具了。观测path可知:
![]()
2. 编译工具和编辑器准备
编译工具我们使用命令行和cmake,【前文】介绍过,安装即可 。
编辑器使用【vscode】 。
需要安装C/C++,C/C++ Extension Pack 两个插件,后者已经包含了CMake Tools插件。
3. 程序准备
C/C++测试程序使用一个简单的程序(这个示例是vscode网址上的)
#include

#include
#include

using namespace std;


int main(int, char**) {

    vector msg {"Hello", "C++", "World", "from", "VS Code", "and the C++ extension!"};

    cout << "Hello, world!\n";

    int i=0;
    for (const string& word : msg)
    {
        cout << word << " ";
        i++;
    }
    cout << endl;
}
4. 命令行结合cmake使用三种编译器编译c++程序
4.1 使用GNU编译器
建立一个文件夹,放入c++程序,并创建一个CMakeLists.txt
cmake_minimum_required(VERSION 3.10)

# set the project name
project(main)

# add the executable
add_executable(main main.cpp)

enable_testing()

add_test(NAME test_serial COMMAND main)
然后进入普通的命令行,使用如下命令进行编译和测试:
cmake -G "MinGW Makefiles"

cmake --build .

ctest  -VV
结果为:
D:\test\projects\icltestcmkcgnu>cmake -G "MinGW Makefiles"
CMake Warning:
  No source or binary directory provided.  Both will be assumed to be the
  same as the current working directory, but note that this warning will
  become a fatal error in future CMake releases.


-- The C compiler identification is GNU 11.2.0
-- The CXX compiler identification is GNU 11.2.0
-- Detecting C compiler ABI info
-- Detecting C compiler ABI info - done
-- Check for working C compiler: D:/msys64/mingw64/bin/gcc.exe - skipped
-- Detecting C compile features
-- Detecting C compile features - done
-- Detecting CXX compiler ABI info
-- Detecting CXX compiler ABI info - done
-- Check for working CXX compiler: D:/msys64/mingw64/bin/g++.exe - skipped
-- Detecting CXX compile features
-- Detecting CXX compile features - done
-- Configuring done
-- Generating done
-- Build files have been written to: D:/test/projects/icltestcmkcgnu

D:\test\projects\icltestcmkcgnu>cmake --build .
[ 50%] Building CXX object CMakeFiles/main.dir/main.cpp.obj
[100%] Linking CXX executable main.exe
[100%] Built target main

D:\test\projects\icltestcmkcgnu>ctest  -VV
UpdateCTestConfiguration  from :D:/test/projects/icltestcmkcgnu/DartConfiguration.tcl
UpdateCTestConfiguration  from :D:/test/projects/icltestcmkcgnu/DartConfiguration.tcl
Test project D:/test/projects/icltestcmkcgnu
Constructing a list of tests
Done constructing a list of tests
Updating test list for fixtures
Added 0 tests to meet fixture requirements
Checking test dependency graph...
Checking test dependency graph end
test 1
    Start 1: test_serial

1: Test command: D:\test\projects\icltestcmkcgnu\main.exe
1: Test timeout computed to be: 10000000
1: Hello, world!
1: Hello C++ World from VS Code and the C++ extension!
1/1 Test #1: test_serial ......................   Passed    0.46 sec

100% tests passed, 0 tests failed out of 1

Total Test time (real) =   0.48 sec

D:\test\projects\icltestcmkcgnu>
4.2 使用ms编译器
建立一个文件夹,放入c++程序,并创建一个CMakeLists.txt,与前一小结相同。
然后使用如下命令进行编译和测试:
cmake .

cmake --build .

ctest -C Debug -VV
注意:进入的命令行是Developer Command Prompt for VS 2019,这是安装ms build工具得到的。
注意:ctest的时候使用选项-C Debug,因为ms这种编译器区分不同的模式。
D:\test\projects\icltestcmkcms>cmake .
-- Building for: Visual Studio 16 2019
-- Selecting Windows SDK version 10.0.19041.0 to target Windows 10.0.18363.
-- The C compiler identification is MSVC 19.29.30139.0
-- The CXX compiler identification is MSVC 19.29.30139.0
-- Detecting C compiler ABI info
-- Detecting C compiler ABI info - done
-- Check for working C compiler: C:/Program Files (x86)/Microsoft Visual Studio/2019/BuildTools/VC/Tools/MSVC/14.29.30133/bin/Hostx64/x64/cl.exe - skipped
-- Detecting C compile features
-- Detecting C compile features - done
-- Detecting CXX compiler ABI info
-- Detecting CXX compiler ABI info - done
-- Check for working CXX compiler: C:/Program Files (x86)/Microsoft Visual Studio/2019/BuildTools/VC/Tools/MSVC/14.29.30133/bin/Hostx64/x64/cl.exe - skipped
-- Detecting CXX compile features
-- Detecting CXX compile features - done
-- Configuring done
-- Generating done
-- Build files have been written to: D:/test/projects/icltestcmkcms

D:\test\projects\icltestcmkcms>cmake --build .
用于 .NET Framework 的 Microsoft (R) 生成引擎版本 16.11.2+f32259642
版权所有(C) Microsoft Corporation。保留所有权利。

  Checking Build System
  Building Custom Rule D:/test/projects/icltestcmkcms/CMakeLists.txt
  main.cpp
  main.vcxproj -> D:\test\projects\icltestcmkcms\Debug\main.exe
  Building Custom Rule D:/test/projects/icltestcmkcms/CMakeLists.txt

D:\test\projects\icltestcmkcms>ctest -C Debug -VV
UpdateCTestConfiguration  from :D:/test/projects/icltestcmkcms/DartConfiguration.tcl
UpdateCTestConfiguration  from :D:/test/projects/icltestcmkcms/DartConfiguration.tcl
Test project D:/test/projects/icltestcmkcms
Constructing a list of tests
Done constructing a list of tests
Updating test list for fixtures
Added 0 tests to meet fixture requirements
Checking test dependency graph...
Checking test dependency graph end
test 1
    Start 1: test_serial

1: Test command: D:\test\projects\icltestcmkcms\Debug\main.exe
1: Test timeout computed to be: 10000000
1: Hello, world!
1: Hello C++ World from VS Code and the C++ extension!
1/1 Test #1: test_serial ......................   Passed    0.32 sec

100% tests passed, 0 tests failed out of 1

Total Test time (real) =   0.35 sec

D:\test\projects\icltestcmkcms>
4.3 使用intel编译器
建立一个文件夹,放入c++程序,并创建一个CMakeLists.txt,与前一小结相同。
然后使用如下命令进行编译和测试:
cmake -T "Intel C++ Compiler 2022" -DCMAKE_CXX_COMPILER="icl" .

cmake --build .

ctest -C Debug -VV
注意:进入的命令行是Intel oneAPI command prompt for Intel 64 for Visual Studio 2019,这是安装intel oneapi工具得到的。
结果为:
D:\test\projects\icltestcmkcintel>cmake -T "Intel C++ Compiler 2022" -DCMAKE_CXX_COMPILER="icl" .
-- Building for: Visual Studio 16 2019
-- Selecting Windows SDK version 10.0.19041.0 to target Windows 10.0.18363.
-- The C compiler identification is IntelLLVM 2022.0.0 with MSVC-like command-line
-- The CXX compiler identification is IntelLLVM 2022.0.0 with MSVC-like command-line
-- Detecting C compiler ABI info
-- Detecting C compiler ABI info - done
-- Check for working C compiler: D:/Program Files/intel/compiler/2022.0.0/windows/bin/intel64/icl.exe - skipped
-- Detecting C compile features
-- Detecting C compile features - done
-- Detecting CXX compiler ABI info
-- Detecting CXX compiler ABI info - done
-- Check for working CXX compiler: D:/Program Files/intel/compiler/2022.0.0/windows/bin/intel64/icl.exe - skipped
-- Detecting CXX compile features
-- Detecting CXX compile features - done
-- Configuring done
-- Generating done
-- Build files have been written to: D:/test/projects/icltestcmkcintel

D:\test\projects\icltestcmkcintel>cmake --build .
用于 .NET Framework 的 Microsoft (R) 生成引擎版本 16.11.2+f32259642
版权所有(C) Microsoft Corporation。保留所有权利。

  Checking Build System
  Building Custom Rule D:/test/projects/icltestcmkcintel/CMakeLists.txt
  Building Custom Rule D:/test/projects/icltestcmkcintel/CMakeLists.txt

D:\test\projects\icltestcmkcintel>ctest -C Debug -VV
UpdateCTestConfiguration  from :D:/test/projects/icltestcmkcintel/DartConfiguration.tcl
UpdateCTestConfiguration  from :D:/test/projects/icltestcmkcintel/DartConfiguration.tcl
Test project D:/test/projects/icltestcmkcintel
Constructing a list of tests
Done constructing a list of tests
Updating test list for fixtures
Added 0 tests to meet fixture requirements
Checking test dependency graph...
Checking test dependency graph end
test 1
    Start 1: test_serial

1: Test command: D:\test\projects\icltestcmkcintel\Debug\main.exe
1: Test timeout computed to be: 10000000
1: Hello, world!
1: Hello C++ World from VS Code and the C++ extension!
1/1 Test #1: test_serial ......................   Passed    0.32 sec

100% tests passed, 0 tests failed out of 1

Total Test time (real) =   0.34 sec

D:\test\projects\icltestcmkcintel>
4.4 fortran程序
方法是类似的,创建一个CMakeLists.txt
cmake_minimum_required(VERSION 3.10)

enable_language(Fortran)

# set the project name
project(main)

# add the executable
add_executable(main main.f90)

enable_testing()

add_test(NAME test_serial COMMAND main)
GNU编译器,进入普通的命令行,用命令:
cmake -G "MinGW Makefiles"

cmake --build .

ctest -VV
编译。
Intel编译器,则进入Intel oneAPI command prompt for Intel 64 for Visual Studio 2019命令行,
使用命令:
cmake -G "NMake Makefiles"

cmake --build .

ctest -VV
编译。
5. 使用vscode和三种编译器编译调试c++程序
5.1 gnu 编译器
使用一般的命令行,进入当前c++程序所在的文件夹,使用命令:
code .
打开vscode。
从vscode菜单:终端-》配置默认生成任务,选择g++,会生成tasks.JSON,自动放在文件加下的.vscode下。
其内容为:
{
	"version": "2.0.0",
	"tasks": [
		{
			"type": "cppbuild",
			"label": "C/C++: g++.exe 生成活动文件",
			"command": "D:\\msys64\\mingw64\\bin\\g++.exe",
			"args": [
				"-fdiagnostics-color=always",
				"-g",
				"${file}",
				"-o",
				"${fileDirname}\\${fileBasenameNoExtension}.exe"
			],
			"options": {
				"cwd": "${fileDirname}"
			},
			"problemMatcher": [
				"$gcc"
			],
			"group": {
				"kind": "build",
				"isDefault": true
			},
			"detail": "编译器: D:\\msys64\\mingw64\\bin\\g++.exe"
		}
	]
}
在编辑器中选择cpp文件,并
从vscode菜单:终端-》运行任务,选择g++,这时可以生成执行文件。
在编辑器中选择cpp文件,并
从vscode菜单:运行-》添加配置,选项gdb,可以生成调试所需的json配置,自动放在文件加下的.vscode下。需要注意:若没有gdb选项,可以随意选择,然后用下述json配置替换即可。
{
    "version": "0.2.0",
    "configurations": [
      {
        "name": "g++.exe - Build and debug active file",
        "type": "cppdbg",
        "request": "launch",
        "program": "${fileDirname}\\${fileBasenameNoExtension}.exe",
        "args": [],
        "stopAtEntry": true,
        "cwd": "${fileDirname}",
        "environment": [],
        "externalConsole": false,
        "MIMode": "gdb",
        "miDebuggerPath": "d:\\msys64\\mingw64\\bin\\gdb.exe",
        "setupCommands": [
          {
            "description": "Enable pretty-printing for gdb",
            "text": "-enable-pretty-printing",
            "ignoreFailures": true
          }
        ],
        "preLaunchTask": "C/C++: g++.exe 生成活动文件"
      }
    ]
  }
修改其中的"stopAtEntry": true,,那么可使在调试时逐句执行。
在编辑器中选择cpp文件,并
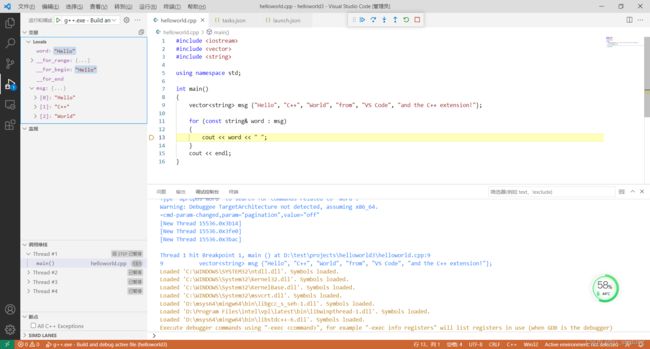
从vscode菜单:运行-》启动调试,则可进入调试。
从调试栏中选择单步跳过,不断执行,可以在左侧栏中看到变量的变化。
5.2 ms 编译器
使用命令行Developer Command Prompt for VS 2019,进入当前c++程序所在的文件夹,使用命令:
code .
打开vscode。
从vscode菜单:终端-》配置默认生成任务,选择C/C++: cl.exe 生成活动文件,会生成tasks.JSON,自动放在文件加下的.vscode下。
其内容为:
{
	"version": "2.0.0",
	"tasks": [
		{
			"type": "cppbuild",
			"label": "C/C++: cl.exe 生成活动文件",
			"command": "cl.exe",
			"args": [
				"/Zi",
				"/EHsc",
				"/nologo",
				"/Fe:",
				"${fileDirname}\\${fileBasenameNoExtension}.exe",
				"${file}"
			],
			"options": {
				"cwd": "${fileDirname}"
			},
			"problemMatcher": [
				"$msCompile"
			],
			"group": {
				"kind": "build",
				"isDefault": true
			},
			"detail": "编译器: cl.exe"
		}
	]
}
在编辑器中选择cpp文件,并
从vscode菜单:终端-》运行任务,选择cl.exe,这时可以生成执行文件。
在编辑器中选择cpp文件,并
从vscode菜单:运行-》添加配置,选项c++(windows),可以生成调试所需的json配置,
,自动放在文件加下的.vscode下。
{
    // 使用 IntelliSense 了解相关属性。
    // 悬停以查看现有属性的描述。
    // 欲了解更多信息,请访问: https://go.microsoft.com/fwlink/?linkid=830387
    "version": "0.2.0",
    "configurations": [
        {
            "name": "cl.exe - 生成和调试活动文件",
            "type": "cppvsdbg",
            "request": "launch",
            "program": "${fileDirname}\\${fileBasenameNoExtension}.exe",
            "args": [],
            "stopAtEntry": true,
            "cwd": "${fileDirname}",
            "environment": [],
            "console": "externalTerminal",
            "preLaunchTask": "C/C++: cl.exe 生成活动文件"
        }
    ]
}
修改其中的"stopAtEntry": true,,那么可使在调试时逐句执行。
在编辑器中选择cpp文件,并
从vscode菜单:运行-》启动调试,则可进入调试。
从调试栏中选择单步跳过,不断执行,可以在左侧栏中看到变量的变化。
5.3 intel 编译器
将c++编译器更改为intel编译可以进行编译和运行。但目前无法使用oneapigdb进行调试(估计以后这个问题会解决。)
首先设置c++编译器:
从vscode菜单:查看-》命令面板,选择C/C++ 编辑配置,找到编译器路径,设置为指定的intel编译器:
D:/Program Files/intel/compiler/latest/windows/bin/intel64/icl.exe
如此可以得到一个c_cpp_properties.json自动放在.vscode目录下。
内容为:
{
    "configurations": [
        {
            "name": "Win32",
            "includePath": [
                "${workspaceFolder}/**"
            ],
            "defines": [
                "_DEBUG",
                "UNICODE",
                "_UNICODE"
            ],
            "windowsSdkVersion": "10.0.19041.0",
            "compilerPath": "D:/Program Files/intel/compiler/latest/windows/bin/intel64/icl.exe",
            "cStandard": "c17",
            "cppStandard": "c++17"
        }
    ],
    "version": 4
}
从vscode菜单:终端-》配置默认生成任务,选择C/C++: icl.exe 生成活动文件,会生成tasks.JSON,自动放在文件加下的.vscode下。
其内容为:
{
    "version": "2.0.0",
    "tasks": [
        {
            "type": "cppbuild",
            "label": "C/C++: icl.exe 生成活动文件",
            "command": "D:/Program Files/intel/compiler/latest/windows/bin/intel64/icl.exe",
            "args": [
                "-fdiagnostics-color=always",
                "/Zi",
                "/Od",
                "/Z7",
                "/debug:all",
                "${file}",
                "-o",
                "${fileDirname}\\${fileBasenameNoExtension}.exe"
            ],
            "options": {
                "cwd": "D:/Program Files/intel/compiler/latest/windows/bin/intel64"
            },
            "problemMatcher": [
                "$gcc"
            ],
            "group": "build",
            "detail": "编译器: \"D:/Program Files/intel/compiler/latest/windows/bin/intel64/icl.exe\""
        }
    ]
}
在编辑器中选择cpp文件,并
从vscode菜单:终端-》运行任务,选择icl.exe,这时可以生成执行文件。
在编辑器中选择cpp文件,并
从vscode菜单:运行-》添加配置,选项oneapi,可以生成调试所需的json配置,
,自动放在文件加下的.vscode下。
在编辑器中选择cpp文件,并
从vscode菜单:运行-》启动调试,则可进入调试,但实际只能执行而无法调试。
测试表明windows下无论gdb-oneapi、gdb都无法进行有效调试,直接在命令行下执行也不行。
这个调试问题目前看windows下是没有解决的。从如下问题可以看到。
【How do I read files with gdb-oneapi, Intel’s debugger, on Windows?】
【Debugging Intel C++ compiled code with GDB】
【Intel’s oneapi C compiler not producing debug information [duplicate]】
5.4 命令行gdb调试
这里只介绍简单的命令:
进入调试:
gdb execfile
或者
gdb
file execfile
symbol-file symbofile
执行:
run
列出源代码:
list
加入断点
break linenumber
逐步执行:
step
6. 使用vscode和cmake及gnu和ms编译器编译调试c++程序
6.1 gnu编译器
使用一般的命令行,进入当前c++程序所在的文件夹,使用命令:
code .
打开vscode。
从vscode菜单:查看-》命令面板,输入cmake,选择cmake:配置,自动进行cmake配置。
从vscode菜单:查看-》命令面板,输入cmake,选择cmake:生成,编译程序。
从左侧文件栏可以看到生成了执行程序main.exe在build目录下面。
执行程序,只要在终端进入build目录,直接输入main.exe回车即可。
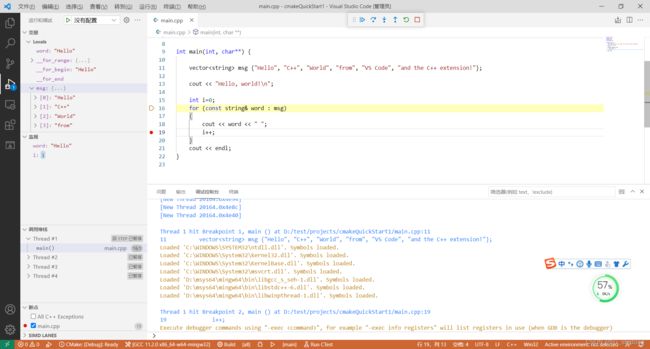
cmake调试程序,首先需要插入断点,然后从vscode菜单:查看-》命令面板,输入cmake,选择cmake:调试,对程序进行调试,从调试栏中选择单步跳过,不断执行,可以在左侧栏中看到变量的变化。
6.2 ms编译器
使用命令行Developer Command Prompt for VS 2019,进入当前c++程序所在的文件夹,使用命令:
code .
打开vscode。
从vscode菜单:查看-》命令面板,输入cmake,选择cmake:配置,自动进行cmake配置。
从vscode菜单:查看-》命令面板,输入cmake,选择cmake:生成,编译程序。
从左侧文件栏可以看到在build目录下,debug目录下生成了执行程序main.exe。
在终端进入改目录,直接输入main.exe回车即可执行程序。
cmake调试程序,首先需要插入断点,然后从vscode菜单:查看-》命令面板,输入cmake,选择cmake:调试,对程序进行调试,从调试栏中选择单步跳过,不断执行,可以在左侧栏中看到变量的变化。
结果为:
7. 小结
本文初步总结了windows下使用不同编译器编译c++和fortran程序的方法,以及结合vscode和cmake进行调试的方法,为windows下c++程序和fortran程序编译提供示范。
参考
- https://code.visualstudio.com/docs/cpp/cmake-linux#_create-a-cmake-hello-world-project
- https://devblogs.microsoft.com/cppblog/cmake-tools-extension-for-visual-studio-code/
- https://blog.csdn.net/u013525455/article/details/52813637


