Springcloud集成 RabbitMQ延时队列
一、场景
当涉及到需要延时处理的业务,比如订单30分钟后过期,2小时后操作业务数据等操作,这里选择用MQ的延时队列+插件来处理,本文记录具体代码实现供参考。
二、代码配置
统一集成在common包中,供各服务集成调用。
1. mq config配置
import org.springframework.amqp.rabbit.connection.CachingConnectionFactory;
import org.springframework.amqp.rabbit.connection.ConnectionFactory;
import org.springframework.amqp.rabbit.core.RabbitTemplate;
import org.springframework.beans.factory.config.ConfigurableBeanFactory;
import org.springframework.context.annotation.Bean;
import org.springframework.context.annotation.Configuration;
import org.springframework.context.annotation.Scope;

/**
 * 描述:RabbitMQ配置类
 *
 * @author: winy_work
 * @date: 2022-08-24 9:50
 */
@Configuration
public class RabbitMQConfig {

    /**
     * 模板配置
     * @param connectionFactory
     * @return
     */
    @Bean
    /** 因为要设置回调类,所以应是prototype类型,如果是singleton类型,则回调类为最后一次设置 */
    @Scope(ConfigurableBeanFactory.SCOPE_PROTOTYPE)
    public RabbitTemplate rabbitTemplate(ConnectionFactory connectionFactory) {
        CachingConnectionFactory cachingConnectionFactory = (CachingConnectionFactory) connectionFactory;
        /** 如果要进行消息回调,则这里必须要设置为true */
        cachingConnectionFactory.setPublisherConfirms(true);
        //rabbitmq心跳20s
        cachingConnectionFactory.setRequestedHeartBeat(20);
        // 设置自动恢复
        cachingConnectionFactory.getRabbitConnectionFactory().setAutomaticRecoveryEnabled(true);
        // 设置 每10s ,重试一次
        cachingConnectionFactory.getRabbitConnectionFactory().setNetworkRecoveryInterval(10);
        // 设置不重新声明交换器,队列等信息。
        cachingConnectionFactory.getRabbitConnectionFactory().setTopologyRecoveryEnabled(false);
        cachingConnectionFactory.setChannelCacheSize(50);
        RabbitTemplate template = new RabbitTemplate(cachingConnectionFactory);
        return template;
    }
}
2. 交换机 exchange 声明 和 队列声明,绑定
import com.bossien.common.constants.RabbitMQConstant;
import org.springframework.amqp.core.Binding;
import org.springframework.amqp.core.BindingBuilder;
import org.springframework.amqp.core.CustomExchange;
import org.springframework.amqp.core.Queue;
import org.springframework.beans.factory.annotation.Qualifier;
import org.springframework.context.annotation.Bean;
import org.springframework.context.annotation.Configuration;

import java.util.HashMap;
import java.util.Map;

/**
 * 描述:RabbitMQ 延时队列声明集合类
 *
 * @author: winy_work
 * @date: 2023-08-24 9:50
 */
@Configuration
public class RabbitMQDelayedDeclare {

    /**
     * 声明交换机
     *
     * @return
     */
    @Bean
    public CustomExchange delayedExchange() {
        Map args = new HashMap<>(2);

        // 交换机类型
        args.put("x-delayed-type", "direct");

        return new CustomExchange(RabbitMQConstant.DELAYED_EXCHANGE,
                "x-delayed-message",
                true,
                false,
                args);
    }

    /**
     * 声明队列
     *
     * @return
     */
    @Bean
    public Queue delayedQueue() {
        Queue queue = new Queue(RabbitMQConstant.DELAYED_QUEUE, true, false, false);
        return queue;
    }

    /**
     * 绑定交换机
     *
     * @param delayedQueue
     * @param delayedExchange
     * @return
     */
    @Bean
    public Binding bindingDelayedQueue(
            @Qualifier("delayedQueue") Queue delayedQueue,
            @Qualifier("delayedExchange") CustomExchange delayedExchange
    ) {
        return BindingBuilder.bind(delayedQueue).to(delayedExchange).with(RabbitMQConstant.DELAYED_QUEUE).noargs();
    }

}
3. 发送消息生产(工具)类
import com.alibaba.fastjson.JSONObject;
import org.slf4j.Logger;
import org.slf4j.LoggerFactory;
import org.springframework.amqp.core.Message;
import org.springframework.amqp.core.MessageBuilder;
import org.springframework.amqp.core.MessageProperties;
import org.springframework.amqp.rabbit.core.RabbitTemplate;
import org.springframework.beans.factory.annotation.Autowired;
import org.springframework.stereotype.Component;

import java.util.UUID;

/**
 * 消息发送服务接口
 *
 * @author winy_work
 */
@Component
public class RabbitMQProducer {

    private final static Logger logger = LoggerFactory.getLogger(RabbitMQProducer.class);

    @Autowired
    private RabbitTemplate rabbitTemplate;

    /**
     * 发送延时消息到队列(定时需求的才用)
     *
     * @param message     消息内容
     * @param delayedTime 延时时间 单位毫秒
     */
    public void sendDelayMsg(Object message, Integer delayedTime) {

        String correlationDataId = UUID.randomUUID().toString();

        String msgStr = JSONObject.toJSONString(message);

        logger.info("messageId is " + correlationDataId + ",消息内容=" + msgStr);
        if (msgStr == null) {
            logger.error("messageId is " + correlationDataId + ",send message failed: message is null");
            return;
        }
        Message messageObj = MessageBuilder.withBody(msgStr.getBytes())
                .setContentType(MessageProperties.CONTENT_TYPE_JSON)
                .setContentEncoding("utf-8")
                .setMessageId(UUID.randomUUID() + "")
                .build();

        // 消息发送
        rabbitTemplate.convertAndSend(RabbitMQConstant.DELAYED_EXCHANGE,
                RabbitMQConstant.DELAYED_QUEUE,
                messageObj,
                (msg) -> {
                    msg.getMessageProperties().setDelay(delayedTime);
                    return msg;
                });
    }
}
4. 注入bean, 交给spring管理, 支持bean注入调用
common resource下新建文件夹 META-INF, 创建文件 spring.factories, 添加内容如下:
org.springframework.boot.autoconfigure.EnableAutoConfiguration=\
  com.bossien.common.core.rabbitmq.RabbitMQConfig,\
  com.bossien.common.core.rabbitmq.RabbitMQProducer,\
  com.bossien.common.core.rabbitmq.RabbitMQDelayedDeclare
5. 上面队列常量类涉及常量 RabbitMQConstant
    /**
     * 延时队列专用交换机
     */
    public static final String DELAYED_EXCHANGE = "delayed.exchange";

    /**
     * 延时队列
     */
    public static final String DELAYED_QUEUE = "delayed.queue";
三、消息生产者测试类
import org.springframework.beans.factory.annotation.Autowired;
import org.springframework.web.bind.annotation.GetMapping;
import org.springframework.web.bind.annotation.RequestMapping;
import org.springframework.web.bind.annotation.RestController;

/**
 * 描述:mq测试控制类
 *
 * @author: winy_work
 * @date: 2022-08-22 14:12
 */
@RestController
@RequestMapping("/rabbitmq")
public class TestRabbitmqController {

    @Autowired
    private RabbitMQProducer producer;

    /**
     * 测试延时队列场景
     * @return
     */
    @GetMapping("/testRabbitmqDelayed")
    public Response testRabbitmqDelayed(){

        // 如果正常情况,那么消费者会根据时间从小到大依次消费执行
        producer.sendDelayMsg("测试延时队列-5s",5000);

        producer.sendDelayMsg("测试延时队列-30s",30000);

        producer.sendDelayMsg("测试延时队列-20s",20000);

        producer.sendDelayMsg("测试延时队列-15s",15000);

        producer.sendDelayMsg("测试延时队列-2s",2000);

        return new Response().success("发送成功!");

    }

}
四、消息消费者测试类
import com.alibaba.fastjson.JSONObject;
import org.slf4j.Logger;
import org.slf4j.LoggerFactory;
import org.springframework.amqp.core.Message;
import org.springframework.amqp.rabbit.annotation.RabbitListener;
import org.springframework.stereotype.Component;

/**
 * 测试mq监听类
 *
 * @author winy_work
 * @desc
 */
@Component
public class TestListenter {

    private final static Logger logger = LoggerFactory.getLogger(TestListenter.class);

    /**
     * 消费测试延时队列
     * @param message
     */
    @RabbitListener(queues = RabbitMQConstant.DELAYED_QUEUE)
    public void handleDelayedMessage(Object obj) {

        logger.info("mq接收到信息:message={}", obj);
    }
}
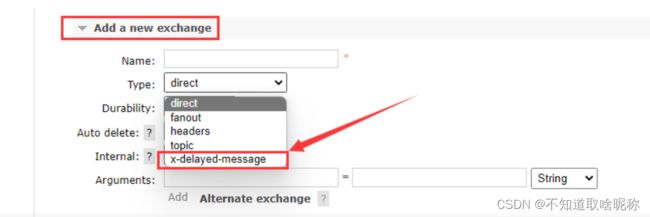
五、注意:上面四步配置完成后工程是启动不起来的,因为声明延时队列的 类型
x-delayed-messageMQ中还没有。需要安装该插件。
插件下载地址:这里需要根据自己安装的mq版本号来下载对应的插件(.ez 文件)。如下图是3.10.2版本的插件。
Releases · rabbitmq/rabbitmq-delayed-message-exchange · GitHub
六、插件安装
下面的地址根据自己的安装路径替换。试了不重启也可以。可以不重启。
# RabbitMQ 的安装目录
cd /usr/lib/rabbitmq/lib/rabbitmq_server-3.10.0/plugins
# 将下载的插件放到 RabbitMQ 安装目录的 plugins 目录下
cp /usr/local/rabbitmq/rabbitmq_delayed_message_exchange-3.10.0.ez /usr/lib/rabbitmq/lib/rabbitmq_server-3.10.0/plugins
# 安装插件
rabbitmq-plugins enable rabbitmq_delayed_message_exchange
# 重启 RabbitMQ
systemctl restart rabbitmq-server安装成功后登录MQ控制台,点击exchange tab页面,查看是否多了如下图选择项,如有,则安装成功。
七、启动程序,调用rest接口测试 localhost:8080/rabbitmq/testRabbitmqDelayed
可以看到控制台打印日志,是按照时间从小到大依次执行的。2s 5s 15s 20s 30s
至此,延时队列就可以成功使用了。

