香橙派4LTS和树莓派4B构建K8S集群实践
目录
1. 说明
1.1 软硬件环境
1.2 设计目标
2 实现
2.1 修改/etc/hosts文件
2.2 docker 安装与设置
2.3 关于关闭SWAP
2.4 安装
3 遇到的问题
3.1 k8s-master-1
3.2 k8s-node-1
4 相关命令
5 参考
1. 说明
1.1 软硬件环境
香橙派4LTS: 命名 k8s-master-1 / 192.168.0.106 / ubuntu 22.04, 4G / 125GSD /
树莓派4B : 命名 k8s-node-1 / 192.168.0.104 / Denian 11, 4G / 64G SD
1.2 设计目标
- 实现K8s集群
- 在其上部署MariaDB Galera Cluster集群
2 实现
2.1 修改/etc/hosts文件
192.168.0.106 k8s-master-1
192.168.0.104 k8s-node-1
199.232.28.133 raw.githubusercontent.com # 以便kubectl apply时能找到
2.2 docker 安装与设置
apt install docker.io用docker info命令查看装好的docker Cgroup Driver是否为systemd,如果不是则修改 /etc/docker/daemon.json, 使得cgroup为systemd(与k8s一致)
"""
{
	"registry-mirrors": [
		"https://docker.mirror.ustc.edu.cn",
		"https://registry.docker-cn.com"
	],
	"exec-opts": ["native.cgroupdriver=systemd"],
	"log-driver": "json-file",
	"log-opts": {
		"max-size": "100m"
	},
	"storage-driver": "overlay2"
}
"""
sudo systemctl daemon-reload
sudo systemctl restart docker.service
sudo docker info  # 查看是否设置成功
2.3 关于关闭SWAP
安装时,需关掉, 但在我的香橙派中,重启后swap分区又会出来,(试过很多方法都不行),简直是打不死的小强,只能在后期添加参数--fail-swap-on=false与其共舞,参看遇到的问题一节
# swapoff -a         # 临时关闭
# sed -ri 's/.*swap.*/#&/' /etc/fstab    # 永久关闭
2.4 安装
# 支持安全连接
apt update &&  apt install -y apt-transport-https curl

# 拿个公钥
curl -s https://mirrors.aliyun.com/kubernetes/apt/doc/apt-key.gpg | apt-key add -

# 添加源
vi /etc/apt/sources.list.d/kubernetes.list
内容:
"""
deb https://mirrors.aliyun.com/kubernetes/apt/ kubernetes-xenial main
"""

sudo apt update

apt -y install kubeadm=1.23.6-00 kubelet=1.23.6-00 kubectl=1.23.6-00

# 固定版本不更新(暂时如此,免得出幺蛾子)
apt-mark hold kubelet kubeadm kubectl

systemctl enable kubelet.service

# 加入环境变量
echo "export KUBECONFIG=/etc/kubernetes/kubelet.conf" >> /etc/profile
source /etc/profile
master server 初始化,这里用了区域镜像,否则等到猴年马月..
kubeadm init --apiserver-advertise-address=192.168.0.106 --pod-network-cidr=10.244.0.0/16 \
 --image-repository registry.aliyuncs.com/google_containers \
 --kubernetes-version v1.23.6
node 加入
# 成功后,会得到与token一起的加入提示命令, 在node1运行之
kubeadm join 192.168.0.106:6443 --token {xxx} \
        --discovery-token-ca-cert-hash sha256:{yyy}


[preflight] Running pre-flight checks
        [WARNING SystemVerification]: missing optional cgroups: hugetlb
[preflight] Reading configuration from the cluster...
[preflight] FYI: You can look at this config file with 'kubectl -n kube-system get cm kubeadm-config -o yaml'
[kubelet-start] Writing kubelet configuration to file "/var/lib/kubelet/config.yaml"
[kubelet-start] Writing kubelet environment file with flags to file "/var/lib/kubelet/kubeadm-flags.env"
[kubelet-start] Starting the kubelet
[kubelet-start] Waiting for the kubelet to perform the TLS Bootstrap...

This node has joined the cluster:
* Certificate signing request was sent to apiserver and a response was received.
* The Kubelet was informed of the new secure connection details.

Run 'kubectl get nodes' on the control-plane to see this node join the cluster.
这时的集群都是NotReady状态的
kubectl get nodes
NAME           STATUS     ROLES                  AGE     VERSION
k8s-master-1   NotReady   control-plane,master   8m15s   v1.23.6
k8s-node-1     NotReady                    2m30s   v1.23.6
在master上安装 Flannel 网络插件
export KUBECONFIG=/etc/kubernetes/admin.conf

kubectl apply -f https://raw.githubusercontent.com/coreos/flannel/master/Documentation/kube-flannel.yml
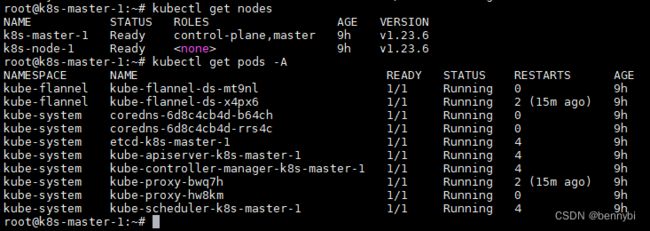
几经周折,完成nodes and pods为running状态,呐喊一下: 
3 遇到的问题
3.1 k8s-master-1
- K8s版本问题,目前需指定安装版本1.23.6-00,超过这个版本安装报错
- 如果删除不了swap交换分区,则kubelet服务会启动不来,由于K8s1.21后的版本能支持swap,所以调整参数(--fail-swap-on=false) 即可,设置方法:
cat /etc/systemd/system/kubelet.service.d/10-kubeadm.conf
# Note: This dropin only works with kubeadm and kubelet v1.11+
[Service]
Environment="KUBELET_KUBECONFIG_ARGS=--bootstrap-kubeconfig=/etc/kubernetes/bootstrap-kubelet.conf --kubeconfig=/etc/kubernetes/kubelet.conf"
Environment="KUBELET_CONFIG_ARGS=--config=/var/lib/kubelet/config.yaml"
# This is a file that "kubeadm init" and "kubeadm join" generates at runtime, populating the KUBELET_KUBEADM_ARGS variable dynamically
EnvironmentFile=-/var/lib/kubelet/kubeadm-flags.env
# This is a file that the user can use for overrides of the kubelet args as a last resort. Preferably, the user should use
# the .NodeRegistration.KubeletExtraArgs object in the configuration files instead. KUBELET_EXTRA_ARGS should be sourced from this file.
EnvironmentFile=-/etc/default/kubelet
ExecStart=
ExecStart=/usr/bin/kubelet $KUBELET_KUBECONFIG_ARGS $KUBELET_CONFIG_ARGS $KUBELET_KUBEADM_ARGS $KUBELET_EXTRA_ARGS --fail-swap-on=false

在启动命令末尾加上: --fail-swap-on=false ,然后reload配置
systemctl daemon-reload
systemctl start kubelet
- "The connection to the server localhost:8080 was refused - did you specify the right host or port?"
cd /etc/kubernetes/

查看到有个文件:kubelet.conf, 执行命令
echo "export KUBECONFIG=/etc/kubernetes/kubelet.conf" >> /etc/profile
source /etc/profile

再次查看 kubectl get pods 已经正常。

原因: kubernetes master没有与本机绑定,集群初始化的时候没有绑定,此时设置在本机的环境变量即可解决问题。
3.2 k8s-node-1
- 加入时,遇到提示:CGROUPS_MEMORY: missing,
解决办法:编辑 /boot/cmdline.txt,加入:
cgroup_enable=memory cgroup_memory=1- Node为NotReady状态, 日志提示:"Unable to update cni config: No networks found in /etc/cni/net.d"
解决办法: 删除 --network-plugin=cni
nano /var/lib/kubelet/kubeadm-flags.env

# KUBELET_KUBEADM_ARGS="--network-plugin=cni --pod-infra-container-image=registry.aliyuncs.com/google_containers/pause:3.6"
=>
KUBELET_KUBEADM_ARGS="--pod-infra-container-image=registry.aliyuncs.com/google_containers/pause:3.6"
- "Failed to generate sandbox config for pod" err="open /run/systemd/resolve/resolv.conf: no such file or directory"
解决办法:
systemctl status systemd-resolved
查看该服务的状态,并进一步解决问题。 在最简单的情况下,它可能只是停止运行了,此时执行

systemctl start systemd-resolved
如果看到pod改为running了,则enable

systemctl enable systemd-resolved
重新启动
4 相关命令
kubeadm token list # 查看 tokens
kubeadm token create # 重新生成
kubectl get pods
kubectl --namespace kube-system logs {pod naem} #查日志
kubectl describe pod --namespace=kube-flannel kube-flannel-ds-x4px6
kubectl get nodes
kubectl describe node k8s-node-1
journalctl -f -u kubelet # 查看kubelet日志
kubectl delete node
kubeadm reset -f && rm -rf /etc/kubernetes/
5 参考
k8s报错收集汇总_520nobody的博客-CSDN博客
Creating a cluster with kubeadm | Kubernetes
Kubernetes安装与踩坑_--apiserver-advertise-address___walden的博客-CSDN博客
使用Kubeadm(1.13+)快速搭建Kubernetes集群
k8s笔记17--ubuntu & k8s 开启 swap功能_k8s swap_昕光xg的博客-CSDN博客