springBoot03-开发-使用篇
springBoot03-开发-使用篇
- 一、热部署
-
- 1、手动开启
- 2、自动启动。默认是5秒钟
- 3、热部署范围控制
- 4、设置高优先级属性禁用热部署
- 二、yml配置高级
-
- 1、@ConfigurationProperties
-
- @EnableConfigurationProperties与@Component不能同时使用:
-
- 方式一:在实体类上面加@Component,不加入enable
- 方式二:在实体类上面加@Component,还加入enable
- 方式三:去掉@component,加入enable
- 2、 宽松绑定/松散绑定【@ConfigurationProperties支持】
- 3、常用计量单位【SpringBoot支持JDK8提供的时间与空间计量单位】
- 4、数据校验
-
- 第一步:添加坐标:导入JSR303与Hibernate校验框架坐标
- 第二步:使用@Validated注解启用校验功能
- 三、测试
-
- 1、加载测试专用属性【临时加载配置属性】
- 2、加载测试专用配置 【临时加载一些bean】
- 3、Web环境模拟测试->表现层
- 4、数据层测试回滚
- 5、测试用例数据设定
- 四、数据层解决方案
-
- 内置数据源
- 五、整合第三方技术
一、热部署
当服务器发现程序发生了变化,做一次内部的重启。原来的服务器是独立的,是通过配置的形式加载了当前运行的项目。而现在服务器是内置的,是受springBoot管控,服务器是程序中的一部分了,那服务器还能感受到程序发生变化吗?
-
要想让服务器感受到代码的变化,如何解决?
必须在spring容器上面做文章。还得需要一个容器进行监控程序有无发生变化,如果变了,让服务器进行内部重启。 所以说的在容器内添加新的设置。 -
关于热部署:
重启(Restart):自定义开发代码,包含类、页面、配置文件等,加载位置restart类加载器。
重载(ReLoad):jar包,加载位置base类加载器
而热部署仅仅属于重启过程,不包含重载的过程。而第一次启动既有重启也有重载。
1、手动开启
第一步:启动开发者工具:启动热部署的工具是:在pom中添加dependency
<dependency>
    <groupId>org.springframework.bootgroupId>
    <artifactId>spring-boot-devtoolsartifactId>
dependency>
第二步骤:ctrl+F9【Build project】
2、自动启动。默认是5秒钟
第一步:导入上面依赖
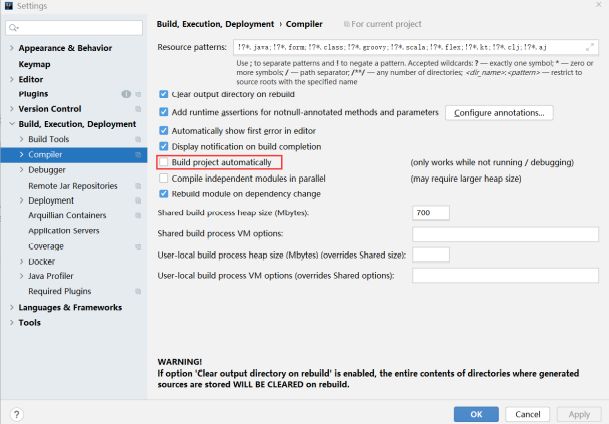
第二步:开启自动构建文件
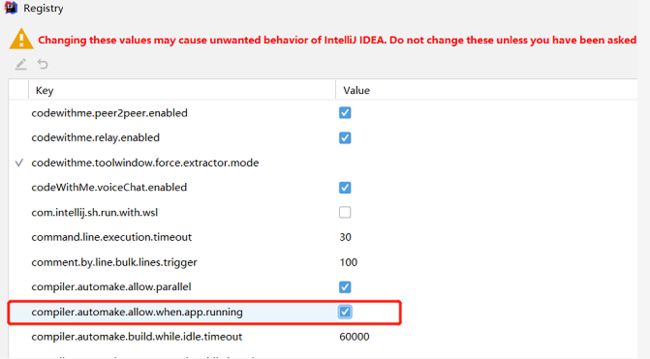
第三步:当APP运行的时候,也允许自动构建项目.
Alt+ctrl+Shift+ /

3、热部署范围控制
- 将以下文件设为不参加热部署
spring:
  devtools:
    restart:
      exclude: application.yaml,static/**,templates/**
4、设置高优先级属性禁用热部署
public static void main(String[] args) {
	System.setProperty("spring.devtools.restart.enabled", "false");
	SpringApplication.run(SSMPApplication.class);
}
而System.setProperty可以写入yaml文件。以及get获取文件信息
  String s = System.setProperty("server.port", "8888");
        String s2 = System.getProperty("server.port");
        System.out.println(s);
        System.out.println(s2);
二、yml配置高级
1、@ConfigurationProperties
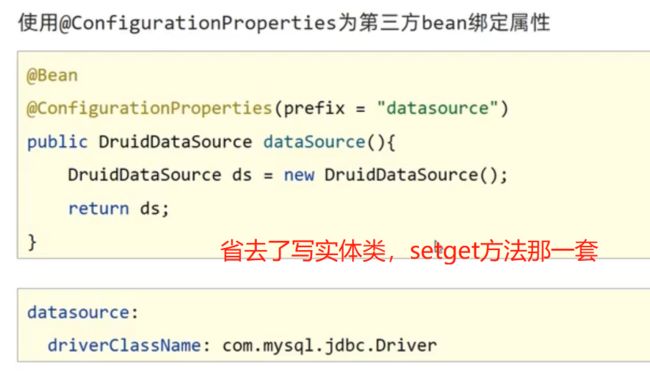
ConfigurationProperties不仅能为自己开发的组件做Bean的属性绑定
还可以为第三方的bean属性绑定。
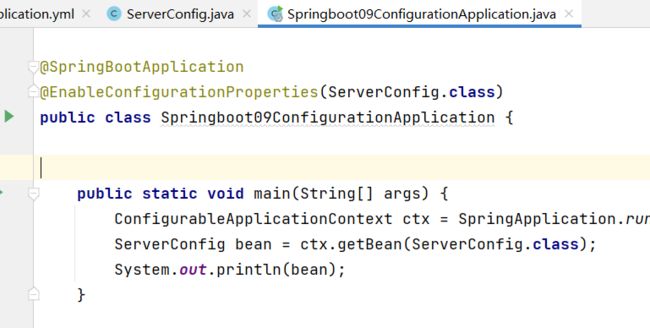
@EnableConfigurationProperties注解可以将使用@ConfigurationProperties注解对应的类加入Spring容器.
@EnableConfigurationProperties与@Component不能同时使用:
方式一:在实体类上面加@Component,不加入enable
方式二:在实体类上面加@Component,还加入enable
意思是:识别到了两个bean 定义。
Exception in thread “main” org.springframework.beans.factory.NoUniqueBeanDefinitionException: No qualifying bean of type ‘com.xxxx.config.ServerConfig’ available: expected single matching bean but found 2: serverConfig,servers-com.xxxx.config.ServerConfig
方式三:去掉@component,加入enable
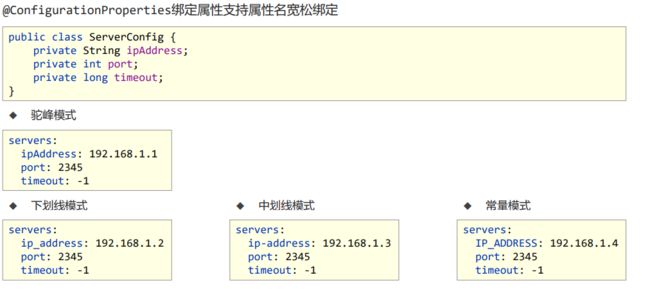
2、 宽松绑定/松散绑定【@ConfigurationProperties支持】
三个文件:1.yml文件,2.实体类。 3.@ConfigurationProperties调用
1.在yml文件中命名随意命名
2.打印时都会根据实体类的名字来进行打印。
3.而注解@ConfigurationProperties下的方法,最好全部是小写的:
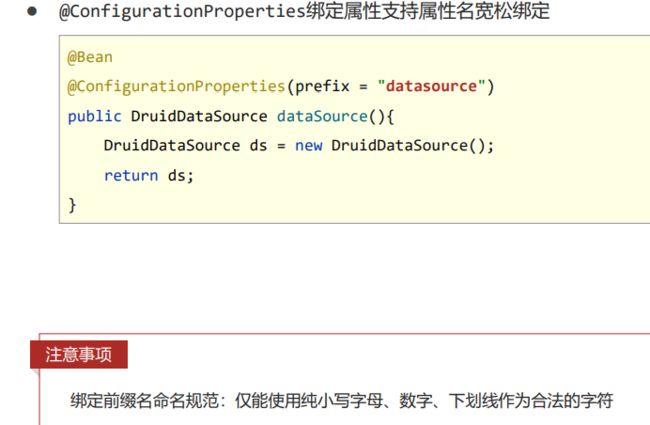
@ConfigurationProperties(prefix = “servers”)绑定前缀名命名规范:仅能使用纯小写字母、数字、下划线作为合法的字符
绑定前缀名命名规范:仅能使用纯小写字母、数字、下划线作为合法的字符
松散绑定不支持注解@Value引用单个属性的方式
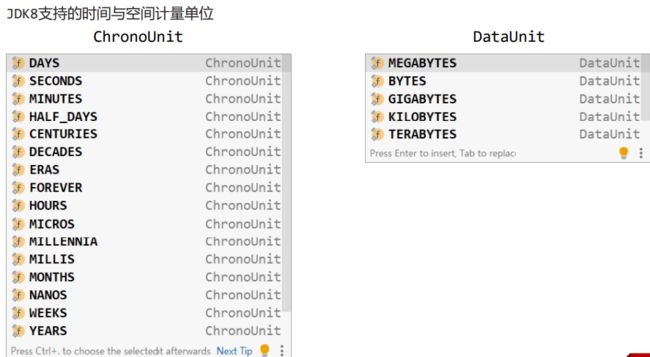
3、常用计量单位【SpringBoot支持JDK8提供的时间与空间计量单位】
yml
servers:
  port: 8080
  ip-address: 192.168.0.0
  name: zhangsan
  timeOut: 10
  dataSize: 10
ServerConfig
package com.xxxx.config;

import lombok.Data;
import org.springframework.boot.context.properties.ConfigurationProperties;
import org.springframework.boot.convert.DataSizeUnit;
import org.springframework.boot.convert.DurationUnit;
import org.springframework.util.unit.DataSize;
import org.springframework.util.unit.DataUnit;

import java.time.Duration;
import java.time.temporal.ChronoUnit;

//@Component
@Data
@ConfigurationProperties(prefix = "servers")
public class ServerConfig {
    /*port: 8080
    ip-address: 192.168.0.0
    name: zhangsan*/
    private String port;
    private String ipaddress;
    private String name;
    @DurationUnit(ChronoUnit.DAYS)
    private Duration timeOut;
    @DataSizeUnit(DataUnit.GIGABYTES)
    private DataSize dataSize;
}
Springboot09ConfigurationApplication
@SpringBootApplication
@EnableConfigurationProperties(ServerConfig.class)
public class Springboot09ConfigurationApplication {


    public static void main(String[] args) {
        ConfigurableApplicationContext ctx = SpringApplication.run(Springboot09ConfigurationApplication.class, args);
        ServerConfig bean = ctx.getBean(ServerConfig.class);
        System.out.println(bean);
    }
}
4、数据校验
开启数据校验有助于系统安全性,J2EE规范中JSR303规范定义了一组有关数据校验相关的API
第一步:添加坐标:导入JSR303与Hibernate校验框架坐标
<dependency>
	<groupId>javax.validationgroupId>
	<artifactId>validation-apiartifactId>
dependency>
<dependency>
	<groupId>org.hibernate.validatorgroupId>
	<artifactId>hibernate-validatorartifactId>
dependency>
第二步:使用@Validated注解启用校验功能
使用具体校验规则规范数据校验格式
@Data
@Validated
@ConfigurationProperties(prefix = "servers")
public class ServerConfig {
    //yaml:  port: 8080
    @Max(value=8888,message = "最大不能超过8888")
    private String port;
}
三、测试
1、加载测试专用属性【临时加载配置属性】
2、加载测试专用配置 【临时加载一些bean】
- 使用@Import注解加载当前测试类专用的配置
@SpringBootTest
@Import(MsgConfig.class)
public class ConfigurationTest {
	@Autowired
	private String msg;

	@Test
	void testConfiguration(){
		System.out.println(msg);
	}
}
3、Web环境模拟测试->表现层
/*
NONE:不启动WEB环境,默认就是NONE
DEFINED_PORT: 用的什么端口,就默认该端口
RANDOM_PORT:随机启动端口。
 */
@SpringBootTest(webEnvironment = SpringBootTest.WebEnvironment.RANDOM_PORT)
//开启虚拟mvc的调用
@AutoConfigureMockMvc
public class WebTest {

    @Test
    public void webTest(@Autowired MockMvc mvc) throws Exception {
        //创建虚拟的请求。当前访问/books
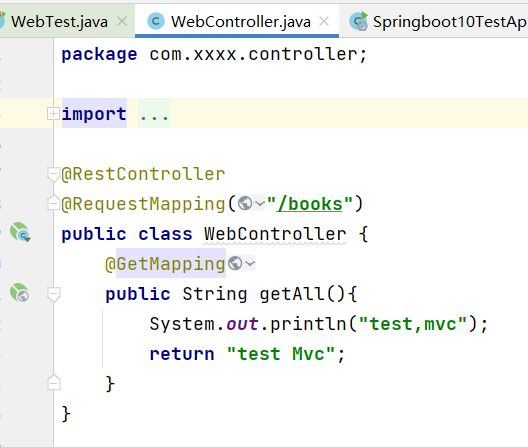
        MockHttpServletRequestBuilder builder = MockMvcRequestBuilders.get("/books");
        //执行对应的请求  perform是执行的意思
        mvc.perform(builder);
    }
}
4、数据层测试回滚
5、测试用例数据设定
四、数据层解决方案
现有数据层解决方案技术选型
Druid + MyBatis-Plus + MySQL
◆ 数据源:DruidDataSource
◆ 持久化技术:MyBatis-Plus / MyBatis
◆ 数据库:MySQL
内置数据源
SpringBoot提供了3种内嵌的数据源对象供开发者选择
◆ HikariCP:默认内置数据源对象
◆ Tomcat提供DataSource:HikariCP不可用的情况下,且在web环境中,将使用tomcat服务器配置的数据源对象
◆ Commons DBCP:Hikari不可用,tomcat数据源也不可用,将使用dbcp数据源
通用配置无法设置具体的数据源配置信息,仅提供基本的连接相关配置,如需配置,在下一级配置中设置具体设定.
spring:
	datasource:
		driver-class-name: com.mysql.cj.jdbc.Driver
		url: jdbc:mysql://localhost:3306/ssm_db
		username: root
		password: root
		hikari:
			maximum-pool-size: 50
五、整合第三方技术
- Redis
- Mongodb
- ES
- MQ
