Springboot+Vue实现简单的前端后分离数据交互
目录
一,前后端分离介绍
二,与传统单体结构的比较
2.1,传统单体结构开发
2.2,前后端分离结构开发
三,简单实现前后端数据交互
1,准备的环境及工具
2,开发步骤
2.1,后端部分
2.2,前端部分
2.3,项目运行及实现结果
编辑
四,简单总结
一,前后端分离介绍
所谓的前后端分离,就是将一个应用开发的前后端编码分开来写。后端负责处理,存储数据,而前端,则主要通过后端提供的数据接口,对数据进行渲染展示。通过这样前后端分工合作,使得项目的分工更加明确,大大降低了前后端代码的之间的耦合度,提高了开发效率。
二,与传统单体结构的比较
2.1,传统单体结构开发
传统的开发主要是,前端通过编写HTML静态界面,然后通过将界面内嵌到JSP中,或者使用Thymeleaf模板解析HTML静态界面。后端通过MVC架构中的DispatcherServlet将处理请求中的数据渲染ModelAndView或者Model到指定的静态界面中,从而达到前后端的整合。
整体的结构如图所示:
在这样一体化的构造中,如果后端业务逻辑需要更改或者数据获取出现问题,前端就要跟后端协调沟通,或者业务功能更加复杂时,这样一体化的弊端就会愈发明显。耦合度高,开发麻烦,严重影响开发效率。
2.2,前后端分离结构开发
采用前后端分离的方式进行开发时,前端只需要独立去编写客户端代码,后端专心于编写服务端代码,然后提供数据接口即可。前端开发人员与后端人员通过约定好接口文档(URL,数据类型,参数)就可以分别进行独立开发,并且,前端还可以进行伪数据构造进行数据展示测试。不需要完全依赖于后端,最后集成一下就能实现相应的业务功能了,从而达到前后端的解耦,大大提高开发效率。
整体结构如图所示:
这样开发以后,前后端开发人员可以更专注于自己擅长的领域,实现职责分离。
- 前后端仅仅通过异步接口(AJAX/JSONP)来编程
- 前后端都各自有自己的开发流程,构建工具,测试集合
- 关注点分离,前后端变得相对独立并解耦合
| 前端 | 后端 |
| 接受,展示数据 | 提供数据 |
| 处理渲染逻辑 | 处理业务逻辑 |
| MVVM架构 | MVC架构 |
| 专注于客户端代码构造 | 专注于服务器代码构造 |
三,简单实现前后端数据交互
1,准备的环境及工具
| 开发准备 | 前端 | 后端 |
| 环境 | node.js | jdk1.8,tomcat9,mysql8 |
| 技术集成 | vue,axios,element-plus | Springboot,MyBatis-plus |
| 开发工具 | Visual Studio Code | IntelliJ IDEA 2022.1,Navicat Premium ,(ApiPost6) |
2,开发步骤
2.1,后端部分
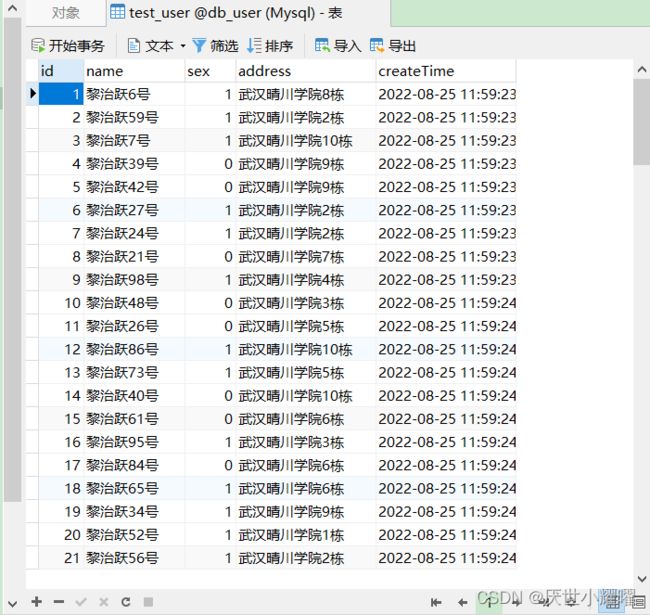
2.1.1,构造一个数据库,准备一张用于数据展示的数据表
create table test_user
(
    id         int(20) auto_increment comment '用户id'
        primary key,
    name       varchar(30) null comment '用户姓名',
    sex        tinyint(1)  null comment '性别(1为男,0为女)',
    address    varchar(45) null comment '用户地址',
    createTime datetime    null,
    constraint id_index
        unique (id) comment 'id为唯一索引'
);
构建存储过程快速插入100条数据,详情方法查看如何使用存储过程快速插入数据
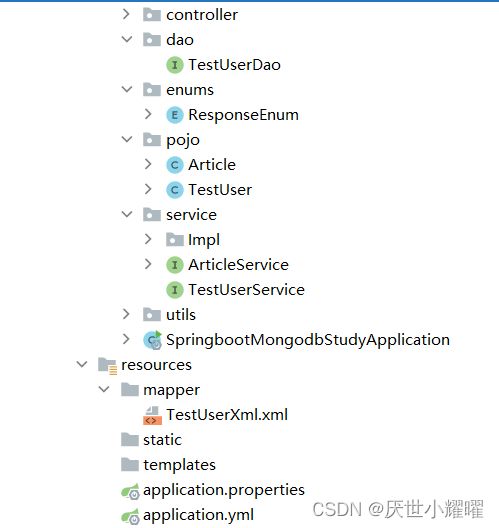
2.1.2,在IDEA里创建一个SpringBoot项目,并导入相关依赖
            org.springframework.boot
            spring-boot-starter-web


            com.baomidou
            mybatis-plus-boot-starter
            3.5.1


            org.springframework.boot
            spring-boot-starter-jdbc


            mysql
            mysql-connector-java


            org.projectlombok
            lombok
            true


            com.baomidou
            mybatis-plus-generator
            3.5.1


            io.springfox
            springfox-boot-starter
            3.0.0


            org.springframework.boot
            spring-boot-starter-test
            test


                    org.junit.vintage
                    junit-vintage-engine


            junit
            junit
            test


            com.alibaba
            fastjson
            1.2.83


            com.alibaba
            easyexcel
            2.2.5
2.1.3,配置yml文件里面的数据库配置
server:
  port: 8090
spring:
  datasource:
    driver-class-name: com.mysql.cj.jdbc.Driver
    password: 123456
    username: root
    url: jdbc:mysql://localhost:3306/db_user?&useSSL=true&useUnicode=true&characterEncoding=utf-8&serverTimezone=UTC
  mvc:
    format:
      date-time: yyyy-MM-dd HH:mm


mybatis-plus:
  mapper-locations: classPath*:/mapper/*.xml
  configuration:
    map-underscore-to-camel-case: false # 禁止大写变小写时自动添加下划线
log-impl: org.apache.ibatis.logging.stdout.StdOutImpl2.1.4,通过MyBatis-plus代码生成器,直接构建基础的项目结构(pojo,service,dao,serviceImpl,controller),通过MyBatis-Plus自动生成代码后,我们基本的一些代码全部省去了,包括业务需要的简单增删改查也全部轻松自动搞定。需要注意的是,自动生成的代码并不能完全适用于我们所有业务,如果业务需求有变,还是需要我们自己手动编写动态SQL,不要过于依赖框架哦~~~~这样后端基本的框架就搭建成功了
2.1.5, 考虑到在前后端数据对介绍会涉及到跨域问题,接口文档对接问题,因此需要简单编写一下跨域,Swagger的配置类。
package com.yy.Config;

import org.springframework.context.annotation.Bean;
import org.springframework.context.annotation.Configuration;
import org.springframework.web.cors.CorsConfiguration;
import org.springframework.web.cors.UrlBasedCorsConfigurationSource;
import org.springframework.web.filter.CorsFilter;

/**
 * @author young
 * @date 2022/8/23 17:33
 * @description: 跨域配置
 */
@Configuration
public class CorsConfig {
    /**
     * 最大有效时长
     */
    private static final  long MAX_TIMEOUT=24*60*60;
    @Bean
    public CorsConfiguration corsConfiguration(){
        CorsConfiguration corsConfiguration = new CorsConfiguration();
        corsConfiguration.setMaxAge(MAX_TIMEOUT);
        //设置访问源请求头
        corsConfiguration.addAllowedHeader("*");
        //设置访问源地址
        corsConfiguration.addAllowedOrigin("*");
        //设置访问源请求方法
        corsConfiguration.addAllowedMethod("*");
        return corsConfiguration;
    }

    /**
     * 设置跨域配置
     * @return
     */
    @Bean
    public CorsFilter corsFilter(){
        UrlBasedCorsConfigurationSource source = new UrlBasedCorsConfigurationSource();
        source.registerCorsConfiguration("/**",corsConfiguration());
        return new CorsFilter(source);
    }
}
package com.yy.Config;

import org.springframework.context.annotation.Bean;
import org.springframework.context.annotation.Configuration;
import org.springframework.core.env.Environment;
import org.springframework.core.env.Profiles;
import springfox.documentation.builders.RequestHandlerSelectors;
import springfox.documentation.service.ApiInfo;
import springfox.documentation.service.Contact;
import springfox.documentation.spi.DocumentationType;
import springfox.documentation.spring.web.plugins.Docket;
import springfox.documentation.swagger2.annotations.EnableSwagger2;

import java.util.ArrayList;

@Configuration
@EnableSwagger2//开启Swagger2
public class SwaggerConfig {

    //添加分组
    @Bean
    public Docket docket1(){
        return new Docket(DocumentationType.SWAGGER_2).groupName("黎治跃");
    }

    //配置Swagger的Docket的bean实例
    @Bean
    public Docket docket(Environment environment){

        //设置要显示的Swagger环境
        Profiles profiles = Profiles.of("dev", "test");
        //获取项目环境
        boolean b = environment.acceptsProfiles(profiles);
        System.out.println(b);

        return new Docket(DocumentationType.SWAGGER_2).groupName("YY")
            .apiInfo(apiInfo())
            .enable(b)  //是否启动Swagger,false,则浏览器无法访问Swagger
            .select()
            //RequestHandlerSelectors,配置要扫描的接口方式
            //basePackage指定要扫描的包
            //any : 扫描全部
            //none :不扫描
            //withClassAnnotation : 扫描类上的注解
            .apis(RequestHandlerSelectors.basePackage("com.yy.controller"))
            //path :过滤路径
            //.paths(PathSelectors.ant("/yy/**"))
            .build();
}

//配置Swagger信息=apiinfo

    private ApiInfo apiInfo(){
        Contact contact = new Contact("YY", "https://www.4399.com", "[email protected]");
        return new ApiInfo("YY的SwaggerAPI文档",
            "黎治跃失恋了,2022/8/19",
            "1.0v",
            "urn:tos",
             contact,
            "Apache 2.0",
            "http://www.apache.org/licenses/LICENSE-2.0",
            new ArrayList<>());
    }
}
为了更好地清晰的让我们获取的信息与前端统一,也可以编写一个统一返回值的类,让返回结果以自定义的JSON格式展示出来,方便我们阅读。
定义一个方便获取常量的枚举类
/**
 * @author young
 * @date 2022/8/19 21:36
 * @description: 响应结果枚举类
 */

@AllArgsConstructor
@Getter
public enum ResponseEnum {
   /**响应成功**/
   SUCCESS(200, "操作成功"),
   /**操作失败*/
   FAIL(201,"获取数据失败"),
   /**错误请求**/
   ERROR(400,"错误请求"),
   /**页面未找到**/
   NOT_FOUND(404,"页面未找到"),
   /**系统异常**/
   SYS_ERROR(-1,"系统异常"),
  /*信息已存在*/
  MSG_ERROR(409,"信息已存在");
   /**响应码**/
   private final Integer code;

   /** 结果 **/
   private  final String  resultMessage;

   public static ResponseEnum getResultCode(Integer code){
      for (ResponseEnum value : ResponseEnum.values()) {
         if (code.equals(value.getCode())){
            return value;
         }
      }
      return ResponseEnum.ERROR;
   }
/*
简单测试一下
 */
   public static void main(String[] args) {
      ResponseEnum resultCode = ResponseEnum.getResultCode(100);
      System.out.println(resultCode);
   }
}
定义统一返回值的类
package com.yy.utils;
import com.yy.enums.ResponseEnum;
import lombok.Data;

import java.io.Serializable;
import java.util.HashMap;
import java.util.Map;

/**
 * @author young
 * @date 2022/8/19 21:52
 * @description: 统一返回结果的类
 */

@Data
public class  R implements Serializable {

    private static final long serialVersionUID = 56665257248936049L;
    /**响应码**/
    private Integer code;

    /**返回消息**/
    private String message;

    /**返回数据**/
    private T data;

   private R(){}
    /**
     * 操作成功ok方法
     */
    public static  R ok(T data) {

        R response = new R<>();
        response.setCode(ResponseEnum.SUCCESS.getCode());
        response.setMessage(ResponseEnum.SUCCESS.getResultMessage());
        response.setData(data);
        return response;
    }

    /**
     * 编译失败方法
     */
    public static  R buildFailure(Integer errCode, String errMessage){

        R response = new R<>();
        response.setCode(errCode);
        response.setMessage(errMessage);
        return response;
    }

}
如果需要在后端对获取的响应数据用mybatis-plus进行分页呢。还需要配置一下mybatis-plus的配置类
/**
 * @author young
 * @date 2022/8/29 21:27
 * @description: MyBatis-Plus分页配置
 */
@Configuration
@MapperScan("com.yy.dao")
public class MyBatisPlusConfig {
    @Bean
    public MybatisPlusInterceptor mybatisPlusInterceptor(){

        MybatisPlusInterceptor interceptor = new MybatisPlusInterceptor();
        PaginationInnerInterceptor paginationInnerInterceptor = new PaginationInnerInterceptor(DbType.MYSQL);
        // 设置请求的页面大于最大页后操作, true调回到首页,false 继续请求  默认false
        // paginationInnerInterceptor.setOverflow(false);
        // 设置最大单页限制数量,默认 500 条,-1 不受限制
        // paginationInnerInterceptor.setMaxLimit(500L);
        interceptor.addInnerInterceptor(paginationInnerInterceptor);
        return interceptor;

    }
}
当然,这个并不是必须的,后面在前端通过element-plus也能对数据自动进行分页展示,个人认为更加方便,没有必要在后端进行分页。如果是为了更好的按条件查询或其他之用,也可以考虑 。
2.1.6,编写controller去提取前端页面需要的数据
/**
* @author young
* @date 2022/8/26 9:36
* @description:
*/
@Slf4j
@RestController
@RequestMapping("/mysql")
public class TestUserController {
private static final DateFormat dataFormat = new SimpleDateFormat("yyyy-MM-dd HH:mm:ss");
@Resource
private TestUserServiceImpl testUserService;
/* 前后端分离测试 */
/**
* 添加用户
*
* @param request
* @return
*/
@PostMapping("/addUserTo")
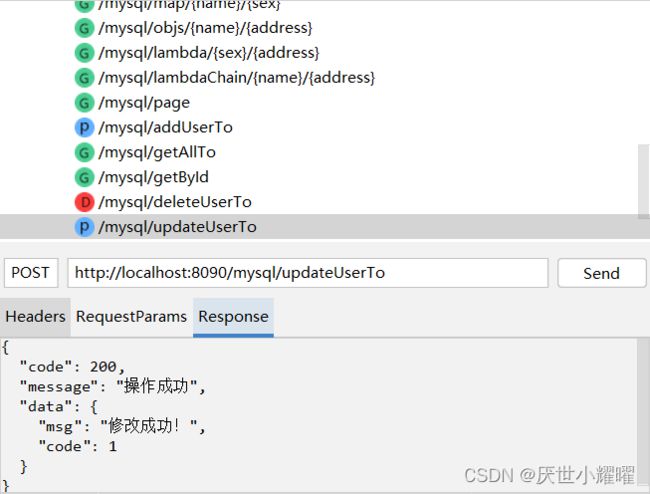
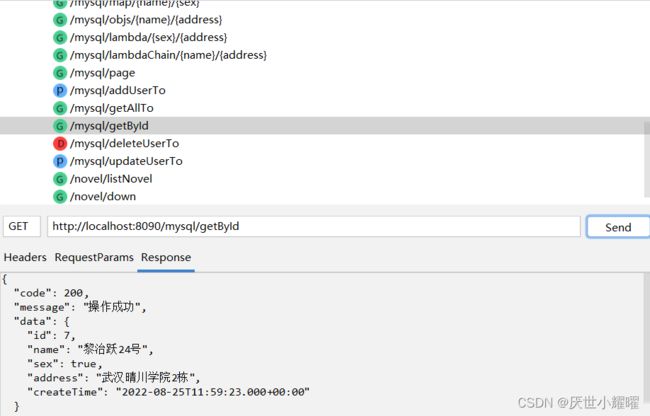
public R最后,通过接口测试工具(Swagger,ApiPost,Postman都可)对我们写的数据接口测试一下,数据返回值符合预期的话,那么后端代码就该一段落了!
2.2,前端部分
前端主要通Vue框架构建项目,主要是对客户端界面进行构造。由于笔者对于前端基础不怎么好,因此主要用Element-Plus进行界面构造,axios解决前后端交互。vue使用的是vue3,但是函数方法上仍旧采用的vue2的形式,主要实现过程如下:
2.2.1,在main.js上全局配置需要使用到的插件
import { createApp } from 'vue'
import ElementPlus from 'element-plus'
import 'element-plus/dist/index.css'
import App from './App.vue'
import * as ELIcons from '@element-plus/icons-vue'
// 配置路由器
import router from './router'

import './assets/global.css'
createApp(App).use(router).use(ELIcons).use(ElementPlus,{size:'small'}).mount('#app')
2.2.2,封装aixos请求后端的请求方式request.js
import axios from 'axios'
import {BASE_URL} from '../util/name'

axios.defaults.timeout = 5000 // 超时时间设置
axios.defaults.baseURL = BASE_URL
// Content-Type 响应头
axios.defaults.headers.post['Content-Type'] = 'application/x-www-form-urlencoded;charset=UTF-8'

// response 拦截器
// 可以在接口响应后统一处理结果
axios.interceptors.response.use(
    response => {
        let res = response.data;
        // 如果是返回的文件
        if (response.config.responseType === 'blob') {
            return res
        }
        // 兼容服务端返回的字符串数据
        if (typeof res === 'string') {
            res = res ? JSON.parse(res) : res
        }
        return res;
    }
    ,
    error => {
        console.log('err' + error) // for debug
        return Promise.reject(error)
    }
)


/**
   * 封装get方法
   * @param url
   * @param data
   * @returns {Promise}
   */
 export function get (url, params = {}, responseType = 'json') {
    return new Promise((resolve, reject) => {
      axios.get(url, {
        params: params,
        responseType
      })
        .then(response => {
          resolve(response.data)
        })
        .catch(err => {
          reject(err)
        })
    })
  }

  /**
     * 封装post请求
     * @param url
     * @param data
     * @returns {Promise}
     */
  export function post (url, data = {}) {
    return new Promise((resolve, reject) => {
      axios.post(url, data)
        .then(response => {
          resolve(response.data)
        }, err => {
          reject(err)
        })
    })
  }

  /**
     * 封装delete请求
     * @param url
     * @param data
     * @returns {Promise}
     */
  export function deletes (url, data = {}) {
    return new Promise((resolve, reject) => {
      axios.delete(url, data)
        .then(response => {
          resolve(response.data)
        }, err => {
          reject(err)
        })
    })
  }
2.2.3,封装前后端api对应的请求接口index.js
import {get,post,deletes} from '../util/request'
const HttpManager={

  // 前端用到的函数            后端对应的接口
   //返回所有用户
  getAllUser: () => get(`mysql/getAllTo`),
  // 返回指定ID的用户
  getUserOfId: (id) => get(`mysql/getById?id=${id}`),
  // 添加用户
  addUser: (params) => post(`mysql/addUserTo`, params),
  // 更新用户信息
  updateUserMsg: (params) => post(`mysql/updateUserTo`, params),
  // 删除用户
  deleteUser: (id) => deletes(`mysql/deleteUserTo?id=${id}`),
  //模糊查询
  likeSelect:(params)=>get(`mysql/likeSelect`,params)
}
export {HttpManager}
2.2.4,提取公共的methos,放在mixins中,这样就能将共用的功能以对象的方式传入 mixins选项中,当组件使用 mixins对象时所有mixins对象的选项都将被混入该组件本身的选项中来,这样就可以提高代码的重用性,使代码保持干净和易于维护。
export const mixin = {
  methods: {
    // 获取要删除列表的id
    handleDelete (id) {
      this.idx = id
      this.delVisible = true
    },
    // 获取批量要删除的列表
    handleSelectionChange (val) {
      this.multipleSelection = val
    },
    // 批量删除
    delAll () {
      console.log("执行该方法")
      for (let item of this.multipleSelection) {
        this.handleDelete(item.id)
        this.deleteRow(item.id)
      }
      this.multipleSelection = []
    },
    getTime (val) {
      let time = String(val).match(/[0-9-]+(?=\s)/)
      return Array.isArray(time) ? time[0] : time
    },
    changeSex (value) {
      if (value === false) {
        return '女'
      } else if (value === true) {
        return '男'
      }
    },
    toggleSex (value) {
      if (value === '女') {
        return false
      } else if (value === '男') {
        return true
      }
    },
    // 更新图片
    handleAvatarSuccess (res, file) {
      if (res.code === 1) {
        this.imageUrl = URL.createObjectURL(file.raw)
        this.getData()
        this.$notify({
          title: '上传成功',
          type: 'success'
        })
      } else {
        this.$notify({
          title: '上传失败',
          type: 'error'
        })
      }
    },
    beforeAvatarUpload (file) {
      const isJPG = (file.type === 'image/jpeg') || (file.type === 'image/png')
      const isLt2M = file.size / 1024 / 1024 < 2
      if (!isJPG) {
        this.$message.error('上传头像图片只能是 JPG 格式!')
      }
      if (!isLt2M) {
        this.$message.error('上传头像图片大小不能超过 2MB!')
      }
      return isJPG && isLt2M
    },

  }
}
2.2.5,抽离出侧边栏组件AsiderBody,头部组件HeaderBody,直接从官网提取,并进行简单的样式更改
 后台管理系统
分组 1
用户管理 1
关于-登录
选项 3
选项4
选项 4-1
分组 1
选项 1
选项 2
选项 3
选项 4
选项 4-1
分组 1
选项 1
选项 2
选项 3
选项 4
选项 4-1
2.2.6,构建主要的信息展示界面,这样只有el-main里面的内容会随路由的改变而切换,而侧边栏AsiderBody,头部栏HeaderBody不会改动,从而实现组件复用。
2.2.7,用户信息展示界面构造,以及相关函数编写调用
2.2.8,简单配置一下router,这样运行项目后,localhst:8080访问进入到“/home”请求对应的组件界面(随便写一个即可)上,点击侧边栏上的用户管理就能跳转到对应的信息展示界面。
import { createRouter, createWebHistory } from 'vue-router'
import HomePage from '@/view/HomePage'

const routes = [
  {
    path: '/',
    name: 'HomePage',
    component: HomePage,
    redirect: '/home',
    children: [
      {
        path: 'home',
        name: 'HomeTest',
        component: () => import('../components/HomeTest.vue')
      },
      {
        path: 'user',
        name: 'UserMsg',
        component: () => import('../view/UserMsg.vue')
      },
      {
        path: 'about',
        name: 'About',
        component: () => import('../components/AboutTest.vue')
      },
    ]
  },
]

const router = createRouter({
  history: createWebHistory(process.env.BASE_URL),
  routes
})
export default router
2.2.9,在vue.config.js上通过chainWebpack配置后端代理地址,这样由于后端已经配置了跨域,前端就可以通过对后端的请求访问到后端对应的接口了。
const { defineConfig } = require('@vue/cli-service')
module.exports = defineConfig({
  transpileDependencies: true,
  chainWebpack: config => {
    config.plugin('define').tap(definitions => {
        Object.assign(definitions[0]['process.env'], {
          NODE_HOST: '"http://localhost:8090"',
        });
        return definitions;
    });
  }
})
2.3,项目运行及实现结果
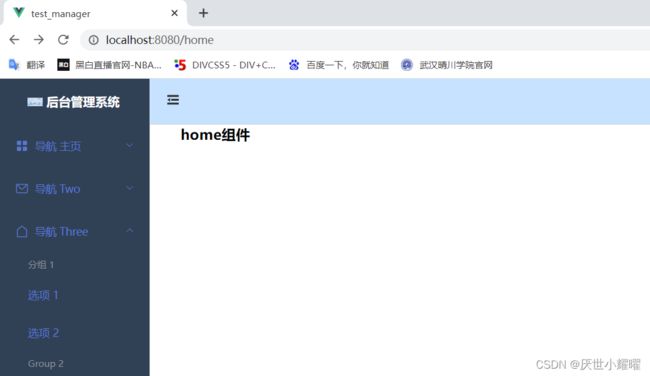
前端通过 npm install 安装项目所需的依赖,然后npm run serve运行项目即可得到初始的HomePage界面。因为前端学的并不扎实,页面配色布局可能一言难尽……
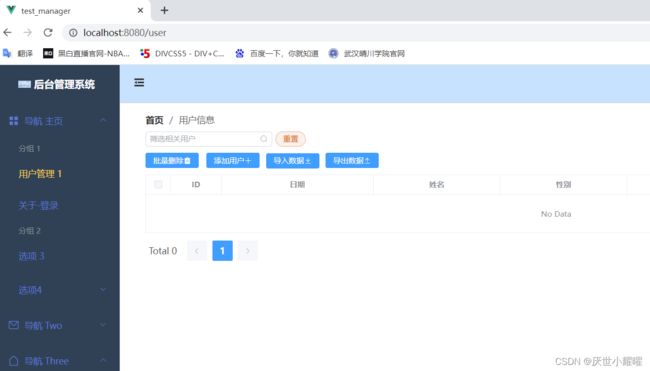
展开导航主页,点击用户展示界面,得到相应界面,此时并没有数据展示,只有初始的一些界面 ,因为后端服务没有开启,数据获取不到。
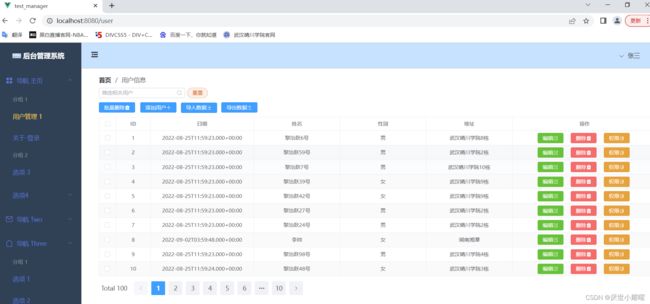
运行后端项目,重新刷新一下前端界面,数据通过element-plus中的el-pagination分页插件已经实现了分页效果。
并且该能实现一些基本增删改查操作,后端数据库的信息也会相应进行更改!
至此,简单的数据交互就实现了。
四,简单总结
这个测试项目还有一些小BUG正在完善中,还有一些实现的功能并没有完全放在博客中,这篇文章仅限于展示一些数据,实现前后端数据之间的交互。后期会继续完善成为一个简易的后台管理系统,供学习练习之用,项目会陆续上传到GitHub/Gitee上……有问题的地方希望大家指正交流,共同进步。
补充:
gitee项目地址
由于项目中涉及一些mysql以及mongodb的数据库,但是考虑比较简单,只是作为数据模拟使用的,因此没有放在项目中,前端也比较较简单没有放在gitee中,大家自行构建。


