接口自动化测试框架封装
一、接口的封装
【策略】去掉全局变量,用yaml文件代替保存
yaml文件一般直接放在根目录下
1、新建yaml公共方法类
在项目根目录下新建一个公共文件夹common;然后新建一个对yaml文件操作的公共的类。(yaml_util.py文件)。

对yaml文件的操作常见有三种:读取、写入、清空
```python
import os
import yaml

#读取
def read_yaml():
    #打开文件,以r只读方式打开,设置编码格式
    with open(os.getcwd()+'extract.yaml', mode='r', encoding='utf-8') as f:
        #使用前要安装pyyaml  pip install PyYAML 捉着在setting中安装
        #stream文件流,loader加载方式设置为全局加载
        #读取yaml中的所有
        value = yaml.load(stream=f, Loader=yaml.FullLoader)
        return value
#读取某个key的值
def read_key(key):
    # 打开文件,以r只读方式打开,设置编码格式
    with open(os.getcwd() + 'extract.yaml', mode='r', encoding='utf-8') as f:
        # 使用前要安装pyyaml  pip install PyYAML 捉着在setting中安装
        # stream文件流,loader加载方式设置为全局加载
        # 读取yaml中的所有
        value = yaml.load(stream=f, Loader=yaml.FullLoader)
        return value[key]
#写入
def write_yaml(data):
    # 打开文件,需要改下打开方式 mode设置w(直接替换)a(追加)
    with open(os.getcwd() + 'extract.yaml', mode='a', encoding='utf-8') as f:
        #将数据data写入yaml文件(stream设置),允许以unicode方式写入
        yaml.dump(data, stream=f, allow_unicode=True)

#清空
def clear_yaml(data):
    # 打开文件,需要改下打开方式 mode设置w(直接替换)
    with open(os.getcwd() + 'extract.yaml', mode='w', encoding='utf-8') as f:
        # 用文件方式清空
        #f.truncate()
        yaml.dump(data, stream=f, allow_unicode=True)
2、测试写好的yaml方法
在testcase2中新建文件test_cyaml.py测试
from common.yaml_util import write_yaml, read_yaml, clear_yaml

class Testyaml:
    def test_1_yaml(self):
        print("\n---------test1--------")
        print("\n111")
        # 测试将age=20写入yaml文件(键值对)
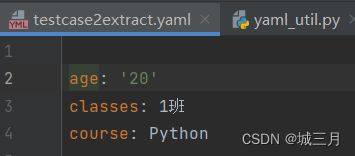
        write_yaml({"age":"20", "classes":"1班", "course":"Python"})
    def test_2_yaml(self):
        print("\n---------test2--------")
        # 测试从yaml文件读取
        value = read_yaml()
        print(value)
        print(value['course'])
    #读取某个key的值
    def test_3_yaml(self):
        print("\n---------test3--------")
        # 测试从yaml文件读取
        value = read_key("classes")
        print(value)
    def test_4_yaml(self):
        print("\n---------test4--------")
        # 测试清除yaml文件内容
        data = ' '
        clear_yaml(data)
写入成功(根目录下生成testcase2extract.yaml文件)

【问题1】每一个接口调用都会向yaml写入数据,会出现重复写入
【解决】在conftest.py文件中定义调用清空的方法,在所有接口请求之前执行。
conftest.py文件部分代码如下
from common.yaml_util import clear_yaml
#。。。省略部分代码。。。
#清空yaml文件
#在所有接口请求之前执行‘
#使用会话级别,并且自动执行
@pytest.fixture(scope='session',autouse=True)
def clear_extract():
    clear_yaml()
二、统一请求的封装
【问题2】如果test_user.py test_api.py存在cookie关联,需要使用同一个session
可以直接通过类名调用session发送request请求。但这样需要导包,(导包会将测试用例也导入)会导致测试用例增加、报错。
①通过同一个session发送请求。
②方便做统计用例的数据、日志封装
1、在common文件夹下新建文件request_util.py(请求工具包)
import json
import requests

#封装意味着方法适应所有请求
class RequestUtil:

    sess = requests.session()
    #发送request请求  method请求方式,url请求路径
    #要适应所有请求所以列出所有参数params,json,data,headers,files
    #params,json,data可以用datas表示,headers,files可以用**kwargs表示(不定长的参数
    #方法中含有self应该通过对象调用 RequestUtil().send_request()
    def send_request(self,method,url,datas,**kwargs):
        #获得请求方式,转化method,统一格式(GET、Get、get)
        method = str(method).lower()
        #返回值,默认None
        res = None
        if method == "get":
            res = RequestUtil.sess.request(method=method, url=url, params=datas, **kwargs)
        elif method == "post":
            #如果datas不为空则兼容json和data的方法 json.dumps(datas)
            if datas:
                str_datas = json.dumps(datas)
            res = RequestUtil.sess.request(method=method, url=url, data=str_datas, **kwargs)
        #暂时先不写put\delete的,直接pass,如果需要加elif
        else:
            pass
        #返回
        return res
2、编写测试用例调用
testcase3文件夹中编写test_crequest.py
import requests
from requests.cookies import RequestsCookieJar

from common.request_util import RequestUtil


class TestCookie:

    def test_get(self):
        url = "https://cn.bing.com/?form=000047"
        data = {"sb_form_c": "pdf"}
        # 【失败】RequestUtil.send_request()通过类调用
        # 【方法中含有self应该通过对象调用】RequestUtil().send_request()通过对象调用
        res = RequestUtil().send_request(method="GET", url=url, datas=data)
        print('\n--------test1--------')
        print(res.status_code)
        print(res.cookies)

    def test_post(self):
        data = {"sb_form_c": "pdf"}
        url = "https://cn.bing.com/?form=000047"
        #session = requests.session()
        #session.post(url=url, data=data)

        res = RequestUtil().send_request(method="post", url=url, datas=data)
        cook = res.cookies
        print('\n---------session--------')
        print(res.status_code)
        print(cook)

if __name__ == '__main__':
    TestCookie.test_getcookie()
    # TestCookie.test_use()
三、yaml数据驱动封装
1、使用yaml文件保存测试用例
testcase3下新建文件test_request.yaml,一般情况下一个接口对应一个yaml文件。里面写请求路径url、请求数据data、请求方式method。有几个用例写几次。
-:接口里面的数据分隔符,一个-分割一组数据
name:接口名称
request:请求
method:请求方式
url:请求路径
data:请求数据
validate:断言None便是没有要断言
-
  name: 接口名称,测试request请求
  request:
    method: get
    url: https://cn.bing.com/?form=000047
    data:
      sb_form_c: pdf
  validate: None
-
  name: 用例2,测试request请求
  request:
    method: get
    url: https://cn.bing.com/?form=000047
    data:
      sb_form_c: ""
  validate: None
2、读取用例
common文件夹中的yaml__util.py文件中加入读取测试用例方法
#读取测试用例
def read_testcase(yaml_name):
    # 修改yaml文件所在路径,读取装有测试用例的yaml文件
    with open(os.getcwd() + '\\'+yaml_name, mode='r', encoding='utf-8') as f:
        value = yaml.load(stream=f, Loader=yaml.FullLoader)
        return value
3、通过装饰器读取测试用例并且测试文件进行测试
testcase文件中的测试文件test_crequest.py进行测试
【数据驱动】一个用例由多组数据来执行(正例反例)
import pytest
from common.request_util import RequestUtil
from common.yaml_util import read_testcase

class TestCookie:

    #数据驱动装饰器 从yaml中读取数据
    @pytest.mark.parametrize("args_name", read_testcase('test_request.yaml'))
    #从yaml中读取某个数据
    def test_get(self,args_name):
        #打印参数,是一个字典格式
        #print(args_name)
        url = args_name['request']['url']
        data = args_name['request']['data']
        method = args_name['request']['method']
        res = RequestUtil().send_request(method=method, url=url, datas=data)
        print('\n--------test--------')
        print(res.status_code)
        print(res.cookies)
四、allure测试报告的生成
1、下载解压安装allure
下载—》解压—》配置环境变量(将bin目录放到环境变量path中)
allure --version 查看版本信息
2、生成json格式的临时报告
pytest.ini 中addopts后的参数加上 --alluredir ./temp
3、根据临时json文件报告生成allure报告
在主文件中,main方法中加入
¥ os.system(‘allure generate ./temp -o ./report --clean’)
import os

import pytest
if __name__ == '__main__':
    pytest.main()
    #生成allure报告,表示利用./temp中的JSON参数(临时报告)生成alure测试报告输出到路径./report当中  --clean清除report当中的原来的报告
    os.system('allure generate ./temp -o ./report --clean')
【笔记】整个项目的结构

common:公共包,存储request请求封装、yaml封装
interface_testcase\testcase1\testcase2\testcase3:测试用例包
reportt:用来保存生成的allure测试报告
temp:allure测试报告生成时需要用到的临时文件
venu:python环境
test.ini:pytest设置文件,更改pytest默认的一些规则
all.py run.py:运行测试用例
extract.yaml:用来保存测试用例的yaml文件