Muduo源码剖析--整体架构
Muduo 整体架构
1. 编译和安装
git: GitHub - chenshuo/muduo: Event-driven network library for multi-threaded Linux server in C++11
git clone https://github.com/chenshuo/muduo.git
安装依赖库:
sudo apt install g++ cmake make libboost-dev
可安装三个非必须的依赖库curl, c-ares DNS, google protobuf
sudo apt install libcur14-openssl-dev libc-ares-dev
sudo apt install protobuf-compiler libprotobuf-dev
编译:
cd muduo
./build.sh -j2
编译muduo库和它的自带的例子,生成的可执行文件和静态库文件分别位于…/build/debug/{bin, lib}
./build.sh install
将muduo头文件和库文件安装到 …/build/debug-install/{include, lib},
release 版本:
BUILD_TYPE=release ./build.sh -j2
BUILD_TYPE=release ./build.sh install
如何在自己的程序中使用muduo
muduo是静态链接的c++程序库, 使用muduo的时候,只需要设置好头文件的路径和库文件路径并链接相应的静态库文件(0lmuduo_net -lmuduo_base)即可.
muduo里面也提供了指导如何把自己的项目包含进自己的工程。Tutorial of Muduo network library
2 muduo 的架构和概念
muduo 是陈硕开发的tcp网络编程库, 是支持非阻塞IO + one event loop peer thread, 不支持阻塞IO. 支持线程安全, 支持多核多线程, 只能用于linux, 不支持跨平台, 作为一款tcp网络库,还是很优秀的,里面有很多值得学习的地方, 这里我将分若干个章节剖析里面的源代码。
muduo 中类的职责和概念划分的非常清晰,在《Linux 多线程服务器端编程》一书的 6.3.1 章节有详细的介绍。实际上目前很多网络库的接口设计也都受到了 muduo 的影响,例如 360 的 evpp 等。
而 muduo 的整体风格受到 Netty 的影响,整个架构依照 Reactor 模式,基本与如下图所示相符:
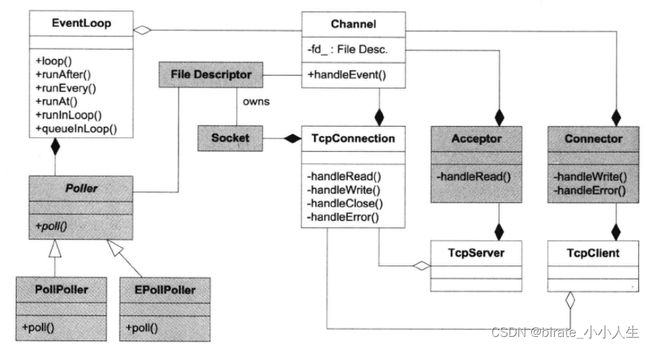
所谓 Reactor 模式,是指有一个循环的过程,不断监听对应事件是否触发,事件触发时调用对应的 callback 进行处理。这里的事件在 muduo 中包括 Socket 可读写事件、定时器事件。负责事件循环的部分在 muduo 被命名为 EventLoop, 主要用于相应计时器和IO事件。muduo采用基于对象而非面向对象的设计风格,事件回调大多以boost::function + std::bind 表达, 用户在使用时不需要继承其中的class. 网络库的核心位于muduo/net 和muduo/net/poller
.
├── Acceptor.cc 接收器,用于服务端接收连接
├── Acceptor.h
├── boilerplate.cc
├── boilerplate.h
├── Buffer.cc 缓冲区,非阻塞IO必备
├── Buffer.h
├── Callbacks.h
├── Channel.cc 用于每个socket连接的事件分发
├── Channel.h
├── CMakeLists.txt
├── Connector.cc 连接器, 用于客户端发起连接
├── Connector.h
├── Endian.h 网络字节序与本机字节序的转换
├── EventLoop.cc 事件分发器
├── EventLoop.h
├── EventLoopThread.cc 新建一个专门用于Eventloop的线程
├── EventLoopThread.h
├── EventLoopThreadPool.cc muduo默认的多线程IO模型
├── EventLoopThreadPool.h
├── InetAddress.cc IP 地址的简单封装
├── InetAddress.h
├── poller IO multiplexing 的实现
│ ├── DefaultPoller.cc
│ ├── EPollPoller.cc
│ ├── EPollPoller.h
│ ├── PollPoller.cc
│ └── PollPoller.h
├── Poller.cc IO multiplexing 的基类接口
├── Poller.h
├── Socket.cc 封装sockets描述符,负责关闭连接
├── Socket.h
├── SocketsOps.cc 封装底层的socket的API
├── SocketsOps.h
├── TcpClient.cc TCP客户端
├── TcpClient.h
├── TcpConnection.cc 负责IO连接的事件
├── TcpConnection.h
├── TcpServer.cc TCP服务端
├── TcpServer.h
├── Timer.cc 定时器
├── Timer.h
├── TimerId.h
├── TimerQueue.cc
├── TimerQueue.h
└── ZlibStream.h
对于使用muduo的头文件,只需要掌握5个关键类: Buffer, EventLoop, TcpConnection, TcpClient, TcpServer。 这篇只做大体简单介绍各个模块的作用,每个模块我会单独来讲。
公开接口:
- Buffer : 数据的读写需要通过ibuffer进行, 用户代码不需要调用read/write, 只需要处理收到的数据和准备好要发送的数据。
- **InetAddress:**封装IPv4/IPv6地址, 它不能解析域名,只认IP地址。 因为直接用
gethostbyname解析域名会阻塞IO线程。 - EventLoop: 事件循环,每个线程只能有一个EventLoop实体,它负责IO和定时器事件的分派。它用eventfd来异步唤醒, 用TimeQueue作为计时器管理, 用Poller作为IO multiplexing.
- EventLoopThread 启动一个线程,在其中运行EventLoop::loop()
- Tcpconnection 是封装了TCP的连接, 它不能发起连接
- TCPClient 用于编写网络客户端,能发起连接,并且由重试功能
- TCPServer 用于编写网络服务器,接收客户的连接。
在这些类中,Tcpconnection的生命期依靠shared_ptr 管理(由用户和库共同控制), Buffer的生命期由TcpConnection控制。 其余类的生命期是由用户控制。
内部接口:
- Channel是 负责注册和响应IO事件,注意它不拥有fd。 它是Acceptor, Connector, EventLoop, TimeQueue, TcpConnection的成员,生命期由后者控制。
- Socket 是一个RAII handle, 控制一个fd, 并在析构的时候关闭fd, 它是Acceptor, TcpConnection的成员,生命期由后者控制。
- SocketOps封装各种Sockets系统调用。
- Poller是PollPoller和EPollPoller的基类,它是EventLoop的成员,生命期由后者控制。
- Connector 用于发起连接
- Acceptor 用于接收连接
- TimeQueue 用timerfd实现定时, 是EventLoop的成员
- EventLoopThreadPool用于创建IO线程池, 用于把TcpConnection分派到某个EventLoop的线程上。它是TcpServer的成员,生命期由后者控制。
[外链图片转存失败,源站可能有防盗链机制,建议将图片保存下来直接上传(img-HS1u8N99-1681024643958)(C:\Users\zhen\AppData\Roaming\Typora\typora-user-images\image-20230406225449143.png)]
3 TCP的网络编程论
muduo里面实现是基于事件的非阻塞网络编程流式, 把原来的"主动调用recv来接收数据, 主动调用accept来接收连接,主动调用send来发送数据"的思路换成 " 注册一个接收/发送数据的回调, 网络库收到数据/接收到数据会调用我, 直接把数据给我,供我消费。需要发送数据的时候,只管往连接中写,网络库会负责无阻塞地发送", 同时整个过程中应该避免阻塞。
muduo里面认为:TCP最主要是处理桑三个半事件。
- 连接的建立
- 连接的断开:包括主动断开和被动断开
- 消息到达,文件描述符可读。
- 消息发送完毕。这个算半个事件。这里的"发送完毕"是指将数据写入操作系统的缓冲区,将由TCP协议栈负责数据的发送和重传,不代表对方已经收到数据。
我们接下来分析下 muduo 是怎么处理和实现这三个半事件的。
我们来看一个最简单的示例, 以一个echo的回显。
#include "examples/simple/echo/echo.h"

#include "muduo/base/Logging.h"
#include "muduo/net/EventLoop.h"

#include

// using namespace muduo;
// using namespace muduo::net;

int main()
{
  LOG_INFO << "pid = " << getpid();
  muduo::net::EventLoop loop;
  muduo::net::InetAddress listenAddr(2007);
  EchoServer server(&loop, listenAddr);
  server.start();
  loop.loop();
}
echo-server 的代码量非常简洁。一个典型的 muduo 的 TcpServer 工作流程如下:
- 建立一个事件循环器 EventLoop
- 建立对应的业务服务器 TcpServer
- 设置 TcpServer 的 Callback
- 启动 server
- 开启事件循环
连接的建立
在我们单纯使用 linux 的 API,编写一个简单的 Tcp 服务器时,建立一个新的连接通常需要四步:
步骤 1. socket() // 调用 socket 函数建立监听 socket
步骤 2. bind() // 绑定地址和端口
步骤 3. listen() // 开始监听端口
步骤 4. accept() // 返回新建立连接的 fd
<一> EventLoop的构造
EventLoop::EventLoop()
  : looping_(false),
    quit_(false),
    eventHandling_(false),
    callingPendingFunctors_(false),
    iteration_(0),
    threadId_(CurrentThread::tid()),
    poller_(Poller::newDefaultPoller(this)),
    timerQueue_(new TimerQueue(this)),
    wakeupFd_(createEventfd()),
    wakeupChannel_(new Channel(this, wakeupFd_)),
    currentActiveChannel_(NULL)
{
  LOG_DEBUG << "EventLoop created " << this << " in thread " << threadId_;
  if (t_loopInThisThread)
  {
    LOG_FATAL << "Another EventLoop " << t_loopInThisThread
              << " exists in this thread " << threadId_;
  }
  else
  {
    t_loopInThisThread = this;
  }
  wakeupChannel_->setReadCallback(
      std::bind(&EventLoop::handleRead, this));
  // we are always reading the wakeupfd
  wakeupChannel_->enableReading();
}
- 首先构造一个EventLoop的对象, 在EventLoop里面, 我们new 一个poller_的对象, newDefaultPoller是一个静态函数,通过环境变量来选择是Epoll还是Poll。
Poller* Poller::newDefaultPoller(EventLoop* loop)
{
  if (::getenv("MUDUO_USE_POLL"))
  {
    return new PollPoller(loop);
  }
  else
  {
    return new EPollPoller(loop);
  }
}
2. 其次,new一个timerQueue_的对象.
TimerQueue::TimerQueue(EventLoop* loop)
  : loop_(loop),
    timerfd_(createTimerfd()),
    timerfdChannel_(loop, timerfd_),
    timers_(),
    callingExpiredTimers_(false)
{
  timerfdChannel_.setReadCallback(
      std::bind(&TimerQueue::handleRead, this));
  // we are always reading the timerfd, we disarm it with timerfd_settime.
  timerfdChannel_.enableReading();
}
2.1 创建一个用于定时器事件的fd, 使用timerfd_create(CLOCK_MONOTONIC, TFD_NONBLOCK | TFD_CLOEXEC);, 包含头文件 #include , 返回fd给timerfd_。
int createTimerfd()
{
  int timerfd = ::timerfd_create(CLOCK_MONOTONIC,
                                 TFD_NONBLOCK | TFD_CLOEXEC);
  if (timerfd < 0)
  {
    LOG_SYSFATAL << "Failed in timerfd_create";
  }
  return timerfd;
}
2.2 把定时器事件的fd传给channel, 由channel 作管理
Channel::Channel(EventLoop* loop, int fd__)
  : loop_(loop),
    fd_(fd__),
    events_(0),
    revents_(0),
    index_(-1),
    logHup_(true),
    tied_(false),
    eventHandling_(false),
    addedToLoop_(false)
{
}
2.3 同时在TimerQueue里面绑定读IO的callback, 并且enableReading(), 在这里我们还没有调用等待事件的函数。再继续往下。
  timerfdChannel_.setReadCallback(
      std::bind(&TimerQueue::handleRead, this));
  // we are always reading the timerfd, we disarm it with timerfd_settime.
  timerfdChannel_.enableReading();

//....
void TimerQueue::handleRead()
{
  loop_->assertInLoopThread();
  Timestamp now(Timestamp::now());
  readTimerfd(timerfd_, now);

  std::vector expired = getExpired(now);

  callingExpiredTimers_ = true;
  cancelingTimers_.clear();
  // safe to callback outside critical section
  for (const Entry& it : expired)
  {
    it.second->run();
  }
  callingExpiredTimers_ = false;

  reset(expired, now);
}
- 创建一个
eventfd用于唤醒, 并将其可读事件注册到 EventLoop 中,和timerfd的流程一样。至此, EventLoop的构造工作就完成了。
int createEventfd()
{
  int evtfd = ::eventfd(0, EFD_NONBLOCK | EFD_CLOEXEC);
  if (evtfd < 0)
  {
    LOG_SYSERR << "Failed in eventfd";
    abort();
  }
  return evtfd;
}
**<二> InetAddress **
这一步很简单,把主机字节序的ip port转成网络字节序的ip port, 这里还支持ipv6, 默认为ipv4。
InetAddress::InetAddress(uint16_t portArg, bool loopbackOnly, bool ipv6)
{
  static_assert(offsetof(InetAddress, addr6_) == 0, "addr6_ offset 0");
  static_assert(offsetof(InetAddress, addr_) == 0, "addr_ offset 0");
  if (ipv6)
  {
    memZero(&addr6_, sizeof addr6_);
    addr6_.sin6_family = AF_INET6;
    in6_addr ip = loopbackOnly ? in6addr_loopback : in6addr_any;
    addr6_.sin6_addr = ip;
    addr6_.sin6_port = sockets::hostToNetwork16(portArg);
  }
  else
  {
    memZero(&addr_, sizeof addr_);
    addr_.sin_family = AF_INET;
    in_addr_t ip = loopbackOnly ? kInaddrLoopback : kInaddrAny;
    addr_.sin_addr.s_addr = sockets::hostToNetwork32(ip);
    addr_.sin_port = sockets::hostToNetwork16(portArg);
  }
}
这里有个小技巧, 结构体addr6_ 和 addr_是union类型的,使用可以稍微节省点内存。
  union
  {
    struct sockaddr_in addr_;
    struct sockaddr_in6 addr6_;
  };
使用offsetof 来判断结构成员的偏移
offsetof(InetAddress, addr6_)
offsetof(InetAddress, addr_)
<三> TcpServer的构造
首先在 TcpServer 对象构建时,TcpServer 的属性 acceptor 同时也被建立。在 Acceptor 的构造函数中分别调用了 socket 函数和 bind 函数完成了 步骤 1和步骤 2。即,当 TcpServer server(&loop, listenAddr) 执行结束时,监听 socket 已经建立好,并已绑定到对应地址和端口了。并设置connect的时候回调和发送message时候的回调。
EchoServer::EchoServer(muduo::net::EventLoop* loop,
                       const muduo::net::InetAddress& listenAddr)
  : server_(loop, listenAddr, "EchoServer")
{
  server_.setConnectionCallback(
      std::bind(&EchoServer::onConnection, this, _1));
  server_.setMessageCallback(
      std::bind(&EchoServer::onMessage, this, _1, _2, _3));
}
TcpServer::TcpServer(EventLoop* loop,
                     const InetAddress& listenAddr,
                     const string& nameArg,
                     Option option)
  : loop_(CHECK_NOTNULL(loop)),
    ipPort_(listenAddr.toIpPort()),
    name_(nameArg),
    acceptor_(new Acceptor(loop, listenAddr, option == kReusePort)),
    threadPool_(new EventLoopThreadPool(loop, name_)),
    connectionCallback_(defaultConnectionCallback),
    messageCallback_(defaultMessageCallback),
    nextConnId_(1)
{
  acceptor_->setNewConnectionCallback(
      std::bind(&TcpServer::newConnection, this, _1, _2));
}
这里我们new一个Accept, 主要把ip 传进去。
Acceptor::Acceptor(EventLoop* loop, const InetAddress& listenAddr, bool reuseport)
  : loop_(loop),
    acceptSocket_(sockets::createNonblockingOrDie(listenAddr.family())),
    acceptChannel_(loop, acceptSocket_.fd()),
    listening_(false),
    idleFd_(::open("/dev/null", O_RDONLY | O_CLOEXEC))
{
  assert(idleFd_ >= 0);
  acceptSocket_.setReuseAddr(true);
  acceptSocket_.setReusePort(reuseport);
  acceptSocket_.bindAddress(listenAddr);
  acceptChannel_.setReadCallback(
      std::bind(&Acceptor::handleRead, this));
}
调用sockets::createNonblockingOrDie(listenAddr.family()) 创建socket, 再把fd交给acceptChannel_ 管理, 同时设置socket的状态, 并绑定ip port.
int sockets::createNonblockingOrDie(sa_family_t family)
{
#if VALGRIND
  int sockfd = ::socket(family, SOCK_STREAM, IPPROTO_TCP);
  if (sockfd < 0)
  {
    LOG_SYSFATAL << "sockets::createNonblockingOrDie";
  }

  setNonBlockAndCloseOnExec(sockfd);
#else
  int sockfd = ::socket(family, SOCK_STREAM | SOCK_NONBLOCK | SOCK_CLOEXEC, IPPROTO_TCP);
  if (sockfd < 0)
  {
    LOG_SYSFATAL << "sockets::createNonblockingOrDie";
  }
#endif
  return sockfd;
}
void Socket::setReuseAddr(bool on)
{
  int optval = on ? 1 : 0;
  ::setsockopt(sockfd_, SOL_SOCKET, SO_REUSEADDR,
               &optval, static_cast(sizeof optval));
  // FIXME CHECK
}

void Socket::setReusePort(bool on)
{
#ifdef SO_REUSEPORT
  int optval = on ? 1 : 0;
  int ret = ::setsockopt(sockfd_, SOL_SOCKET, SO_REUSEPORT,
                         &optval, static_cast(sizeof optval));
  if (ret < 0 && on)
  {
    LOG_SYSERR << "SO_REUSEPORT failed.";
  }
#else
  if (on)
  {
    LOG_ERROR << "SO_REUSEPORT is not supported.";
  }
#endif
}

void sockets::bindOrDie(int sockfd, const struct sockaddr* addr)
{
  int ret = ::bind(sockfd, addr, static_cast(sizeof(struct sockaddr_in6)));
  if (ret < 0)
  {
    LOG_SYSFATAL << "sockets::bindOrDie";
  }
}
而当执行 server.start() 时,主要做了两个工作:
- 在监听 socket 上启动 listen 函数,也就是 步骤 3;
- 将监听 socket 的可读事件注册到 EventLoop 中。
void TcpServer::start()
{
  if (started_.getAndSet(1) == 0)
  {
    threadPool_->start(threadInitCallback_);

    assert(!acceptor_->listening());
    loop_->runInLoop(
        std::bind(&Acceptor::listen, get_pointer(acceptor_)));
  }
}
void Acceptor::listen()
{
  loop_->assertInLoopThread();
  listening_ = true;
  acceptSocket_.listen();
  acceptChannel_.enableReading();
}
此时,程序已完成对socket的监听,但还不够,因为此时程序的主角 EventLoop 尚未启动。当调用 loop.loop() 时,程序开始循环监听该 socket 的可读事件。
void EventLoop::loop()
{
  assert(!looping_);
  assertInLoopThread();
  looping_ = true;
  quit_ = false;  // FIXME: what if someone calls quit() before loop() ?
  LOG_TRACE << "EventLoop " << this << " start looping";

  while (!quit_)
  {
    activeChannels_.clear();
    pollReturnTime_ = poller_->poll(kPollTimeMs, &activeChannels_);
    ++iteration_;
    if (Logger::logLevel() <= Logger::TRACE)
    {
      printActiveChannels();
    }
    // TODO sort channel by priority
    eventHandling_ = true;
    for (Channel* channel : activeChannels_)
    {
      currentActiveChannel_ = channel;
      currentActiveChannel_->handleEvent(pollReturnTime_);
    }
    currentActiveChannel_ = NULL;
    eventHandling_ = false;
    doPendingFunctors();
  }

  LOG_TRACE << "EventLoop " << this << " stop looping";
  looping_ = false;
}
我们可以看到, loop会一直再循环里面从epoll/poll 读取activeChannels_ , 对于那些已经active的事件, 我们调用handleEvent(), 再handleEventWithGuard调用各种已经注册事件的callback。
void Channel::handleEvent(Timestamp receiveTime)
{
  std::shared_ptr guard;
  if (tied_)
  {
    guard = tie_.lock();
    if (guard)
    {
      handleEventWithGuard(receiveTime);
    }
  }
  else
  {
    handleEventWithGuard(receiveTime);
  }
}

void Channel::handleEventWithGuard(Timestamp receiveTime)
{
  eventHandling_ = true;
  LOG_TRACE << reventsToString();
  if ((revents_ & POLLHUP) && !(revents_ & POLLIN))
  {
    if (logHup_)
    {
      LOG_WARN << "fd = " << fd_ << " Channel::handle_event() POLLHUP";
    }
    if (closeCallback_) closeCallback_();
  }

  if (revents_ & POLLNVAL)
  {
    LOG_WARN << "fd = " << fd_ << " Channel::handle_event() POLLNVAL";
  }

  if (revents_ & (POLLERR | POLLNVAL))
  {
    if (errorCallback_) errorCallback_();
  }
  if (revents_ & (POLLIN | POLLPRI | POLLRDHUP))
  {
    if (readCallback_) readCallback_(receiveTime);
  }
  if (revents_ & POLLOUT)
  {
    if (writeCallback_) writeCallback_();
  }
  eventHandling_ = false;
}
当新连接请求建立时,可读事件触发,该事件的 callback 实际上就是 Acceptor::handleRead() 方法。
在 Acceptor::handleRead() 方法中,做了三件事:
- 调用了 accept 函数,完成了 步骤 4,实现了连接的建立。得到一个已连接 socket 的 fd。
- 创建 TcpConnection 对象。
- 将已连接 socket 的可读事件注册到 EventLoop 中。
再handleRead里面会调用我们再TcpServer设置的回调函数。
acceptor_->setNewConnectionCallback(std::bind(&TcpServer::newConnection, this, _1, _2)); 调用 TcpServer::newConnection
void Acceptor::handleRead()
{
  loop_->assertInLoopThread();
  InetAddress peerAddr;
  //FIXME loop until no more
  int connfd = acceptSocket_.accept(&peerAddr);
  if (connfd >= 0)
  {
    // string hostport = peerAddr.toIpPort();
    // LOG_TRACE << "Accepts of " << hostport;
    if (newConnectionCallback_)
    {
      newConnectionCallback_(connfd, peerAddr);
    }
    else
    {
      sockets::close(connfd);
    }
  }
  else
  {
    LOG_SYSERR << "in Acceptor::handleRead";
    // Read the section named "The special problem of
    // accept()ing when you can't" in libev's doc.
    // By Marc Lehmann, author of libev.
    if (errno == EMFILE)
    {
      ::close(idleFd_);
      idleFd_ = ::accept(acceptSocket_.fd(), NULL, NULL);
      ::close(idleFd_);
      idleFd_ = ::open("/dev/null", O_RDONLY | O_CLOEXEC);
    }
  }
}
void TcpServer::newConnection(int sockfd, const InetAddress& peerAddr)
{
  loop_->assertInLoopThread();
  EventLoop* ioLoop = threadPool_->getNextLoop();
  char buf[64];
  snprintf(buf, sizeof buf, "-%s#%d", ipPort_.c_str(), nextConnId_);
  ++nextConnId_;
  string connName = name_ + buf;

  LOG_INFO << "TcpServer::newConnection [" << name_
           << "] - new connection [" << connName
           << "] from " << peerAddr.toIpPort();
  InetAddress localAddr(sockets::getLocalAddr(sockfd));
  // FIXME poll with zero timeout to double confirm the new connection
  // FIXME use make_shared if necessary
  TcpConnectionPtr conn(new TcpConnection(ioLoop,
                                          connName,
                                          sockfd,
                                          localAddr,
                                          peerAddr));
  connections_[connName] = conn;
  conn->setConnectionCallback(connectionCallback_);
  conn->setMessageCallback(messageCallback_);
  conn->setWriteCompleteCallback(writeCompleteCallback_);
  conn->setCloseCallback(
      std::bind(&TcpServer::removeConnection, this, _1)); // FIXME: unsafe
  ioLoop->runInLoop(std::bind(&TcpConnection::connectEstablished, conn));
}
最后,会调用TcpConnection::connectEstablished, 调用connectionCallback_(), 也就是我们再TcpServer上设置的回调。
void TcpConnection::connectEstablished()
{
  loop_->assertInLoopThread();
  assert(state_ == kConnecting);
  setState(kConnected);
  channel_->tie(shared_from_this());
  channel_->enableReading();

  connectionCallback_(shared_from_this());
}
//connectionCallback_ 调用的是
 server_.setConnectionCallback(std::bind(&EchoServer::onConnection, this, _1));
这里还有一个需要注意的点,创建的 TcpConnnection 对象是个 shared_ptr,该对象会被保存在 TcpServer 的 connections 中。这样才能保证引用计数大于 0,对象不被释放。
至此,一个新的连接已完全建立好,该连接的socket可读事件也已注册到 EventLoop 中了。
消息的读取
在新连接建立的时候,会将新连接的 socket 的可读事件注册到 EventLoop 中。假如客户端发送消息,导致已连接 socket 的可读事件触发,该事件对应的 callback 同样也会在 EventLoop::loop() 中被调用。 这个和上面的步骤是一样的。
再TcpServer里面通过调用setMessageCallback 和 setConnectionCallback。
  void setConnectionCallback(const ConnectionCallback& cb)
  { connectionCallback_ = cb; }

  /// Set message callback.
  /// Not thread safe.
  void setMessageCallback(const MessageCallback& cb)
  { messageCallback_ = cb; }
上一节我们说到,在Acceptor::handleRead()方法中,我们在第二步创建了TcpConnection的对象,在TcpConnection中, 我们设置了一系类,read, write, close, error的call back函数。这些事件的触发都在EventLoop::loop() 里面, 当有可读事件触发时,我们调用了TcpConnection::handleRead() 函数。
TcpConnection::TcpConnection(EventLoop* loop,
                             const string& nameArg,
                             int sockfd,
                             const InetAddress& localAddr,
                             const InetAddress& peerAddr)
  : loop_(CHECK_NOTNULL(loop)),
    name_(nameArg),
    state_(kConnecting),
    reading_(true),
    socket_(new Socket(sockfd)),
    channel_(new Channel(loop, sockfd)),
    localAddr_(localAddr),
    peerAddr_(peerAddr),
    highWaterMark_(64*1024*1024)
{
  channel_->setReadCallback(
      std::bind(&TcpConnection::handleRead, this, _1));
  channel_->setWriteCallback(
      std::bind(&TcpConnection::handleWrite, this));
  channel_->setCloseCallback(
      std::bind(&TcpConnection::handleClose, this));
  channel_->setErrorCallback(
      std::bind(&TcpConnection::handleError, this));
  LOG_DEBUG << "TcpConnection::ctor[" <<  name_ << "] at " << this
            << " fd=" << sockfd;
  socket_->setKeepAlive(true);
}
在 TcpConnection::handleRead 方法中,主要做了两件事:
- 从 socket 中读取数据,并将其放入 inputbuffer 中
- 调用 messageCallback,执行业务逻辑。
messageCallback 是在建立新连接时,将 TcpServer::messageCallback 方法 bind 到了 TcpConnection::messageCallback 的方法。
TcpServer::messageCallback 就是业务逻辑的主要实现函数。通常情况下,我们可以在里面实现消息的编解码、消息的分发等工作,这里就不再深入探讨了。
void TcpConnection::handleRead(Timestamp receiveTime)
{
  loop_->assertInLoopThread();
  int savedErrno = 0;
  ssize_t n = inputBuffer_.readFd(channel_->fd(), &savedErrno);
  if (n > 0)
  {
    messageCallback_(shared_from_this(), &inputBuffer_, receiveTime);
  }
  else if (n == 0)
  {
    handleClose();      // 断开处理
  }
  else
  {
    errno = savedErrno;
    LOG_SYSERR << "TcpConnection::handleRead";
    handleError();
  }
}
在我们上面给出的示例代码中,echo-server 的 messageCallback 非常简单,就是直接将得到的数据,重新 send 回去。在实际的业务处理中,一般都会调用 TcpConnection::send() 方法,给客户端回复消息。
这里需要注意的是,在 messageCallback 中,用户会有可能会把任务抛给自定义的 Worker 线程池处理。
但是这个在 Worker 线程池中任务,切忌直接对 Buffer 的操作。因为 Buffer 并不是线程安全的。
我们需要记住一个准则:
所有对 IO 和 buffer 的读写,都应该在 IO 线程中完成。
一般情况下,先在交给 Worker 线程池之前,应该现在 IO 线程中把 Buffer 进行切分解包等动作。将解包后的消息交由线程池处理,避免多个线程操作同一个资源
消息的发送
用户通过调用 TcpConnection::send() 向客户端回复消息。由于 muduo 中使用了 OutputBuffer,因此消息的发送过程比较复杂。
首先需要注意的是线程安全问题, 上文说到对于消息的读写必须都在 EventLoop 的同一个线程 (通常称为 IO 线程) 中进行:
因此,TcpConnection::send 必须要保证线程安全性,它是这么做的:
void TcpConnection::send(Buffer* buf)
{
  if (state_ == kConnected)
  {
    if (loop_->isInLoopThread())
    {
      sendInLoop(buf->peek(), buf->readableBytes());
      buf->retrieveAll();
    }
    else
    {
      void (TcpConnection::*fp)(const StringPiece& message) = &TcpConnection::sendInLoop;
      loop_->runInLoop(
          std::bind(fp, this,     // FIXME
                    buf->retrieveAllAsString()));
                    //std::forward(message)));
    }
  }
}
检测 send 的时候,是否在当前 IO 线程,如果是的话,直接进行写相关操作 sendInLoop。
如果不在一个线程的话,需要将该任务抛给 IO 线程执行 runInloop, 以保证 write 动作是在 IO 线程中执行的。我们后面会讲解 runInloop 的具体实现。
在 sendInloop 中,做了下面几件事:
- 假如 OutputBuffer 为空,则直接向 socket 写数据
- 如果向 socket 写数据没有写完,则统计剩余的字节个数,并进行下一步。没有写完可能是因为此时 socket 的 TCP 缓冲区已满了。
- 如果此时 OutputBuffer 中的旧数据的个数和未写完字节个数之和大于 highWaterMark,则将 highWaterMarkCallback 放入待执行队列中
- 将对应 socket 的可写事件注册到 EventLoop 中
注意:直到发送消息的时候,muduo 才会把 socket 的可写事件注册到了 EventLoop 中。在此之前只注册了可读事件。
连接 socket 的可写事件对应的 callback 是 TcpConnection::handleWrite()
当某个 socket 的可写事件触发时,TcpConnection::handleWrite 会做两个工作:
- 尽可能将数据从 OutputBuffer 中向 socket 中 write 数据
- 如果 OutputBuffer 没有剩余的,则 将该 socket 的可写事件移除,并调用 writeCompleteCallback
void TcpConnection::handleWrite()
{
  loop_->assertInLoopThread();
  if (channel_->isWriting())
  {
    ssize_t n = sockets::write(channel_->fd(),
                               outputBuffer_.peek(),
                               outputBuffer_.readableBytes());
    if (n > 0)
    {
      outputBuffer_.retrieve(n);
      if (outputBuffer_.readableBytes() == 0)
      {
        channel_->disableWriting();
        if (writeCompleteCallback_)
        {
          loop_->queueInLoop(std::bind(writeCompleteCallback_, shared_from_this()));
        }
        if (state_ == kDisconnecting)
        {
          shutdownInLoop();
        }
      }
    }
    else
    {
      LOG_SYSERR << "TcpConnection::handleWrite";
      // if (state_ == kDisconnecting)
      // {
      //   shutdownInLoop();
      // }
    }
  }
  else
  {
    LOG_TRACE << "Connection fd = " << channel_->fd()
              << " is down, no more writing";
  }
}
为什么要移除可写事件
因为当 OutputBuffer 中没数据时,我们不需要向 socket 中写入数据。但是此时 socket 一直是处于可写状态的, 这将会导致 TcpConnection::handleWrite() 一直被触发, 因为muduo的Eventloop 采用的是epoll level trigger。然而这个触发毫无意义,因为并没有什么可以写的。
所以 muduo 的处理方式是,当 OutputBuffer 还有数据时,socket 可写事件是注册状态。当 OutputBuffer 为空时,则将 socket 的可写事件移除。
此外,highWaterMarkCallback 和 writeCompleteCallback 一般配合使用,起到限流的作用。
为什么采用level trigger, 不是edge tigger
- 为了和传统的poll 兼容, 因为在文件描述符数目较少,活动文件描述符比较高时, epool 不见得比poll 高效。
- level tigger 编程更容易, 以往 select/poll 的经验都可以继续用, 不可能发生漏掉事件的bug
- 读写的时候不必出现EAGAIN, 可以节省系统调用次数,降低延迟
连接的断开
我们看下 muduo 对于连接的断开是怎么处理的。
连接的断开分为被动断开和主动断开。主动断开和被动断开的处理方式基本一致,因此本文只讲下被动断开的部分。
被动断开即客户端断开了连接,server 端需要感知到这个断开的过程,然后进行的相关的处理。
其中感知远程断开这一步是在 Tcp 连接的可读事件处理函数 handleRead 中进行的:当对 socket 进行 read 操作时,返回值为 0,则说明此时连接已断开。
接下来会做四件事情:
- 将该 TCP 连接对应的事件从 EventLoop 移除
- 调用用户的 ConnectionCallback
- 将对应的 TcpConnection 对象从 Server 移除。
- close 对应的 fd。此步骤是在析构函数中自动触发的,当 TcpConnection 对象被移除后,引用计数为 0,对象析构时会调用 close。
void TcpConnection::handleClose()
{
  loop_->assertInLoopThread();
  LOG_TRACE << "fd = " << channel_->fd() << " state = " << stateToString();
  assert(state_ == kConnected || state_ == kDisconnecting);
  // we don't close fd, leave it to dtor, so we can find leaks easily.
  setState(kDisconnected);
  channel_->disableAll();

  TcpConnectionPtr guardThis(shared_from_this());
  connectionCallback_(guardThis);
  // must be the last line
  closeCallback_(guardThis);
}
runInLoop 的实现
在讲解消息的发送过程时候,我们讲到为了保证对 buffer 和 socket 的写动作是在 IO 线程中进行,使用了一个 runInLoop 函数,将该写任务抛给了 IO 线程处理。我们接下来看下 runInLoop 的实现:
void EventLoop::runInLoop(Functor cb)
{
  if (isInLoopThread())
  {
    cb();
  }
  else
  {
    queueInLoop(std::move(cb));
  }
}

void EventLoop::queueInLoop(Functor cb)
{
  {
  MutexLockGuard lock(mutex_);
  pendingFunctors_.push_back(std::move(cb));
  }

  if (!isInLoopThread() || callingPendingFunctors_)
  {
    wakeup();
  }
}
这里可以看到,做了一层判断。如果调用时是此 EventLoop 的运行线程,则直接执行此函数。否则调用 queueInLoop 函数。
这里有两个动作:
- 加锁,然后将该函数放到该 EventLoop 的 pendingFunctors_队列中。
- 判断是否要唤醒 EventLoop,如果是则调用 wakeup() 唤醒该 EventLoop。
这里有几个问题:
- 为什么要唤醒 EventLoop?
- wakeup 是怎么实现的?
- pendingFunctors_是如何被消费的?
为什么要唤醒 EventLoop?
我们首先调用了 pendingFunctors_.push_back(cb), 将该函数放在 pendingFunctors_中。EventLoop 的每一轮循环在最后会调用 doPendingFunctors 依次执行这些函数。
而 EventLoop 的唤醒是通过 epoll_wait 实现的,如果此时该 EventLoop 中迟迟没有事件触发,那么 epoll_wait 一直就会阻塞。 这样会导致,pendingFunctors_中的任务迟迟不能被执行了。
所以必须要唤醒 EventLoop ,从而让pendingFunctors_中的任务尽快被执行。
wakeup 是怎么实现的
muduo 这里采用了对 eventfd 的读写来实现对 EventLoop 的唤醒。
在 EventLoop 建立之后,就创建一个 eventfd,并将其可读事件注册到 EventLoop 中。
wakeup() 的过程本质上是对这个 eventfd 进行写操作,以触发该 eventfd 的可读事件。这样就起到了唤醒 EventLoop 的作用。
void EventLoop::wakeup()
{
  uint64_t one = 1;
  ssize_t n = sockets::write(wakeupFd_, &one, sizeof one);
  if (n != sizeof one)
  {
    LOG_ERROR << "EventLoop::wakeup() writes " << n << " bytes instead of 8";
  }
}
doPendingFunctors 的实现
void EventLoop::doPendingFunctors()
{
  std::vector functors;
  callingPendingFunctors_ = true;

  {
  MutexLockGuard lock(mutex_);
  functors.swap(pendingFunctors_);
  }

  for (const Functor& functor : functors)
  {
    functor();
  }
  callingPendingFunctors_ = false;
}
从代码可以看到,函数非常简单。大概只有十行代码,但是这十行代码中却有两个非常巧妙的地方。
- callingPendingFunctors_的作用
从代码可以看出,如果 callingPendingFunctors_为 false,则说明此时尚未开始执行 doPendingFunctors 函数。
这个有什么作用呢,我们需要结合下 queueInLoop 中,对是否执行 wakeup() 的判断
void EventLoop::queueInLoop(Functor cb)
{
  {
  MutexLockGuard lock(mutex_);
  pendingFunctors_.push_back(std::move(cb));
  }

  if (!isInLoopThread() || callingPendingFunctors_)
  {
    wakeup();
  }
}
这里还需要结合下 EventLoop 循环的实现,其中 doPendingFunctors() 是 每轮循环的最后一步处理。
如果调用 queueInLoop 和 EventLoop 在同一个线程,且 callingPendingFunctors_为 false 时,则说明:此时尚未执行到 doPendingFunctors()。
那么此时即使不用 wakeup,也可以在之后照旧执行 doPendingFunctors() 了。
这么做的好处非常明显,可以减少对 eventfd 的 IO 读写。
- 锁范围的减少
在此函数中,有一段特别的代码:
  std::vector functors;
  callingPendingFunctors_ = true;

  {
  MutexLockGuard lock(mutex_);
  functors.swap(pendingFunctors_);
  }
这个作用是 pendingFunctors_和 functors 的内容进行交换,实际上就是此时 functors 持有了 pendingFunctors_的内容,而 pendingFunctors_被清空了。
这个好处是什么呢?
如果不这么做,直接遍历 pendingFunctors_, 然后处理对应的函数。这样的话,锁会一直等到所有函数处理完才会被释放。在此期间,queueInLoop 将不可用。
而以上的写法,可以极大减小锁范围,整个锁的持有时间就是 swap 那一下的时间。待处理函数执行的时候,其他线程还是可以继续调用 queueInLoop。
参考:
万字长文梳理Muduo库核心代码及优秀编程细节思想剖析 - 知乎 (zhihu.com)
muduo 源码剖析 | 编程沉思录 (cyhone.com)
《Linux多线程服务端编程:使用muduo C++网络库》