CAS单点登录
简介
CAS是Central Authentication Service的缩写,中央认证服务,一种独立开放指令协议。CAS 是 耶鲁大学(Yale University)发起的一个开源项目,旨在为 Web 应用系统提供一种可靠的单点登录方法,CAS 在 2004 年 12 月正式成为 JA-SIG 的一个项目。
特点
1、开源的企业级单点登录解决方案。
2、CAS Server 为需要独立部署的 Web 应用。
3、CAS Client 支持非常多的客户端(这里指单点登录系统中的各个 Web 应用),包括 Java, .Net, PHP, Perl, Apache, uPortal, Ruby 等。
4、CAS属于Apache 2.0许可证,允许代码修改,再发布(作为开源或商业软件)。
版本说明
6.0 及以上需要jdk11,如果你是jdk8,最高只能用5.3版本
5.3 以下版本的是[maven]工程,6.0以上改成[gradle]工程了
这里基于5.3版本搭建
原理
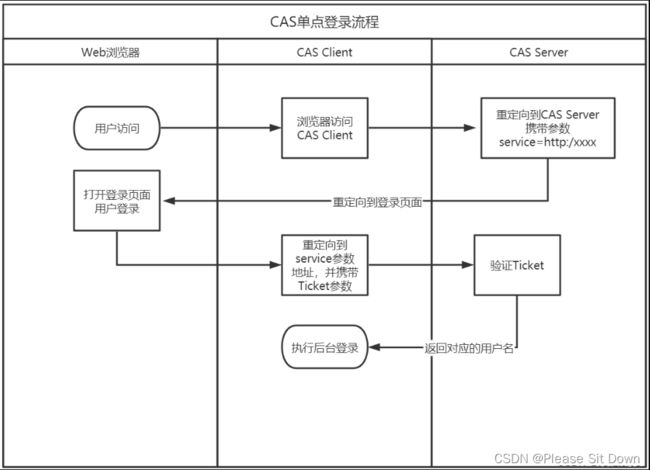
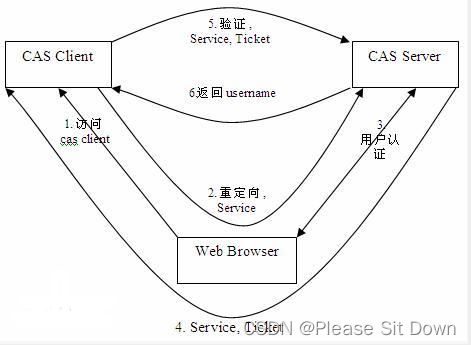
流程:
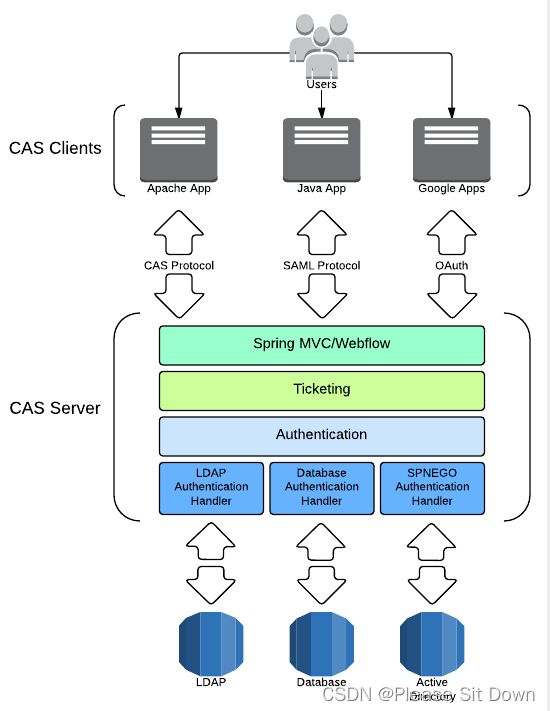
从结构上看,CAS 包含两个部分: CAS Server 和 CAS Client。CAS Server 需要独立部署,主要负责对用户的认证工作;CAS Client 负责处理对客户端受保护资源的访问请求,需要登录时,重定向到 CAS Server。
CAS Client 与受保护的客户端应用部署在一起,以 Filter 方式保护受保护的资源。对于访问受保护资源的每个 Web 请求,CAS Client 会分析该请求的 Http 请求中是否包含 Service Ticket,如果没有,则说明当前用户尚未登录,于是将请求重定向到指定好的 CAS Server 登录地址,并传递 Service (也就是要访问的目的资源地址),以便登录成功过后转回该地址。用户在第 3 步中输入认证信息,如果登录成功,CAS Server 随机产生一个相当长度、唯一、不可伪造的 Service Ticket,并缓存以待将来验证,之后系统自动重定向到 Service 所在地址,并为客户端浏览器设置一个 Ticket Granted Cookie(TGC),CAS Client 在拿到 Service 和新产生的 Ticket 过后,在第 5,6 步中与 CAS Server 进行身份核实,以确保 Service Ticket 的合法性。
在该协议中,所有与 CAS 的交互均采用 SSL 协议,确保,ST 和 TGC 的安全性。协议工作过程中会有 2 次重定向的过程,但是 CAS Client 与 CAS Server 之间进行 Ticket 验证的过程对于用户是透明的。
CAS中重要的三个关键词
TGT:缓存在cas server用户登录标识的票据(可以存放在mongodb,mysql等数据存储介质中,默认是放在本地内存中)
TGC:缓存在浏览器cookie中用户登录标识票据,在同一个用户下,可以用TGC去cas server中查找对应的TGT,获取ST
ST:就是ticket,访问资源服务器的票据,即一张通行证
服务端搭建
源码下载:https://github.com/apereo/cas-overlay-template
使用IDEA打开项目:
1、修改jdk版本:File->Settings
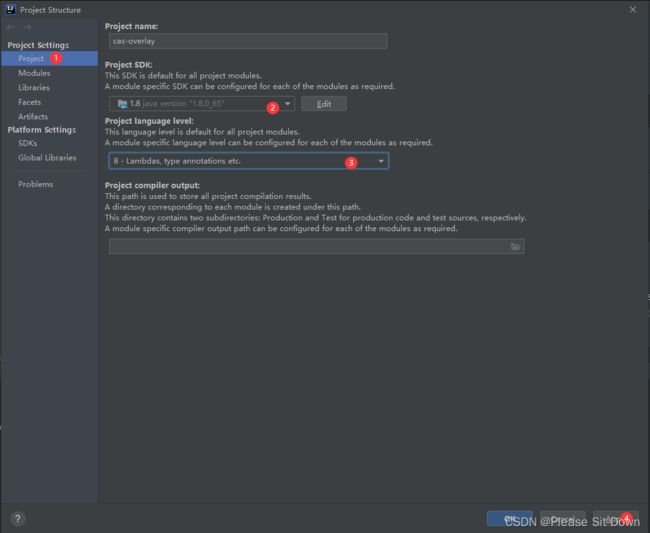
2、修改项目jdk版本File->Project Structure
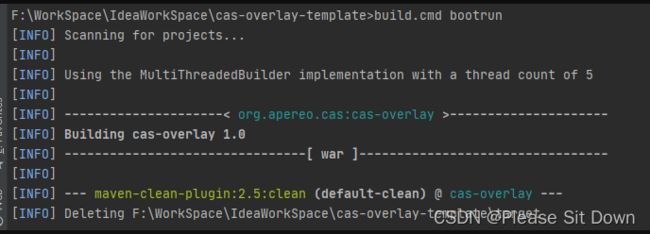
3、安装依赖(控制台输入:build.cmd bootrun 回车)
4、在工程下创建java和resources文件并设置成工程文件
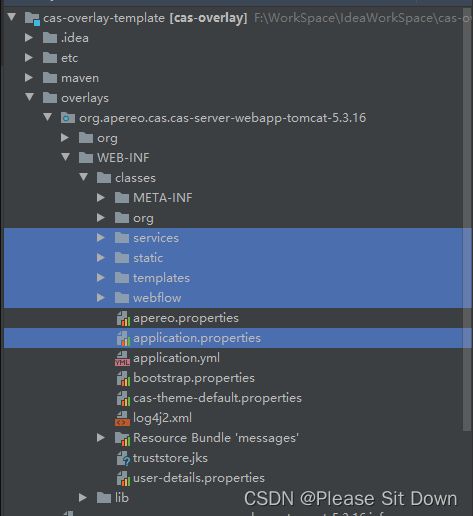
复制以下目录到resources下
设置application.properties中加载资源文件
#加载json资源
cas.serviceRegistry.json.location=classpath:/services
5、默认登录
默认用户名和密码在WEB-INF\classes\application.properties中
用户名:casuser 密码:Mellon
CAS默认使用的是HTTPS协议,如果使用HTTPS协议需要SSL安全证书(需向特定的机构申请和购买) 。如果对安全要求不高或是在开发测试阶段,可使用HTTP协议。我们这里讲解通过修改配置,让CAS使用HTTP协议。
如果不去除https认证下面整合客户端时会出现未认证授权的服务
1)修改CAS服务端配置文件
WEB-INF\classes目录的application,properties添加如下的内容
#是否开启json识别功能,默认为false
cas.serviceRegistry.initFromJson=true
#忽略https安全协议,使用 HTTP 协议
cas.tgc.secure=false
2)WEB-INF\classes\services目录下的HTTPSandIMAPS-10000001.json
修改内容如下,即添加http
修改以上配置即可使用默认用户名:casuser 和密码:Mellon 登录
6、使用MySQL数据库进行验证登录
# 第一步:新建数据和表:
CREATE DATABASE /*!32312 IF NOT EXISTS*/`db_sso` /*!40100 DEFAULT CHARACTER SET utf8 */;

USE `db_sso`;

/*Table structure for table `t_cas` */
DROP TABLE IF EXISTS `t_cas`;

CREATE TABLE `t_cas` (
  `id` int(11) NOT NULL AUTO_INCREMENT,
  `username` varchar(30) DEFAULT NULL,
  `password` varchar(100) DEFAULT NULL,
  PRIMARY KEY (`id`)
) ENGINE=InnoDB AUTO_INCREMENT=2 DEFAULT CHARSET=utf8;

/*Data for the table `t_cas` */
insert  into `t_cas`(`id`,`username`,`password`) values (1,'system','123456');


# 第二步:修改application.properties配置文件

# 注释掉写死的认证用户
# 加上jdbc数据源配置
# cas.authn.accept.users=casuser::Mellon
# cas.authn.jdbc.query[0].dialect=org.hibernate.dialect.MySQL5Dialect
cas.authn.jdbc.query[0].url=jdbc:mysql://localhost:3306/db_sso?serverTimezone=GMT
cas.authn.jdbc.query[0].user=root
cas.authn.jdbc.query[0].password=123456
cas.authn.jdbc.query[0].sql=select * from t_cas where username=?
cas.authn.jdbc.query[0].fieldPassword=password
cas.authn.jdbc.query[0].driverClass=com.mysql.jdbc.Driver
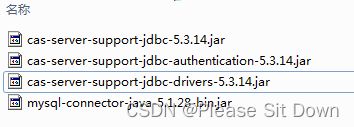
加上jdbc驱动包以及支持jar
或者在pom.xml中添加:
<dependencies>
    <dependency>
        <groupId>org.apereo.casgroupId>
        <artifactId>cas-server-support-jdbcartifactId>
        <version>5.3.16version>
    dependency>
    <dependency>
        <groupId>org.apereo.casgroupId>
        <artifactId>cas-server-support-jdbc-authenticationartifactId>
        <version>5.3.16version>
    dependency>
    <dependency>
        <groupId>org.apereo.casgroupId>
        <artifactId>cas-server-support-jdbc-driversartifactId>
        <version>5.3.16version>
    dependency>
    <dependency>
        <groupId>mysqlgroupId>
        <artifactId>mysql-connector-javaartifactId>
        <version>5.1.46version>
    dependency>
dependencies>
7、密码加密校验
# 第一步:数据库生成下md5密码
SELECT MD5('123456');

# 第二步:修改application.properties配置文件
cas.authn.jdbc.query[0].passwordEncoder.type=DEFAULT
cas.authn.jdbc.query[0].passwordEncoder.characterEncoding=UTF-8
# MD5加密策略
cas.authn.jdbc.query[0].passwordEncoder.encodingAlgorithm=MD5
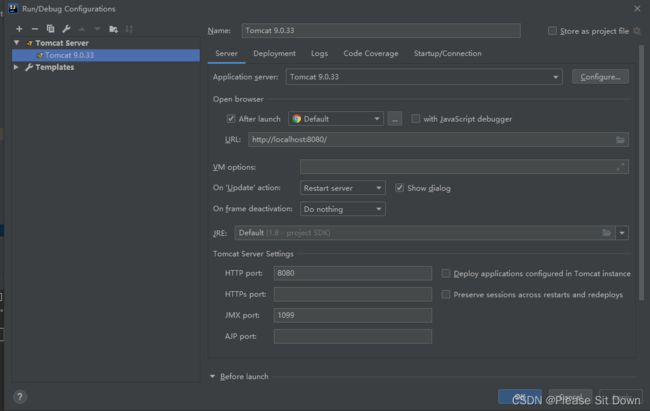
8、添加Tomcat进行测试
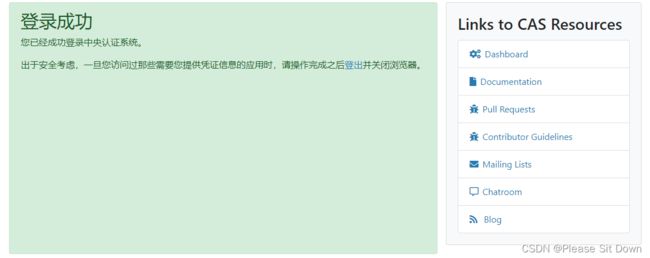
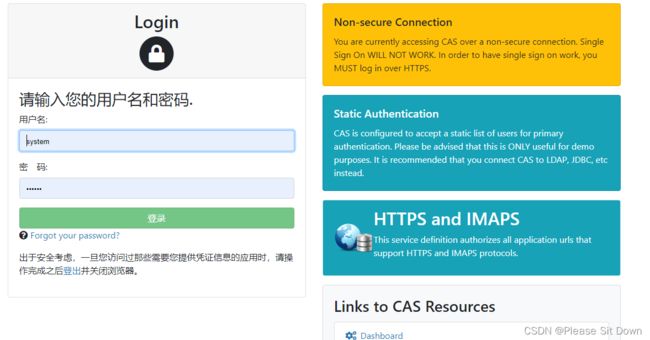
启动:输入system 123456
登录成功
客户端搭建
创建一个空的Spring Boot项目并引入依赖
<dependencies>
    <dependency>
        <groupId>org.springframework.bootgroupId>
        <artifactId>spring-boot-starter-webartifactId>
    dependency>

    <dependency>
        <groupId>mysqlgroupId>
        <artifactId>mysql-connector-javaartifactId>
        <scope>runtimescope>
    dependency>
    <dependency>
        <groupId>org.projectlombokgroupId>
        <artifactId>lombokartifactId>
        <optional>trueoptional>
    dependency>
    <dependency>
        <groupId>org.springframework.bootgroupId>
        <artifactId>spring-boot-starter-testartifactId>
        <scope>testscope>
    dependency>
    <dependency>
        <groupId>org.jasig.cas.clientgroupId>
        <artifactId>cas-client-coreartifactId>
        <version>3.6.1version>
    dependency>
    <dependency>
        <groupId>net.unicon.casgroupId>
        <artifactId>cas-client-autoconfig-supportartifactId>
        <version>2.3.0-GAversion>
    dependency>
    <dependency>
        <groupId>org.springframework.bootgroupId>
        <artifactId>spring-boot-starter-thymeleafartifactId>
        <version>2.6.7version>
    dependency>
dependencies>
application.yml加配置:
cas:
  server-url-prefix: http://localhost:8080/
  server-login-url: http://localhost:8080/login
  client-host-url: http://localhost:8881/
  validation-type: cas3
server:
  port: 8881
启动类添加注解:
@EnableCasClient
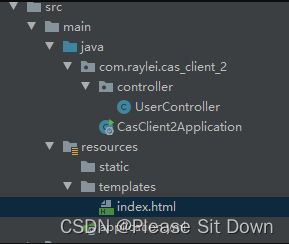
添加Controller
@Controller
public class UserController {
    @RequestMapping("/index")
    public ModelAndView index(){
        ModelAndView model = new ModelAndView();
        model.setViewName("index");
        return model;
    }
}
添加一个templates模板
DOCTYPE html>
<html lang="en" xmlns:th="http://www.thymeleaf.org">
<head>
    <meta charset="UTF-8">
    <title>cas_client_2title>
head>
<body>
欢迎:<font th:text="${session._const_cas_assertion_.principal.name}">font>br>
cas_client
body>
html>
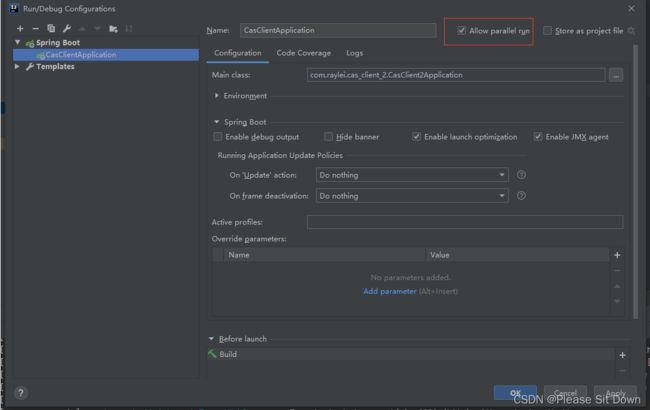
勾选 Allow parallel run,启动三个实例:
yaml中每个实例配置:
# 实例1
cas:
  server-url-prefix: http://localhost:8080/
  server-login-url: http://localhost:8080/login
  client-host-url: http://localhost:8881/
  validation-type: cas3
server:
  port: 8881

# 实例2
cas:
  server-url-prefix: http://localhost:8080/
  server-login-url: http://localhost:8080/login
  client-host-url: http://localhost:8882/
  validation-type: cas3
server:
  port: 8882

# 实例3
cas:
  server-url-prefix: http://localhost:8080/
  server-login-url: http://localhost:8080/login
  client-host-url: http://localhost:8883/
  validation-type: cas3
server:
  port: 8883
运行:
访问 http://localhost:8881/index
登录后:
访问:http://localhost:8882/index
直接登录:
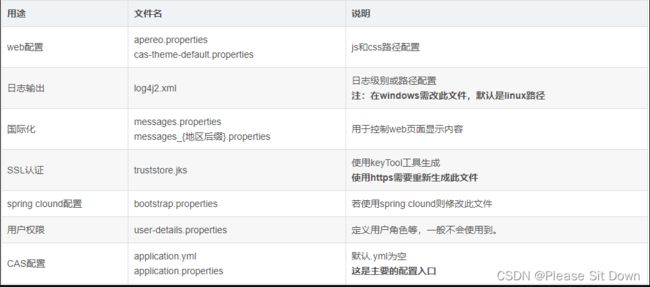
配置文件分类
\WEB-INF\classes\目录下有许多的.properties和.xml文件。
application.properties详解
application.properties包含cas运行所需要的一系列参数。若要自定义此配置文件,可以创建application.properties到cas-overlay-template\src\main\resources\目录下,然后重新执行maven构建生成war包。
不建议直接修改cas.war中的配置文件,因为如果这样做,当重新cas.war时,所修改的配置就会丢失了。
springboot相关参数
注:内置容器是指cas.war包含了tomcat的jar包,以springboot方式运行
如果cas.war放在tomcat/webapps/下运行,以下参数无效!
内置容器配置:
# CAS Server Context Configuration
# CAS服务应用上下文配置
#
#Web应用名称
server.context-path=/cas
#应用监听端口
server.port=8443

# 以下是SSL证书相关参数。若要禁用SSL功能请注释掉以下参数,或者给以下参数设置空值。
#
#SSL证书(https)保存路径
server.ssl.key-store=file:/etc/cas/thekeystore
#SSL证书密钥库
server.ssl.key-store-password=changeit
#SSL证书密码
server.ssl.key-password=changeit

#单次http请求的header头最大长度2MB=2097152/1024/1024
server.max-http-header-size=2097152
#转发http报文时是否连header头一起转发?
server.use-forward-headers=true
#连接超时时长2秒=2 * 1000
server.connection-timeout=20000
#服务器发生错误时,错误信息是否要包含堆栈信息
server.error.include-stacktrace=ALWAYS

#是否压缩http报文
server.compression.enabled=true
#要压缩的报文格式
server.compression.mime-types=application/javascript,application/json,application/xml,text/html,text/xml,text/plain
######################################################
#               以下是tomcat相关配置
######################################################
#单次http请求的header头最大长度2MB=2097152/1024/1024
server.tomcat.max-http-post-size=2097152
#存放Tomcat日志、Dump等文件的临时文件夹,默认为系统的tmp文件夹
server.tomcat.basedir=build/tomcat
#打开Tomcat的Access日志,并可以设置日志格式的方法
server.tomcat.accesslog.enabled=true
server.tomcat.accesslog.pattern=%t %a "%r" %s (%D ms)
server.tomcat.accesslog.suffix=.log
#tomcat初始会创建的线程数
server.tomcat.min-spare-threads=10
#tomcat最大线程数,默认为200
server.tomcat.max-threads=200
#设定http header使用的,用来覆盖原来port的value.
server.tomcat.port-header=X-Forwarded-Port
#设定Header包含的协议,通常是 X-Forwarded-Proto,如果remoteIpHeader有值,则将设置为RemoteIpValve.
server.tomcat.protocol-header=X-Forwarded-Proto
#设定使用SSL的header的值,默认https.
server.tomcat.protocol-header-https-value=https
#设定remote IP的header,如果remoteIpHeader有值,则设置为RemoteIpValve
server.tomcat.remote-ip-header=X-FORWARDED-FOR
#tomcat的默认URI解码字符集
server.tomcat.uri-encoding=UTF-8

#springboot的http请求编码格式
spring.http.encoding.charset=UTF-8
#是否为springboot指定http请求的编码
spring.http.encoding.enabled=true
#是否对springboot指定http请求编制编码
spring.http.encoding.force=true
spring云总线配置:
spring.cloud.bus.enabled=false

# 指示是否用本机属性覆盖云总线的配置
#如果想要远程配置优先级高,那么allowOverride设置为false,如果想要本地配置优先级高那么allowOverride设置为true。默认为true。
spring.cloud.config.allow-override=true

#外部配置是否可覆盖本机的配置.
spring.cloud.config.override-system-properties=false

# When allowOverride is true, external properties should take lowest priority, and not override any
# existing property sources (including local config files).
#外部源配置是否不覆盖任何源
spring.cloud.config.override-none=false

#是否动态刷新总线配置
# spring.cloud.bus.refresh.enabled=true
#是否启用环境变化事件
# spring.cloud.bus.env.enabled=true
#总线使用的队列或主题名称
# spring.cloud.bus.destination=CasCloudBus
#是否启用总线ack消息确认,若不确认成功则重发
# spring.cloud.bus.ack.enabled=true

#如CAS访问地址是http://localhost/cas
#则默认访问http://localhost/cas/status/dashboard会提示没权限。
#要打开status需要修改下面的配置。
在application.properties中修改和增加如下的信息:
#enabled要设置为true, sensitive要设置为false
endpoints.enabled=false
endpoints.sensitive=true

endpoints.restart.enabled=false
endpoints.shutdown.enabled=false
##
安全管理:
# The 'enabled' flag below here controls the rendering of details for the health endpoint amongst other things.
#启用安全管理
management.security.enabled=true
#安全管理的角色:执行者,管理员
management.security.roles=ACTUATOR,ADMIN
#安全管理session
management.security.sessions=if_required
#安全管理上下文(应用名)
management.context-path=/status
#在每个响应中添加“X-Application-Context”HTTP头
management.add-application-context-header=false
# Define a CAS-specific "WARN" status code and its order
#管理健康状态的顺序
management.health.status.order=WARN, DOWN, OUT_OF_SERVICE, UNKNOWN, UP

# Control the security of the management/actuator endpoints
# With basic authentication, assuming Spring Security and/or relevant modules are on the classpath.
#安全基础鉴权模式:通过角色鉴权
security.basic.authorize-mode=role
#安全基础路径
security.basic.path=/cas/status/**
#安全基础启用
# security.basic.enabled=true
#安全用户名
# security.user.name=casuser
#安全用户密码
# security.user.password=
CAS Web应用会话配置:
# CAS Web Application Session Configuration
#
#会话超时时长,默认300
server.session.timeout=300
#是否设置Cookie没有安全标志
#如果在Cookie中设置了"HttpOnly"属性,那么通过程序(JS脚本、Applet等)将无法读取到Cookie信息,这样能有效的防止XSS攻击。
server.session.cookie.http-only=true
#设定Session的追踪模式(cookie, url, ssl)
server.session.tracking-modes=COOKIE
thymeleaf模板引擎配置:
# CAS Thymeleaf View Configuration
#
#模板编码格式,默认UTF-8
spring.thymeleaf.encoding=UTF-8
#是否启用模板缓存。默认true
spring.thymeleaf.cache=true
#模板格式校验(LEGACYHTML5,HTML5,HTML)
#LEGACYHTML5——严格校验
spring.thymeleaf.mode=HTML
##Thymeleaf模板解析器在解析器链中的顺序。默认情况下,它排第一位。顺序从1开始,只有在定义了额外的TemplateResolver Bean时才需要设置这个属性。
spring.thymeleaf.template-resolver-order=100
log4j配置:
# CAS Log4j Configuration
#
# logging.config=file:/etc/cas/log4j2.xml
#是否禁用log4j自动初始化?
server.context-parameters.isLog4jAutoInitializationDisabled=true
CAS切面配置:
# CAS AspectJ Configuration
#
#是否自动启用aop切面
spring.aop.auto=true
#是否使用切面代理目标类
spring.aop.proxy-target-class=true
CAS 登录帐号配置
# CAS Authentication Credentials
# 用户名:casuser,密码:Mellon
默认情况下,它排第一位。顺序从1开始,只有在定义了额外的TemplateResolver Bean时才需要设置这个属性。
spring.thymeleaf.template-resolver-order=100
log4j配置:
# CAS Log4j Configuration
#
# logging.config=file:/etc/cas/log4j2.xml
#是否禁用log4j自动初始化?
server.context-parameters.isLog4jAutoInitializationDisabled=true
CAS切面配置:
# CAS AspectJ Configuration
#
#是否自动启用aop切面
spring.aop.auto=true
#是否使用切面代理目标类
spring.aop.proxy-target-class=true
CAS 登录帐号配置
# CAS Authentication Credentials
# 用户名:casuser,密码:Mellon
cas.authn.accept.users=casuser::Mellon






![[外链图片转存失败,源站可能有防盗链机制,建议将图片保存下来直接上传(img-kVyEfmKE-1654063593693)(https://gitee.com/qq_connect-847/cloud_images/raw/master/image_company/image-20220601130128435.png)]](http://img.e-com-net.com/image/info8/c76d6cf8103d47a2936640f47174553d.jpg)
![[外链图片转存失败,源站可能有防盗链机制,建议将图片保存下来直接上传(img-df599mCF-1654063593693)(https://gitee.com/qq_connect-847/cloud_images/raw/master/image_company/image-20220601130210779.png)]](http://img.e-com-net.com/image/info8/50433a0545204c85a6b43e5b679ebb19.jpg)
