Mac上安装Server 1.7.2的Appium笔记
本人第一次写博客,本篇博客是对前一段工作学习的总结,如有疑问,敬请指正交流。
本次安装依照网上的资料进行,大致步骤总结如下:
GITHUB网站ios-real-devices-setup相关文档地址:
https://github.com/appium/appium/blob/master/docs/en/drivers/ios-xcuitest-real-devices.md
1、本次Mac系统版本是MacOS High Sierra version10.13.4,安装的appium的server版本是1.7.2,使用的appium的appium1.5.0.dmg安装包,使用的xcode版本是xcode9.4。安装时,要保证能联网。
2、检查mac环境(如果有必要可以将usr包下的local包移入废纸篓):
(1)检查brew相关信息:$ brew -v 检查brew版本
(2)检查brew安装了什么:$ brew list
(3)检查brew安装的工具哪些不是最新:$ brew outdated
(4)brew的相关指令:$ brew -h | $ brew help
(其他相关指令的使用方法:https://docs.brew.sh/FAQ)
3、安装(更新)brew:
$ /usr/bin/ruby -e "$(curl -fsSL https://raw.githubusercontent.com/Homebrew/install/master/install)"
(具体Homebrew的相关内容:https://brew.sh/)
4、安装(更新)libimobiledevice:
$ brew install libimobiledevice --HEAD
5、安装(更新)carthage:
$ brew install carthage
6、安装(更新)node:(安装node的目的是为了能使用npm指令)
$ brew install node
(相关formulae的内容:https://formulae.brew.sh/formula/)
(nodeJs相关的内容:https://nodejs.org/en/)
7、安装ios-deploy:
$ npm install -g ios-deploy
8、安装xcpretty,该操作需要为xcpretty指定安装目录:
(作用:用于对xcodebuild的输出进行格式化。并包含输出report功能。)
$ gem install xcpretty | $ sudo gem install xcpretty -n/usr/local/bin(推荐)
9、安装appium:http://appium.io/ 下载所需版本的appium
10、编译WDA软件包:(WDA软件包也可以替换为事先打包好的WDA软件包)
(重点一)进入appium包内容下的WebDriverAgent安装目录,运行bootstrap;
$ cd '所安装的appium的WebDriverAgent包的路径'
$ mkdir -p Resources/WebDriverAgent.bundle(可省略)
$ sh ./Scripts/bootstrap.sh
(无报错就OK了。忽略出现的flow init --help提示)

(重点二)用Xcode编译WebDriverAgent:
双击WDA软件包里的WebDriverAgent.xcodeproj文件,xcode里会打开WDA项目内容。
编译WebDriverAgentLib:
(1)修改Bundle Indentifier --> com.%%%.WebDriverAgentLib(%是占位符,具体请自定义)
(2)勾选Automatically manage signing
(3)选择开发Team,Signing Certificate 不报错 (个人开发账号有效期只有一周,请使用付费账号)
(4)选择Deployment Target (安装此软件的最小IOS版本)
(5)点击运行,上方显示Build Succeeded

编译WebDriverAgentRunner:
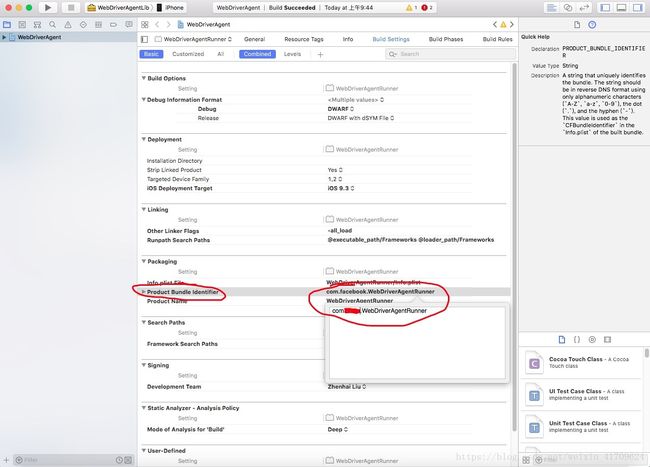
–> Build Setting --> Basic --> 确认iOS Deployment Target,修改Product Bundle Identifier
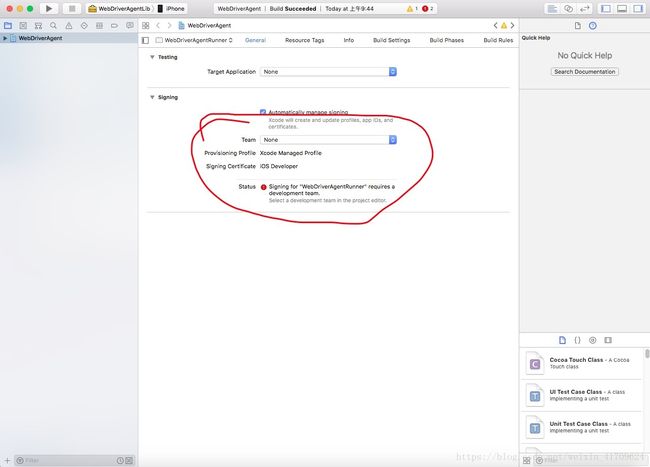
–> General --> 勾选Automatically manage signing,选择Team,无报错后运行,显示Build Succeeded,即成功
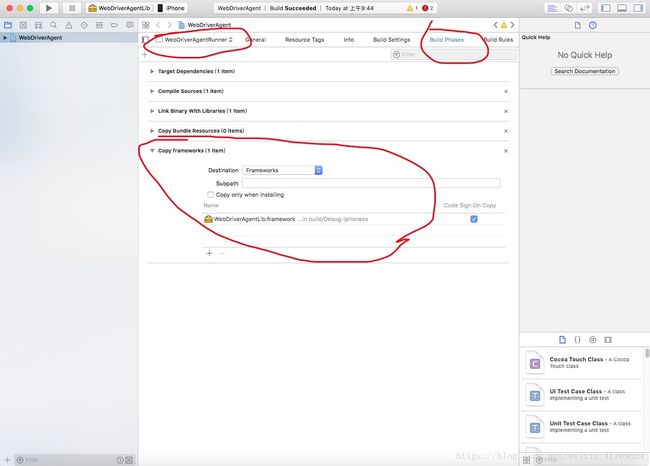
(重点三)WebDriverAgentRunner–>Build Phases–>Copy frameworks:
如果没有导入RoutingHTTPServer.framework包,则要加入。
12、打包WDA到移动设备上:
(移动设备和Mac都在用一网段下,且都能连接外网)
方法一:关闭Xcode,进入WebDriverAgent文件夹:
$ cd '所安装的appium的WebDriverAgent包的路径'
$ xcodebuild -project WebDriverAgent.xcodeproj -scheme WebDriverAgentRunner -destination 'id=移动设备的UDID' test
(xcodebuild指令丢失解决方法:sudo Xcode-select -switch +
/Applications/Xcode.app/Contents/Developer)
运行后,在移动上会安装WDA。
(开发者账号如果使用的是个人账号,在移动设备的设置中要选择信任开发者)
方法二:(推荐)
Product --> Scheme
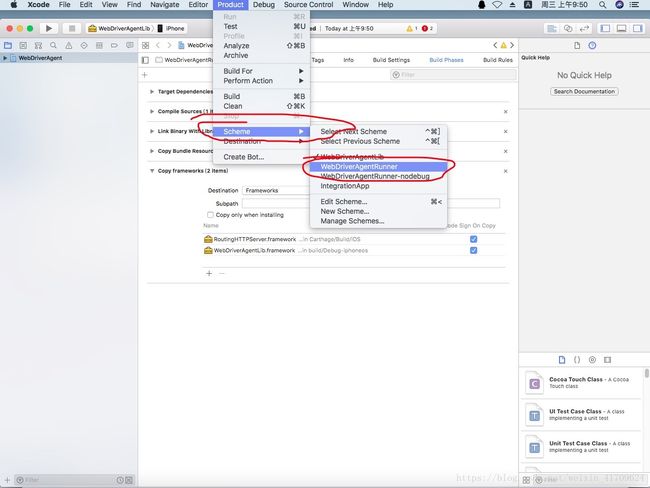
Product --> Destination
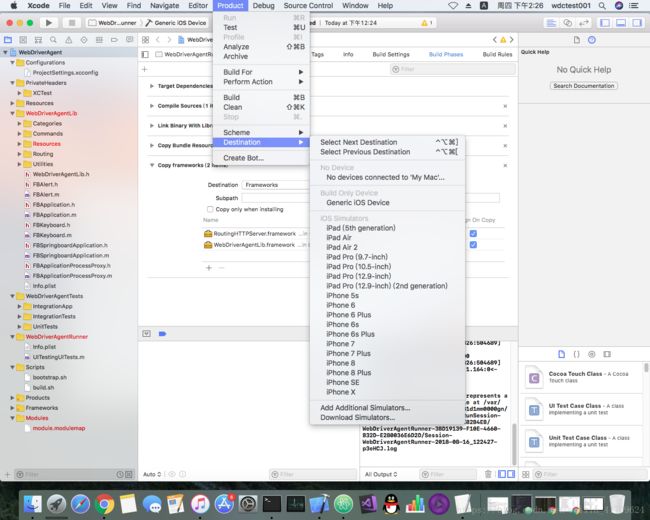
Product --> Test
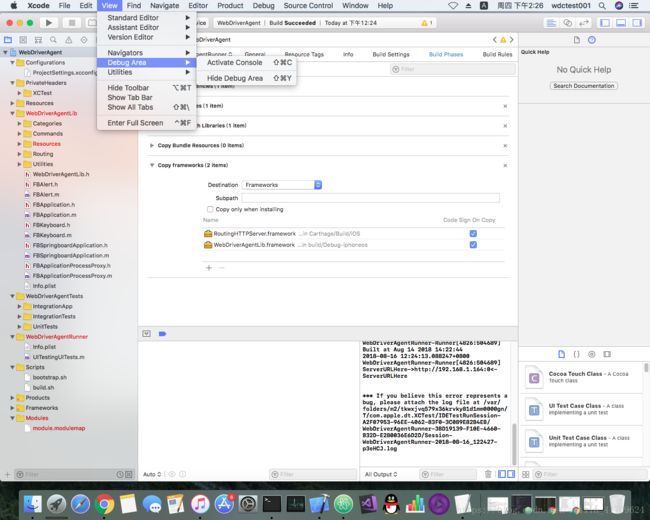
View --> Debug Area --> Activate Console 查看控制台输出信息,无报错则测试成功
=========================================================================================================================
常用命令行指令:查看设备上的app的bundleId:$ ideviceinstaller -l
查看连接的移动设备UDID:$ idevice_id -l可能的检查点: USB support:
https://github.com/facebook/WebDriverAgent/wiki/USB-supprt
=========================================================================================================================