Ubuntu20.04配置深度学习环境yolov5最简流程
一、Ubuntu20.04配置深度学习环境
1.首先给Ubuntu安装Chrome浏览器(搜索引擎换成百度即可)
安装命令:打开终端直接输入
wget https://dl.google.com/linux/direct/google-chrome-stable_current_amd64.deb
sudo dpkg -i google-chrome-stable_current_amd64.deb
sudo apt-get -f install
2.换成搜狗输入法(如果安装完成无法打汉字,可输入以下命令)
sudo apt-get update
sudo apt install libqt5qml5 libqt5quick5 libqt5quickwidgets5 qml-module-qtquick2
sudo apt install libgsettings-qt13.安装WPS for Linux
进入搜狗for linux官网下载搜狗输入法 ,下载x86版本
WPS for linux4. ubuntu换国内镜像源
conda config --add channels https://mirrors.tuna.tsinghua.edu.cn/anaconda/pkgs/free/
conda config --add channels https://mirrors.tuna.tsinghua.edu.cn/anaconda/pkgs/main/
conda config --add channels https://mirrors.tuna.tsinghua.edu.cn/anaconda/cloud/conda-forge/
5.安装配置anaconda
anaconda添加国内镜像源
#添加镜像源
conda config --add channels https://mirrors.tuna.tsinghua.edu.cn/anaconda/pkgs/main
conda config --add channels https://mirrors.tuna.tsinghua.edu.cn/anaconda/pkgs/free
conda config --add channels https://mirrors.tuna.tsinghua.edu.cn/anaconda/pkgs/r
conda config --add channels https://mirrors.tuna.tsinghua.edu.cn/anaconda/pkgs/pro
conda config --add channels https://mirrors.tuna.tsinghua.edu.cn/anaconda/pkgs/msys2
#显示检索路径
conda config --set show_channel_urls yes#显示镜像通道
conda config --show channels安装完成anaconda后创建一个虚拟环境
conda create -n yolo python=3.7yolo是你虚拟环境名字,可自己取,Python不要安装太高版本3.7即可
查看自己的虚拟环境
conda env list 激活虚拟环境
conda activate yolo 接下来需要在虚拟环境里面安装pytorch
二、安装pytorch前首先安装显卡驱动
输入
nvidia-smi提示Command 'nvidia-smi' not found, but can be installed with:说明你还没有安装显卡驱动
2.安装显卡驱动最简单方式:
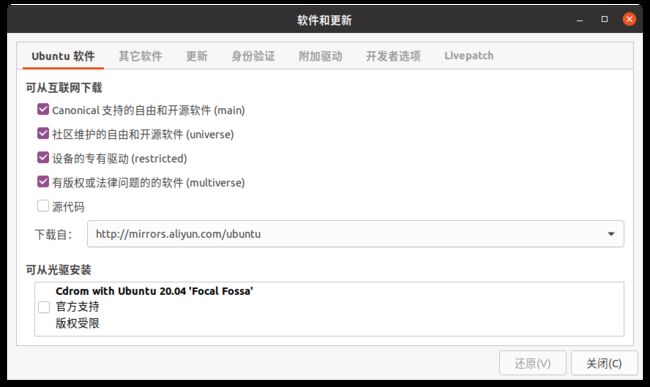
打开软件和更新
ununtu软件-下载自-安装源改成国内,然后左面有一个附加驱动里面有许多专有的驱动程序,点击一个专有的,接着点击应用更改
3.这时如果弹出更新应用时出错
解决方法:打开软件更新器更新一下
完成后重启在输入nvidia-smi就可以看到电脑可以安装cuda的最高版本号
(图上看到可以安装的cuda最高版本号为12.0,不建议安装这么高版本)
三、安装配置pytorch
1.首先查看查看显卡使用情况
打开终端输入:
nvidia-smi查看可以安装cuda的版本(低于这个或等于这个版本都可以安装,高于11.3版本,建议安装11.3的)
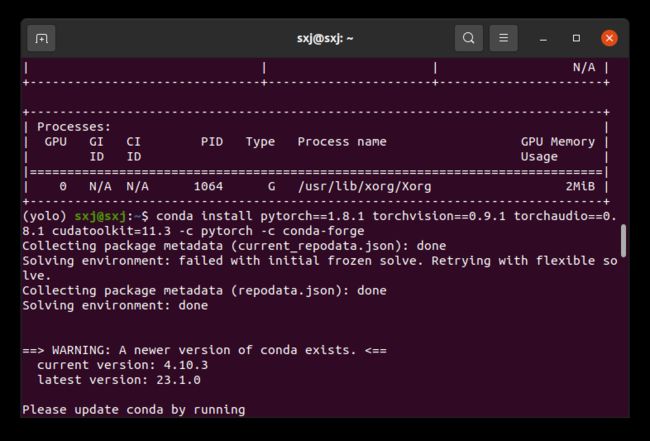
2.进入自己创建的虚拟环境把pytorch安装在自己的虚拟环境里面(这个命令就可以把cuda和cudnn及pytorch一起配置完成在虚拟环境里面,不需要在单独给电脑配置)
(可以在torch官网上复制安装命令)
打开终端输入:
conda install pytorch==1.8.1 torchvision==0.9.1 torchaudio==0.8.1 cudatoolkit=11.3 -c pytorch -c conda-forge安装命令复制过来进行安装(不要把安装命令后面的-c pytorch -c conda-forge去掉,否则你安装的将是cpu版的,无法调用gpu)
配置完成测试,终端打开输入:
Python
import torch # 如果pytorch安装成功即可导入
print(torch.cuda.is_available()) # 查看CUDA是否可用,输出true代表可以调用GPU
print(torch.cuda.device_count()) # 查看可用的CUDA数量
print(torch.version.cuda) # 查看CUDA的版本号
4.用conda list查看pytorch和cuda、cudnn的版本
如果发现安装成CPU版本,用以下命令卸载在重新安装:
 conda uninstall pytorch
 conda uninstall libtorch
四、ubuntu20.04下载安装tensorrt
4.1 环境
CUDA 11.1 (11.2、11.3)
CUDNN 8.1
4.2 下载tensorRT (匹配相应的版本)
官网地址 :https://developer.nvidia.com/nvidia-tensorrt-8x-download
下载的时tar包
安装
解压
tar zxf TensorRT-8.0.1.6.Linux.x86_64-gnu.cuda-11.3.cudnn8.2.tar.gz
存放在自己想放的目录下(也可以重命名),如:
mv TensorRT-8.0.1.6 /opt4.3 添加环境
将下面的环境变量 添加到.bashrc文件并保存:
export LD_LIBRARY_PATH=$LD_LIBRARY_PATH:/opt/TensorRT-8.0.1.6/lib激活环境:
source .bashrc复制tensorRT目录下 lib、include文件夹到系统文件夹(或者将这两个文件夹路径添加到.bashrc文件中)
sudo cp -r ./lib/* /usr/lib
sudo cp -r ./include/* /usr/include
4.4 C++测试是否成功
测试代码:TensorRT-8.0.1.6/samples/sampleMNIST
本版本无需去data文件夹下载对应的数据集,自己带了,如果没有,那就下载对应的数据集
4.5 python download_pgms.py
如果文件夹下有pgm格式的图片 说明下载成功
在tensorRT目录下samples文件夹下 用sampleMNIST示例测试
编译:
make清除之前编译的可执行文件及配置文件:
make clean编译成功,执行bin目录下的可执行文件
./../../bin/sample_mnist参考文章:https://blog.csdn.net/qq_42739865/article/details/119001024
需要对yolov5中的权重模型.pt转换成onnx的,请点击以下链接:
yolo的模型转换权重pt文件转onnx(1)
https://blog.csdn.net/m0_60657960/article/details/129404179?csdn_share_tail=%7B%22type%22%3A%22blog%22%2C%22rType%22%3A%22article%22%2C%22rId%22%3A%22129404179%22%2C%22source%22%3A%22m0_60657960%22%7D#:~:text=yolo%E7%9A%84%E6%A8%A1%E5%9E%8B%E8%BD%AC%E6%8D%A2%E6%9D%83%E9%87%8Dpt%E6%96%87%E4%BB%B6%E8%BD%AConnx%EF%BC%881%EF%BC%89
参考文章:
检查pytorch是否安装成功、查看torch和cuda的版本
超详细 Ubuntu安装PyTorch步骤
ubuntu18.04安装显卡驱动(四种方式)


