Faster-RCNN代码解读2:快速上手使用
Faster-RCNN代码解读2:快速上手使用
前言
因为最近打算尝试一下Faster-RCNN的复现,不要多想,我还没有厉害到可以一个人复现所有代码。所以,是参考别人的代码,进行自己的解读。
代码来自于B站的UP主(大佬666),其把代码都放到了GitHub上了,我把链接都放到下面了(应该不算侵权吧,毕竟代码都开源了_):
b站链接:https://www.bilibili.com/video/BV1of4y1m7nj/?vd_source=afeab8b555e5eb1bfa1e7f267262cbf2

GitHub链接:https://github.com/WZMIAOMIAO/deep-learning-for-image-processing
目的
其实UP主已经做了很好的视频讲解了他的代码,只是有时候我还是喜欢阅读博客来学习,另外视频很长,6个小时,我看的时候容易睡着_,所以才打算写博客记录一下学习笔记。
目前完成的内容
第一篇:VOC数据集详细介绍
第二篇:Faster-RCNN代码解读2:快速上手使用(本文)
目录结构
文章目录
-
- Faster-RCNN代码解读2:快速上手使用
-
- 1. 前言:
- 2. 下载项目代码:
- 3. 下载数据和权重文件:
- 4. predict.py文件解读:
- 5. pascal_voc_classes.json文件介绍:
- 6. 快速上手:
- 7. 总结:
1. 前言:
本篇文章的作用是准备好一些必备的数据或权重文件,以实现直接快速使用代码的目的。
2. 下载项目代码:
打开大佬的GitHub链接,然后,进入pytorch_object_detection文件内:
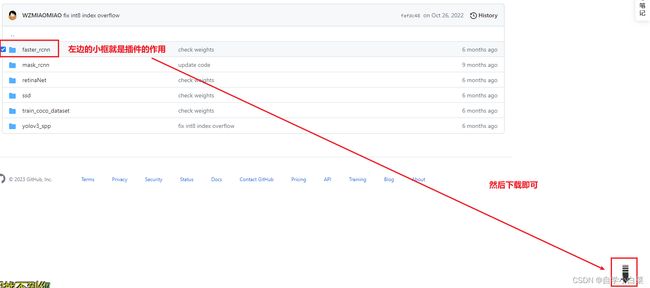
然后,把Faster-RCNN文件夹下载下来即可。不过,GitHub本身不支持单个文件夹的下载,这时候推荐一下浏览器的插件GitZip for github ,把这个插件安装后,即可下载单独的文件夹,如下图所示:
下载完成后的目录结构如下:
3. 下载数据和权重文件:
打开README.md文件,里面说明了预训练权重文件和数据集的下载地址:
- ResNet50+FPN权重文件下载:
官方的权重文件:https://download.pytorch.org/models/fasterrcnn_resnet50_fpn_coco-258fb6c6.pth

up主自己训练后的权重地址:
https://pan.baidu.com/s/1ifilndFRtAV5RDZINSHj5w 提取码:dsz8
- 数据集下载地址:
http://host.robots.ox.ac.uk/pascal/VOC/voc2012/VOCtrainval_11-May-2012.tar
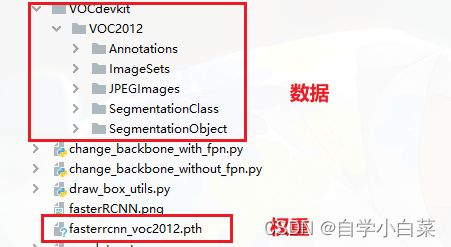
完成上述下载后,可以得到下图的文件:
4. predict.py文件解读:
打开predict.py文件,这个文件的作用就是加载已经训练过的模型,对一张图片进行目标检测。
main函数:
看main函数,主要分为四个部分:
- 设置权重文件路径(需要我们改的参数),并用模型加载:
# 选定GPU
device = torch.device("cuda:0" if torch.cuda.is_available() else "cpu")
print("using {} device.".format(device))

# 创建模型:21=20个类别+1个背景
model = create_model(num_classes=21)

# 加载权重参数
# weights_path = "./save_weights/model.pth"   # 权重保存路径,作者自己定义的
weights_path = "./fasterrcnn_voc2012.pth"   # 权重保存路径,我们下载后自己的路径
assert os.path.exists(weights_path), "{} file dose not exist.".format(weights_path)
# 开始加载权重文件
weights_dict = torch.load(weights_path, map_location='cpu')  # 加载之前训练保存的字典
weights_dict = weights_dict["model"] if "model" in weights_dict else weights_dict # 选定model参数
model.load_state_dict(weights_dict) # 加载
model.to(device) # 放入GPU
- 读取“类别----数字值”的json文件,并生成一个字典,以方便后期将预测的类别(比如:1、2这样的数字)转为字符串(比如:person、bicycle等)
# 读取json文件
label_json_path = './pascal_voc_classes.json'
assert os.path.exists(label_json_path), "json file {} dose not exist.".format(label_json_path)
with open(label_json_path, 'r') as f:
class_dict = json.load(f)
# 将值转为字典
category_index = {str(v): str(k) for k, v in class_dict.items()}
- 加载一张测试图片(需要改为我们自己的),并改为符合
[batch,channel,w,h]的格式
# 加载一张测试图片
original_img = Image.open("./test.jpg") # 需要改为自己的路径

# 将PIL图像格式转为tensor格式
data_transform = transforms.Compose([transforms.ToTensor()])
img = data_transform(original_img)
# 增加一个batch维度,符合训练图片格式
img = torch.unsqueeze(img, dim=0)
- 开始预测图片,并计算运行的时间(一般不计算第一次的时间,因为GPU调用需要时间)和画出对应图像
model.eval()  # 进入验证模式
with torch.no_grad():
    # init
    # 初始化,原始图像的宽、高
    img_height, img_width = img.shape[-2:]
    # 将图像放入GPU中,并变为model可以识别的格式[batch_size,channel,w,h]
    init_img = torch.zeros((1, 3, img_height, img_width), device=device)
    # 验证
    model(init_img)

    # 计算预测时间,不过不能直接计算第一次,因为需要启动gpu等
    t_start = time_synchronized()
    predictions = model(img.to(device))[0]
    t_end = time_synchronized()
    print("inference+NMS time: {}".format(t_end - t_start))

    # 得到预测的相关参数
    predict_boxes = predictions["boxes"].to("cpu").numpy()
    predict_classes = predictions["labels"].to("cpu").numpy()
    predict_scores = predictions["scores"].to("cpu").numpy()

    if len(predict_boxes) == 0:
    	print("没有检测到任何目标!")

    # 绘制图像
    plot_img = draw_objs(original_img,
                             predict_boxes,
                             predict_classes,
                             predict_scores,
                             category_index=category_index,
                             box_thresh=0.5,
                             line_thickness=3,
                             font='arial.ttf',
                             font_size=20)
    plt.imshow(plot_img)
    plt.show()
    # 保存预测的图片结果
    plot_img.save("test_result.jpg")
create_model函数
了解了main函数后,我们再看看create_model函数,这个函数的作用就是创建模型。作者在该项目中采取了很多模型,比如VGG16、mobilenetv2、resnet等等,而这里我们用的是刚刚下载的权重文件对应的模型,即resNet50+fpn+faster-rcnn,因此需要把其它的模型代码注释掉:
def create_model(num_classes):
    # mobileNetv2+faster_RCNN
    # backbone = MobileNetV2().features
    # backbone.out_channels = 1280
    #
    # anchor_generator = AnchorsGenerator(sizes=((32, 64, 128, 256, 512),),
    #                                     aspect_ratios=((0.5, 1.0, 2.0),))
    #
    # roi_pooler = torchvision.ops.MultiScaleRoIAlign(featmap_names=['0'],
    #                                                 output_size=[7, 7],
    #                                                 sampling_ratio=2)
    #
    # model = FasterRCNN(backbone=backbone,
    #                    num_classes=num_classes,
    #                    rpn_anchor_generator=anchor_generator,
    #                    box_roi_pool=roi_pooler)

    # resNet50+fpn+faster_RCNN
    # 注意,这里的norm_layer要和训练脚本中保持一致
    backbone = resnet50_fpn_backbone(norm_layer=torch.nn.BatchNorm2d)
    model = FasterRCNN(backbone=backbone, num_classes=num_classes, rpn_score_thresh=0.5)

    return model
5. pascal_voc_classes.json文件介绍:
我们再看看上面涉及json文件,这个文件就是voc数据集的类别和数字值的对应关系,比如:
{
    "aeroplane": 1,
    "bicycle": 2,
    "bird": 3,
    "boat": 4,
    "bottle": 5,
    "bus": 6,
    "car": 7,
    "cat": 8,
    "chair": 9,
    "cow": 10,
    "diningtable": 11,
    "dog": 12,
    "horse": 13,
    "motorbike": 14,
    "person": 15,
    "pottedplant": 16,
    "sheep": 17,
    "sofa": 18,
    "train": 19,
    "tvmonitor": 20
}
需要注意的是,这里的值是从1开始的,是因为0一般是留给背景的。
6. 快速上手:
有了上面的解读后,我们可以快速上手看看效果。
这里再次声明一下predict.py文件需要修改**权重文件路径和自己搞一张测试图片并修改路径。**完成修改后,直接运行该文件即可,我测试了几张图片,结果如下图:
7. 总结:
上面主要简单介绍了如何快速上手,看到结果,给自己一种这个很简单的错觉。后面,主要就是对一些主要的文件进行解读。


