SpringBoot
SpringBoot
SpringBoot简介
-
SpringBoot提供了一种快速使用Spring的方式,基于约定优于配置的思想,可以让开发人员不必在配置和逻辑业务之间进行思维的切换,全身心的投入到逻辑代码的编写中,从而大大提高了开发的效率。
-
SpringBoot的自动配置是在应用程序启动时,考虑众多因素,才决定Spring配置应该用哪个,该过程是SpringBoot自动完成的。
-
SpringBoot提供了一种快速开发Spring项目的方式,而不是对Spring功能上的增强。
-
Spring的缺点:
配置繁琐
依赖繁琐 -
SpringBoot功能:
自动配置
起步依赖:依赖传递
辅助功能 -
个人看法:
在实际写代码的过程中,逻辑层代码(三层结构的代码)和SSM框架没有变化。但是SpringBoot创建的时候方便了很多,而且内置的Tomcat等容器,不再需要我们单独配置。依赖的管理也让我们在创建项目后减少了不必要的版本冲突。
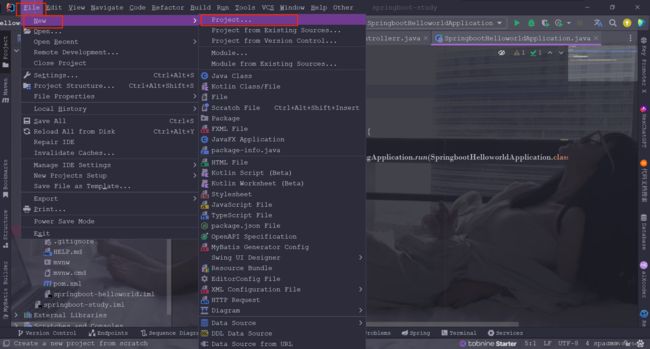
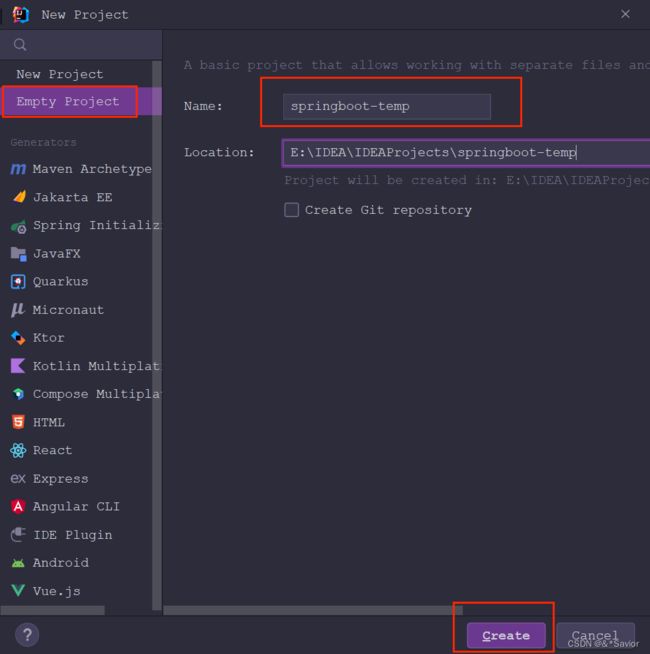
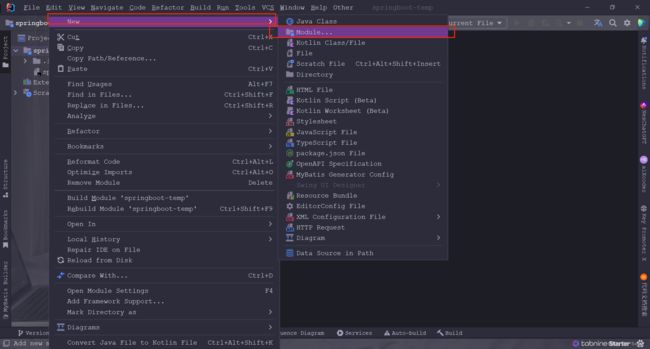
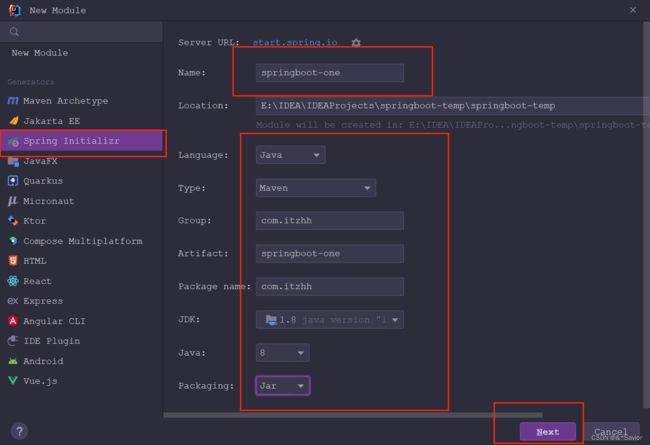
创建一个简单的SpringBoot项目
- 选择依赖和springboot版本,这边的依赖不选后面也可以直接通过在pom.xml中添加依赖实现, 只是这样方便一点。
-
导致这个问题的原因是版本的问题,Maven和springboot的版本不匹配,这个就根据自己的情况可以去查一下自己的Maven版本支持什么范围的springboot,或者你想用的springboot版本支持哪些版本的Maven。
-
这边创建成功后做一个小测试,看能否正常呈现。
-
创建controller,编写测试demo1。注意一定要和启动类在同一级目录下, 不然没用。
-
点击启动类启动,出现spring图形,默认端口为8080,可以通过浏览器访问,看结果。
SpringBoot配置
SpringBoot配置文件分类
-
SpringBoot是基于约定的,所以很多配置都有默认值,比如前面所提到的端口默认为8080,如果想使用自己的配置替换默认配置的话,就可以使用application配置文件进行配置。
-
有三种后缀:properties、yml、yaml。
-
application.properties中
server.port=8080
- application.yml和application.yaml中,注意,:后面有一个空格,这个不能少
server:
  port: 8080
- 配置文件名称:application
- 在同一级目录下优先级:properties>yml>yaml
yaml介绍
- YAML全称是 YAML Ain’t Markup Language 。YAML是一种直观的能够被电脑识别的的数据数据序列化格式,并且容易被人类阅读,容易和脚本语言交互的,可以被支持YAML库的不同的编程语言程序导入,比如: C/C++, Ruby, Python, Java, Perl, C#, PHP等。YML文件是以数据为核心的,比传统的xml方式更加简洁。YAML文件的扩展名可以使用.yml或者.yaml。
yaml基本语法
- 大小写敏感
- 数据值前边必须有空格,作为分隔符
- 使用缩进表示层级关系
- 缩进时不允许使用Tab键,只允许使用空格
- 缩进的空格数目不重要,只要相同层级的元素左侧对齐即可
- #表示注释,从这个字符一直到行尾,都会被解析器忽略
yaml数据格式:
- 对象(map):键值对的集合
person:
 name: zhangsan
 # 行内写法
person: {name: zhangsan}
- 数组:一组按次序排列的值
address:
 - beijing
 - shanghai
# 行内写法
address: [beijing,shanghai]
- 纯量:单个的、不可再分的值
msg1: 'hello \n world' # 单引忽略转义字符
msg2: "hello \n world" # 双引识别转义字符
- 参数引用
name: lisi
person:
 name: ${name} # 引用上边定义的name值
读取配置文件内容
先在yml中定义一些用于测试的数据
address:
  - beijing
  - shanghai
  - tianjin
# 行内写法
#address: [beijing,shanghai]

msg1: 'hello \n world' # 单引忽略转义字符
msg2: "hello \n world" # 双引识别转义字符

name: wangwu

person:
  name: ${name}
@Value
- 这种写法需要一个个创建对象,数据较少可以,数据较多时很显然会很麻烦。
package com.itzhh.controller;

import org.springframework.beans.factory.annotation.Value;
import org.springframework.web.bind.annotation.RequestMapping;
import org.springframework.web.bind.annotation.RestController;

/**
 * @author: zhh
 * @date: 2023-04-16 18:35
 * @description: <描述>
 */
@RestController
public class DemoController {

  @Value("${name}")
    private  String name;

  @Value("${address[1]}")
  private  String address;

  @Value("${person.name}")
  private String name2;

  @Value("${msg1}")
  private String msg1;

  @Value("${msg2}")
  private String msg2;


    @RequestMapping("/demo2")
    public String demo2() {
        System.out.println("name="+name);
        System.out.println("name2="+name2);
        System.out.println("msg1="+msg1);
        System.out.println("msg1="+msg2);
        System.out.println("address="+address);

        return "demo2";
    }
}
Environment
创建一个Environment对象,然后通过这个对象来获取。
package com.itzhh.controller;

import org.springframework.beans.factory.annotation.Autowired;
import org.springframework.beans.factory.annotation.Value;
import org.springframework.core.env.Environment;
import org.springframework.web.bind.annotation.RequestMapping;
import org.springframework.web.bind.annotation.RestController;

/**
 * @author: zhh
 * @date: 2023-04-16 18:35
 * @description: <描述>
 */
@RestController
public class DemoController {


  @Autowired
  private Environment environment;


    @RequestMapping("/demo3")
    public String demo3() {
        System.out.println(environment.getProperty("name"));
        System.out.println(environment.getProperty("person.name"));
        System.out.println(environment.getProperty("msg1"));
        System.out.println(environment.getProperty("msg2"));
        System.out.println(environment.getProperty("address[1]"));
        return "demo3";
    }
}
@ConfigurationProperties
先写一个类,加上这个注解
package com.itzhh.entity;

import org.springframework.boot.context.properties.ConfigurationProperties;
import org.springframework.stereotype.Component;

import java.util.Arrays;

/**
 * @author: zhh
 * @date: 2023-04-16 20:05
 * @description: <描述>
 */
@Component
@ConfigurationProperties
public class ConfigEntity {
    private String name;
    private  String[] address;

    public ConfigEntity() {
    }

    public ConfigEntity(String name, String[] address) {
        this.name = name;
        this.address = address;
    }

    public String getName() {
        return name;
    }

    public void setName(String name) {
        this.name = name;
    }

    public String[] getAddress() {
        return address;
    }

    public void setAddress(String[] address) {
        this.address = address;
    }

    @Override
    public String toString() {
        return "ConfigEntity{" +
                "name='" + name + '\'' +
                ", address=" + Arrays.toString(address) +
                '}';
    }
}
写这个注解会出现红色的提示,不影响,但是不好看,可以去掉

点进去,将其中的依赖加上。
<dependency>
    <groupId>org.springframework.bootgroupId>
    <artifactId>spring-boot-configuration-processorartifactId>
    <optional>trueoptional>
dependency>
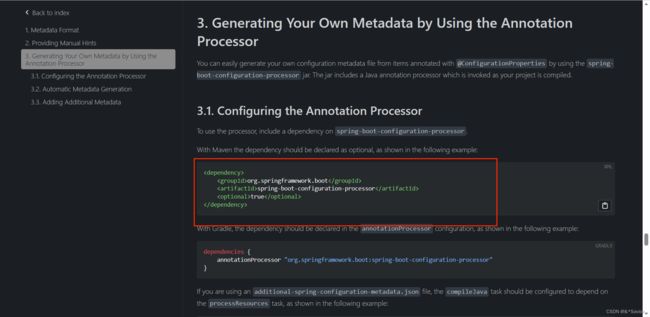
此时,再回去看时就没有了。
在controller中创建这个对象,即可获取其中的数据。
package com.itzhh.controller;

import com.itzhh.entity.ConfigEntity;
import org.springframework.beans.factory.annotation.Autowired;
import org.springframework.beans.factory.annotation.Value;
import org.springframework.core.env.Environment;
import org.springframework.web.bind.annotation.RequestMapping;
import org.springframework.web.bind.annotation.RestController;

import java.util.Arrays;

/**
 * @author: zhh
 * @date: 2023-04-16 18:35
 * @description: <描述>
 */
@RestController
public class DemoController {


  @Autowired
  private ConfigEntity configEntity;


    @RequestMapping("/demo4")
    public String demo4() {
        System.out.println(configEntity.getName());
        Arrays.asList(configEntity.getAddress()).stream()
                .forEach(System.out::println);
        return "demo4";
    }
}
profile
我们在开发Spring Boot应用时,通常同一套程序会被安装到不同环境,比如:开发、测试、生产等。其中数据库地址、服务器端口等等配置都不同,如果每次打包时,都要修改配置文件,那么非常麻烦。profile功能就是来进行动态配置切换的。
profile配置方式
多profile文件方式
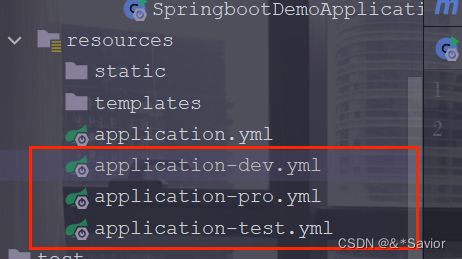
- application-dev.properties/yml 开发环境
- application-test.properties/yml 测试环境
- application-pro.properties/yml 生产环境
yml多文档方式
- 在yml中使用 — 分隔不同配置
---

server:
  port: 8081

spring:
  profiles: dev
---

server:
  port: 8082

spring:
  profiles: test
---
server:
  port: 8083

spring:
  profiles: pro
---
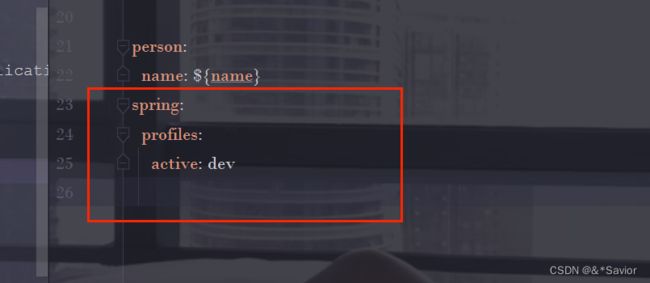
spring:
  profiles:
    active: dev
profile激活方式
-
虚拟机参数:在VM options 指定:
-Dspring.profiles.active=dev
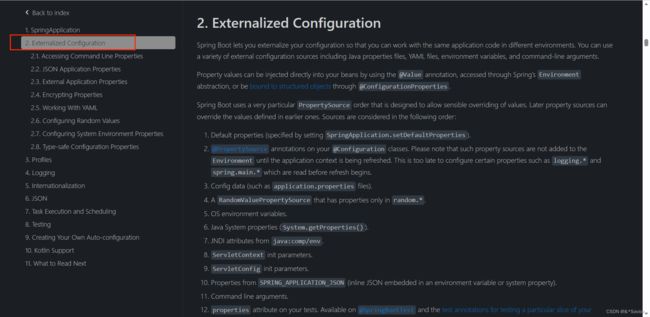
内部配置加载顺序
Springboot程序启动时,会从以下位置加载配置文件:
- file:./config/:当前项目下的/config目录下
- file:./ :当前项目的根目录
- classpath:/config/:classpath的/config目录
- classpath:/ :classpath的根目录
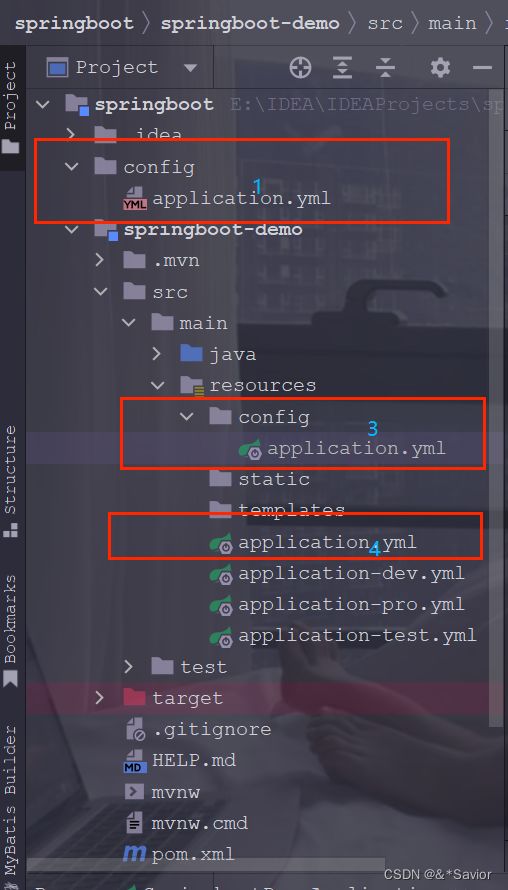
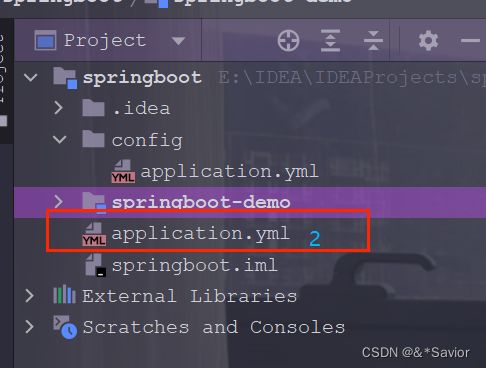
加载顺序为上文的排列顺序,高优先级配置的属性会生效
外部配置加载顺序
整合其它框架
整合Junit
- 一般测试内容为service代码,所以先编写一段用来测试
- 接着加入相关依赖,并写测试类。主要两个注解
@RunWith(SpringRunner.class) @SpringBootTest(classes = SpringbootDemoApplication.class)
package com.itzhh;

import com.itzhh.service.DemoService;
import org.junit.Test;
import org.junit.runner.RunWith;
import org.springframework.beans.factory.annotation.Autowired;
import org.springframework.boot.test.context.SpringBootTest;
import org.springframework.test.context.junit4.SpringRunner;

/**
 * @author: zhh
 * @date: 2023-04-16 22:03
 * @description: <描述>
 */
@RunWith(SpringRunner.class)
@SpringBootTest(classes = SpringbootDemoApplication.class)
public class DemoServiceTest {

    @Autowired
    private DemoService demoService;

    @Test
    public void test(){
        demoService.test1();
    }
}
整合mybatis
主要加上相关依赖和配置datasource,这个我之前在mybatis-plus中有,都差不多,这边不记录了。具体可以看mybatis-plus1
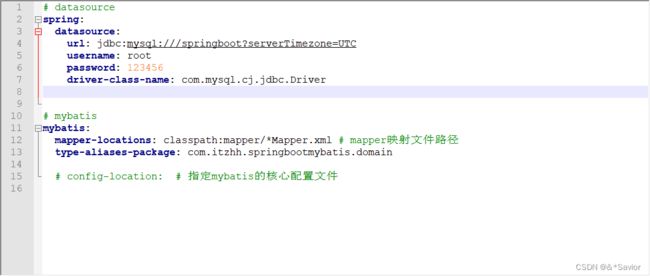
依赖主要有:
    <dependencies>
        <dependency>
            <groupId>org.mybatis.spring.bootgroupId>
            <artifactId>mybatis-spring-boot-starterartifactId>
            <version>2.1.0version>
        dependency>

        <dependency>
            <groupId>mysqlgroupId>
            <artifactId>mysql-connector-javaartifactId>

        dependency>
        <dependency>
            <groupId>org.springframework.bootgroupId>
            <artifactId>spring-boot-starter-testartifactId>
            <scope>testscope>
        dependency>
    dependencies>
整合Redis
主要依赖:
     <dependency>
            <groupId>org.springframework.bootgroupId>
            <artifactId>spring-boot-starter-data-redisartifactId>
        dependency>

        <dependency>
            <groupId>org.springframework.bootgroupId>
            <artifactId>spring-boot-starter-testartifactId>
            <scope>testscope>
        dependency>
        <dependency>
            <groupId>junitgroupId>
            <artifactId>junitartifactId>
            <scope>testscope>
        dependency>
    dependencies>
application.yml 由于是本机安装的redis环境,这边这个可以不配置,都是默认值
spring:
  redis:
    host: 127.0.0.1 # redis的主机ip
    port: 6379
双击启动,附redis,直接下载解压即可。
链接:https://pan.baidu.com/s/1CdyZvRnb_46lH9DSPJWHyA 提取码:1111
package com.itzhh;

import org.junit.jupiter.api.Test;
import org.junit.runner.RunWith;
import org.springframework.beans.factory.annotation.Autowired;
import org.springframework.boot.test.context.SpringBootTest;
import org.springframework.data.redis.core.RedisTemplate;
import org.springframework.test.context.junit4.SpringRunner;

@RunWith(SpringRunner.class)
@SpringBootTest
class SpringbootRedisApplicationTests {

    @Autowired
    private RedisTemplate redisTemplate;

    @Test
    public void testSet() {
        //存入数据
        redisTemplate.boundValueOps("name").set("zhangsan");
    }

    @Test
    public void testGet() {
        //获取数据
        Object name = redisTemplate.boundValueOps("name").get();
        System.out.println(name);
    }

}
小结与彩蛋
上面所写基本上算是一个springboot的小入门,有了SSM的基础,再结合我上面所写,基本上也能够实现一个完整的springboot的项目,不过,springboot在版本这方面需要考虑周全,包括IDEA、Maven、SpringBoot的版本需要合适才行,不然会有很多问题。
另外,这边给个彩蛋。每次启动springboot的项目都会有一个spring的图像,这个是可以改的,在resources下添加一个banner.txt,将需要展示的图像写在其中重新启动即可。这个给一个可以生成图像的网址:banner生成器
添加完后就可以像下面这样了。

