牛客社区项目
创建项目
认识Spring
Spring Ioc
- Inversion 偶发Control
- 控制反转,是一种面向对象的设计思想。
- Dependecy Injection
- 依赖注入,是Ioc思想的实现方式。
- Ioc Container
- Ioc容器,是实现依赖注入的关键,本质上是一个工厂。
下面通过单元测试来认识上面提到的内容:
默认打开测试类是这样的——
当我们想要测试某个bean的时候,只需要给测试类添加上@ContenxtConfiguration注解来标注我们想要导入这个测试类的某些bean,详见@ContextConfiguration的用法_Kevin_Darcy的博客-CSDN博客
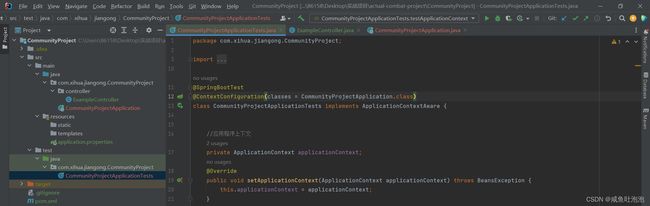
ApplicationContextAware:Aware接口的Bean在被初始化之后,可以获取到一些相对应的资源,Aware接口本身并不具备什么功能,一般用于子类继承后,Spring上下文初始化bean的时候对这个bean传入需要的资源。当一个类实现了ApplicationContextAware之后,这个类就能够得到ApplicationContext中的全部bean,换句话说,就是这个类能够直接获取spring配置文件中全部的bean对象。
当测试的接口被两个类同时实现时,若不处理的话会报异常,这个时候有两种做法:
一:在其中一个实现类上面加上@Primary注解
@Repository
@Primary
public class ExampleDaoMyBatis implements ExampleDao{
    @Override
    public String select() {
        return "MyBatis";
    }
}
二:在注解中给实现类起名字,然后通过类名来访问
@Repository("ExampleDaoBibernate")
public class ExampleDaoBibernate implements ExampleDao{
    @Override
    public String select() {
        return "hIbernate";
    }
}
applicationContext.getBean("ExampleDaoBibernate", ExampleDao.class);当需要在Spring中使用别人写的类的时候,只需要将这个类配置到Spring中即可:
@Configuration
public class ExampleConfig {
    @Bean
    public SimpleDateFormat simpleDateFormat(){
        return new SimpleDateFormat("yyyy-MM-dd HH:mm:ss");
    }
}
@Test
public void testBeanConfig(){
System.out.println(applicationContext.getBean(SimpleDateFormat.class).format(new Date()));
}认识Spring MVC
请求数据的两种方法
通过?
    //GET请求
    //  /student?current=1&limit=20
    @RequestMapping(path = "/students",method = RequestMethod.GET)
    @ResponseBody
    public String getStudents(
            @RequestParam(name = "current",required = false,defaultValue = "1") int Current,
            @RequestParam(name = "limit",required = false,defaultValue = "10") int Limit) {
        System.out.println(Current);
        System.out.println(Limit);
        return "some student";
    }
@RequestParam注解中的name是指将前端中current的值传递给后端Current中,required默认为true表示前端必须传递值,如果不穿就会报错,因为我们不知道前端是否要传递值,所以改为false,同时如果前端没有传递值,那么我们就设定一个默认值作为前端传递的值。
通过/
    //  /student/123
    @RequestMapping(path = "/student/{id}",method = RequestMethod.GET)
    @ResponseBody
    public String getStudent(@PathVariable("id") int id){
        System.out.println(id);
        return "a student";
    }
上面的这种方式是Restful风格的写法
响应数据的各种方式
返回属性
增加学生
    //POST请求
    @RequestMapping(path = "/student",method = RequestMethod.POST)
    @ResponseBody
    public String saveStudent(String name,int age){
        System.out.println(name);
        System.out.println(age);
        return "success";
    }
返回HTML页面
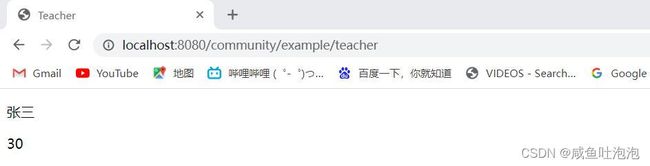
    //响应HTML数据
    @RequestMapping(path = "/teacher",method = RequestMethod.GET)
    public ModelAndView getTeacher(){
        ModelAndView modelAndView = new ModelAndView();
        modelAndView.addObject("name","张三");
        modelAndView.addObject("age",30);
        modelAndView.setViewName("/demo/view");
        return modelAndView;
} 
另外一种方式:
    @RequestMapping(path = "/school",method = RequestMethod.GET)
    public String getSchool(Model model){
        model.addAttribute("name","西华大学");
        model.addAttribute("age",80);
        return "/demo/view";
    }
返回JSON数据
    @RequestMapping(path = "/emp",method = RequestMethod.GET)
    @ResponseBody
    public Map getEmp(){
        Map emp = new HashMap<>();
        emp.put("name","张三");
        emp.put("age",23);
        emp.put("salary",9000);
        return emp;
    }
@RequestMapping(path = "/emps",method = RequestMethod.GET)
@ResponseBody
public List> getEmps(){
List> list = new ArrayList<>();
Map emp = new HashMap<>();
emp.put("name","张三");
emp.put("age",23);
emp.put("salary",9000);
list.add(emp);
emp.put("name","李四");
emp.put("age",24);
emp.put("salary",9300);
list.add(emp);
emp.put("name","王五");
emp.put("age",25);
emp.put("salary",8000);
list.add(emp);
return list;
} 注册功能
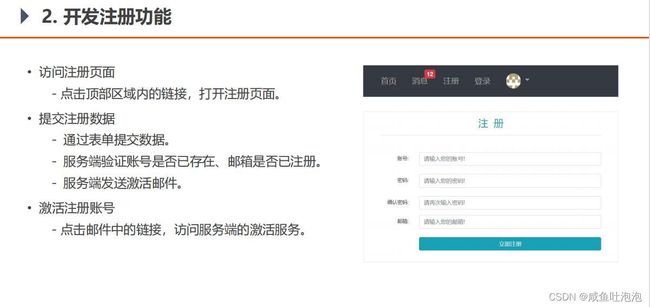
访问注册页面
@Controller
public class LoginController {
    @RequestMapping(path = "/register",method = RequestMethod.GET)
    public String getRegisterPage(){
        return "/site/register";
    }
}
提交注册数据
为了判断字符串和集合中的数据是否为空方便后面编程的需要,需要导入一个包:
			org.apache.commons
			commons-lang3
			3.9
因为注册的时候需要发送邮件,邮件中需要激活链接,这个链接就需要链接到本机地址,所以需要在配置文件中自定义配置本机地址:
community.path.domain=http://localhost:8080为了注册页面生成随机激活码和后面上传头像和设置密码,需要封装一个工具类:
public class CoumunityUtil {

    //生成随机字符串
    public static String generateUUID(){
        return UUID.randomUUID().toString().replace("-","");
    }

    /**
     * MD5加密
     * hello —> abc123def456
     * hello + 3e4a8 -> abc123def456abc
     * @param key
     * @return
     */
    public static String md5(String key){
        if(StringUtils.isBlank(key)){
            return null;
        }
        /**
         * 作用:将传入的值加密成十六进制的字符串返回
         * DigestUtils是Spring自带的工具类
         */
        return DigestUtils.md5DigestAsHex(key.getBytes());
    }
}
业务层:
@Service
public class UserService{

    @Autowired
    private UserMapper userMapper;

    @Autowired
    private TemplateEngine templateEngine;

    @Autowired
    private MailClient mailClient;

    @Value("${community.path.domain}")
    private String domain;

    @Value("${server.servlet.context-path}")
    private String contextPath;

    public Map register(User user) throws IllegalAccessException {
        Map map = new HashMap<>();

        //空值处理
        if(user == null){
            throw new IllegalAccessException("参数不能为空");
        }

        if(StringUtils.isBlank(user.getUsername())){
            map.put("usernameMsg","账号不能为空!");
            return map;
        }
        if(StringUtils.isBlank(user.getPassword())){
            map.put("passwordMsg","密码不能为空!");
            return map;
        }
        if(StringUtils.isBlank(user.getEmail())){
            map.put("emailMsg","邮箱不能为空!");
            return map;
        }

        //验证账号
        User u = userMapper.selectByName(user.getUsername());
        if(u != null){
            map.put("usernameMsg","该账号已存在!");
            return map;
        }
        User e = userMapper.selectByEmail(user.getEmail());
        if(e != null){
            map.put("emailMsg","该邮箱已被注册!");
            return map;
        }

        //注册用户
        user.setSalt(CoumunityUtil.generateUUID().substring(0,5));
        user.setPassword(CoumunityUtil.md5(user.getPassword()) + user.getSalt());
        user.setType(0);
        user.setStatus(0);
        user.setActivationCode(CoumunityUtil.generateUUID());
        user.setHeaderUrl(String.format("http://images.nowcoder.com/head/%dt.png", new Random().nextInt(1000)));
        user.setCreateTime(new Date());
        userMapper.insertUser(user);


        //激活邮件
        Context context = new Context();
        context.setVariable("email",user.getEmail());
        // http://localhost:8080/community/activation/101/code
        String url = domain + contextPath + "/activation/" + user.getId() + "/" + user.getActivationCode();
        context.setVariable("url",url);
        String content = templateEngine.process("/mail/activation", context);
        mailClient.sendMail(user.getEmail(),"激活账号",content);

        return map;
    }
}
控制层:
@Controller
public class LoginController{

    @Autowired
    private UserService userService;

    @RequestMapping(path = "/register",method = RequestMethod.POST)
    public String register(Model model, User user) throws IllegalAccessException {
        Map map = userService.register(user);
        if(map == null || map.isEmpty()){
            model.addAttribute("msg","注册成功,我们已经向你的邮箱发送了一封激活邮件,请尽快激活");
            model.addAttribute("target","/index");
            return "/site/operate-result";
        }else {
            model.addAttribute("usernameMsg",map.get("usernameMsg"));
            model.addAttribute("passwordMsg",map.get("passwordMsg"));
            model.addAttribute("emailMsg",map.get("emailMsg"));
            return "/site/register";
        }
    }

}
激活注册账号
为了判断邮件的注册状态需要封装一个激活状态类:
public interface ActiveStatus {
    /**
     * 激活成功
     */
    int ACTIVE_SUCCESS = 0;

    /**
     * 重复激活
     */
    int ACTIVE_REPEAT = 1;

    /**
     * 激活失败
     */
    int ACTIVE_FAILURE = 2;
}
业务层:
@Service
public class UserService implements ActiveStatus {

    @Autowired
    private UserMapper userMapper;

    public int activetion(int userId,String code){
        User user = userMapper.selectById(userId);
        System.out.println(user.getStatus());
        if(user.getStatus() == 1){
            return ACTIVE_REPEAT;
        } else if (user.getActivationCode().equals(code)) {
            userMapper.updateStatus(userId,1);
            return ACTIVE_SUCCESS;
        }else{
            return ACTIVE_FAILURE;
        }
    }
}
控制层:
@Controller
public class LoginController implements ActiveStatus {

    @Autowired
    private UserService userService;

    @RequestMapping(path = "/activation/{userId}/{code}",method = RequestMethod.GET)
    public String activetion(Model model, @PathVariable("userId") int userId,@PathVariable("code") String code){
        int result = userService.activetion(userId, code);
        System.out.println(result);
        if(result == ACTIVE_SUCCESS){
            model.addAttribute("msg","激活成功,你的账号已经可以正常使用了!");
            model.addAttribute("target","/login");
        } else if (result == ACTIVE_REPEAT) {
            model.addAttribute("msg","无效操作,该账号已经激活过了!");
            model.addAttribute("target","/index");
        }else{
            model.addAttribute("msg","激活失败,你提供的激活码不正确!");
            model.addAttribute("target","/index");
        }
        return "/site/operate-result";
    }

    @RequestMapping(path = "/login",method = RequestMethod.GET)
    public String login(){
        return "/site/login";
    }
}
登录页面生成验证码功能
生成验证码需要一个工具Kaptcha
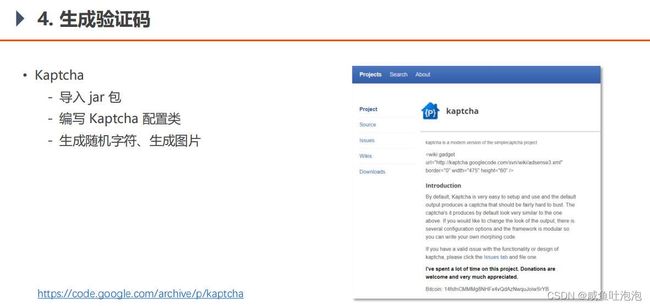
导入jia包:
			com.github.penggle
			kaptcha
			2.3.2
编写Kaptcha配置类:
@Configuration
public class KaptchaConfig {
    @Bean
    public Producer DefaultKaptcha(){
        Properties properties = new Properties();
        properties.setProperty("kaptcha.image.width","100");
        properties.setProperty("kaptcha.image.height","40");
        properties.setProperty("kaptcha.textproducer.font.size","32");
        properties.setProperty("kaptcha.textproducer.font.color","0,0,0");
        properties.setProperty("kaptcha.textproducer.char.string","0123456789ABCDEFGHIJKLMNOPQRSTUVWXYZ");
        properties.setProperty("kaptcha.textproducer.char.length","4");
        properties.setProperty("kaptcha.noise.impl","com.google.code.kaptcha.impl.NoNoise");
        DefaultKaptcha kaptcha = new DefaultKaptcha();
        Config config = new Config(properties);
        kaptcha.setConfig(config);
        return kaptcha;
    }
}
上面将Kaptcha包里面的Producer类装配到Spring容器中,Producer是一个接口,它里面就两个方法createImage(根据提供的文字生成图片)方法和createText(生成文字)方法:
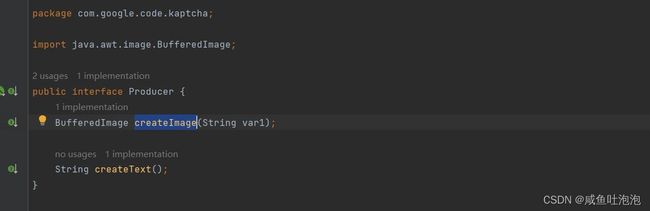
DefaultKaptcha是Producer的实现类,它里面就有上面提到的两个方法,但是里面的参数配置比较麻烦,为了实现我们的目的,我们需要自己写一个配置 ,所以需要将配置类Properties对象创建出来,在里面写我们的逻辑,然后配置文件需要装配,所以创建出装配类Congif。最后再使用DefaultKaptcha里面的setConfig方法将配置对象穿进去,将我们的配置加入到Producer配置文件中。关于配置类Properties和装配类Config可以看下面这两篇文章。
(8条消息) Properties类的用法总结_源码复兴号的博客-CSDN博客
(8条消息) 独家解读:简单又强大的配置文件 Config 读写类_config类_曾经去过跨越一个小时的地方的博客-CSDN博客生成随机字符串生成图片
@Controller
public class LoginController implements ActiveStatus {
    @Autowired
    private Producer defaultKaptcha;

    @RequestMapping(path = "/kaptcha",method = RequestMethod.GET)
    public void generateKaptcha(HttpServletResponse response, HttpSession session){
        //生成字符串
        String text = defaultKaptcha.createText();
        //生成图片
        BufferedImage image = defaultKaptcha.createImage(text);
        //将text存储到session中
        session.setAttribute("Kaptcha",text);

        //将图片输出给浏览器
        response.setContentType("image/png");
        try {
            OutputStream outputStream = response.getOutputStream();
            ImageIO.write(image,"png",outputStream);
        } catch (IOException e) {
            throw new RuntimeException(e);
        }
    }
}
开发登录、退出功能
开发功能
因为登录页面有一个记住我功能,是否勾选它的设定缓存时间是不同的,所以需要把他们设置到常量中:
    /**
     * 设置默认登陆状态的超时时间
     */
    int DEFAULT_EXPIRED_SECONDS = 3600 * 12;

    /**
     * 设置勾选记住我状态登录凭证的超时时间
     */
    int REMEMBER_EXPIRED_SECONDS = 3600 * 24 * 100;
dao层:
@Mapper
public interface LoginTicketMapper {
@Insert({
"insert into login_ticket(user_id,ticket,status,expired) ",
"values(#{userId},#{ticket},#{status},#{expired})"
})
@Options(useGeneratedKeys = true,keyProperty = "id") //表示如果插入的表id以自增列为主键,则允许 JDBC 支持自动生成主键,并可将自动生成的主键id返回。 useGeneratedKeys参数只针对 insert 语句生效,默认为 false
int insertLoginTicket(LoginTicket loginTicket);
@Select({
"select id,user_id,ticket,status,expired ",
"from login_ticket where ticket=#{ticket}"
})
LoginTicket selectByTicket(String ticket);
@Update({
""
})
int updateStatus(String ticket,int status);
}上面注意一点自增主键的设置:
@Options(useGeneratedKeys = true,keyProperty = "id") //表示如果插入的表id以自增列为主键,则允许 JDBC 支持自动生成主键,并可将自动生成的主键id返回。 useGeneratedKeys参数只针对 insert 语句生效,默认为 false业务层:
@Service
public class UserService implements CommunityConstant {

    @Autowired
    private UserMapper userMapper;

    @Autowired
    private LoginTicketMapper loginTicketMapper;

    @Value("${server.servlet.context-path}")
    private String contextPath;

    public Map login(String username,String password,int expiredSeconds){
        Map map = new HashMap<>();
        //验证账号是否为空
        if(StringUtils.isBlank(username)){
            map.put("usernameMsg","账号不能为空");
            return map;
        }
        //验证密码是否为空
        if(StringUtils.isBlank(password)){
            map.put("passwordMsg","密码不能为空");
            return map;
        }

        //验证账号是否存在
        User user = userMapper.selectByName(username);
        if(user==null){
            map.put("usernameMsg","该账号不存在");
            return map;
        }
        //验证密码是否正确
        password = CoumunityUtil.md5(password + user.getSalt());
        if(!user.getPassword().equals(password)){
            map.put("passwordMsg","密码不正确");
            return map;
        }
        //验证激活状态
        if(user.getStatus()==0){
            map.put("usernameMsg","该账号未激活");
            return map;
        }

        //生成登录凭证
        LoginTicket loginTicket = new LoginTicket();
        loginTicket.setUserId(user.getId());
        loginTicket.setTicket(CoumunityUtil.generateUUID());
        loginTicket.setStatus(0);
        loginTicket.setExpired(new Date(System.currentTimeMillis() + expiredSeconds * 1000));
        loginTicketMapper.insertLoginTicket(loginTicket);

        map.put("ticket",loginTicket.getTicket());
        return map;
    }
}
控制层:
@Controller
public class LoginController implements CommunityConstant {

    @Autowired
    private UserService userService;

    @RequestMapping(path = "/login",method = RequestMethod.POST)
    public String login(String username,String password,String code,
                                    boolean rememberme,Model model,HttpSession session,HttpServletResponse response){
        //检查验证码是否正确
        String kaptcha = (String) session.getAttribute("Kaptcha");
        if(StringUtils.isBlank(kaptcha) || StringUtils.isBlank(code) || !kaptcha.equalsIgnoreCase(code)){
            model.addAttribute("codeMsg","验证码不正确");
            return "/site/login";
        }
        //检查账号密码是否正确
        int expiredSeconds = rememberme ? REMEMBER_EXPIRED_SECONDS : DEFAULT_EXPIRED_SECONDS;
        Map map = userService.login(username, password, expiredSeconds);
        if(map.containsKey("ticket")){
            Cookie cookie = new Cookie("ticket", map.get("ticket").toString());
            cookie.setPath(contextPath);
            cookie.setMaxAge(expiredSeconds);
            response.addCookie(cookie);
            return "redirect:/index";
        }else{
            model.addAttribute("usernameMsg",map.get("usernameMsg"));
            model.addAttribute("passwordMsg",map.get("passwordMsg"));
            return "/site/login";
        }
    }
}
退出功能
业务层:
@Service
public class UserService implements CommunityConstant {
    @Autowired
    private LoginTicketMapper loginTicketMapper;

    public void logout(String ticket){
        loginTicketMapper.updateStatus(ticket, 1);
    }
}
控制层:
@Controller
public class LoginController implements CommunityConstant {
    @Autowired
    private UserService userService;

    @RequestMapping(path = "/logout",method = RequestMethod.GET)
    public String logout(@CookieValue("ticket") String ticket){
        userService.logout(ticket);
        return "redirect:/login";
    }
}
显示登录信息功能
页面要根据用户的登陆状态显示不同的信息,比如用户登陆以后页面中的导航栏就只能显示首页、消息、个人中心等功能键。用户未登录就要显示首页、注册、登录等功能。为了显示这样的就需要实现拦截器功能来判断用户的登录状态。之前在用户登录的业务里面当用户登录以后我们会给浏览器一个ticket,所以只要通过这个ticket凭证就能判断用户是否登录。
业务大致流程:
拦截器和拦截规则的示例
@Component
public class AlphaInterceptor implements HandlerInterceptor {

    private static final Logger logger = LoggerFactory.getLogger(AlphaInterceptor.class);

    //在Controller之前执行
    @Override
    public boolean preHandle(HttpServletRequest request, HttpServletResponse response, Object handler) throws Exception {
        logger.debug("preHandle:" + handler.toString());
        return true;
    }

    //在Controller之后执行
    @Override
    public void postHandle(HttpServletRequest request, HttpServletResponse response, Object handler, ModelAndView modelAndView) throws Exception {
        logger.debug("postHandle:" + handler.toString());
    }

    //在TemplateEngin之后执行
    @Override
    public void afterCompletion(HttpServletRequest request, HttpServletResponse response, Object handler, Exception ex) throws Exception {
        logger.debug("afterCompletion" + handler.toString());
    }
}
@Configuration
public class WebMvcConfig implements WebMvcConfigurer {
@Autowired
private AlphaInterceptor alphaInterceptor;
@Override
public void addInterceptors(InterceptorRegistry registry) {
registry.addInterceptor(alphaInterceptor)
.excludePathPatterns("/**/*.css","/**/*.js","/**/*.png","/**/*.jpg","/**/*.jpeg")
.addPathPatterns("/register","/login");
}
}配置拦截器和拦截规则
@Component
public class HostHolder {
    private ThreadLocal users = new ThreadLocal<>();

    public void setUsers(User user){
        users.set(user);
    }

    public User getUser(){
        return users.get();
    }

    public void clear(){
        users.remove();
    }

}
public class CookieUtil {
public static String getValue(HttpServletRequest request,String name) throws IllegalAccessException {
if(request==null || name == null){
throw new IllegalAccessException("参数为空!");
}
Cookie[] cookies = request.getCookies();
if(cookies != null){
for (Cookie cookie: cookies
) {
if(cookie.getName().equals(name)){
return cookie.getValue();
}
}
}
return null;
}
}@Component
public class LoginInterceptor implements HandlerInterceptor {
@Autowired
private HostHolder hostHolder;
@Autowired
private UserService userService;
@Override
public boolean preHandle(HttpServletRequest request, HttpServletResponse response, Object handler) throws Exception {
//从cookie中获取凭证
String ticket = CookieUtil.getValue(request, "ticket");
if(ticket != null){
//查询凭证
LoginTicket loginTicket = userService.selectByTicket(ticket);
//检验凭证是否有效
if(loginTicket != null && loginTicket.getStatus() == 0 && loginTicket.getExpired().after(new Date())){
//根据凭证查询用户
User user = userService.findUserById(loginTicket.getUserId());
//在本次请求中持有用户
hostHolder.setUsers(user);
}
}
return true;
}
@Override
public void postHandle(HttpServletRequest request, HttpServletResponse response, Object handler, ModelAndView modelAndView) throws Exception {
User user = hostHolder.getUser();
if(user != null && modelAndView != null){
modelAndView.addObject("loginUser",user);
}
}
@Override
public void afterCompletion(HttpServletRequest request, HttpServletResponse response, Object handler, Exception ex) throws Exception {
hostHolder.clear();
}
}@Configuration
public class WebMvcConfig implements WebMvcConfigurer {
@Autowired
private LoginInterceptor loginInterceptor;
@Override
public void addInterceptors(InterceptorRegistry registry) {
registry.addInterceptor(loginInterceptor)
.excludePathPatterns("/**/*.css","/**/*.js","/**/*.png","/**/*.jpg","/**/*.jpeg");
}
}@Service
public class UserService implements CommunityConstant {
@Autowired
private LoginTicketMapper loginTicketMapper;
public LoginTicket selectByTicket(String ticket){
return loginTicketMapper.selectByTicket(ticket);
}
}
实现上传文件和修改密码功能
访问账号设置页面
@Controller
@RequestMapping("/user")
public class UserController {
    @RequestMapping(path = "/setting",method = RequestMethod.GET)
    public String getSettingPage(){
        return "/site/setting";
    }
}
上传头像和获取头像
#配置上传头像要到的文件路径
community.path.upload=C:/Users/86158/Pictures/headerImage
#配置Spring中文件上传的的上限
spring.servlet.multipart.maxFileSize=10MB
spring.servlet.multipart.maxRequestSize=20MB
@Controller
@RequestMapping("/user")
public class UserController {
private static final Logger logger = LoggerFactory.getLogger(UserController.class);
@Value("${community.path.upload}")
private String uploadPath;
@Value("${community.path.domain}")
private String domain;
@Value("${server.servlet.context-path}")
private String contextPath;
@Autowired
private UserService userService;
@Autowired
private HostHolder hostHolder;
@RequestMapping(path = "/setting",method = RequestMethod.GET)
public String getSettingPage(){
return "/site/setting";
}
@RequestMapping(path = "/upload",method = RequestMethod.POST)
public String uploadHeader(MultipartFile headerImage, Model model){
if(headerImage==null){
model.addAttribute("error","你还没有选择图片");
return "/site/setting";
}
String fileName = headerImage.getOriginalFilename();
String suffix = fileName.substring(fileName.lastIndexOf("."));
if(StringUtils.isBlank(suffix)){
model.addAttribute("error","文件格式不正确!");
return "/site/setting";
}
//生成随机文件名
fileName = CoumunityUtil.generateUUID() + suffix;
//确定文件存放的路径
File dest = new File(uploadPath + "/" + fileName);
try {
headerImage.transferTo(dest);
} catch (IOException e) {
logger.error("上传文件失败: " + e.getMessage());
throw new RuntimeException("上传文件失败,服务器发生异常!",e);
}
//更新当前用户的头像的路径(web访问路径)
// http://localhost:8080/community/user/header/xxx.png
User user = hostHolder.getUser();
String headerUrl = domain + contextPath + "/user/header/" + fileName;
userService.updateHeader(user.getId(),headerUrl);
return "redirect:/index";
}
@RequestMapping(path = "/header/{fileName}",method = RequestMethod.GET)
public void getHeader(@PathVariable("fileName") String fileName, HttpServletResponse response){
//服务器存储路径
fileName = uploadPath + "/" + fileName;
//文件后缀
String suffix = fileName.substring(fileName.lastIndexOf("."));
//响应图片
response.setContentType("image/" + suffix);
try(
FileInputStream fis = new FileInputStream(fileName);
ServletOutputStream os = response.getOutputStream();
) {
byte[] buffer = new byte[1024];
int b = 0;
while((b = fis.read(buffer)) != -1){
os.write(buffer,0,b);
}
} catch (IOException e) {
logger.error("读取头像失败: " + e.getMessage());
}
}
}@Service
public class UserService implements CommunityConstant {
@Autowired
private UserMapper userMapper;
public int updateHeader(int userId,String headerUrl){
return userMapper.updateHeader(userId, headerUrl);
}
}修改密码
业务层:
@Service
public class UserService implements CommunityConstant {
    @Autowired
    private UserMapper userMapper;

    public Map updatePassword(User user,String prePassword,String curPassword,String repeatPassword){
        Map map = new HashMap<>();
        //判断旧密码是否为空
        if(StringUtils.isBlank(prePassword)){
            map.put("prePasswordMsg","原先密码不能为空");
            return map;
        }
        //判断新密码是否为空
        if(StringUtils.isBlank(curPassword)){
            map.put("curPasswordMsg","新密码不能为空");
            return map;
        }
        //判断新密码和旧密码是否相同
        if(prePassword.equals(curPassword)){
            map.put("curPasswordMsg","新密码不能和旧密码相同");
            return map;
        }
        //判断新密码和重复密码是否一致
        if(!curPassword.equals(repeatPassword)){
            map.put("repeatPasswordMsg","重复密码与新密码不一致");
            return map;
        }
        //执行更新密码
        String password = CoumunityUtil.md5(curPassword+user.getSalt());
        int result = userMapper.updatePassword(user.getId(), password);
        if(result != 1){
            map.put("curPasswordMsg","更新密码失败");
            return map;
        }
        return map;
    }
}
控制层:
@Controller
@RequestMapping("/user")
public class UserController {
    private static final Logger logger = LoggerFactory.getLogger(UserController.class);
    @Autowired
    private UserService userService;

    @Autowired
    private HostHolder hostHolder;

    @RequestMapping(path = "/modify/password",method = RequestMethod.POST)
    public String modifyPassword(Model model, String prePassword, String curPassword,String repeatPassword){
        User user = hostHolder.getUser();
        Map map = new HashMap<>();
        map = userService.updatePassword(user,prePassword,curPassword,repeatPassword);
        if(!map.isEmpty()){
            model.addAttribute("prePasswordMsg",map.get("prePasswordMsg"));
            model.addAttribute("curPasswordMsg",map.get("curPasswordMsg"));
            model.addAttribute("repeatPasswordMsg",map.get("repeatPasswordMsg"));
            return "/site/setting";
        }else{
            return "redirect:/login";
        }
    }
}
检查登录状态
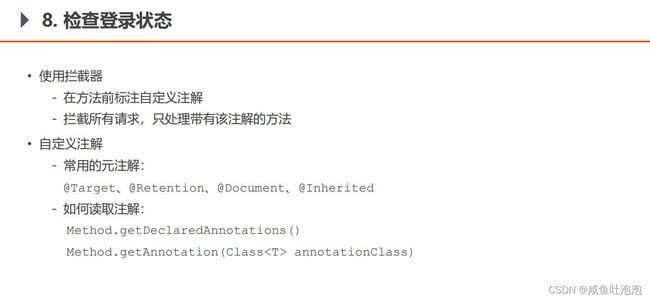
上面常用的元注解的含义:
@Target注解用于描述注解的使用范围,也就是描述注解可以用在什么地方,它可以作用在——
@Target(ElementType.TYPE)——接口、类、枚举、注解
@Target(ElementType.FIELD)——字段、枚举的常量
@Target(ElementType.METHOD)——方法
@Target(ElementType.PARAMETER)——方法参数
@Target(ElementType.CONSTRUCTOR) ——构造函数
@Target(ElementType.LOCAL_VARIABLE)——局部变量
@Target(ElementType.ANNOTATION_TYPE)——注解
@Target(ElementType.PACKAGE)——包,用于记录java文件的package信息
@Retention注解用来描述注解的生命周期
@Retention 注解传入的是 RetentionPolicy 枚举,该枚举有三个常量,分别是 SOURCE、CLASS 和 RUNTIME
三者区别如下:
SOURCE 代表着注解仅保留在源级别中,编译器将Java文件编译成class文件时将之遗弃。
CLASS 代表着注解被保留在class文件中,JVM加载class文件时将之遗弃。
RUNTIME 代表着标记的注解会由JVM保留,因此运行时环境可以使用它。
@Document注解表示是否开启日志文件
@Inherited注解表示是否继承
因为在业务中有很多方法需要在用户未登录的情况下进行拦截,所以为了方便只需要在需要进行拦截的方法上面加上自定义的拦截注解即可,所以我们需要编制自定义的注解:
@Target(ElementType.METHOD)
@Retention(RetentionPolicy.RUNTIME)
public @interface LoginRequired {

}
在获取设置页面和上传头像两个功能上面加上自定义注解

然后配置拦截器和拦截规则
@Component
public class LoginRequiredInterceptor implements HandlerInterceptor {

    @Autowired
    private HostHolder hostHolder;

    @Override
    public boolean preHandle(HttpServletRequest request, HttpServletResponse response, Object handler) throws Exception {
        if(handler instanceof HandlerMethod){
            HandlerMethod handlerMethod = (HandlerMethod) handler;
            Method method = handlerMethod.getMethod();
            LoginRequired annotation = method.getAnnotation(LoginRequired.class);
            if(annotation != null && hostHolder.getUser() == null){
                response.sendRedirect(request.getContextPath() + "/login");
                return false;
            }
        }
        return true;
    }
}
@Configuration
public class WebMvcConfig implements WebMvcConfigurer {
@Autowired
private LoginRequiredInterceptor loginRequiredInterceptor;
@Override
public void addInterceptors(InterceptorRegistry registry) {
registry.addInterceptor(loginRequiredInterceptor)
.excludePathPatterns("/**/*.css","/**/*.js","/**/*.png","/**/*.jpg","/**/*.jpeg");
}
}过滤敏感词
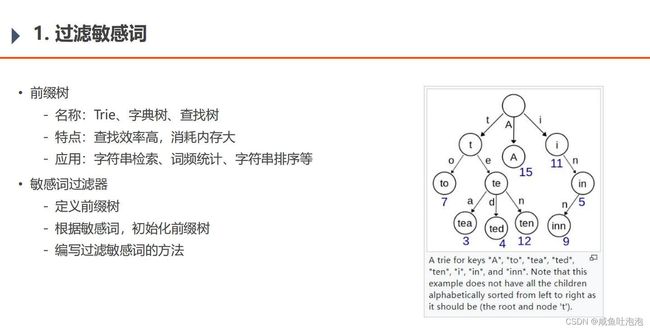
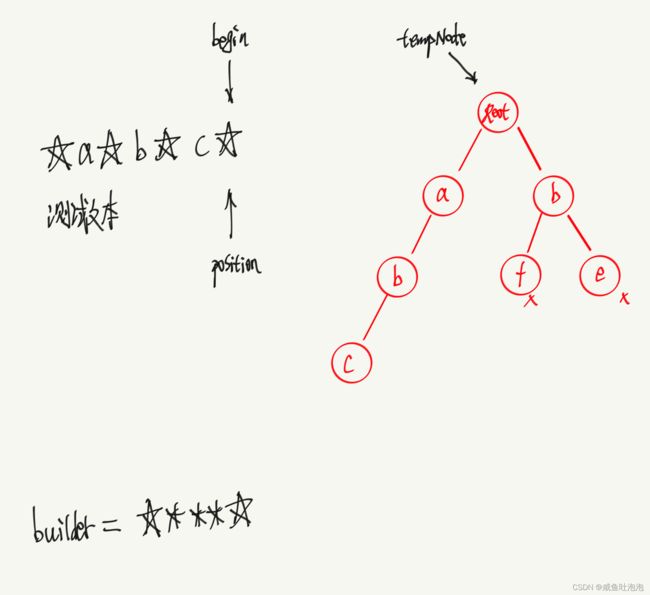
前缀树算法
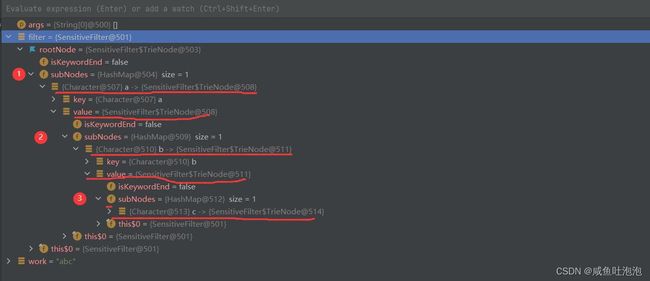
根据前缀树的特点将敏感词挂载到树上:
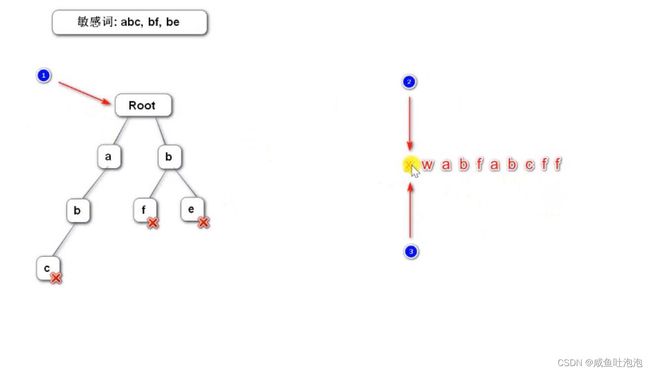
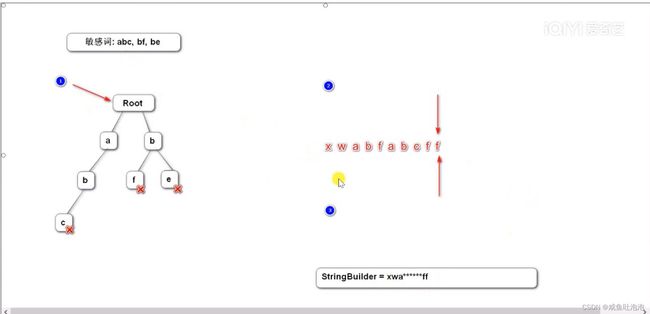
定义三个指针,指针1指向根节点,指针2和指针3指向文本的开头。
定义前缀树
@Component
public class SensitiveFilter {
//根节点
private TrieNode rootNode = new TrieNode();
private class TrieNode{
//关键词结束标识
private boolean isKeywordEnd = false;
//子节点(key是下级字符,value是下级节点)
private Map subNodes = new HashMap<>();
public boolean isKeywordEnd() {
return isKeywordEnd;
}
public void setKeywordEnd(boolean keywordEnd) {
isKeywordEnd = keywordEnd;
}
//添加子节点
public void addSubNode(Character c,TrieNode node){
subNodes.put(c, node);
}
//获取子节点
public TrieNode getSubNode(Character c){
return subNodes.get(c);
}
}
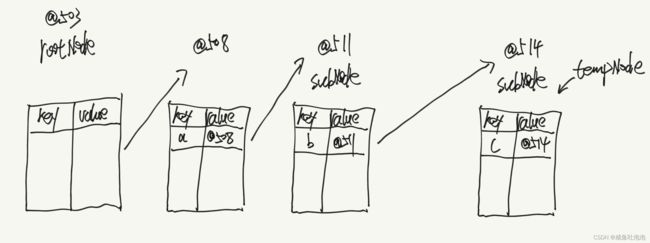
} 将敏感词挂到前缀树上:
// 将一个敏感词添加到前缀树中
private void addKeyword(String keyword) {
TrieNode tempNode = rootNode;
for (int i = 0; i < keyword.length(); i++) {
char c = keyword.charAt(i);
TrieNode subNode = tempNode.getSubNode(c);
if (subNode == null) {
// 初始化子节点
subNode = new TrieNode();
tempNode.addSubNode(c, subNode);
}
// 指向子节点,进入下一轮循环
tempNode = subNode;
// 设置结束标识
if (i == keyword.length() - 1) {
tempNode.setKeywordEnd(true);
}
}
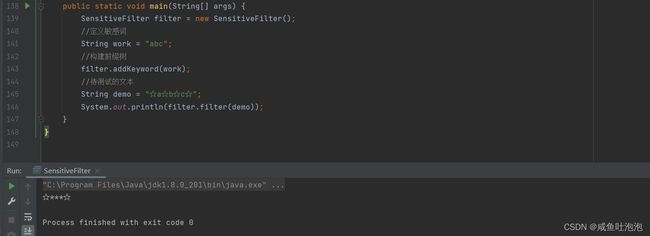
}测试:
    public static void main(String[] args) {
        SensitiveFilter filter = new SensitiveFilter();
        //定义敏感词
        String work = "aabc";
        filter.addKeyword(work);
        System.out.println("Hello");
    }
过滤敏感词:
    //替换字符
    private static final String REPLACEMENT = "***";


    /**
     * 过滤敏感词
     * @param text 带过滤的文本
     * @return  过滤以后的文本
     */
    public String filter(String text){
        if(StringUtils.isBlank(text)){
            return null;
        }

        //指针1
        TrieNode tempNode = rootNode;
        //指针2
        int begin = 0;
        //指针3
        int position = 0;
        //返回过滤以后的结果
        StringBuilder builder = new StringBuilder();

        while(position < text.length()){
            char c = text.charAt(position);

            //跳过符号
            if(isSymbol(c)){
                //若指针1处于根节点,将此符号计入结果,让指针2向下走一步
                if(tempNode == rootNode){
                    builder.append(c);
                    begin++;
                }
                //无论符号在开头或中间,指针3都向下走一步
                position++;
                continue;
            }
            //检查下级节点
            tempNode = tempNode.getSubNode(c);
            if(tempNode == null){
                //以begin开头的字符串不是敏感词
                builder.append(text.charAt(begin));
                //进入下一个位置
                position = ++begin;
                //重新指向根节点
                tempNode = rootNode;
            } else if (tempNode.isKeywordEnd) {
                //发现敏感词,将begin~position字符串换掉
                builder.append(REPLACEMENT);
                //进入下一个位置
                begin = ++position;
                //重新指向根节点
                tempNode = rootNode;
            }else {
                //检查下一个字符
                position++;
            }
        }
        //将最后一批字符计入结果
        builder.append(text.substring(begin));
        return builder.toString();
    }

    //判断是否为符号
    private boolean isSymbol(Character c){
        // 0x2E80~0x9FFF 是东亚文字范围
        return !CharUtils.isAsciiAlphanumeric(c) && (c < 0x2E80 || c > 0x9FFF);
    }
测试:
过滤算法执行的流程 :