【JavaEE】线程池
1.为什么使用线程池
1.1手动创建线程,不是用线程池
在没有使用线程池之前,我们是这样创建线程的,然后让这个线程执行run方法。
public class Demo {
    public static void main(String[] args) {
        Thread t = new Thread(new Runnable() {
            @Override
            public void run() {
                System.out.println("手动创建线程执行任务");
            }
        });
        t.start();
    }
}
手动创建线程是属于内核态操作,简单来说就是直接叫操作系统内核,帮我们创建一个线程。
但是操作系统内核它很忙,有很多任务等着它处理,指不定什么时候才能帮我们创建一个线程,所以我们可能会等很久。
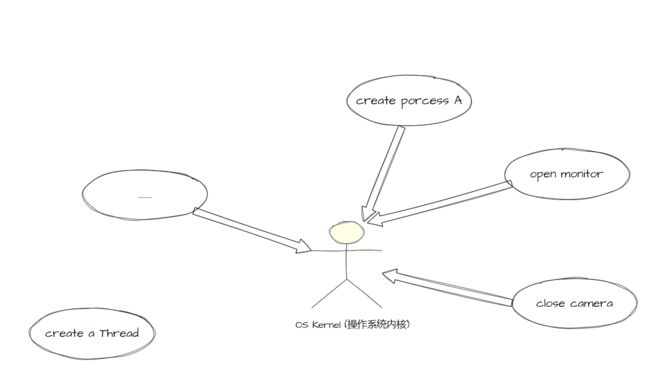
所以,手动创建线程是比较慢的。
1.2使用线程池
public class ThreadPoolTest1 {
    public static void main(String[] args) {
        //创建线程池
        ExecutorService pool = Executors.newCachedThreadPool();

        //提交任务
        pool.submit(new Runnable() {
            @Override
            public void run() {
                System.out.println("使用线程池执行任务");
            }
        });
    }
}
而这里是先创建了一个线程池,然后直接把任务交给线程池,由线程池里的线程负责执行任务。

这里的操作没有涉及到操作系统内核,是存粹的用户态。我们把任务交给了线程池处理,而线程池里的线程都是已经创建好了的,所以我们的任务可以很快得到处理。
总结:
- 手动创建线程执行任务涉及到操作系统内核,速度比较慢。
- 使用线程池执行任务的话,就比手动创建线程执行任务快,因为线程池里的线程都是创建好了的,任务可以立马得到执行。
2.线程池的参数介绍
在Executors类中提供了创建不同线程池的方法。

但是那么多看不完,我们得挑重点看。
在idea中看了源码后发现,newCahcedThreadPool底层是创建了一个ThreadPoolExecutor对象。

同样的newFinxedThreadPool也是用ThreadPoolExecutor这个类来创建的。

而且ThreadPoolExecutor还是其他线程池类的父类。

所以重点就放在ThreadPoolExecutor这个类上。
这个类有几个构造器,不过看下面这一个就行了,因为下面这个构造器的参数是最多的,这个构造器的参数弄懂了,其他构造器也就自然懂了。
构造器如下:
ThreadPoolExecutor(int corePoolSize, int maximumPoolSize,
                   long keepAliveTime, TimeUnit unit,
                   BlockingQueue<Runnable> workQueue,
                   ThreadFactory threadFactory,
                   RejectedExecutionHandler handler)
corePoolSize
int corePoolSize		基本的线程数
					    即使这些线程空闲,没有工作,也会保留这么多的的线程
maximumPoolSize
int maximumPoolSize 线程池中允许的最大线程数
keepAliveTime
long keepAliveTime		当线程池中的线程数大于基本的线程数时
						空闲的并且多余的线程等待新任务的最大时间
						过了这个时间这些空闲的并且多余的线程就会被销毁
TimeUnit
TimeUnit unit 是keepAliveTime的单位,这是个枚举类
TimeUnit的几个常量如下:
DAYS
Time unit representing twenty four hours

HOURS
Time unit representing sixty minutes

MINUTES
Time unit representing sixty seconds

SECONDS
Time unit representing one second

MILLISECONDS
Time unit representing one thousandth of a second

MICROSECONDS
Time unit representing one thousandth of a millisecond

NANOSECONDS
Time unit representing one thousandth of a microsecond
workQueue
BlockingQueue<Runnable> workQueue 用来保存任务的队列
threadFactory
ThreadFactory threadFactory 当创建新线程时使用的工厂
handler
RejectedExecutionHandler handler

当workQueue满了并且线程的数量达到maximumPoolsize时,
线程池拒绝添加新来的任务时,采取的策略。
| 策略(静态内部类) | 说明 |
|---|---|
| ThreadPoolExecutor.AbortPolicy | 抛出RejectedExecutionException异常 |
| ThreadPoolExecutor.CallerRunsPolicy | 由向线程池提交任务的线程来执行被拒绝的任务 |
| ThreadPoolExecutor.DiscardPolicy | 抛弃被拒绝的任务 |
| ThreadPoolExecutor.DiscardOldestPolicy | 抛弃最旧的任务 也就是workQueue中的队首元素 (最先提交而没有得到执行的任务) |
3.线程池的工作流程
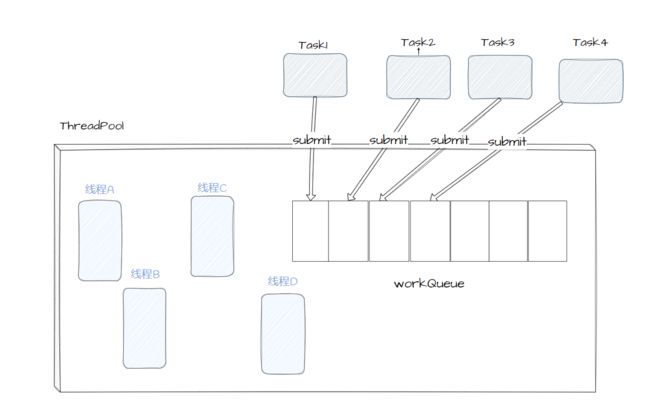
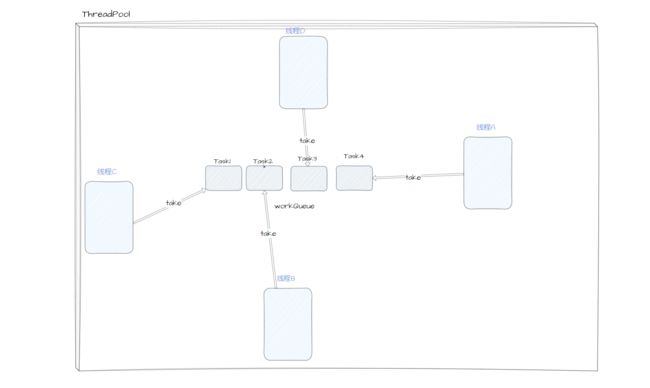
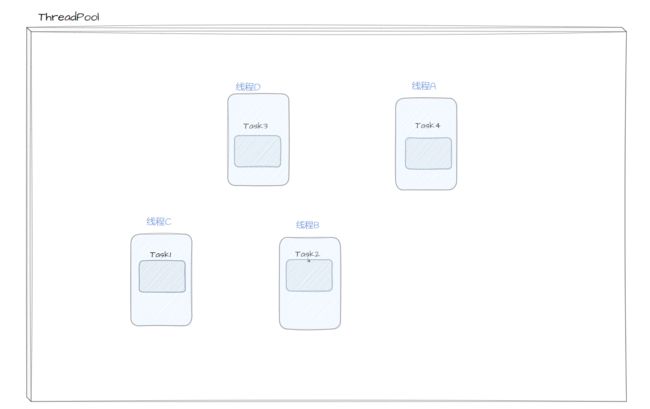
线程池的工作原理比较好理解,具体如下图:
4.使用Executors创建常见的线程池
Executors里有创建各个线程池的静态方法,直接调用即可创建各个不同的线程池。
4.1创建CachedThreadPool
静态方法:
static ExecutorService	newCachedThreadPool()

static ExecutorService	newCachedThreadPool(ThreadFactory threadFactory)
代码:
public class ThreadPoolTest2 {
    public static void main(String[] args) {
        testCachedPool();
    }

    public static void testCachedPool() {
        //创建CachedThreadPool
        ExecutorService pool = Executors.newCachedThreadPool();

        //提交任务
        pool.submit(new Runnable() {
            @Override
            public void run() {
                System.out.println("CachedPool");
            }
        });
    }
4.2创建ScheduledThreadPool
静态方法:
static ScheduledExecutorService	newScheduledThreadPool(int corePoolSize)

static ScheduledExecutorService	newScheduledThreadPool(int corePoolSize,
											ThreadFactory threadFactory)
代码:
public class ThreadPoolTest3 {
    public static void main(String[] args) {
        testSchedulePool();
    }

    public static void testSchedulePool() {
        //创建可以定时执行任务的ScheduledThreadPool
        ScheduledExecutorService scheduledExecutorService = Executors.newScheduledThreadPool(3);

        //提交一般任务
        scheduledExecutorService.submit(new Runnable() {
            @Override
            public void run() {
                System.out.println("执行一般任务");
            }
        });

        //提交定时的任务
        scheduledExecutorService.schedule(new Runnable(){
            @Override
            public void run() {
                System.out.println("执行定时任务");
            }
        }, 1000, TimeUnit.MILLISECONDS);

    }
}
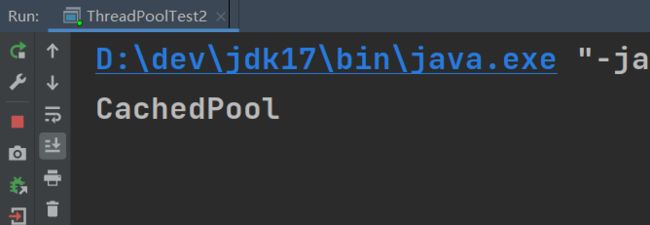
运行结果:

这里用Executors创建了CachedThreadPool和SchedualedThreadPool这两种线程池,还有一些其他的线程池,这里就不举例子了,要用到的时候再看文档就行。
下面是Java8官方文档链接,线程池的各个接口和类都在java.util.concurrent这个包下。
Java8官方文档

