docker安装oracle_11g -- 命还长时,自己搞的小玩具!!!
前言: 如果不是嫌命长, 建议不这么玩, 因为装到最后你会很崩溃, 感觉毫无意义, 就是个玩具, 哎~~~就是玩!!!
参考文档
1.https://blog.51cto.com/u_12946336/5722259
2.https://www.muzhuangnet.com/show/118178.html
3.https://blog.csdn.net/qq_42957435/article/details/125599275?spm=1001.2014.3001.5506
1.oracle-xe-11.2.0-1.0.x86_64.rpm.zip下载地址,亲测有效
2. 下载官方的dockerfile:
git clone https://github.com/oracle/docker-images.git
下载成功后,可见如下图所示文件夹(git安装参考链接3)
cd到dockerfiles文件夹下,查看文件列表
cd /docker-images/OracleDatabase/SingleInstance/dockerfiles/
ll
cd到 11.2.0.2 文件夹下
cd 11.2.0.2
ll

查看 Dockerfile.xe 文件,可以看到所需要的Oracle的安装介质文件名, 页首已提供百度网盘下载链接
cat Dockerfile.xe
3. 将安装包拷贝到该目录下,运行开始安装:
3.1 回退到 dockerfiles文件夹下,构建镜像
./buildContainerImage.sh -x -v 11.2.0.2 (捕风捉影弄的 什么 -x -s -e 的,洒家不懂都有啥区别...)
接下来就是要好长时间了,坐等镜像构建~~~
================================================================
下面的安装很狗, 因为我基本不太懂,就四处抄抄, 到最后也就是装了个玩具, 自己玩玩, 前后搞了三天, 如果时间多少值点钱, 麻烦直接打开链接, 直接用helowin的这个镜像安装吧!!!
docker run -p 1521:1521 --shm-size="1g" --name oracle --privileged=true -v /home/program/oracle/app:/u01/app/oracle/app -v /home/program/oracle/dpdump:/u01/app/oracle/dpdump -v /home/program/oracle/oraInventory:/u01/app/oracle/oraInventory 46495c2763a4
上面的容器启动命令麻烦换上自己的镜像ID!!!
出现如下所示内容 ,容器就已经准备好了, ctrl + c,直接退出;
[root@localhost home]# docker run -p 1521:1521 --shm-size="1g" --name oracle --privileged=true -v /home/program/oracle/app:/u01/app/oracle/app -v /home/program/oracle/dpdump:/u01/app/oracle/dpdump -v /home/program/oracle/oraInventory:/u01/app/oracle/oraInventory 46495c2763a4
ORACLE PASSWORD FOR SYS AND SYSTEM: 199499246a5cac26

Oracle Database 11g Express Edition Configuration
-------------------------------------------------
This will configure on-boot properties of Oracle Database 11g Express
Edition.  The following questions will determine whether the database should
be starting upon system boot, the ports it will use, and the passwords that
will be used for database accounts.  Press <Enter> to accept the defaults.
Ctrl-C will abort.

Specify the HTTP port that will be used for Oracle Application Express [8080]:
Specify a port that will be used for the database listener [1521]:
Specify a password to be used for database accounts.  Note that the same
password will be used for SYS and SYSTEM.  Oracle recommends the use of
different passwords for each database account.  This can be done after
initial configuration:
Confirm the password:

Do you want Oracle Database 11g Express Edition to be started on boot (y/n) [y]:
Starting Oracle Net Listener...Done
Configuring database...Done
Starting Oracle Database 11g Express Edition instance...Done
Installation completed successfully.

SQL*Plus: Release 11.2.0.2.0 Production on Thu Apr 13 07:00:38 2023

Copyright (c) 1982, 2011, Oracle.  All rights reserved.


Connected to:
Oracle Database 11g Express Edition Release 11.2.0.2.0 - 64bit Production

SQL>
PL/SQL procedure successfully completed.

SQL> SQL>
Database altered.

SQL>
Database altered.

SQL>
Database altered.

SQL>
System altered.

SQL>
System altered.

SQL>
System altered.

SQL>
Database altered.

SQL>
Database altered.

SQL> SQL>
System altered.

SQL> Disconnected from Oracle Database 11g Express Edition Release 11.2.0.2.0 - 64bit Production
#########################
DATABASE IS READY TO USE!
#########################
The following output is now a tail of the alert.log:
  Current log# 5 seq# 4 mem# 0: /u01/app/oracle/oradata/XE/redo05.log
      ALTER DATABASE DROP LOGFILE GROUP 1
Deleted Oracle managed file /u01/app/oracle/fast_recovery_area/XE/onlinelog/o1_mf_1_l3hb3osr_.log
Completed:       ALTER DATABASE DROP LOGFILE GROUP 1
      ALTER DATABASE DROP LOGFILE GROUP 2
Deleted Oracle managed file /u01/app/oracle/fast_recovery_area/XE/onlinelog/o1_mf_2_l3hb3owv_.log
Completed:       ALTER DATABASE DROP LOGFILE GROUP 2
Cleared LOG_ARCHIVE_DEST_1 parameter default value
Using LOG_ARCHIVE_DEST_1 parameter default value as /u01/app/oracle/product/11.2.0/xe/dbs/arch
ALTER SYSTEM SET db_recovery_file_dest='' SCOPE=BOTH;
 docker start oracle  -- 启动容器
 docker ps -- 查看容器状态
 docker exec -it oracle bash -- 进入容器

安装vim命令,为修改 /etc/profile做准备(后面的基本是抄的, 原文链接在此!!!)
su root 不需要密码
yum -y update
yum -y install vim      如下图所示,就是命令已成功安装了
vim /etc/profile  如上图最后一行所示,修改这个文件,在最后添加如下内容

export ORACLE_HOME=/u01/app/oracle/product/11.2.0/xe
export ORACLE_SID=XE
export PATH=$ORACLE_HOME/bin:$PATH
source /etc/profile -- 使修改后的文件生效
ln -s $ORACLE_HOME/bin/sqlplus /usr/bin
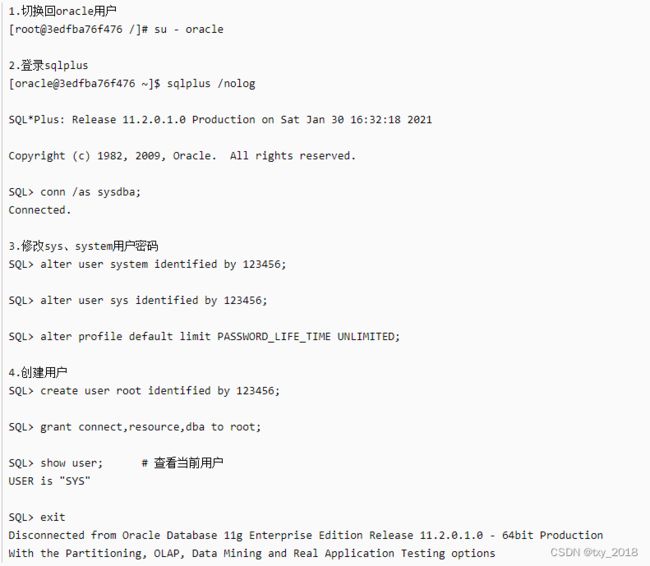
再切换回oracle用户,剩下的截图贴这儿吧,已经不想再倒腾了, 适当修修改改就完事儿了, 原文链接在此!!!

+++++++++++++++++=我自己用的,方便CV=======
切换到oracle目录
su - oracle
登录sqlplus并修改sys、system用户密码
sqlplus /nolog
SQL>conn /as sysdba;
SQL> alter user system identified by 123456;
SQL> alter user sys identified by 123456;
SQL> alter profile default limit PASSWORD_LIFE_TIME UNLIMITED;
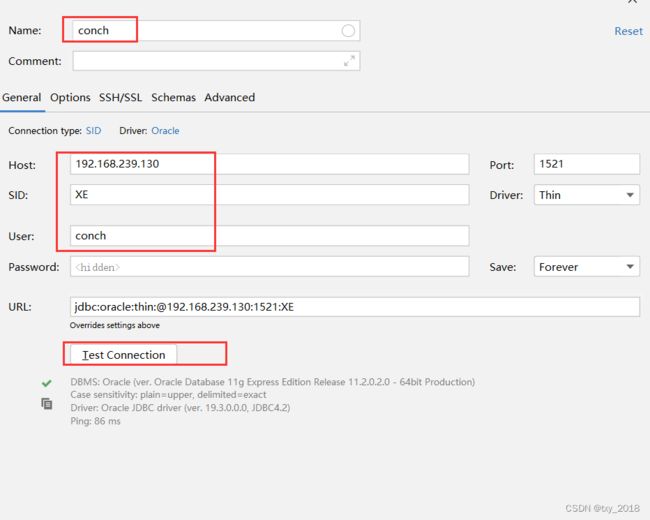
SQL> create user conch identified by 123456;
SQL> grant connect,resource,dba to conch;
SQL> show user;      # 查看当前用户
SQL> exit


