Journey of Android for Mac
下了决心要学Java,几个同事都建议我去学Android,自己觉得能做点应用放手机上玩玩也比较有动力。
沈逸有篇文章里面写道:
搞C的看不起搞C++的. 搞C++的看不起搞java的. 搞java的看不起搞.net的. 搞.net的看不起搞js的. 搞js的看不起搞html的. 搞html的看不起美工...
虽然我用Mac可能做iphone开发比较方便点,而最快的上手方式就是先用Object-C
但是业界普遍认为C++比java要高级,C#.net不如java高级,Object-C还不如C#
现在的公司本来以为可能C++程序员比较多,进来才发现我们这个楼层java程序员最多。
学ios连个问的人都没有,公司的业务也还没做到这块来。
问java的问题,就掉师傅堆里了。
前公司有个学会了OC的同事,出去找工作就遇到很多公司都希望找用C++的高手,而不需要OC的半桶水。
自从我的iphone5被偷以后,就不打算再用iphone了,就今天睡觉都做梦莫名其妙又丢了一部iphone,还是我们家那口子用的4s,这个有阴影的说。
先去oracle装新的jdk,Mac本身自带了旧的6,我用oracle在线监测没有通过,所以就装了新的7
虽然air的空间不大,还是决定正儿八经装个eclipse for Mac
毕竟我们公司的html5 studio也是模仿这个ide的,熟悉熟悉文件结构什么的都有好处。
选了stable 的 4.5M1:
http://download.eclipse.org/eclipse/downloads/
下载后,在终端中用md5 指令后跟文件路径来验证md5值
Last login: Fri Aug 29 21:45:45 on console

PsAir:~ narumi$ md5 /.../eclipse-SDK-4.5M1-macosx-cocoa-x86_64.tar.gz
//回车 MD5 (/Users/narumi/Downloads/eclipse-SDK-4.5M1-macosx-cocoa-x86_64.tar.gz) = 3427d9452e5496104358b615665a9340
解压后拖到Applications即可。
环境变量的配置,根据eclipse的官方文档提到了jdk的path:
-vm value: Mac OS X Example


On a Mac OS X system, you can find eclipse.ini by right-clicking (or Ctrl+click) on the Eclipse executable in Finder, choose Show Package Contents, and then locate eclipse.ini in the MacOS folder under Contents.


To specify Java 6 for OS X:


 -vm

/System/Library/Frameworks/JavaVM.framework/Versions/1.6.0/Home/bin/java

For versions of Mac OS X 10.7+ the location has changed to


/Library/Java/JavaVirtualMachines/<''jdk_name_ver''>/Contents/Home/...

To be safer, determine the location for the JDK you intend to use via the utility /usr/libexec/java_home and put this value with .../bin/java appended into the Eclipse.ini file.
这里要却别一下虚拟机的路径和插件的路径:
System Preferences里面的Java Control Panel/View and manage Java Runtime versions and settings for Java applications and applets./View 显然如上文所述我的OSX 10.9.3 的path已经改为:
/Library/Internet Plug-Ins/JavaAppletPlugin.plugin/Contents/Home/bin/java
如果要在终端中进入这个路径,空格用\ 转义,即反斜杠加空格。但是带空格的路径还是不能作为虚拟机路径的,幸好这不是虚拟机路径。
这个是applet plugin的路径,不是虚拟机的路径。
1.7.0_67虚拟机的路径在
/library/java/javavirtualmachines
1.6.0虚拟机的路径在
/system/library/java/javavirtualmachines
1.6.0是系统自带的,就不把它写进 ~/.profile 里面去了。
不过mac推荐设定的路径是
/usr/libexec/java_home
这是一个可执行文件,它会自动选择jre的版本作为$JAVA_HOME
写法是
export
JAVA_HOME = "/usr/libexec/java_home"
这里用vim的几个简单指令在终端里操作:

mac下设置PATH

1 首先查看PATH


  命令:$PATH


2 如何设置PATH


  命令:echo "export PATH=xxxxxx:$PATH" >> ~/.bash_profile


  解释:把"export PATH=xxxxxx:$PATH"输出打印到~/.bash_profile中去。


3 Unix知识补充:~/.bash_profile介绍


  mac和linux终端一般用bash来进行解析。当bash在读完了整体环境变量的/etc/profile并借此调用其他配置文件后,接下来则是会读取用户自定义的个人配置文件。bash读取的文件总共有三种:


  ~/.bash_profile   ~/.bash_login    ~/.profile


  其实bash再启动是只读上面文件的一个,而读取的顺序则是依照上面的顺序。也就是说读到bash_profile就不读后面的了,如果bash_profile不存在,后面的才能有机会。


 1./etc/profile   (建议不修改这个文件 )

 全局(公有)配置,不管是哪个用户,登录时都会读取该文件。


 2./etc/bashrc    (一般在这个文件中添加系统级环境变量)

 全局(公有)配置,bash shell执行时,不管是何种方式,都会读取此文件。

 我在这里加入mysqlstart、mysql和mysqladmin命令的别名,保证每一个用户都可以使用这3个命令。


 3.~/.bash_profile  (一般在这个文件中添加用户级环境变量)

(注:Linux 里面是 .bashrc 而 Mac 是 .bash_profile)

 若bash shell是以login方式执行时,才会读取此文件。该文件仅仅执行一次!默认情况下,他设置一些环境变量

 我在这里:设置终端配色、

 我在这里:设置命令别名alias ll='ls -la'

 我在这里:设置环境变量:export PATH=/opt/local/bin:/opt/local/sbin:$PATH
cat 用于显示文件内容,改之前查看,改之后检查。
vi ~/.profile 或者~可以用$HOME也是一样的
进入vi后,用 i 在当前位置插入
:w 保存
:q 退出vi
这样首先jdk的环境变量配置好,eclipse也装好了。
然后是安卓的SDK,苦逼的不墙都下不到谷歌家的东西。。。http://developer.android.com/sdk/index.html#download
只能找国内的各大软件站了。
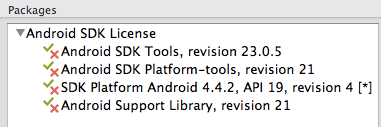
搞到SDK之后,运行 tools/Android,在弹出的Android SDK Manager对话框中选择左边的Installed packages,右边就会列出当前已经安装了的SDK,点击下面的“Update All”然后一步一步进行安装,刚开始很慢,其实还是没被墙的,慢慢会来速度。
然后安装ADT。打开eclipse,可以在线安装:
点击菜单中的 Help/Install New Software/在弹出的对话框中有个“Work with”,在右边的输入栏中输入:
然后下面就会pending出来一个“Developer Tools”,勾选上,然后一路的Next下去就可以安装完成。
在线不成,上ADT离线包 http://dl.google.com/android/ADT-23.0.2.zip 这个直连地址意外的可以下。
离线安装法的官方文档:(其中最新的版本为ADT-23.0.3,不过鉴于我的SDKS 23.0.2,就没下最新的)

Installing the Eclipse Plugin


Android offers a custom plugin for the Eclipse IDE, called Android Development Tools (ADT). This plugin provides a powerful, integrated environment in which to develop Android apps. It extends the capabilities of Eclipse to let you quickly set up new Android projects, build an app UI, debug your app, and export signed (or unsigned) app packages (APKs) for distribution.


Note: You should install the ADT plugin only if you already have an Eclipse installation that you want to continue using. If you do not have Eclipse installed, you should instead install the complete Android SDK, which includes the latest IDE for Android developers.


Your existing Eclipse installation must meet these requirements:


Eclipse 3.7.2 (Indigo) or greater

Note: Eclipse 3.6 (Helios) is no longer supported with the latest version of ADT.

Eclipse JDT plugin (included in most Eclipse IDE packages)

JDK 6 (JRE alone is not sufficient)

Not compatible with GNU Compiler for Java (gcj)

Download the ADT Plugin

To add the ADT plugin to Eclipse:


Start Eclipse, then select Help > Install New Software.

Click Add, in the top-right corner.

In the Add Repository dialog that appears, enter "ADT Plugin" for the Name and the following URL for the Location:

https://dl-ssl.google.com/android/eclipse/

Note: The Android Developer Tools update site requires a secure connection. Make sure the update site URL you enter starts with HTTPS.

Click OK.

In the Available Software dialog, select the checkbox next to Developer Tools and click Next.

In the next window, you'll see a list of the tools to be downloaded. Click Next.

Read and accept the license agreements, then click Finish.

If you get a security warning saying that the authenticity or validity of the software can't be established, click OK.

When the installation completes, restart Eclipse.

Configure the ADT Plugin

Once Eclipse restarts, you must specify the location of your Android SDK directory:


In the "Welcome to Android Development" window that appears, select Use existing SDKs.

Browse and select the location of the Android SDK directory you recently downloaded and unpacked.

Click Next.

Your Eclipse IDE is now set up to develop Android apps, but you need to add the latest SDK platform tools and an Android platform to your environment. To get these packages for your SDK, continue to Adding Platforms and Packages.


Troubleshooting ADT Installation

If you are having trouble downloading the ADT plugin after following the steps above and you are behind a firewall (such as a corporate firewall), make sure that you have properly configured your proxy settings in Eclipse. In Eclipse, you can configure proxy information from the main Eclipse menu in Window (on Mac OS X, Eclipse) > Preferences > General > Network Connections.


If you are still unable to use Eclipse to download the ADT plugin as a remote update site, you can download the ADT zip file to your local machine and manually install it:


Download the ADT Plugin zip file (do not unpack it):

Package    Size    MD5 Checksum

ADT-23.0.3.zip    103321934 bytes    ab2f5e2fbbdddeeb7dfd02cd4046538a

Start Eclipse, then select Help > Install New Software.

Click Add, in the top-right corner.

In the Add Repository dialog, click Archive.

Select the downloaded ADT-23.0.3.zip file and click OK.

Enter "ADT Plugin" for the name and click OK.

In the Available Software dialog, select the checkbox next to Developer Tools and click Next.

In the next window, you'll see a list of the tools to be downloaded. Click Next.

Read and accept the license agreements, then click Finish.

If you get a security warning saying that the authenticity or validity of the software can't be established, click OK.

When the installation completes, restart Eclipse.

To update your plugin once you've installed using the zip file, you will have to follow these steps again instead of the default update instructions.


Other install errors


Note that there are features of ADT that require some optional Eclipse packages (for example, WST). If you encounter an error when installing ADT, your Eclipse installion might not include these packages. For information about how to quickly add the necessary packages to your Eclipse installation, see the troubleshooting topic ADT Installation Error: "requires plug-in org.eclipse.wst.sse.ui".


For Linux users


If you encounter this error when installing the ADT Plugin for Eclipse:


An error occurred during provisioning.

Cannot connect to keystore.

JKS

...then your development machine lacks a suitable Java VM. Installing Sun Java 6 will resolve this issue and you can then reinstall the ADT Plugin.
上文好不容易打开的,为了避免下次需要墙,抄下来果然没错,转眼又进不去了。
就是在刚才在线安装的步骤中,不要填url了,点archive,选中下载的zip文件,就能成功看到“Developer Tools”,勾选上,然后一路Next同上,刚开始也很慢,要有信心。。
装好ADT后在菜单栏Eclipse/Preferences/Android/在SDK Loaction中填入刚下载的SDK的路径。
在 ~/.bashrc (我选择了这一级的path配置文件)里面添加Android SDK下的 tools 目录路径和Android SDK下的 platform-tools 目录路径<使用pwd可以直接显示路径全称>
在终端使用source命令:source .bashrc 不报错则成功。
测试adb的环境变量有没有配置好:终端敲 adb 回车
测试java虚拟机的path有没有设置成功,终端敲 android 回车

adb

Android Debug Bridge version 1.0.31


 -a                            - directs adb to listen on all interfaces for a connection

 -d                            - directs command to the only connected USB device

                                 returns an error if more than one USB device is present.

 -e                            - directs command to the only running emulator.

                                 returns an error if more than one emulator is running.

 -s <specific device>          - directs command to the device or emulator with the given

                                 serial number or qualifier. Overrides ANDROID_SERIAL

                                 environment variable.

 -p <product name or path>     - simple product name like 'sooner', or

                                 a relative/absolute path to a product

                                 out directory like 'out/target/product/sooner'.

                                 If -p is not specified, the ANDROID_PRODUCT_OUT

                                 environment variable is used, which must

                                 be an absolute path.

 -H                            - Name of adb server host (default: localhost)

 -P                            - Port of adb server (default: 5037)

 devices [-l]                  - list all connected devices

                                 ('-l' will also list device qualifiers)

 connect <host>[:<port>]       - connect to a device via TCP/IP

                                 Port 5555 is used by default if no port number is specified.

 disconnect [<host>[:<port>]]  - disconnect from a TCP/IP device.

                                 Port 5555 is used by default if no port number is specified.

                                 Using this command with no additional arguments

                                 will disconnect from all connected TCP/IP devices.


device commands:

  adb push [-p] <local> <remote>

                               - copy file/dir to device

                                 ('-p' to display the transfer progress)

  adb pull [-p] [-a] <remote> [<local>]

                               - copy file/dir from device

                                 ('-p' to display the transfer progress)

                                 ('-a' means copy timestamp and mode)

  adb sync [ <directory> ]     - copy host->device only if changed

                                 (-l means list but don't copy)

                                 (see 'adb help all')

  adb shell                    - run remote shell interactively

  adb shell <command>          - run remote shell command

  adb emu <command>            - run emulator console command

  adb logcat [ <filter-spec> ] - View device log

  adb forward --list           - list all forward socket connections.

                                 the format is a list of lines with the following format:

                                    <serial> " " <local> " " <remote> "\n"

  adb forward <local> <remote> - forward socket connections

                                 forward specs are one of:

                                   tcp:<port>

                                   localabstract:<unix domain socket name>

                                   localreserved:<unix domain socket name>

                                   localfilesystem:<unix domain socket name>

                                   dev:<character device name>

                                   jdwp:<process pid> (remote only)

  adb forward --no-rebind <local> <remote>

                               - same as 'adb forward <local> <remote>' but fails

                                 if <local> is already forwarded

  adb forward --remove <local> - remove a specific forward socket connection

  adb forward --remove-all     - remove all forward socket connections

  adb jdwp                     - list PIDs of processes hosting a JDWP transport

  adb install [-l] [-r] [-d] [-s] [--algo <algorithm name> --key <hex-encoded key> --iv <hex-encoded iv>] <file>

                               - push this package file to the device and install it

                                 ('-l' means forward-lock the app)

                                 ('-r' means reinstall the app, keeping its data)

                                 ('-d' means allow version code downgrade)

                                 ('-s' means install on SD card instead of internal storage)

                                 ('--algo', '--key', and '--iv' mean the file is encrypted already)

  adb uninstall [-k] <package> - remove this app package from the device

                                 ('-k' means keep the data and cache directories)

  adb bugreport                - return all information from the device

                                 that should be included in a bug report.


  adb backup [-f <file>] [-apk|-noapk] [-obb|-noobb] [-shared|-noshared] [-all] [-system|-nosystem] [<packages...>]

                               - write an archive of the device's data to <file>.

                                 If no -f option is supplied then the data is written

                                 to "backup.ab" in the current directory.

                                 (-apk|-noapk enable/disable backup of the .apks themselves

                                    in the archive; the default is noapk.)

                                 (-obb|-noobb enable/disable backup of any installed apk expansion

                                    (aka .obb) files associated with each application; the default

                                    is noobb.)

                                 (-shared|-noshared enable/disable backup of the device's

                                    shared storage / SD card contents; the default is noshared.)

                                 (-all means to back up all installed applications)

                                 (-system|-nosystem toggles whether -all automatically includes

                                    system applications; the default is to include system apps)

                                 (<packages...> is the list of applications to be backed up.  If

                                    the -all or -shared flags are passed, then the package

                                    list is optional.  Applications explicitly given on the

                                    command line will be included even if -nosystem would

                                    ordinarily cause them to be omitted.)


  adb restore <file>           - restore device contents from the <file> backup archive


  adb help                     - show this help message

  adb version                  - show version num


scripting:

  adb wait-for-device          - block until device is online

  adb start-server             - ensure that there is a server running

  adb kill-server              - kill the server if it is running

  adb get-state                - prints: offline | bootloader | device

  adb get-serialno             - prints: <serial-number>

  adb get-devpath              - prints: <device-path>

  adb status-window            - continuously print device status for a specified device

  adb remount                  - remounts the /system partition on the device read-write

  adb reboot [bootloader|recovery] - reboots the device, optionally into the bootloader or recovery program

  adb reboot-bootloader        - reboots the device into the bootloader

  adb root                     - restarts the adbd daemon with root permissions

  adb usb                      - restarts the adbd daemon listening on USB

  adb tcpip <port>             - restarts the adbd daemon listening on TCP on the specified port

networking:

  adb ppp <tty> [parameters]   - Run PPP over USB.

 Note: you should not automatically start a PPP connection.

 <tty> refers to the tty for PPP stream. Eg. dev:/dev/omap_csmi_tty1

 [parameters] - Eg. defaultroute debug dump local notty usepeerdns


adb sync notes: adb sync [ <directory> ]

  <localdir> can be interpreted in several ways:


  - If <directory> is not specified, both /system and /data partitions will be updated.


  - If it is "system" or "data", only the corresponding partition

    is updated.


environmental variables:

  ADB_TRACE                    - Print debug information. A comma separated list of the following values

                                 1 or all, adb, sockets, packets, rwx, usb, sync, sysdeps, transport, jdwp

  ANDROID_SERIAL               - The serial number to connect to. -s takes priority over this if given.

  ANDROID_LOG_TAGS             - When used with the logcat option, only these debug tags are printed.
这样就ok了!
如果用eclipse创建新的Android项目还出现compile with 后面没有选项,就是API没有装,我就因为网速问题一直没装上,卡在这里很久。。

phython 总是那么环保方便。
星期一组里安卓哥给了我一个软件,貌似他没在用eclipse做Android
https://dl.google.com/android/studio/install/0.8.6/android-studio-bundle-135.1339820-mac.dmg
原因就是eclipse配环境比较麻烦。
比如jre的版本,eclipse每次创建新的java project的时候,可以配置使用的jre,记得在new的时候找到蓝色的config jre 链接。
如果project所用版本的jre没有安装,project不能run通过。
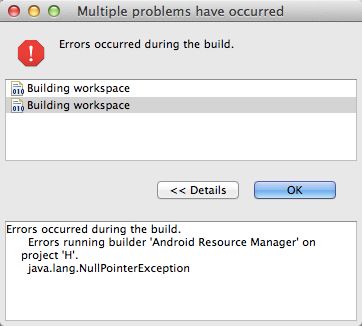
创建android新项目的时候javalang出错又是为什么呢,
查了很久,看了stackoverflow,有很多人遇到过这个问题,也有很多人解决了这个问题。
我的一波三折:
1.删除出错的eclipse
2.解压新的eclipse
3.启动eclipse
4.选择一个新的workspace,如果有旧的,并且有可能是不同版本的eclipse的workspace,要么不要选,要么删掉重新让新的eclipse创建一个。
5.自动检查更新说没有更新以后,在Help里面点 install new software,然后从可用站点里面复制出
https://dl-ssl.google.com/android/eclipse/
放到地址栏,然后点Add,会搜索出来一个developer tools,
安装这个android的developer tools
6.设置adt路径,如果以前设置过,点安卓图标就自动启动,安装其中检测到的更新
7.这时候创建有activity的Android Application project仍然会出错,

于是我创建了一个没有activity的Application project(其实之前我也试过单独附加activity,根本没有finish可以点)
8.new 。。other。。activity,成功附加到那个没有activity的project上
9.再重新创建一个有activity的project,奇迹发生了!
后由于time machine备份的不完整导致我遗失了一部分adt文件,

装了以上更新还是不行!
为了避免占用过大的硬盘空间只装最高版本的sdk,装了21全套,20和19都删掉,
又先创建无activity的project再附加上去,
终于可以正常创建安卓项目了。
好多次我都想放弃去装google官方的Android studio,但考虑到还要学java语言基础,考虑到教程,考虑到公司的ide和eclipse界面相仿才坚持下来了,庆幸坚持下来了。
