opencv的初体验
http://guoming.me/opencv-config 这篇文章有讲解opencv的安装与配置
一些常用库
opencv_core249d.lib
opencv_imgproc249d.lib
opencv_highgui249d.lib
opencv_ml249d.lib
opencv_video249d.lib
opencv_features2d249d.lib
opencv_calib3d249d.lib
opencv_contrib249d.lib
opencv_legacy249d.lib
opencv_flann249d.lib
opencv_gpu249d.lib
一个测试程序
 1 #include <opencv2/core/core.hpp>
 2 #include <opencv2/highgui/highgui.hpp>
 3 #include <iostream>
 4
 5 using namespace cv;
 6 using namespace std;
 7
 8 int main()
 9 {
10     Mat image;
11     image = imread("D:\\lenargb.jpg", -1); // Read the file
12
13     if (!image.data) // Check for invalid input
14     {
15         cout << "Could not open or find the image" << std::endl;
16         return -1;
17     }
18
19     namedWindow("Display window", WINDOW_AUTOSIZE); // Create a window for display.
20     imshow("Display window", image); // Show our image inside it.
21
22     waitKey(0); // Wait for a keystroke in the window
23     return 0;
24 }
Mat 类的一些属性
//矩阵的维数,取值应该大于或等于 2
int dims;
//矩阵的行数和列数,如果矩阵超过 2 维,这两个变量的值都为-1
int rows, cols;
//指向数据的指针
uchar* data;
Mat 构造方法
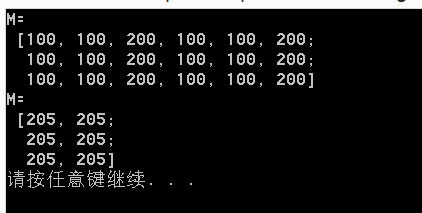
Mat M(3,2, CV_8UC3, Scalar(0,0,255));
cout << "M = " << endl << " " << M << endl;
第一行代码创建一个行数(高度)为 3,列数(宽度)为 2 的图像,图像元素是 8 位无符号整数类型,且有三个通道。图像的所有像素值被初始化为(0, 0,255)。由于 OpenCV 中默认的颜色顺序为 BGR,因此这是一个全红色的图像。
第二行代码是输出 Mat 类的实例 M 的所有像素值。 Mat 重定义了<<操作符,使用这个操作符,可以方便地输出所有像素值,而不需要使用 for 循环逐个像素输出
opencv中图像的通道数
基本上,描述一个像素点,如果是灰度,那么只需要一个数值来描述它,就是单通道。
如果一个像素点,有RGB三种颜色来描述它,就是三通道
windows的bmp有时候是一个四通道图像,R、G、B加上一个A通道,表示透明度。
最后这个,一般叫做alpha通道,表示透明度的。
初学只要知道单通道和三通道就好;
创建图像对象
Mat常用的构造函数:
Mat(int rows,int cols,int type,const scalar &s);
其中 rows 表示行数,cols表示列数,两者可以结合为Size size;
Type 可以是 CV_8UC1, CV_16SC1, …,CV_64FC4 等。里面的 8U 表示 8 位无符号整数,16S 表示 16 位有符号整数,64F表示 64 位浮点数(即 double 类型);C 后面的数表示通道数,例如 C1 表示一个通道的图像,C4 表示 4 个通道的图像,以此类推。
如果你需要更多的通道数,需要用宏 CV_8UC(n),例如:Mat M(3,2, CV_8UC(5));//创建行数为 3,列数为 2,通道数为 5 的图像
Scalar 可以设置通道里的像素值;可有可无。可以使用 Mat 类的 create()函数创建图像。
#include <opencv2/core/core.hpp>
#include <opencv2/highgui/highgui.hpp>
#include <iostream>

using namespace cv;
using namespace std;

int _tmain(int argc, _TCHAR* argv[])
{
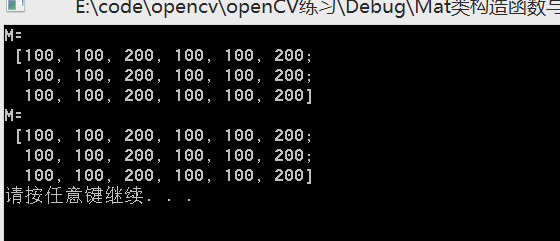
    Mat img(3, 2, CV_8UC3, Scalar(100, 100, 200));
    cout << "M=" << endl << " " << img << endl;
    img.create(3, 2, CV_8UC1);
    cout << "M=" << endl <<" "<< img << endl;

    //imshow("嘿嘿", img);
    //waitKey();
    system("pause");
    return 0;
}
这里我们发现create函数只有Mat类构造函数的前三个参数,故不能设置像素初始值,我们上面设置单通道是看到不管构造时是什么值,经过create后都变成了205;当设置成三通道时,如果图像的尺寸和通道数相同,则并不会重新设置像素值,因为如果create的参数和初始值(如果有的话)是一样的话,那么就不会重新分配内存;
遍历像素
(1) at()函数 是个模版函数;需要指明元素类型
#include <time.h>
#include <iostream>
#include "opencv2/opencv.hpp"
//一般用这个头文件就可以,只不过可能会把大部分用不到的头文件引入进来;
using namespace std;
using namespace cv;
int main(int argc, char* argv[])
{
    srand(time(NULL));
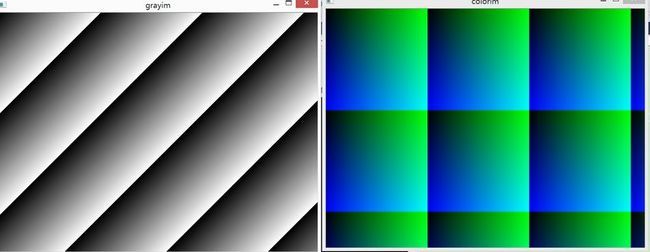
    Mat grayim(600, 800, CV_8UC1);//600*800的灰度图;
    Mat colorim(600, 800, CV_8UC3);//600*800的彩色图;
    //遍历所有像素,并设置像素值;
    for (int i = 0; i < grayim.rows; ++i)//Mat的rows和cols属性是public的;
        for (int j = 0; j < grayim.cols; ++j)
            grayim.at<uchar>(i, j) = (i + j) % 255;
    //遍历所有像素,并设置像素值;
    for (int i = 0; i < colorim.rows; ++i)
        for (int j = 0; j < colorim.cols; ++j)
        {
            Vec3b pixel;//
            pixel[0] = i % 255; //Blue
            pixel[1] = j % 255; //Green
            pixel[2] = 0; //Red
            colorim.at<Vec3b>(i, j) = pixel;
        }
    //显示结果
    imshow("grayim", grayim);
    imshow("colorim", colorim);

    waitKey(0);
    return 0;
}
OpenCV 中有模板类 Vec,可以表示一个向量,用来表示彩色图像的一个像素;例如 8U 类型的 RGB 彩色图像可以使用 Vec3b,3 通道 float 类型的矩阵可以使用 Vec3f
Vec3b color; //用 color 变量描述一种 RGB 颜色

color[0]=255; //B 分量

color[1]=0; //G 分量

color[2]=0; //R 分量
2) 使用STL库里的迭代器,
#include <time.h>
#include <iostream>
#include "opencv2/opencv.hpp"
//一般用这个头文件就可以,只不过可能会把大部分用不到的头文件引入进来;
using namespace std;
using namespace cv;
int main(int argc, char* argv[])
{
    srand(time(NULL));
    Mat grayim(600, 800, CV_8UC1);//600*800的灰度图;
    Mat colorim(600, 800, CV_8UC3);//600*800的彩色图;
    //遍历所有像素,并设置像素值;
    MatIterator_<uchar> graim_it, graim_end;
    MatIterator_<Vec3b>    color_it, color_end;
    for (graim_it=grayim.begin<uchar>(),graim_end=grayim.end<uchar>(); graim_it!=graim_end; ++graim_it)
    {
        *graim_it = rand() % 255;
    }
    for (color_it = colorim.begin<Vec3b>(), color_end = colorim.end<Vec3b>(); color_it != color_end; color_it++)
    {
        (*color_it)[0] = rand() % 255;
        (*color_it)[1] = rand() % 255;
        (*color_it)[2] = 0;

    }
    //显示结果
    imshow("grayim", grayim);
    imshow("colorim", colorim);
    waitKey(0);
    return 0;
}
使用迭代器一定要注意原来的元素的类型哦;
Mat_类的必要性
Mat_ 类 是个模版类
#include <iostream>
#include <opencv2/core/core.hpp>
#include <opencv2/highgui/highgui.hpp>
using namespace cv;
using namespace std;

int _tmain(int argc, _TCHAR* argv[])
{

#pragma region Mat在调用一些函数时必须指明类型;除了at还有begin,end等
    Mat mtx1(6, 8, CV_8UC1);
//    for (int i = 0; i < mtx1.rows; i++)
//    {
//        for (int j = 0; j < mtx1.cols; j++)
//        {
//            double d1 = (i + j) % 255;
//            mtx1.at<uchar>(i, j) = d1;
//            double d2 = mtx1.at<uchar>(i, j);
//            if (d1 == d2)
//            {
//                mtx1.at<uchar>(i, j) = 255;
//            }
//            else
//                mtx1.at<uchar>(i, j) = 0;
//        }
//    }
//    cout << "mtx1=" << endl << " " << mtx1 << endl;
#pragma endregion

    Mat_<uchar> mtx2=(Mat_<uchar> &)mtx1;
    randu(mtx2, Scalar::all(0), Scalar::all(255));
    cout << "mtx2=\n " << mtx2 << endl;
    for (int i = 0; i < mtx2.rows; i++)
    {
        for (int j = 0; j < mtx2.cols; j++)
        {
            double d3 = (i + j) % 255;
            mtx2(i,j) = d3;                        //    这里把at函数包装成操作符();
            double d4 = mtx2(i, j);
            MatIterator_<uchar> it = mtx2.begin();
            MatIterator_<uchar> it2 = mtx1.begin<uchar>();
        }
    }

    system("pause");
    return 0;
}
Mat类对象调用的很多方法都要指明类型,Mat_类是个模版类 对Mat进行了包装,只用在声明的时候指明类型,需要注意几点:
(1) 声明的时候指定类型
(2) 访问一个元素的时候可以直接使用重载的()操作符
(3) 调用其它方法时不用指定类型
这样的好处是
(1) 方便编程,不用写类型了
(2) 如果使用的时候类型标错了,那么在使用的时候会因为内存越界而出现运行时错误,因为c++是弱类型的,所以编译阶段不报错;比如声明的时候存的是uchar类型的,每个元素占一个字节,当访问的时候如果指定成double型的话,就会查8个字节,很容易越界。
图像的读取和存储
imread()函数返回的是 Mat 对象,如果读取文件失败,则会返回一个空矩阵,即 Mat::data 的值是 NULL。执行 imread()之后,需要检查文件是否成功读入,可以使用 Mat::empty()函数进行检查。Mat imread(const string& filename, int flags=1 )
参数flags>0是,返回一个三通道彩色图像,如果图像是灰度图,强制转换为彩色图像
flag=0 返回一个灰度图,单通道,如果图像是彩色图,则强制转换为灰度图;
flag<0 对图像不进行通道转换;
bool imwrite(const string& filename, InputArray image, const vector<int>& params=vector<int>())
BMP 格式是无损格式,但是一般不进行压缩,文件尺寸非常大;JPEG 格式的文件娇小,但是 JPEG 是有损压缩,会丢失一些信息。PNG 是无损压缩格式,推荐使用。
params 可以指定文件格式的一些细节信息
JPEG:表示图像的质量,取值范围从 0 到 100。数值越大表示图像质量越高,当然文件也越大。默认值是 95。
PNG:表示压缩级别,取值范围是从 0 到 9。数值越大表示文件越小,但是压缩花费的时间也越长。默认值是 3。
PPM, PGM 或 PBM:表示文件是以二进制还是纯文本方式存储,取值为0 或 1。如果取值为 1,则表示以二进制方式存储。默认值是 1。
只有 8U 类型的单通道和 3 通道(颜色顺序为 BGR)矩阵才能保存为全格式,其它类型可以通过Mat::convertTo()函数或者 cvtColor()函数将矩阵转为可以保存的格式。
Imshow 如果不加那个waitkey的话有时候只会显示一个灰色窗口;
默认参数为0,意思是等待forever,返回按下键的值,返回有两种可能1是在指定时间内用户按键盘,返回按的键值,要么是时间到返回0;ESC返回的是27;
#include <opencv2/opencv.hpp>
#include <iostream>
using namespace std;
using namespace cv;
int _tmain(int argc, _TCHAR* argv[])
{
    Mat img = imread("D:\\lenargb.jpg", 0);
#pragma region 下面判断是否为空
    if (img.empty())
    {
        cout << "无法加载图片" << endl;
        system("pause");
        return -1;
    }
#pragma endregion
    Mat result;
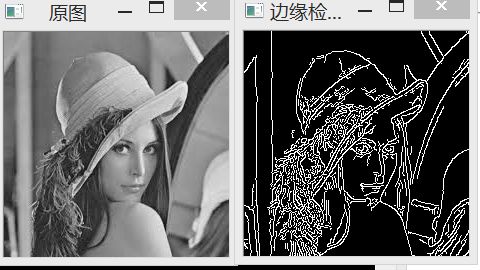
    Canny(img, result, 50, 150);
    imshow("原图", img);
    imshow("边缘检测后", result);
    imwrite("D://result.png", result);
    waitKey();
    system("pause");

    return 0;
}


