MyBatis 快速入门
文章目录
-
- 一. MyBatis 是什么?
- 二. 学习 MyBatis 的意义
- 三. MyBatis 学习
- 四. 创建 Mybatis 查询
-
- 4.1 创建数据库和表
- 4. 2 MyBatis 环境搭建
-
- 1. 添加 MyBatis 框架支持
- image-20230505204034077
- 2. 设置 MyBatis 的配置信息
-
- 2.1 设置数据库连接的相关信息
- 2.2 MyBatis 的xml 保存路径 和 xml 命名格式
- 4.3MyBatis 模式开发
-
- 1. interface 部分
- 2. xml 部分
一. MyBatis 是什么?
MyBatis 是一款优秀的持久层框架(将电脑中的数据保存到磁盘上) , 它支持自定义 SQL , 存储过程以及高级映射. MyBatis 去除了几乎所有的 JDBC 代码以及设置参数和获取结果集的工作. MyBatis 可以通过简单的 xml 或 注解 来配置和映射原始类型 , 接口和 java POJO (plain old java objects , 普通老式 java 对象) 为数据库中的记录.
MyBatis 提供简单易用的 API 就是为了更加简单的操作和读取数据.
二. 学习 MyBatis 的意义
对应后端开发人员来说 , 程序主要由 后端程序 和 数据库组成.
JDBC 过于冗余且代码复用性很差
三. MyBatis 学习
MyBatis 学习只有两个部分:
- 配置 MyBatis 开发环境.
- 使用 MyBatis 模式和语法操作数据库.
四. 创建 Mybatis 查询
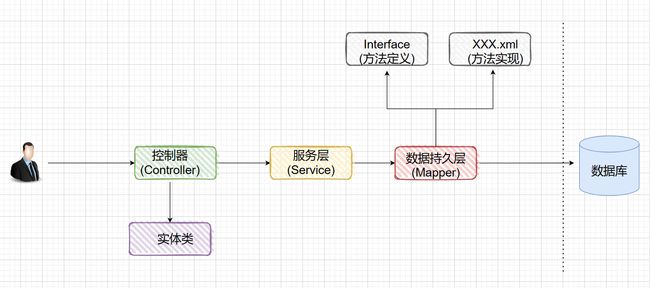
学习 Mybatis 之前 , 知道 Mybatis 的整个框架执行流程非常关键.
MyBatis 是一个 ORM 框架(Object Relation Mapping) , 即对象关系映射. 在面向对象编程中 , 该框架会将关系型数据库中的数据和对象建立映射关系 , 进而自动完成数据和对象之间的转换.
ORM 框架对数据库的映射:
- 数据表: 映射为 “类”
- 记录: 映射为 “对象”
- 字段: 映射为 “属性”
也就是说 , Mybatis 可以像操作对象一样来操作数据库中的表 , 并自动实现数据和对象之间的转换.
4.1 创建数据库和表
通过 MyBatis 我们要实现的功能是 , 查询一个博客系统中所有用户的信息.
通过 MySQL 创建数据库和表 , 代码如下:
-- 创建数据库
drop database if exists mycnblog;
create database mycnblog DEFAULT CHARACTER SET utf8mb4;

-- 使用数据数据
use mycnblog;

-- 创建表[用户表]
drop table if exists  userinfo;
create table userinfo(
    id int primary key auto_increment,
    username varchar(100) not null,
    password varchar(32) not null,
    photo varchar(500) default '',
    createtime timestamp default current_timestamp,
    updatetime timestamp default current_timestamp,
    `state` int default 1
) default charset 'utf8mb4';

-- 创建文章表
drop table if exists  articleinfo;
create table articleinfo(
    id int primary key auto_increment,
    title varchar(100) not null,
    content text not null,
    createtime timestamp default current_timestamp,
    updatetime timestamp default current_timestamp,
    uid int not null,
    rcount int not null default 1,
    `state` int default 1
)default charset 'utf8mb4';

-- 创建视频表
drop table if exists videoinfo;
create table videoinfo(
  	vid int primary key,
  	`title` varchar(250),
  	`url` varchar(1000),
		createtime timestamp default current_timestamp,
		updatetime timestamp default current_timestamp,
  	uid int
)default charset 'utf8mb4';

-- 添加一个用户信息
INSERT INTO `mycnblog`.`userinfo` (`id`, `username`, `password`, `photo`, `createtime`, `updatetime`, `state`) VALUES
(1, 'admin', 'admin', '', '2021-12-06 17:10:48', '2021-12-06 17:10:48', 1);

-- 文章添加测试数据
insert into articleinfo(title,content,uid)
    values('Java','Java正文',1);

-- 添加视频
insert into videoinfo(vid,title,url,uid) values(1,'java title','http://www.baidu.com',1);
4. 2 MyBatis 环境搭建
1. 添加 MyBatis 框架支持
Tips: 添加完 MyBatis 框架之后 , 还要添加需要 MySQL驱动. 这是因为 Mybatis 就像是淘宝这样的电商平台 , 需要有 MySQL 这样的商家入驻.
但是直接启动就会报错 , 这是因为添加的依赖只是声明了要使用数据库 , 并没有说明具体的数据库的地址 , 密码 , 用户名…
2. 设置 MyBatis 的配置信息
2.1 设置数据库连接的相关信息
yml 格式的配置文件 , propertise 同理.
# 数据库连接配置
spring:
  datasource:
    url: jdbc:mysql://localhost:3306/mycnblog?characterEncoding=utf8&useSSL=false
    username: root
#    password 要写自己本机 mysql 客户端的密码
    password: 111111
    driver-class-name: com.mysql.cj.jdbc.Driver
2.2 MyBatis 的xml 保存路径 和 xml 命名格式
创建 resourse/mybatis 的所有表的 xml 文件 , 意味着该目录下所有的文件后缀都为…Mapper.xml , 一种默认潜规则更加方便.
#   配置 mybatis xml 的文件路径
mybatis.mapper-locations=classpath:mybaits/*Mapper.xml
4.3MyBatis 模式开发
由两部分组成:
- interface: 提供让其他层可以注入使用的接口
- xml: 具体实现 sql (可以看做是上面 interface 的实现)
Mybatis 的映射器 Mapper 就像是一个代理对象 , 让 interface 中的方法声明 和 xml 中的方法实现 , 生成一个代理对象 , 然后就可以在其他层调用这个代理对象.
1. interface 部分
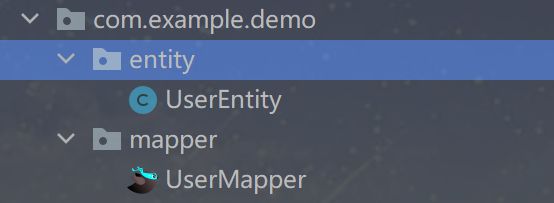
编写实体类 , 在 entity 目录下 , 创建一个 UserEntity 实体类 , 成员依据数据库中字段来写.
@Data //Lombok 中 @Data 注解的作用是自动生成 Java 类的 getter、setter、toString、equals、hashCode 等常用方法
public class UserEntity {
    private int id;
    private String username;
    private String password;
    private String photo;
    private LocalDateTime createtime;
    private LocalDateTime updatetime;
    private Integer state;
}
编写数据持久层 , 在 mapper 目录下创建一个 UserMapper 接口.
@Mapper 注解的作用是将一个 java 接口标记为 Mybatis 的映射器(Mapper) , 使其可以被 Mybatis 框架扫描并生成对应的实现类.
@Mapper
public interface UserMapper {
    List<UserEntity> getAll();
}
2. xml 部分
xml 是针对 interface 的实现 , 因此 xml 的命名最好和 interface 的命名一致 (更加直观)
在 resources 的 mybatis 目录下创建一个 UserMapper.xml 文件. (文件中的内容无需记忆 , 直接复制粘贴即可)
namespace 中定义了当前 xml 实现的接口是哪个?
select 标签中至少需要两个参数 , 告诉 xml 实现的方法是哪个方法 , 以及返回的数据类型是什么?
DOCTYPE mapper PUBLIC "-//mybatis.org/xml/DTD Mapper 3.0//EN" "http://mybatis.org/dtd/mybatis-3-mapper.dtd">
<mapper namespace="com.example.demo.mapper.UserMapper">
    <select id="getAll" resultType="com.example.demo.entity.UserEntity">
        select * from userinfo
    select>
mapper>
后续增加新的功能 , 只需在 interface 中添加新方法 , xml 中实现该方法即可.
由 mybatis 标准分层可知 , service 用来访问 mapper , controller 用来访问 service.
创建 service 层 , 将 mapper 暴露出来 , 供其他人来访问.
@Service //把类托管到 Spring
public class UserService {
    @Autowired //属性注入
    private UserMapper userMapper; // mybatis 允许把一个接口当做是一个对象 , 其中操作框架代理自动完成.

    public List<UserEntity> getAll(){
        return userMapper.getAll();
    }
}
创建 controller 层 , 访问 service.
@RequestMapping("/user")
@RestController
public class UserController {
    @Autowired
    private UserService userService;

    @RequestMapping("/getAll")
    public List<UserEntity> getAll(){
        return userService.getAll();
    }
}
访问 localhost:8080/user/getAll , 结果如下:


