win10 VScode配置GCC(MinGW)
Python微信订餐小程序课程视频
https://edu.csdn.net/course/detail/36074
Python实战量化交易理财系统
https://edu.csdn.net/course/detail/35475
前提
- 安装 Visual Studio Code
- 安装 C/C++ 扩展 for VS Code 也可以在vscode的extension界面搜索’c’查找插件安装

3. 获取最新的 Mingw-w64 ,或者通过 MSYS2 安装
4. 添加 Mingw-w64的bin文件夹路径到系统环境变量中,bin路径取决于Mingw-w64的安装路径,C:\XXX\XXX\mingw64\bin示例,步骤如下
1. 在底栏的搜索框中,搜索“设置”,打开win设置程序
2. 在设置中,搜索系统环境变量
3. 选择系统中的`path`变量(个人用户的也可以),点击编辑
4. 新建一个环境变量,将Mingw-w64的bin文件夹路径添加进去。
5. 点击确定保存更新路径,需要重新打开cmd才能路径生效
- 检查是否成功安装,打开cmd,输入
gcc -v
如果没有成功输出版本号,那说明安装不成功
Hello World!
创建一个空文件夹projects用来存放vscode项目文件。再projects中创建一个子文件夹helloworld,然后在vscode中打开这个helloworld文件夹。
可以在cmd完成这项操作:
mkdir projects
cd projects
mkdir helloworld
cd helloworld
code .
code .命令是指在此文件夹中打开vscode。
添加源文件
添加helloworld.c
#include

int main()
{
    printf("Hello world!");

    return 0;
}
编译
这一步要创建tasks.json,文件是用于告诉vs code怎么编译程序
在主菜单中,选择 Terminal > Configure Default Build Task. 选择一个编译器点击,c语言就选择gcc,c++就选择g++

选择之后,tasks.json会被创建在.vscode文件夹中。文件内容与下文相似
{
  "tasks": [
    {
      "type": "cppbuild",
      "label": "C/C++: gcc.exe build active file",
      "command": "C:/msys64/mingw64/bin/gcc.exe",
      "args": ["-g", "${file}", "-o", "${fileDirname}\\${fileBasenameNoExtension}.exe"],
      "options": {
        "cwd": "${fileDirname}"
      },
      "problemMatcher": ["$gcc"],
      "group": {
        "kind": "build",
        "isDefault": true
      },
      "detail": "compiler: C:/msys64/mingw64/bin/gcc.exe"
    }
  ],
  "version": "2.0.0"
}
command: 指定编译器的路径
args: 指定将传递给gcc的命令行参数,这些参数必须按照编译器期望的顺序指定。这些参数告诉gcc获取活动文件(${file}),先编译它,然后在当前文件夹(${fileDirname})创建一个可执行文件,其名字与活动文件一样,但是后缀是.exe。(${fileBasenameNoExtension}.exe)
label: 这是你在任务列表中看到的,可以随便给它起个名字。
"isDefault": true指定该任务将在按下Ctrl+Shift+B时运行,只是为了方便使用,也可以在 Terminal: Run Build Task 中编译文件
运行编译
- 回到
helloworld.c,可以通过Ctrl+Shift+B快捷键编译,也可以点击Terminal: Run Build Task编译 - 编译成功之后,会在集成的terminal中输出类似下图的信息

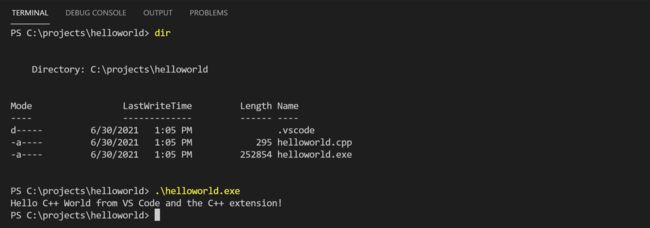
3. 点击任何键退出界面。运行 dir 命令将会看到新创建的 helloworld.exe
可以在terminal中运行exe文件 (helloworld.exe 或者 .\helloworld.exe)
图片仅作参考,本实例实际运行输出为
Hello world!
编辑json文件
使用"${workspaceFolder}\\*.c" 代替 ${file},编译时会编译当前文件夹中所有的.c文件,输出文件名也要修改为"${fileDirname}\\${fileBasenameNoExtension}.exe"
debug
在此操作中会创建一个launch.json文件。当你按F5调试程序时,VS Code需要使用launch文件来启动GDB调试器。
- 在主菜单中,选择Run > Add Configuration… 然后选取 C++ (GDB/LLDB)
- 然后再选取
gcc.exe build and debug active file(c语言就选gcc,c++就选取g++)
完成操作后会创建一个launch.json文件,内容与下方类似
{
  "version": "0.2.0",
  "configurations": [
    {
      "name": "g++.exe - Build and debug active file",
      "type": "cppdbg",
      "request": "launch",
      "program": "${fileDirname}\\${fileBasenameNoExtension}.exe",
      "args": [],
      "stopAtEntry": false,
      "cwd": "${fileDirname}",
      "environment": [],
      "externalConsole": false,
      "MIMode": "gdb",
      "miDebuggerPath": "C:\\msys64\\mingw64\\bin\\gdb.exe",
      "setupCommands": [
        {
          "description": "Enable pretty-printing for gdb",
          "text": "-enable-pretty-printing",
          "ignoreFailures": true
        }
      ],
      "preLaunchTask": "C/C++: g++.exe build active file"
    }
  ]
}
program: 设置指定要调试的程序
stopAtEntry: 默认为false,为true时,debug时会在main函数开头设置断点
preLaunchTask: 设置用于指定在启动前要执行的任务,确保与tasks.json中label保持一致
C/C++ configurations
如果想要对C/C++扩展的拥有更多的控制权,需要创建一个c_cpp_properties.json文件。这将允许你改变设置,如编译器的路径,包括路径,c++标准(默认是c++ 17)以及更多。
- 使用快捷键
Ctrl+Shift+P,搜索C/C++: Edit Configurations (UI)


