JUC基础-0606
9.ReentrantReadWriteLock读写锁
9.1 锁的基本概念
悲观锁:不支持并发,效率低,但是可以解决所有并发安全问题
乐观锁:支持并发读,维护一个版本号,写的时候比较版本号进行控制,先提交的版本号的线程可以进行写。
表锁:只操作一条记录的时候,对整张表上锁
行锁:只对一条记录上锁,行锁会发生死锁。
读锁:共享锁,发生死锁
写锁:独占锁,发生死锁
读锁发生死锁案例:
- 两个线程都持有读锁,不释放并都企图获取写锁
- 读锁升级写锁可能会导致死锁:这是因为在升级期间,读锁需要被释放,但是写锁在获得之前需要等待所有的读锁释放。如果有其他线程持有读锁并试图获取写锁,则会出现死锁情况。因此,建议在升级锁之前先释放读锁,并在获得写锁之前检查是否存在等待的写锁。
写锁发生死锁案例:
- 两个线程都要对两条记录进行修改,两线程都持有一条记录的写锁,不释放,并企图获取另一条记录的写锁,产生死锁。
9.2 读写锁介绍
现实中有这样一种场景:对共享资源有读和写的操作,且写操作没有读操作那 么频繁。在没有写操作的时候,多个线程同时读一个资源没有任何问题,所以应该允许多个线程同时读取共享资源;但是如果一个线程想去写这些共享资源,就不应该允许其他线程对该资源进行读和写的操作了。
针对这种场景,JAVA 的并发包提供了读写锁 ReentrantReadWriteLock, 它表示两个锁,一个是读操作相关的锁,称为共享锁;一个是写相关的锁,称为排他锁
- 线程进入读锁的前提条件:
- 没有其他线程的写锁
- 没有写请求, 或者有写请求,但调用线程和持有锁的线程是同一个(可重入锁)。
- 线程进入写锁的前提条件:
- 没有其他线程的读锁
- 没有其他线程的写锁
- 而读写锁有以下三个重要的特性:
- 公平选择性:支持非公平(默认)和公平的锁获取方式,吞吐量还是非公 平优于公平。
- 重进入:读锁和写锁都支持线程重进入。
- 锁降级:遵循获取写锁、获取读锁再释放写锁的次序,写锁能够降级成为读锁。
//资源类
class MyCache {
    //创建map集合
    private volatile Map<String,Object> map = new HashMap<>();

    //创建读写锁对象
    private ReadWriteLock rwLock = new ReentrantReadWriteLock();

    //放数据
    public void put(String key,Object value) {
        //添加写锁
        rwLock.writeLock().lock();

        try {
            System.out.println(Thread.currentThread().getName()+" 正在写操作"+key);
            //暂停一会
            TimeUnit.MICROSECONDS.sleep(300);
            //放数据
            map.put(key,value);
            System.out.println(Thread.currentThread().getName()+" 写完了"+key);
        } catch (InterruptedException e) {
            e.printStackTrace();
        } finally {
            //释放写锁
            rwLock.writeLock().unlock();
        }
    }

    //取数据
    public Object get(String key) {
        //添加读锁
        rwLock.readLock().lock();
        Object result = null;
        try {
            System.out.println(Thread.currentThread().getName()+" 正在读取操作"+key);
            //暂停一会
            TimeUnit.MICROSECONDS.sleep(300);
            result = map.get(key);
            System.out.println(Thread.currentThread().getName()+" 取完了"+key);
        } catch (InterruptedException e) {
            e.printStackTrace();
        } finally {
            //释放读锁
            rwLock.readLock().unlock();
        }
        return result;
    }
}

public class ReadWriteLockDemo {
    public static void main(String[] args) throws InterruptedException {
        MyCache myCache = new MyCache();
        //创建线程放数据
        for (int i = 1; i <=5; i++) {
            final int num = i;
            new Thread(()->{
                myCache.put(num+"",num+"");
            },String.valueOf(i)).start();
        }

        TimeUnit.MICROSECONDS.sleep(300);

        //创建线程取数据
        for (int i = 1; i <=5; i++) {
            final int num = i;
            new Thread(()->{
                myCache.get(num+"");
            },String.valueOf(i)).start();
        }
    }
}
注意:如果不进行加锁的操作,可能会存在没写完就开始读,然后读出null的情况
9.3 读写锁演变
读写锁:一个资源可以被一个或多个读线程访问,或者被一个写线程访问。读写互斥,读读共享
- 无锁情况:多线程抢夺资源
- 加锁:使用synchronized和ReentrantLock
- 都是独占式的
- 每次只能来一个操作,读读不共享
- 读写锁:ReenTrantReadWriteLock
- 读读共享,提升性能,同时多人读
- 写独占
- 缺点:容易造成锁饥饿问题。例如一直有读进程,没有机会写。
9.4 读写锁的降级
- 将写入锁降级为读锁
- 过程:jdk8官方说明
- 获取写锁
- 再获取读锁
- 释放写锁
- 释放读锁
- 过程:jdk8官方说明
- 将读锁不能升级为写锁:读完成后才可以写,只有释放读锁之后才可以加写锁
- 过程:需要先读,释放读锁,再加写锁
代码演示:
				//锁降级

        //1 获取写锁
        writeLock.lock();
        System.out.println("-- writelock");

        //2 获取读锁
        readLock.lock();
        System.out.println("---read");

        //3 释放写锁
        writeLock.unlock();

        //4 释放读锁
        readLock.unlock();

//	输出结果:
-- writelock
---read
因为读写锁是可重入锁,所以,加完写锁可以加读锁。
但是反过来就不行了
			//2 获取读锁
        readLock.lock();
        System.out.println("---read");

        //1 获取写锁
        writeLock.lock();
        System.out.println("-- writelock");


        //3 释放写锁
        writeLock.unlock();

        //4 释放读锁
        readLock.unlock();
//	输出结果:
---read
  卡住了
原因: 当线程获取读锁的时候,可能有其他线程同时也在持有读锁,因此不能把获取读锁的线程“升级”为写锁。而对于获得写锁的线程,它一定独占了读写 锁,因此可以继续让它获取读锁,当它同时获取了写锁和读锁后,还可以先释 放写锁继续持有读锁,这样一个写锁就“降级”为了读锁。
10.阻塞队列BlockingQueue
10.1 BlockingQueue 简介
- Concurrent 包中,BlockingQueue 很好的解决了多线程中,如何高效安全 “传输”数据的问题。通过这些高效并且线程安全的队列类,为我们快速搭建 高质量的多线程程序带来极大的便利。本文详细介绍了 BlockingQueue 家庭 中的所有成员,包括他们各自的功能以及常见使用场景。
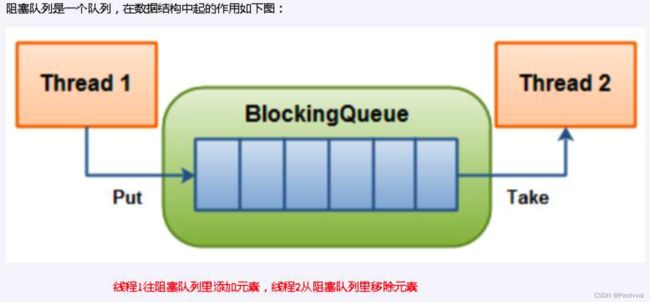
- 阻塞队列,顾名思义,首先它是一个队列, 通过一个共享的队列,可以使得数据由队列的一端输入,从另外一端输出;
- 常用的队列主要有以下两种:
- 先进先出(FIFO):先插入的队列的元素也最先出队列,类似于排队的功能。 从某种程度上来说这种队列也体现了一种公平性
- 后进先出(LIFO):后插入队列的元素最先出队列,这种队列优先处理最近发 生的事件(栈)
- 在多线程领域:所谓阻塞,在某些情况下会挂起线程(即阻塞),一旦条件满足,被挂起 的线程又会自动被唤起
- 为什么需要 BlockingQueue
- 好处是我们不需要关心什么时候需要阻塞线程,什么时候需要唤醒线程,因为这一切 BlockingQueue 都给你一手包办了
- 在 concurrent 包发布以前,在多线程环境下,我们每个程序员都必须去自己控制这些细 节,尤其还要兼顾效率和线程安全,而这会给我们的程序带来不小的复杂度。
- 多线程环境中,通过队列可以很容易实现数据共享,比如经典的“生产者”和“消费者”模型中,通过队列可以很便利地实现两者之间的数据共享。假设我们有若干生产者线程,另外又有若干个消费者线程。如果生产者线程需要把准备好的数据共享给消费者线程,利用队列的方式来传递数据,就可以很方便地解决他们之间的数据共享问题。但如果生产者和消费者在某个时间段内,万一发生数据处理速度不匹配的情况呢?理想情况下,如果生产者产出数据的速度大于消费者消费的速度,并且当生产出来的数据累积到一定程度的时候,那么生产者必须暂停等待一下(阻塞生产者线程),以便等待消费者线程把累积的数据处理完毕,反之亦然。
- 当队列中没有数据的情况下,消费者端的所有线程都会被自动阻塞(挂起), 直到有数据放入队列
- 当队列中填满数据的情况下,生产者端的所有线程都会被自动阻塞(挂起), 直到队列中有空的位置,线程被自动唤醒
10.2 阻塞队列分类
10.2.1 ArrayBolckingQueue(常用)
- 基于数组的阻塞队列实现,在 ArrayBlockingQueue 内部,维护了一个定长数 组,以便缓存队列中的数据对象,这是一个常用的阻塞队列,除了一个定长数 组外,ArrayBlockingQueue 内部还保存着两个整形变量,分别标识着队列的 头部和尾部在数组中的位置。
- ArrayBlockingQueue 在生产者放入数据和消费者获取数据,都是共用同一个锁对象,由此也意味着两者无法真正并行运行,这点尤其不同于 LinkedBlockingQueue;按照实现原理来分析,ArrayBlockingQueue 完全可以采用分离锁,从而实现生产者和消费者操作的完全并行运行。DougLea之所以没这样去做,也许是因为 ArrayBlockingQueue 的数据写入和获取操作已经足够轻巧,以至于引入独立的锁机制,除了给代码带来额外的复杂性外,其在性能上完全占不到任何便宜。 ArrayBlockingQueue 和 LinkedBlockingQueue 间还有一个明显的不同之处在于,前者在插入或删除 元素时不会产生或销毁任何额外的对象实例,而后者则会生成一个额外的 Node 对象。这在长时间内需要高效并发地处理大批量数据的系统中,其对于 GC 的影响还是存在一定的区别。而在创建 ArrayBlockingQueue 时,我们还 可以控制对象的内部锁是否采用公平锁,默认采用非公平锁。
- 一句话总结 :由数组结构组成的有界阻塞队列。
10.2.2 LinkedBlockingQueue(常用)
- ArrayBlockingQueue 和 LinkedBlockingQueue 是两个最普通也是最常用 的阻塞队列,一般情况下,在处理多线程间的生产者消费者问题,使用这两个 类足以。
- 一句话总结:由链表结构组成的有界(但大小默认值为 integer.MAX_VALUE)阻塞队列。
10.2.3 DelayQueue
一句话总结:使用优先级队列实现的延迟无界阻塞队列。
10.2.4 PriorityBlockingQueue
- 基于优先级的阻塞队列(优先级的判断通过构造函数传入的 Compator 对象来 决定),但需要注意的是 PriorityBlockingQueue 并不会阻塞数据生产者,而 只会在没有可消费的数据时,阻塞数据的消费者。
- 因此使用的时候要特别注意,生产者生产数据的速度绝对不能快于消费者消费 数据的速度,否则时间一长,会最终耗尽所有的可用堆内存空间。
- 在实现 PriorityBlockingQueue 时,内部控制线程同步的锁采用的是公平锁。
- 一句话总结: 支持优先级排序的无界阻塞队列。
10.2.5 SynchronousQueue
- 一种无缓冲的等待队列,类似于无中介的直接交易,有点像原始社会中的生产 者和消费者,生产者拿着产品去集市销售给产品的最终消费者,而消费者必须 亲自去集市找到所要商品的直接生产者,如果一方没有找到合适的目标,那么 对不起,大家都在集市等待。相对于有缓冲的 BlockingQueue 来说,少了一 个中间经销商的环节(缓冲区),如果有经销商,生产者直接把产品批发给经 销商,而无需在意经销商最终会将这些产品卖给那些消费者,由于经销商可以 库存一部分商品,因此相对于直接交易模式,总体来说采用中间经销商的模式 会吞吐量高一些(可以批量买卖);但另一方面,又因为经销商的引入,使得 产品从生产者到消费者中间增加了额外的交易环节,单个产品的及时响应性能 可能会降低。
- 声明一个 SynchronousQueue 有两种不同的方式,它们之间有着不太一样的 行为。
- 公平模式和非公平模式的区别:
- 公平模式:SynchronousQueue 会采用公平锁,并配合一个 FIFO 队列来阻塞 多余的生产者和消费者,从而体系整体的公平策略;
- 非公平模式(SynchronousQueue 默认):SynchronousQueue 采用非公平 锁,同时配合一个 LIFO 队列来管理多余的生产者和消费者,而后一种模式, 如果生产者和消费者的处理速度有差距,则很容易出现饥渴的情况,即可能有 某些生产者或者是消费者的数据永远都得不到处理。
- 一句话总结: 不存储元素的阻塞队列,也即单个元素的队列。
10.2.6 LinkedTransferQueue
一句话总结:由链表组成的无界阻塞队列。
10.2.7 LinkedBlockingDeque
- LinkedBlockingDeque 是一个由链表结构组成的双向阻塞队列,即可以从队 列的两端插入和移除元素。
- 一句话总结:由链表组成的双向阻塞队列
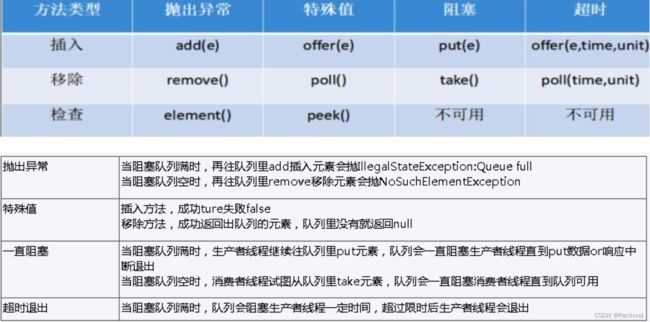
10.3 核心方法
代码演示:
public class BlockingQueueDemo {

    public static void main(String[] args) throws InterruptedException {
        //创建阻塞队列
        BlockingQueue<String> blockingQueue = new ArrayBlockingQueue<>(3);

        //第一组
        System.out.println(blockingQueue.add("a"));   //  打印true
        System.out.println(blockingQueue.add("b"));   //  打印true
        System.out.println(blockingQueue.add("c"));   //  打印true
        System.out.println(blockingQueue.element());  //  打印a

        System.out.println(blockingQueue.add("w"));   //  抛出异常 Queue full
        System.out.println(blockingQueue.remove());   // 打印a
        System.out.println(blockingQueue.remove());   // 打印b
        System.out.println(blockingQueue.remove());   // 打印c
        System.out.println(blockingQueue.remove());   // 抛出异常 NoSuchElementException

        //第二组
        System.out.println(blockingQueue.offer("a"));   //  打印 true
        System.out.println(blockingQueue.offer("b"));   //  打印 true
        System.out.println(blockingQueue.offer("c"));   //  打印 true
        System.out.println(blockingQueue.offer("www"));   //  打印 false

        System.out.println(blockingQueue.poll());   //  打印a
        System.out.println(blockingQueue.poll());   //  打印b
        System.out.println(blockingQueue.poll());   //  打印c
        System.out.println(blockingQueue.poll());   //  打印 null

        //第三组
        blockingQueue.put("a");        //
        blockingQueue.put("b");        //
        blockingQueue.put("c");        //
        blockingQueue.put("w");        //   陷入阻塞

        System.out.println(blockingQueue.take());       //  打印a
        System.out.println(blockingQueue.take());       //  打印b
        System.out.println(blockingQueue.take());       //  打印c
        System.out.println(blockingQueue.take());       //  陷入阻塞

        //第四组
        System.out.println(blockingQueue.offer("a"));   //  打印true
        System.out.println(blockingQueue.offer("b"));   //  打印true
        System.out.println(blockingQueue.offer("c"));   //  打印true
        System.out.println(blockingQueue.offer("w",3L, TimeUnit.SECONDS));  //  等待了3秒,打印false
    }
}
10.4 小结
1. 在多线程领域:所谓阻塞,在某些情况下会挂起线程(即阻塞),一旦条件满足,被挂起的线程又会自动被唤起
2. 为什么需要 BlockingQueue? 在 concurrent 包发布以前,在多线程环境下, 我们每个程序员都必须去自己控制这些细节,尤其还要兼顾效率和线程安全, 而这会给我们的程序带来不小的复杂度。使用后我们不需要关心什么时候需要 阻塞线程,什么时候需要唤醒线程,因为这一切 BlockingQueue 都给你一手 包办了
11.ThreadPool线程池
11.1 线程池概述
线程池(英语:thread pool):一种线程使用模式。线程过多会带来调度开销, 进而影响缓存局部性和整体性能。而线程池维护着多个线程,等待着监督管理 者分配可并发执行的任务。这避免了在处理短时间任务时创建与销毁线程的代 价。线程池不仅能够保证内核的充分利用,还能防止过分调度。
例子: 10 年前单核 CPU 电脑,假的多线程,像马戏团小丑玩多个球,CPU 需 要来回切换。 现在是多核电脑,多个线程各自跑在独立的 CPU 上,不用切换 效率高。
线程池的优势: 线程池做的工作只要是控制运行的线程数量,处理过程中将任 务放入队列,然后在线程创建后启动这些任务,如果线程数量超过了最大数量, 超出数量的线程排队等候,等其他线程执行完毕,再从队列中取出任务来执行。
它的主要特点为:
- 降低资源消耗: 通过重复利用已创建的线程降低线程创建和销毁造成的销耗。
- 提高响应速度: 当任务到达时,任务可以不需要等待线程创建就能立即执行。
- 提高线程的可管理性: 线程是稀缺资源,如果无限制的创建,不仅会销耗系统资源,还会降低系统的稳定性,使用线程池可以进行统一的分配,调优和监控。
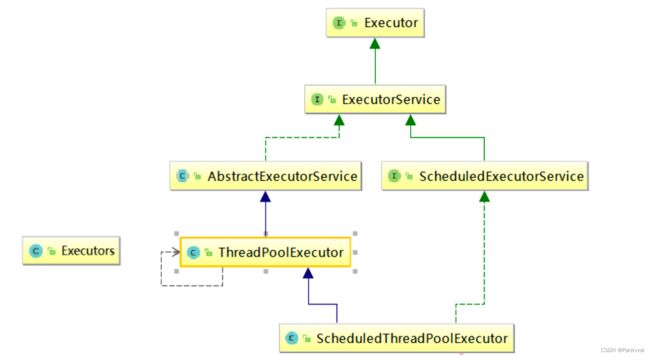
- Java 中的线程是通过 Executor 框架实现的,该框架中用到了 Executor,Executors,ExecutorService,ThreadPoolExecutor 这几个类
11.2 线程池分类
- Executors.newFixedThreadPool(int):一池N线程
- Executors.newSingleThreadExecutor( ):一个任务一个任务执行,一池一线程
- Executors.newCachedThreadPool( ):线程池根据需求创建线程,可扩容,遇强则强
11.2.1 newCachedThreadPool(常用)
- 作用:创建一个可缓存线程池,如果线程池长度超过处理需要,可灵活回收空 闲线程,若无可回收,则新建线程.
- 特点:
- 线程池中数量没有固定,可达到最大值(Interger. MAX_VALUE)
- 线程池中的线程可进行缓存重复利用和回收(回收默认时间为 1 分钟)
- 当线程池中,没有可用线程,会重新创建一个线程
- 创建方式:
// 扩容线程池 ExecutorService threadPool3 = Executors.newCachedThreadPool(); try { for(int i=1;i<=20;i++){ final int num = i; threadPool3.execute(()->{ System.out.println(Thread.currentThread().getName()+" 正在办理业务"+num); }); } } catch (Exception e) { throw new RuntimeException(e); }finally { threadPool1.shutdown(); } // 输出: pool-3-thread-1 正在办理业务1 pool-3-thread-3 正在办理业务3 pool-3-thread-2 正在办理业务2 pool-3-thread-4 正在办理业务4 pool-3-thread-5 正在办理业务5 pool-3-thread-2 正在办理业务6 pool-3-thread-1 正在办理业务10 pool-3-thread-4 正在办理业务8 pool-3-thread-3 正在办理业务9 pool-3-thread-1 正在办理业务13 pool-3-thread-5 正在办理业务7 pool-3-thread-2 正在办理业务14 pool-3-thread-4 正在办理业务12 pool-3-thread-1 正在办理业务17 pool-3-thread-3 正在办理业务19 pool-3-thread-5 正在办理业务16 pool-3-thread-2 正在办理业务18 pool-3-thread-6 正在办理业务11 pool-3-thread-8 正在办理业务20 pool-3-thread-7 正在办理业务15 - 场景: 适用于创建一个可无限扩大的线程池,服务器负载压力较轻,执行时间较 短,任务多的场景
11.2.2 newFixedThreadPool(常用)
- 作用:创建一个可重用固定线程数的线程池,以共享的无界队列方式来运行这 些线程。在任意点,在大多数线程会处于处理任务的活动状态。如果在所有线 程处于活动状态时提交附加任务,则在有可用线程之前,附加任务将在队列中 等待。如果在关闭前的执行期间由于失败而导致任何线程终止,那么一个新线 程将代替它执行后续的任务(如果需要)。在某个线程被显式地关闭之前,池 中的线程将一直存在。
- 特征:
- 线程池中的线程处于一定的量,可以很好的控制线程的并发量 • 线程可以重复被使用,在显示关闭之前,都将一直存在
- 超出一定量的线程被提交时候需在队列中等待
- 创建方式:
// 一池5线程 ExecutorService threadPool1 = Executors.newFixedThreadPool(5); try { for(int i=1;i<=10;i++){ final int num = i; threadPool1.execute(()->{ System.out.println(Thread.currentThread().getName()+" 正在办理业务"+num); }); } } catch (Exception e) { throw new RuntimeException(e); }finally { threadPool1.shutdown(); } // 输出: pool-1-thread-1 正在办理业务1 pool-1-thread-3 正在办理业务3 pool-1-thread-2 正在办理业务2 pool-1-thread-4 正在办理业务4 pool-1-thread-5 正在办理业务5 pool-1-thread-4 正在办理业务7 pool-1-thread-5 正在办理业务8 pool-1-thread-4 正在办理业务9 pool-1-thread-5 正在办理业务10 pool-1-thread-3 正在办理业务6 - 场景: 适用于可以预测线程数量的业务中,或者服务器负载较重,对线程数有严 格限制的场景
11.2.3 newSingleThreadExecutor(常用)
- 作用:创建一个使用单个 worker 线程的 Executor,以无界队列方式来运行该 线程。(注意,如果因为在关闭前的执行期间出现失败而终止了此单个线程, 那么如果需要,一个新线程将代替它执行后续的任务)。可保证顺序地执行各 个任务,并且在任意给定的时间不会有多个线程是活动的。与其他等效的 newFixedThreadPool 不同,可保证无需重新配置此方法所返回的执行程序即 可使用其他的线程。
- 特征: 线程池中最多执行 1 个线程,之后提交的线程活动将会排在队列中以此 执行
- 创建方式:
// 一池一线程 ExecutorService threadPool2 = Executors.newSingleThreadExecutor(); try { for(int i=1;i<=10;i++){ final int num = i; threadPool2.execute(()->{ System.out.println(Thread.currentThread().getName()+" 正在办理业务"+num); }); } } catch (Exception e) { throw new RuntimeException(e); }finally { threadPool1.shutdown(); } // 输出: pool-2-thread-1 正在办理业务1 pool-2-thread-1 正在办理业务2 pool-2-thread-1 正在办理业务3 pool-2-thread-1 正在办理业务4 pool-2-thread-1 正在办理业务5 pool-2-thread-1 正在办理业务6 pool-2-thread-1 正在办理业务7 pool-2-thread-1 正在办理业务8 pool-2-thread-1 正在办理业务9 pool-2-thread-1 正在办理业务10 - 场景:适用于需要保证顺序执行各个任务,并且在任意时间点,不会同时有多个 线程的场景
11.3 底层原理
11.2 中介绍的三个线程池底层实现都使用了ThreadPoolExecutor
11.3.1 ThreadPoolExecutor参数
public ThreadPoolExecutor(int corePoolSize,
                              int maximumPoolSize,
                              long keepAliveTime,
                              TimeUnit unit,
                              BlockingQueue<Runnable> workQueue,
                              ThreadFactory threadFactory,
                              RejectedExecutionHandler handler) {
        if (corePoolSize < 0 ||
            maximumPoolSize <= 0 ||
            maximumPoolSize < corePoolSize ||
            keepAliveTime < 0)
            throw new IllegalArgumentException();
        if (workQueue == null || threadFactory == null || handler == null)
            throw new NullPointerException();
        this.acc = System.getSecurityManager() == null ?
                null :
                AccessController.getContext();
        this.corePoolSize = corePoolSize;
        this.maximumPoolSize = maximumPoolSize;
        this.workQueue = workQueue;
        this.keepAliveTime = unit.toNanos(keepAliveTime);
        this.threadFactory = threadFactory;
        this.handler = handler;
    }
- corePoolSize: 常驻线程数量,核心线程数量。不过有没有任务,都有这些线程
- maximumPoolSize: 最大支持线程数量
- keepAliveTime: 线程存活时间,扩容的线程多长时间不使用之后会结束掉
- unit: 3中的时间单位
- workQueue: 阻塞队列,常驻线程数量都用完了就会进入阻塞队列
- threadFactory: 线程工厂,用于创建线程
- handler: 拒绝策略,
11.3.2 底层工作流程
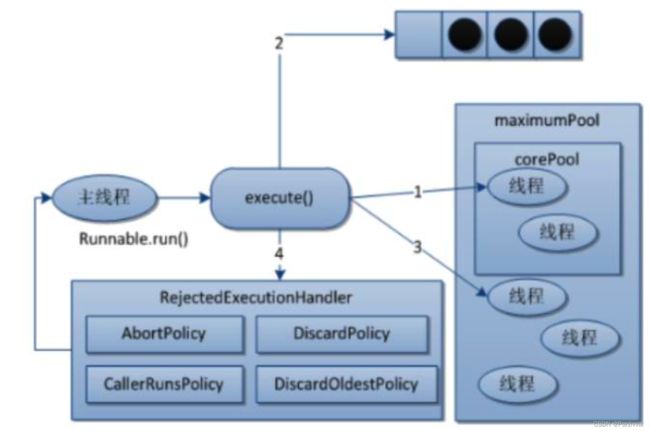
- 执行了execute之后,线程才会创建
- corePool:核心(常驻)
- maximumPool:最大线程
- 如果最大线程满了,阻塞队列也满了,直接执行拒绝策略
- 例如现有情况,来了1,2两个任务占满了常驻线程,第3,4,5会去阻塞队列等待,阻塞队列满了,会创建新线程去解决第6,7,8.对第9个执行拒绝策略。
- 任务流转:corePool -> BlockingQueue -> maximumPool -> rejectedExecutionHandler
11.3.3 拒绝策略
11.4 自定义线程池
-
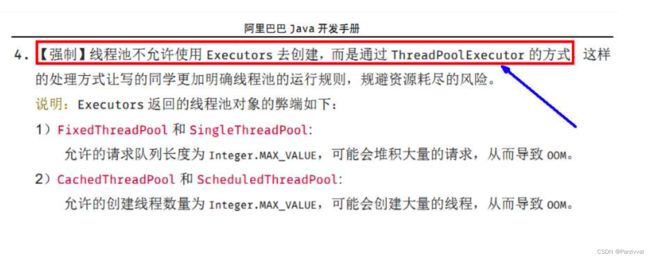
项目中创建多线程时,使用常见的三种线程池创建方式,单一、可变、定长都 有一定问题,原因是 FixedThreadPool 和 SingleThreadExecutor 底层都是用 LinkedBlockingQueue 实现的,这个队列最大长度为 Integer.MAX_VALUE, 容易导致 OOM。所以实际生产一般自己通过 ThreadPoolExecutor 的 7 个参 数,自定义线程池
-
创建线程池推荐适用ThreadPoolExecutor及其7个参数手动创建
- corePoolSize 线程池的核心线程数
- maximumPoolSize 能容纳的最大线程数 o keepAliveTime 空闲线程存活时间
- unit 存活的时间单位
- workQueue 存放提交但未执行任务的队列
- threadFactory 创建线程的工厂类
- handler 等待队列满后的拒绝策略
-
为什么不允许适用不允许Executors.的方式手动创建线程池,如下图
代码示例:
ThreadPoolExecutor threadPool = new ThreadPoolExecutor(2, 5, 2L, TimeUnit.SECONDS,
                new ArrayBlockingQueue<>(3),
                Executors.defaultThreadFactory(),
                new ThreadPoolExecutor.AbortPolicy()
        );

        //10个顾客请求
        try {
            for (int i = 1; i <=10; i++) {
                //执行
                threadPool.execute(()->{
                    System.out.println(Thread.currentThread().getName()+" 办理业务");
                });
            }
        }catch (Exception e) {
            e.printStackTrace();
        }finally {
            //关闭
            threadPool.shutdown();
        }
