Android进阶 View的工作原理:源码分析View的三大工作流程
Android进阶 View的工作原理:源码分析View的三大工作流程
导语
想象一下,如果我们要画画,把画画的流程拆分的话,那么应该分几个部分呢?一般来说,专业的画师会进行提前构图,然后再进行绘画最后上色。实际上Android系统把各种控件显示到屏幕也相当于是系统在进行绘画,也需要把绘画的过程分为几个大的步骤,这就是View的工作流程。
View的工作流程可以分为三个步骤:
- 测量(确定各个控件的大小尺寸和位置)
- 放置(将控件放置到指定位置和大小)
- 绘制(将控件渲染显示出来,这之后我们才能看到)
本篇文章就是主要介绍系统如何绘制各种各样的View控件的三大工作流程。
View的工作流程入口
在我的前几篇文章中,介绍到了Activity的基本构成(可以看这篇文章Android进阶 View事件体系(二):从源码解析View的事件分发),简要可以看下面这幅图片:
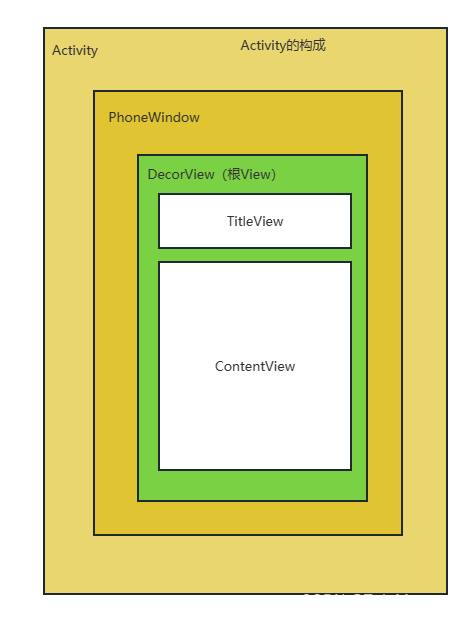
实际上,当DecorView被创建完成之后的一段时间内还不能被显示,因为还没被加载到Window中,这个过程是通过ViewRoot为桥梁连接Window和DecorView的。所以我们先来了解这个过程是怎样开始的。
1.DecorView被加载入Window中
当DecorView创建完毕,要加载到Window中时,需要先了解Activity的创建过程。当我们调用Activity的startActivity方法时,最终是调用了ActivityThread类的handleLaunchActivity方法,我们来看看它的源码:
public Activity handleLaunchActivity(ActivityClientRecord r,
            PendingTransactionActions pendingActions, Intent customIntent) {
        .......
        final Activity a = performLaunchActivity(r, customIntent);//1

        if (a != null) {
            r.createdConfig = new Configuration(mConfigurationController.getConfiguration());
            reportSizeConfigurations(r);
            if (!r.activity.mFinished && pendingActions != null) {
                pendingActions.setOldState(r.state);
                pendingActions.setRestoreInstanceState(true);
                pendingActions.setCallOnPostCreate(true);
            }
        } else {
            // If there was an error, for any reason, tell the activity manager to stop us.
            ActivityClient.getInstance().finishActivity(r.token, Activity.RESULT_CANCELED,
                    null /* resultData */, Activity.DONT_FINISH_TASK_WITH_ACTIVITY);
        }

        return a;
    }
上面代码处的的performLaunchActivity方法使用来创建Activity,里面会调用Activity的onCreate方法,从而完成DecorView的创建,具体我们看performLaunchActivity方法的源码:
private Activity performLaunchActivity(ActivityClientRecord r, Intent customIntent) {
      			......
                // Assigning the activity to the record before calling onCreate() allows
                // ActivityThread#getActivity() lookup for the callbacks triggered from
                // ActivityLifecycleCallbacks#onActivityCreated() or
                // ActivityLifecycleCallback#onActivityPostCreated().
                r.activity = activity;
                if (r.isPersistable()) {
                    mInstrumentation.callActivityOnCreate(activity, r.state, r.persistentState);//1
                } else {
                    mInstrumentation.callActivityOnCreate(activity, r.state);//2
                }
                if (!activity.mCalled) {
                    throw new SuperNotCalledException(
                        "Activity " + r.intent.getComponent().toShortString() +
                        " did not call through to super.onCreate()");
                }
                mLastReportedWindowingMode.put(activity.getActivityToken(),
                        config.windowConfiguration.getWindowingMode());
            }
            r.setState(ON_CREATE);

        } catch (SuperNotCalledException e) {
            throw e;

        } catch (Exception e) {
            if (!mInstrumentation.onException(activity, e)) {
                throw new RuntimeException(
                    "Unable to start activity " + component
                    + ": " + e.toString(), e);
            }
        }

        return activity;
    }
我们依然来关注关键的方法,上面注释一二处调用到了mInstrumentation.callActivityOnCreate方法,而这个callActivityOnCreate方法就会调用Activity的performCreate方法:
    public void callActivityOnCreate(Activity activity, Bundle icicle) {
        prePerformCreate(activity);
        activity.performCreate(icicle);
        postPerformCreate(activity);
    }
performCreate方法最终调用到了Activity的onCreate回调方法,在之前的文章里我们也提到过,onCreate方法中的setContentView方法就创建得到了DecorView,所以onCreate方法完成了DecorView的创建。
同理,onResume方法也是在ActivityThread中的handleResumeActivity方法中被调用的,我们之前提到的DecorView就是在这个方法里被添加进Window中的,我们接下来看这个handleResumeActivity的源码:
@Override
    public void handleResumeActivity(ActivityClientRecord r, boolean finalStateRequest,
            boolean isForward, String reason) {
     	.....
        if (r.window == null && !a.mFinished && willBeVisible) {
            r.window = r.activity.getWindow();
            View decor = r.window.getDecorView();//1
            decor.setVisibility(View.INVISIBLE);
            ViewManager wm = a.getWindowManager();//2
            WindowManager.LayoutParams l = r.window.getAttributes();
            a.mDecor = decor;
            l.type = WindowManager.LayoutParams.TYPE_BASE_APPLICATION;
            l.softInputMode |= forwardBit;
            if (r.mPreserveWindow) {
                a.mWindowAdded = true;
                r.mPreserveWindow = false;
                // Normally the ViewRoot sets up callbacks with the Activity
                // in addView->ViewRootImpl#setView. If we are instead reusing
                // the decor view we have to notify the view root that the
                // callbacks may have changed.
                ViewRootImpl impl = decor.getViewRootImpl();
                if (impl != null) {
                    impl.notifyChildRebuilt();
                }
            }
            if (a.mVisibleFromClient) {
                if (!a.mWindowAdded) {
                    a.mWindowAdded = true;
                    wm.addView(decor, l);//3
                } else {
                    // The activity will get a callback for this {@link LayoutParams} change
                    // earlier. However, at that time the decor will not be set (this is set
                    // in this method), so no action will be taken. This call ensures the
                    // callback occurs with the decor set.
                    a.onWindowAttributesChanged(l);
                }
            }

			.....
    }
源码较长,我们这里只选取我们需要关注的几行,先看注释一处,获得了我们创建的Activity中的DecorView对象,注释二处则是获得了WindowManager对象,这个对象是用来将DecorView添加到Window中的,紧接着第三行注释处就调用了WindowManger的addView方法,将DecorView加载进入了Window中,这个具体的过程我们就不展开了,以后的博客中将会介绍到。总之只要知道是在onResume方法中将DecorView加载进入Window即可。
2.ViewRootImpl的performTraversals
实际上,当我们详细了解到DecorView是如何加载到Window中,就可以发现实际上是通过ViewRootImpl的setView加载的:
root.setView(view, wparams, panelParentView, userId);
实际上,也正是通过ViewRootImpl的performTraversal方法开始View的工作流程的,详细见下面的源码:
private void performTraversals() {
			....

                    performMeasure(childWidthMeasureSpec, childHeightMeasureSpec);//1

                    int width = host.getMeasuredWidth();
                    int height = host.getMeasuredHeight();
                    boolean measureAgain = false;

                    if (lp.horizontalWeight > 0.0f) {
                        width += (int) ((mWidth - width) * lp.horizontalWeight);
                        childWidthMeasureSpec = MeasureSpec.makeMeasureSpec(width,
                                MeasureSpec.EXACTLY);
                        measureAgain = true;
                    }
                    if (lp.verticalWeight > 0.0f) {
                        height += (int) ((mHeight - height) * lp.verticalWeight);
                        childHeightMeasureSpec = MeasureSpec.makeMeasureSpec(height,
                                MeasureSpec.EXACTLY);
                        measureAgain = true;
                    }

                    if (measureAgain) {
                        if (DEBUG_LAYOUT) Log.v(mTag,
                                "And hey let's measure once more: width=" + width
                                + " height=" + height);
                        performMeasure(childWidthMeasureSpec, childHeightMeasureSpec);
                    }

                    layoutRequested = true;
                }
            }
        } else {
            maybeHandleWindowMove(frame);
        }

        if (surfaceSizeChanged || surfaceReplaced || surfaceCreated || windowAttributesChanged) {
            prepareSurfaces();
        }

        final boolean didLayout = layoutRequested && (!mStopped || mReportNextDraw);
        boolean triggerGlobalLayoutListener = didLayout
                || mAttachInfo.mRecomputeGlobalAttributes;
        if (didLayout) {
            performLayout(lp, mWidth, mHeight);//2

            // By this point all views have been sized and positioned
            // We can compute the transparent area

            if ((host.mPrivateFlags & View.PFLAG_REQUEST_TRANSPARENT_REGIONS) != 0) {
                // start out transparent
                // TODO: AVOID THAT CALL BY CACHING THE RESULT?
                host.getLocationInWindow(mTmpLocation);
                mTransparentRegion.set(mTmpLocation[0], mTmpLocation[1],
                        mTmpLocation[0] + host.mRight - host.mLeft,
                        mTmpLocation[1] + host.mBottom - host.mTop);

                host.gatherTransparentRegion(mTransparentRegion);
                if (mTranslator != null) {
                    mTranslator.translateRegionInWindowToScreen(mTransparentRegion);
                }

                if (!mTransparentRegion.equals(mPreviousTransparentRegion)) {
                    mPreviousTransparentRegion.set(mTransparentRegion);
                    mFullRedrawNeeded = true;
                    SurfaceControl sc = getSurfaceControl();
                    if (sc.isValid()) {
                        mTransaction.setTransparentRegionHint(sc, mTransparentRegion).apply();
                    }
                }
            }

            if (DBG) {
                System.out.println("======================================");
                System.out.println("performTraversals -- after setFrame");
                host.debug();
            }
        }
       .....
	   .....
       .....

        if (!isViewVisible) {
            if (mPendingTransitions != null && mPendingTransitions.size() > 0) {
                for (int i = 0; i < mPendingTransitions.size(); ++i) {
                    mPendingTransitions.get(i).endChangingAnimations();
                }
                mPendingTransitions.clear();
            }

            if (mSyncBufferCallback != null) {
                mSyncBufferCallback.onBufferReady(null);
            }
        } else if (cancelAndRedraw) {
            // Try again
            scheduleTraversals();
        } else {
            if (mPendingTransitions != null && mPendingTransitions.size() > 0) {
                for (int i = 0; i < mPendingTransitions.size(); ++i) {
                    mPendingTransitions.get(i).startChangingAnimations();
                }
                mPendingTransitions.clear();
            }
            if (!performDraw() && mSyncBufferCallback != null) {//3
                mSyncBufferCallback.onBufferReady(null);
            }
        }
		....
    }
这个方法比较长,我们仍然截取我们需要的部分,可以看到在注释1,2,3处分别调用了performMeasure,performLayout,performDraw三个方法,这三个方法会会调用对应的measure,layout和draw三个方法,而这三个方法又会调用对应的onMeasure,onLayout,onDraw三个方法,具体如下图所示:
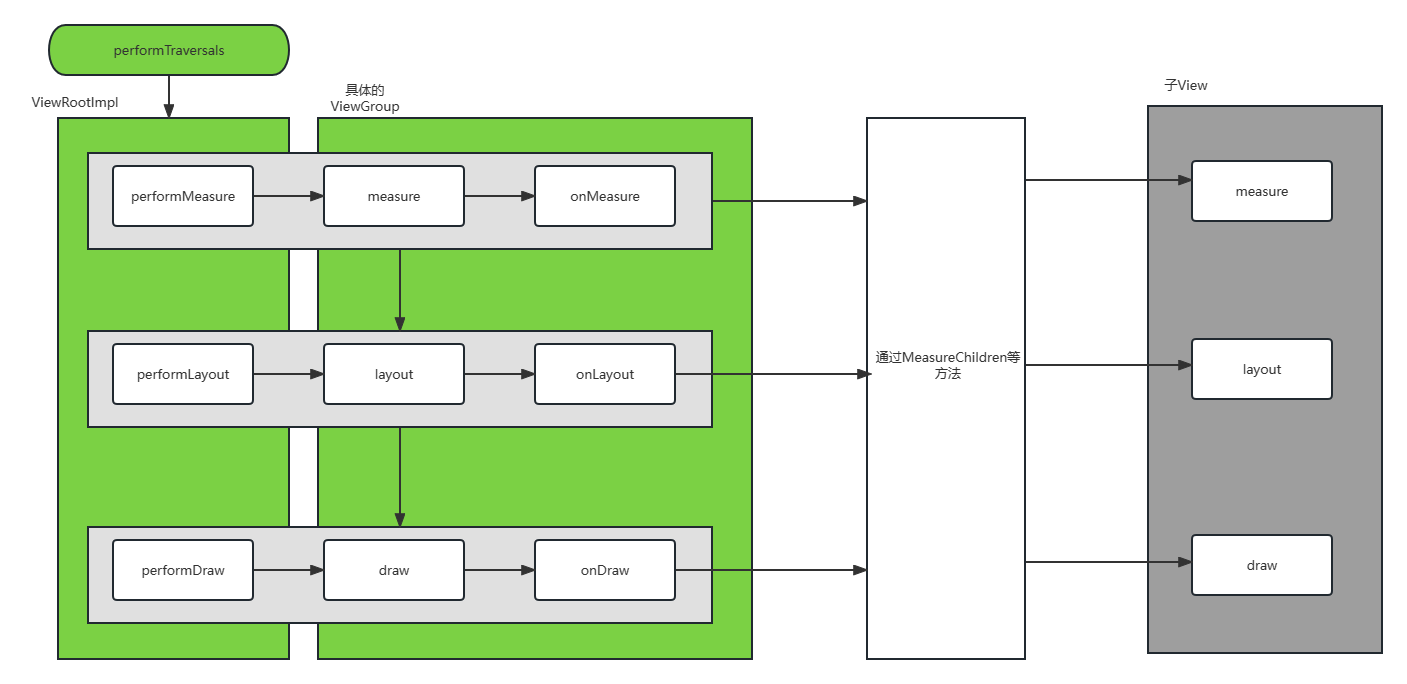
对于ViewGroup来说,performTraversals方法会依次调用performMeasure,performLayout和performDraw三个方法,这三个方法会依次执行对应的工作方法,最后会调用onMeasure等对应方法,在对应的onMeasure等方法中又会依次调用子View的measure等流程,总之就是会递归执行,和事件分发的思想其实很类似,归根到底还是View的树结构。
理解MeasureSpec
MeasureSpec可以理解为测量规格尺寸,里面存储了View的测量得到的宽和高的信息。这个测量规格尺寸很大程度地决定了一个View实际的规格尺寸。之所以说是很大程度是因为在测量过程中测量过程受到父容器的MeasureSpec影响。不过一个View本身的MeasureSpec又会受到View的布局参数LayoutParams和父容器的MeasureSpec影响:

在onMeasure方法中,将会根据这个MeasureSpec来确定View的宽和高,接下来我们来看MeasureSpec类的主要内容:
 public static class MeasureSpec {
        private static final int MODE_SHIFT = 30;
        private static final int MODE_MASK  = 0x3 << MODE_SHIFT;

        public @interface MeasureSpecMode {}
        public static final int UNSPECIFIED = 0 << MODE_SHIFT;
        public static final int EXACTLY     = 1 << MODE_SHIFT;
        public static final int AT_MOST     = 2 << MODE_SHIFT;

        public static int makeMeasureSpec(@IntRange(from = 0, to = (1 << MeasureSpec.MODE_SHIFT) - 1) int size,
                                          @MeasureSpecMode int mode) {
            if (sUseBrokenMakeMeasureSpec) {
                return size + mode;
            } else {
                return (size & ~MODE_MASK) | (mode & MODE_MASK);
            }
        }


        public static int makeSafeMeasureSpec(int size, int mode) {
            if (sUseZeroUnspecifiedMeasureSpec && mode == UNSPECIFIED) {
                return 0;
            }
            return makeMeasureSpec(size, mode);
        }


        public static int getMode(int measureSpec) {
            //noinspection ResourceType
            return (measureSpec & MODE_MASK);
        }
        public static int getSize(int measureSpec) {
            return (measureSpec & ~MODE_MASK);
        }

		...
    }
这个MeasureSpec类是View的内部类,从它的常量可以看出来,它代表了32位的int值,其中高2位代表specMode,低30位代表specSize,即一个模式,一个尺寸。关于测量模式,有三种状态:
| 模式 | 含义 |
|---|---|
| UNSPECIFIED | 未指定模式,View想多大就多大,父容器不做限制,一般用于系统内部的测量,我们也不关注这个 |
| EXACTLY | 精确模式,对应于match_parent属性 和 指定了具体的数值的情况。这个时候父容器已经检测出了View所需要的精确大小,View的最终大小就是SpecSize所指定的值 |
| AT_MOST | 最大模式,对应wrap_content属性。父容器制定了一个可用大小,View的大小不能大于这个值,具体是什么要看不同的View的实现 |
说到这里,就得看看我们之前所说的DecorView的MesureSpect了,对于DecorView来说,它就是顶级的View了,那么它的测量是怎样的呢,这个测量是在ViewRootImpl中实现的:
  childWidthMeasureSpec = getRootMeasureSpec(baseSize, lp.width, lp.privateFlags);
  childHeightMeasureSpec = getRootMeasureSpec(desiredWindowHeight, lp.height,lp.privateFlags);
  performMeasure(childWidthMeasureSpec, childHeightMeasureSpec);
所以又是调用getRootMeasureSpec方法的,我们简单了解一下即可:
    private static int getRootMeasureSpec(int windowSize, int measurement, int privateFlags) {
        int measureSpec;
        final int rootDimension = (privateFlags & PRIVATE_FLAG_LAYOUT_SIZE_EXTENDED_BY_CUTOUT) != 0
                ? MATCH_PARENT : measurement;
        switch (rootDimension) {
            case ViewGroup.LayoutParams.MATCH_PARENT:
                // Window can't resize. Force root view to be windowSize.
                measureSpec = MeasureSpec.makeMeasureSpec(windowSize, MeasureSpec.EXACTLY);
                break;
            case ViewGroup.LayoutParams.WRAP_CONTENT:
                // Window can resize. Set max size for root view.
                measureSpec = MeasureSpec.makeMeasureSpec(windowSize, MeasureSpec.AT_MOST);
                break;
            default:
                // Window wants to be an exact size. Force root view to be that size.
                measureSpec = MeasureSpec.makeMeasureSpec(rootDimension, MeasureSpec.EXACTLY);
                break;
        }
        return measureSpec;
    }
其中,windowSize参数指的是窗口的尺寸,所以对于DecorView来说,它的MeasureSpect是由自身的LayoutParams参数决定的。
上面说的是DecorView,而对于普通的View来说(ViewGroup是没有performMeasure方法的),View的measure过程是由ViewGroup的measureChild等一系列方法而开启的。接下来我们来看View的measure流程。
View的Measure流程
先来看View的onMeasure方法:
  protected void onMeasure(int widthMeasureSpec, int heightMeasureSpec) {
      setMeasuredDimension(getDefaultSize(getSuggestedMinimumWidth(), widthMeasureSpec),
              getDefaultSize(getSuggestedMinimumHeight(), heightMeasureSpec));
  }
在 Android 源码中,setMeasureDimension() 方法用于设置 View 的测量尺寸。具体而言,它用于设置 View 在进行测量过程中计算得出的宽度和高度。当一个 View 被测量时,系统会调用其 onMeasure() 方法来计算它的宽度和高度。在 onMeasure() 方法内部,会调用 setMeasureDimension() 方法来设置测量尺寸,将计算得出的宽度和高度保存起来。
总而言之,setMeasureDimension() 方法完成的操作是将计算得出的宽度和高度保存为 View 的测量尺寸,在布局过程中起到重要的参考作用。
所以默认设置的尺寸是什么呢?是通过getDefaultSize(getSuggestedMinimumWidth(), widthMeasureSpec)方法和getDefaultSize(getSuggestedMinimumHeight(), heightMeasureSpec)方法得出的相应的宽度和高度。
  public static int getDefaultSize(int size, int measureSpec) {
        int result = size;
        int specMode = MeasureSpec.getMode(measureSpec);
        int specSize = MeasureSpec.getSize(measureSpec);

        switch (specMode) {
        case MeasureSpec.UNSPECIFIED:
            result = size;
            break;
        case MeasureSpec.AT_MOST:
        case MeasureSpec.EXACTLY:
            result = specSize;
            break;
        }
        return result;
    }

	protected int getSuggestedMinimumWidth() {
 		 return (mBackground == null) ? mMinWidth : max(mMinWidth, mBackground.getMinimumWidth());
		}

	protected int getSuggestedMinimumHeight() {
        return (mBackground == null) ? mMinHeight : max(mMinHeight, mBackground.getMinimumHeight());
   		 }
在getDefaultSize方法中,size参数是尺寸,measureSpec是测量模式,最终返回的参数就是得到的测量尺寸measureSpecSize,在这方法中我们可以知道,默认的测量方法下得到的尺寸大小是不区分EXACTLY模式和AT_MOST模式的,因为他们最终都是将measureSpecSize中的参数给直接返回,所以说如果我们想要实现自己的View的话就需要重写这个方法。
而getSuggestedMinimumWidth/Height方法得到的UNSOECUFUED模式下的尺寸返回值,它的取值取决于View有没有设置背景,如果没有设置背景的话,那么它的值将会是mMinWidth属性或者mMinHeight的值;设置了背景的话,它的取值就是背景的宽和高。其实总的来说我们也没必要深究这个参数了。
ViewGroup的measure流程
对于ViewGroup来说,它不只要测量自身的尺寸,还需要测量子View的尺寸,ViewGroup中没有定义onMeasure方法,但却定义了measureChildren方法:
    protected void measureChildren(int widthMeasureSpec, int heightMeasureSpec) {
        final int size = mChildrenCount;
        final View[] children = mChildren;
        for (int i = 0; i < size; ++i) {
            final View child = children[i];
            if ((child.mViewFlags & VISIBILITY_MASK) != GONE) {
                measureChild(child, widthMeasureSpec, heightMeasureSpec);
            }
        }
    }

	protected void measureChild(View child, int parentWidthMeasureSpec,
        int parentHeightMeasureSpec) {
        final LayoutParams lp = child.getLayoutParams();

        final int childWidthMeasureSpec = getChildMeasureSpec(parentWidthMeasureSpec,
                mPaddingLeft + mPaddingRight, lp.width);
        final int childHeightMeasureSpec = getChildMeasureSpec(parentHeightMeasureSpec,
                mPaddingTop + mPaddingBottom, lp.height);

        child.measure(childWidthMeasureSpec, childHeightMeasureSpec);
    }
显然这是会遍历子View并开启它们的measure流程的,具体获得子View的MeasureSpec参数是在measureChild方法中,通过getChildMeasureSpec得到了子View的参数,传入的第一个参数是父容器的MeasureSpec,之前提到过子View的MeasureSpec的转化会受到父容器的影响就是在这里体现,第二个参数是已经使用的空间,具体来说就是Padding参数(还有个方法是也考虑到Margin参数的),第三个参数是子View的布局参数LayoutParams。接下来我们看看这个方法的转化规则:
    public static int getChildMeasureSpec(int spec, int padding, int childDimension) {
        int specMode = MeasureSpec.getMode(spec);
        int specSize = MeasureSpec.getSize(spec);

        int size = Math.max(0, specSize - padding);

        int resultSize = 0;
        int resultMode = 0;

        switch (specMode) {
        // Parent has imposed an exact size on us
        case MeasureSpec.EXACTLY:
            if (childDimension >= 0) {
                resultSize = childDimension;
                resultMode = MeasureSpec.EXACTLY;
            } else if (childDimension == LayoutParams.MATCH_PARENT) {
                // Child wants to be our size. So be it.
                resultSize = size;
                resultMode = MeasureSpec.EXACTLY;
            } else if (childDimension == LayoutParams.WRAP_CONTENT) {
                // Child wants to determine its own size. It can't be
                // bigger than us.
                resultSize = size;
                resultMode = MeasureSpec.AT_MOST;
            }
            break;

        // Parent has imposed a maximum size on us
        case MeasureSpec.AT_MOST:
            if (childDimension >= 0) {
                // Child wants a specific size... so be it
                resultSize = childDimension;
                resultMode = MeasureSpec.EXACTLY;
            } else if (childDimension == LayoutParams.MATCH_PARENT) {
                // Child wants to be our size, but our size is not fixed.
                // Constrain child to not be bigger than us.
                resultSize = size;
                resultMode = MeasureSpec.AT_MOST;
            } else if (childDimension == LayoutParams.WRAP_CONTENT) {
                // Child wants to determine its own size. It can't be
                // bigger than us.
                resultSize = size;
                resultMode = MeasureSpec.AT_MOST;
            }
            break;

        // Parent asked to see how big we want to be
        case MeasureSpec.UNSPECIFIED:
            if (childDimension >= 0) {
                // Child wants a specific size... let them have it
                resultSize = childDimension;
                resultMode = MeasureSpec.EXACTLY;
            } else if (childDimension == LayoutParams.MATCH_PARENT) {
                // Child wants to be our size... find out how big it should
                // be
                resultSize = View.sUseZeroUnspecifiedMeasureSpec ? 0 : size;
                resultMode = MeasureSpec.UNSPECIFIED;
            } else if (childDimension == LayoutParams.WRAP_CONTENT) {
                // Child wants to determine its own size.... find out how
                // big it should be
                resultSize = View.sUseZeroUnspecifiedMeasureSpec ? 0 : size;
                resultMode = MeasureSpec.UNSPECIFIED;
            }
            break;
        }
        //noinspection ResourceType
        return MeasureSpec.makeMeasureSpec(resultSize, resultMode);
    }
根据上面的逻辑,我们可以总结出以下表格:
| 子View布局参数 \ 父容器模式 | EXACTLY | AT_MOST | UNSPECIFIED |
|---|---|---|---|
| dp/px(精确给定了数值) | EXACTLY-childSize | EXACTLY-childSize | EXACTLY-childSize |
| match_parent | EXACTLY-parentSize | AT_MOST-parentSize | UNSPECIFIED-0 |
| wrap_content | AT_MOST-parentSize | AT_MOST-parentSize | UNSPECIFIED-0 |
如果我们在Android绘制布局过程中经常会尝试各种布局的话,相信一定会对这些规则深有体会,实际上我们使用中得到的各种效果大多数也是遵循这种规则的,当然我们也可定义自己的规则。这些得到的参数最终会传递到我们之前的measure方法中并调用setDimension方法设置到View的参数中去。
ViewGroup并没有提供onMeasure方法(不过ViewGroup也是View,View有omMeasure方法但会有缺陷),而是让各种子类去实现测量方法,究其原因就是ViewGroup有其布局的不同需要,很难统一
以LinearLayout为例,分析其measure方法
为了帮助我们更加深刻地理解这个过程,我们以我们最常用到的LinearLayout为例,来分析它的measure过程。
    protected void onMeasure(int widthMeasureSpec, int heightMeasureSpec) {
        if (mOrientation == VERTICAL) {
            measureVertical(widthMeasureSpec, heightMeasureSpec);
        } else {
            measureHorizontal(widthMeasureSpec, heightMeasureSpec);
        }
    }
LinearLayout的onMeasure主要就是根据朝向来确定测量方式的,这也和使用过程中指定的朝向参数相对应,接下来我们看看朝向是纵向时的测量流程:
void measureVertical(int widthMeasureSpec, int heightMeasureSpec) {
        mTotalLength = 0;
        int maxWidth = 0;
        int childState = 0;
        int alternativeMaxWidth = 0;
        int weightedMaxWidth = 0;
        boolean allFillParent = true;
        float totalWeight = 0;

        final int count = getVirtualChildCount();

        final int widthMode = MeasureSpec.getMode(widthMeasureSpec);
        final int heightMode = MeasureSpec.getMode(heightMeasureSpec);
		......
        // See how tall everyone is. Also remember max width.
        for (int i = 0; i < count; ++i) {
            final View child = getVirtualChildAt(i);
            if (child == null) {
                mTotalLength += measureNullChild(i);
                continue;
            }

            if (child.getVisibility() == View.GONE) {
               i += getChildrenSkipCount(child, i);
               continue;
            }

            nonSkippedChildCount++;
            if (hasDividerBeforeChildAt(i)) {
                mTotalLength += mDividerHeight;
            }

            final LayoutParams lp = (LayoutParams) child.getLayoutParams();

            totalWeight += lp.weight;

            final boolean useExcessSpace = lp.height == 0 && lp.weight > 0;
            if (heightMode == MeasureSpec.EXACTLY && useExcessSpace) {
                final int totalLength = mTotalLength;
                mTotalLength = Math.max(totalLength, totalLength + lp.topMargin + lp.bottomMargin);
                skippedMeasure = true;
            } else {
                if (useExcessSpace) {
                    lp.height = LayoutParams.WRAP_CONTENT;
                }
                final int usedHeight = totalWeight == 0 ? mTotalLength : 0;
                measureChildBeforeLayout(child, i, widthMeasureSpec, 0,
                        heightMeasureSpec, usedHeight);

                final int childHeight = child.getMeasuredHeight();
                if (useExcessSpace) {
                    lp.height = 0;
                    consumedExcessSpace += childHeight;
                }

                final int totalLength = mTotalLength;
                mTotalLength = Math.max(totalLength, totalLength + childHeight + lp.topMargin +
                       lp.bottomMargin + getNextLocationOffset(child));

                if (useLargestChild) {
                    largestChildHeight = Math.max(childHeight, largestChildHeight);
                }
            }
            if ((baselineChildIndex >= 0) && (baselineChildIndex == i + 1)) {
               mBaselineChildTop = mTotalLength;
            }
            if (i < baselineChildIndex && lp.weight > 0) {
                throw new RuntimeException("A child of LinearLayout with index "
                        + "less than mBaselineAlignedChildIndex has weight > 0, which "
                        + "won't work.  Either remove the weight, or don't set "
                        + "mBaselineAlignedChildIndex.");
            }

            boolean matchWidthLocally = false;
            if (widthMode != MeasureSpec.EXACTLY && lp.width == LayoutParams.MATCH_PARENT) {
                matchWidth = true;
                matchWidthLocally = true;
            }

            final int margin = lp.leftMargin + lp.rightMargin;
            final int measuredWidth = child.getMeasuredWidth() + margin;
            maxWidth = Math.max(maxWidth, measuredWidth);
            childState = combineMeasuredStates(childState, child.getMeasuredState());

            allFillParent = allFillParent && lp.width == LayoutParams.MATCH_PARENT;
            if (lp.weight > 0) {
                weightedMaxWidth = Math.max(weightedMaxWidth,
                        matchWidthLocally ? margin : measuredWidth);
            } else {
                alternativeMaxWidth = Math.max(alternativeMaxWidth,
                        matchWidthLocally ? margin : measuredWidth);
            }

            i += getChildrenSkipCount(child, i);
        }

        if (nonSkippedChildCount > 0 && hasDividerBeforeChildAt(count)) {
            mTotalLength += mDividerHeight;
        }

        if (useLargestChild &&
                (heightMode == MeasureSpec.AT_MOST || heightMode == MeasureSpec.UNSPECIFIED)) {
            mTotalLength = 0;

            for (int i = 0; i < count; ++i) {
                final View child = getVirtualChildAt(i);
                if (child == null) {
                    mTotalLength += measureNullChild(i);
                    continue;
                }

                if (child.getVisibility() == GONE) {
                    i += getChildrenSkipCount(child, i);
                    continue;
                }

                final LinearLayout.LayoutParams lp = (LinearLayout.LayoutParams)
                        child.getLayoutParams();
                // Account for negative margins
                final int totalLength = mTotalLength;
                mTotalLength = Math.max(totalLength, totalLength + largestChildHeight +
                        lp.topMargin + lp.bottomMargin + getNextLocationOffset(child));
            }
        }

        mTotalLength += mPaddingTop + mPaddingBottom;

        int heightSize = mTotalLength;

        heightSize = Math.max(heightSize, getSuggestedMinimumHeight());

        int heightSizeAndState = resolveSizeAndState(heightSize, heightMeasureSpec, 0);
        heightSize = heightSizeAndState & MEASURED_SIZE_MASK;
        int remainingExcess = heightSize - mTotalLength
                + (mAllowInconsistentMeasurement ? 0 : consumedExcessSpace);
        if (skippedMeasure
                || ((sRemeasureWeightedChildren || remainingExcess != 0) && totalWeight > 0.0f)) {
            float remainingWeightSum = mWeightSum > 0.0f ? mWeightSum : totalWeight;

            mTotalLength = 0;

            for (int i = 0; i < count; ++i) {
                final View child = getVirtualChildAt(i);
                if (child == null || child.getVisibility() == View.GONE) {
                    continue;
                }

                final LayoutParams lp = (LayoutParams) child.getLayoutParams();
                final float childWeight = lp.weight;
                if (childWeight > 0) {
                    final int share = (int) (childWeight * remainingExcess / remainingWeightSum);
                    remainingExcess -= share;
                    remainingWeightSum -= childWeight;

                    final int childHeight;
                    if (mUseLargestChild && heightMode != MeasureSpec.EXACTLY) {
                        childHeight = largestChildHeight;
                    } else if (lp.height == 0 && (!mAllowInconsistentMeasurement
                            || heightMode == MeasureSpec.EXACTLY)) {
                        childHeight = share;
                    } else {
                        childHeight = child.getMeasuredHeight() + share;
                    }

                    final int childHeightMeasureSpec = MeasureSpec.makeMeasureSpec(
                            Math.max(0, childHeight), MeasureSpec.EXACTLY);
                    final int childWidthMeasureSpec = getChildMeasureSpec(widthMeasureSpec,
                            mPaddingLeft + mPaddingRight + lp.leftMargin + lp.rightMargin,
                            lp.width);
                    child.measure(childWidthMeasureSpec, childHeightMeasureSpec);
                    childState = combineMeasuredStates(childState, child.getMeasuredState()
                            & (MEASURED_STATE_MASK>>MEASURED_HEIGHT_STATE_SHIFT));
                }

                final int margin =  lp.leftMargin + lp.rightMargin;
                final int measuredWidth = child.getMeasuredWidth() + margin;
                maxWidth = Math.max(maxWidth, measuredWidth);

                boolean matchWidthLocally = widthMode != MeasureSpec.EXACTLY &&
                        lp.width == LayoutParams.MATCH_PARENT;

                alternativeMaxWidth = Math.max(alternativeMaxWidth,
                        matchWidthLocally ? margin : measuredWidth);

                allFillParent = allFillParent && lp.width == LayoutParams.MATCH_PARENT;

                final int totalLength = mTotalLength;
                mTotalLength = Math.max(totalLength, totalLength + child.getMeasuredHeight() +
                        lp.topMargin + lp.bottomMargin + getNextLocationOffset(child));
            }
            mTotalLength += mPaddingTop + mPaddingBottom;
        } else {
            alternativeMaxWidth = Math.max(alternativeMaxWidth,
                                           weightedMaxWidth);

            if (useLargestChild && heightMode != MeasureSpec.EXACTLY) {
                for (int i = 0; i < count; i++) {
                    final View child = getVirtualChildAt(i);
                    if (child == null || child.getVisibility() == View.GONE) {
                        continue;
                    }

                    final LinearLayout.LayoutParams lp =
                            (LinearLayout.LayoutParams) child.getLayoutParams();

                    float childExtra = lp.weight;
                    if (childExtra > 0) {
                        child.measure(
                                MeasureSpec.makeMeasureSpec(child.getMeasuredWidth(),
                                        MeasureSpec.EXACTLY),
                                MeasureSpec.makeMeasureSpec(largestChildHeight,
                                        MeasureSpec.EXACTLY));
                    }
                }
            }
        }

        if (!allFillParent && widthMode != MeasureSpec.EXACTLY) {
            maxWidth = alternativeMaxWidth;
        }
        maxWidth += mPaddingLeft + mPaddingRight;
        maxWidth = Math.max(maxWidth, getSuggestedMinimumWidth());
        setMeasuredDimension(resolveSizeAndState(maxWidth, widthMeasureSpec, childState),
                heightSizeAndState);

        if (matchWidth) {
            forceUniformWidth(count, heightMeasureSpec);
        }
    }
调用 measureVertical() 方法时,它会在垂直方向上测量 LinearLayout 中的子 View。首先,一些变量被初始化,包括总长度(mTotalLength)、最大宽度(maxWidth)、子 View 的状态(childState)等。
接下来,通过调用 getVirtualChildCount() 方法获取子 View 的数量,并使用 MeasureSpec.getMode() 方法获取宽度和高度的测量模式。这些信息将在后续的测量过程中使用。在测量过程中,遍历 LinearLayout 中的每个子 View。对于每个子 View,首先检查其可见性。如果子 View 不可见(View.GONE),则跳过后续的测量过程。
对于可见的子 View,首先判断是否在其前面需要添加分隔线,如果需要则增加分隔线的高度到总长度(mTotalLength)中。
然后获取子 View 的布局参数(LayoutParams),并根据布局参数中的权重(weight)来累加总权重(totalWeight)。
接下来根据高度的测量模式和子 View 的布局参数,判断是否需要优化测量过程。如果子 View 的高度为 0 且权重大于 0,且高度测量模式为 MeasureSpec.EXACTLY,则说明子 View 只使用额外的空间进行布局,此时可以跳过测量过程(skippedMeasure 标志设为 true)。
如果不需要跳过测量过程,则根据子 View 的布局参数确定子 View 的高度。如果子 View 的高度为 0 且不需要保持一致的测量结果(mAllowInconsistentMeasurement 为 false),或者高度测量模式为 MeasureSpec.EXACTLY,则将子 View 的高度设置为 LayoutParams.WRAP_CONTENT,以便测量子 View 的最佳高度。
然后通过调用 measureChildBeforeLayout() 方法测量子 View 的尺寸,并获取测量后的子 View 的高度。
如果子 View 的高度需要使用额外的空间进行布局,则将子 View 的高度重置为 0,并将额外使用的空间累加到 consumedExcessSpace 变量中。
在测量完一个子 View 后,更新总长度(mTotalLength)的值,将当前子 View 的高度、上下边距以及下一个子 View 的位置偏移量加到总长度中。如果需要基于某个子 View 计算基线位置,记录该子 View 的位置为 mBaselineChildTop。如果当前子 View 的索引小于基线对齐的子 View 索引(baselineChildIndex),并且布局参数的权重大于 0,抛出异常。这是因为基线对齐的子 View 必须在没有权重的子 View 之后。然后判断是否需要匹配宽度。如果需要匹配宽度,则将最大宽度(maxWidth)设置为当前子 View 的测量宽度,并记录当前子 View 的状态(childState)。
在遍历所有子 View 完成后,根据测量模式和测量结果,计算 LinearLayout 的最终宽度和高度。最后调用 setMeasuredDimension() 方法设置 LinearLayout 的测量尺寸。
总结来说,一般情况下就是将子View纵向的长度累加作为自身的长度,将子View中最大的宽度作为自身的宽度。到此我们就分析完measure流程了,这也是三大流程中最复杂的流程。
View和ViewGroup的layout流程
layout的作用就是确定元素的位置。ViewGroup中的layout是用来确定子View的位置的,而View的layout方法自然就是确定自身位置的,我们先来看View的layout流程,先看方法:
public void layout(int l, int t, int r, int b) {
        if ((mPrivateFlags3 & PFLAG3_MEASURE_NEEDED_BEFORE_LAYOUT) != 0) {
            onMeasure(mOldWidthMeasureSpec, mOldHeightMeasureSpec);
            mPrivateFlags3 &= ~PFLAG3_MEASURE_NEEDED_BEFORE_LAYOUT;
        }
        int oldL = mLeft;
        int oldT = mTop;
        int oldB = mBottom;
        int oldR = mRight;

        boolean changed = isLayoutModeOptical(mParent) ?
                setOpticalFrame(l, t, r, b) : setFrame(l, t, r, b);//1
        if (changed || (mPrivateFlags & PFLAG_LAYOUT_REQUIRED) == PFLAG_LAYOUT_REQUIRED) {
            onLayout(changed, l, t, r, b);//2
            if (shouldDrawRoundScrollbar()) {
                if(mRoundScrollbarRenderer == null) {
                    mRoundScrollbarRenderer = new RoundScrollbarRenderer(this);
                }
            } else {
                mRoundScrollbarRenderer = null;
            }
            mPrivateFlags &= ~PFLAG_LAYOUT_REQUIRED;
            ListenerInfo li = mListenerInfo;
            if (li != null && li.mOnLayoutChangeListeners != null) {
                ArrayList<OnLayoutChangeListener> listenersCopy =
                        (ArrayList<OnLayoutChangeListener>)li.mOnLayoutChangeListeners.clone();
                int numListeners = listenersCopy.size();
                for (int i = 0; i < numListeners; ++i) {
                    listenersCopy.get(i).onLayoutChange(this, l, t, r, b, oldL, oldT, oldR, oldB);
                }
            }
        }
		......
    }
传入的四个参数分别是View的左边界,上边界,右边界和下边界,在之前的文章中有提到:Android进阶 View事件体系(一):概要介绍和实现View的滑动 不过这里也给出图片加以说明:
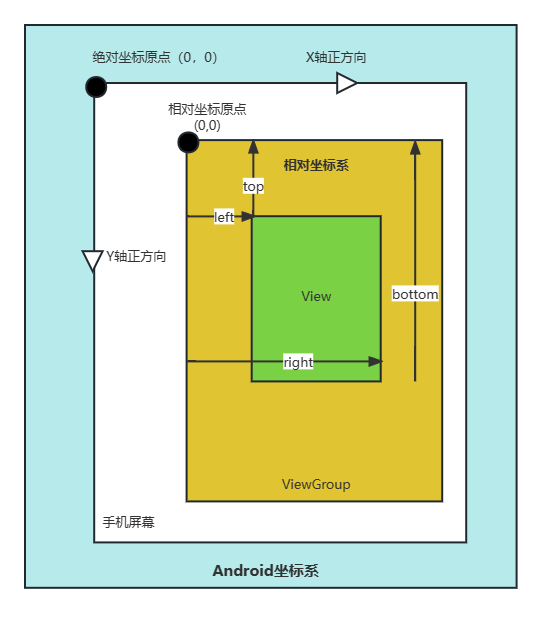
注释1处的:
        boolean changed = isLayoutModeOptical(mParent) ?
		setOpticalFrame(l, t, r, b) : setFrame(l, t, r, b);//1
就是用来具体设置这四个边界值的,这两行代码做的就是判断是否为光学布局,如果是光学布局就调用setOpticalFrame方法设置边界,否则就调用setFrame方法设置边界值。至于什么是光学布局,这里就不展开了,总之只要知道通过setFrame成功设置了四个边界值就好。
完成了边界值的设置后,将会调用注释2处的onLayout方法正式进行布局,不过这个onLayout方法默认是一个空方法,这和onMeasure类似,反正都是需要我们进行重写的。我们还是用LinearLayout为例子来说明。
以LinearLayout为例,分析其onLayout方法
老规矩,先上源码:
    protected void onLayout(boolean changed, int l, int t, int r, int b) {
        if (mOrientation == VERTICAL) {
            layoutVertical(l, t, r, b);
        } else {
            layoutHorizontal(l, t, r, b);
        }
    }
还是和onMeasure差不多的结构,分为纵向布局和横向布局,这里我们仍然以它的朝向为纵向时为例:
void layoutVertical(int left, int top, int right, int bottom) {
        final int paddingLeft = mPaddingLeft;

        int childTop;
        int childLeft;

        // Where right end of child should go
        final int width = right - left;
        int childRight = width - mPaddingRight;

        // Space available for child
        int childSpace = width - paddingLeft - mPaddingRight;

        final int count = getVirtualChildCount();

        final int majorGravity = mGravity & Gravity.VERTICAL_GRAVITY_MASK;
        final int minorGravity = mGravity & Gravity.RELATIVE_HORIZONTAL_GRAVITY_MASK;

        switch (majorGravity) {
           case Gravity.BOTTOM:
               // mTotalLength contains the padding already
               childTop = mPaddingTop + bottom - top - mTotalLength;
               break;

               // mTotalLength contains the padding already
           case Gravity.CENTER_VERTICAL:
               childTop = mPaddingTop + (bottom - top - mTotalLength) / 2;
               break;

           case Gravity.TOP:
           default:
               childTop = mPaddingTop;
               break;
        }

        for (int i = 0; i < count; i++) {
            final View child = getVirtualChildAt(i);
            if (child == null) {
                childTop += measureNullChild(i);
            } else if (child.getVisibility() != GONE) {
                final int childWidth = child.getMeasuredWidth();
                final int childHeight = child.getMeasuredHeight();

                final LinearLayout.LayoutParams lp =
                        (LinearLayout.LayoutParams) child.getLayoutParams();

                int gravity = lp.gravity;
                if (gravity < 0) {
                    gravity = minorGravity;
                }
                final int layoutDirection = getLayoutDirection();
                final int absoluteGravity = Gravity.getAbsoluteGravity(gravity, layoutDirection);
                switch (absoluteGravity & Gravity.HORIZONTAL_GRAVITY_MASK) {
                    case Gravity.CENTER_HORIZONTAL:
                        childLeft = paddingLeft + ((childSpace - childWidth) / 2)
                                + lp.leftMargin - lp.rightMargin;
                        break;

                    case Gravity.RIGHT:
                        childLeft = childRight - childWidth - lp.rightMargin;
                        break;

                    case Gravity.LEFT:
                    default:
                        childLeft = paddingLeft + lp.leftMargin;
                        break;
                }

                if (hasDividerBeforeChildAt(i)) {
                    childTop += mDividerHeight;
                }

                childTop += lp.topMargin;
                setChildFrame(child, childLeft, childTop + getLocationOffset(child),
                        childWidth, childHeight);
                childTop += childHeight + lp.bottomMargin + getNextLocationOffset(child);

                i += getChildrenSkipCount(child, i);
            }
        }
    }
首先会根据Gravity属性确定第一个子View的起始位置,所以说这个childTop就是用来设置子View的起始上边界,而childLeft确定了子View的起始左边界值,有了这两个和View的宽度和高度就可以确定View的边界值了。而View的宽度和高度是用过getMeasuredWidth/Height得到的,最终会依次调用setChildFrame方法设置子View的边界值,传入的正是起始点和宽高度。同时LinearLayout将会累积高度值,这样就可以实现自View纵向排列而不重叠的效果。这样我们就比较简要地分析了Linearlayout的layout过程了。
这里我们也可以发现,LinearLayout的实际尺寸就是MeasureSpec中传入的值:
final int childWidth = child.getMeasuredWidth();
final int childHeight = child.getMeasuredHeight();
......
setChildFrame(child, childLeft, childTop + getLocationOffset(child),
                        childWidth, childHeight);
一般情况下View是遵守MeasureSpec中的尺寸等于实际的尺寸这个规则的,不过这不是决定的,我们也可以自定义View使其不相等,比如:
public void layout(int l,int t,int r,int b){
	super.layout(l,t,r + 100,b + 100);
}
这种情况下,实际的尺寸就和测量尺寸不一致了,可以说实际放置View时只是参考了测量尺寸,只不过绝大情况下都将测量尺寸设置为实际尺寸。测量尺寸和实际尺寸也可以通过getMeasureWidth/Height和getWidth/Height方法分别获得,读者可以自行体验。
View和ViewGroup的Draw流程
至于Draw流程就比较简单了,之前两步已经确定了View的尺寸和摆放位置,Draw要做的就是将View绘制到屏幕上。关于Draw,官方注释中也进行了详细的解释:
/*
* Draw traversal performs several drawing steps which must be executed
* in the appropriate order:
*
* 1. Draw the background
* 2. If necessary, save the canvas’ layers to prepare for fading
* 3. Draw view’s content
* 4. Draw children
* 5. If necessary, draw the fading edges and restore layers
* 6. Draw decorations (scrollbars for instance)
* 7. If necessary, draw the default focus highlight
*/
这是一段注释,描述了绘制遍历(draw traversal)的执行顺序和步骤。绘制遍历是指在进行绘制时按照一定的顺序遍历视图层次结构的过程。以下是每个步骤的解释:
-
绘制背景:如果需要的话,首先绘制视图的背景。
-
如有需要,保存画布的图层以准备进行淡入淡出效果。
-
绘制视图的内容:绘制视图自身的内容,例如文本、图像等。
-
绘制子视图:遍历并绘制视图的子视图,按照它们在视图层次结构中的顺序绘制。
-
如有需要,绘制渐变边缘效果并恢复图层:绘制视图的边缘效果,例如渐变阴影或边框,并在完成后恢复之前保存的图层。
-
绘制装饰(例如滚动条):绘制视图的装饰元素,例如滚动条。
-
如有需要,绘制默认的焦点高亮效果:绘制视图的默认焦点高亮效果,以指示当前获取焦点的视图。
我们就按照上边的步骤,这里挑重点的几个步骤进行分析
步骤一:绘制背景
绘制背景的话将会调用到View的drawBackground方法,如下所示:
    private void drawBackground(Canvas canvas) {
		......

        final int scrollX = mScrollX;
        final int scrollY = mScrollY;
        if ((scrollX | scrollY) == 0) {
            background.draw(canvas);
        } else {
            canvas.translate(scrollX, scrollY);
            background.draw(canvas);
            canvas.translate(-scrollX, -scrollY);
        }
    }
主要看最后这一段,出现了我们很熟悉的scroll参数,具体来说,在绘制背景时会考虑当前画布是否有偏移,如果有偏移的话,就会在先将画布移动到指定位置再进行绘制,绘制完毕之后再将画布移动回原位
步骤三:绘制视图内容
这一步实际上就是绘制自身View的内容,调用到的是View的onDraw方法,不过这个方法也是一个空方法:
    protected void onDraw(Canvas canvas) {
    }
这需要我们自己实现。
步骤四:绘制子视图
步骤四调用的是View的dispatchDraw方法,这个方法也是一个空方法:
    protected void dispatchDraw(Canvas canvas) {

    }
不过这个方法在ViewGroup中进行了重写,我们来看ViewGroup中的内容:
    protected void dispatchDraw(Canvas canvas) {
    ......
        for (int i = 0; i < childrenCount; i++) {
            while (transientIndex >= 0 && mTransientIndices.get(transientIndex) == i) {
                final View transientChild = mTransientViews.get(transientIndex);
                if ((transientChild.mViewFlags & VISIBILITY_MASK) == VISIBLE ||
                        transientChild.getAnimation() != null) {
                    more |= drawChild(canvas, transientChild, drawingTime);
                }
                transientIndex++;
                if (transientIndex >= transientCount) {
                    transientIndex = -1;
                }
            }

            final int childIndex = getAndVerifyPreorderedIndex(childrenCount, i, customOrder);
            final View child = getAndVerifyPreorderedView(preorderedList, children, childIndex);
            if ((child.mViewFlags & VISIBILITY_MASK) == VISIBLE || child.getAnimation() != null) {
                more |= drawChild(canvas, child, drawingTime);
            }
        }
        while (transientIndex >= 0) {
            // there may be additional transient views after the normal views
            final View transientChild = mTransientViews.get(transientIndex);
            if ((transientChild.mViewFlags & VISIBILITY_MASK) == VISIBLE ||
                    transientChild.getAnimation() != null) {
                more |= drawChild(canvas, transientChild, drawingTime);
            }
            transientIndex++;
            if (transientIndex >= transientCount) {
                break;
            }
        }
        if (preorderedList != null) preorderedList.clear();

        // Draw any disappearing views that have animations
        if (mDisappearingChildren != null) {
            final ArrayList<View> disappearingChildren = mDisappearingChildren;
            final int disappearingCount = disappearingChildren.size() - 1;
            // Go backwards -- we may delete as animations finish
            for (int i = disappearingCount; i >= 0; i--) {
                final View child = disappearingChildren.get(i);
                more |= drawChild(canvas, child, drawingTime);
            }
        }
	......
    }
整个ViewGroup的dispatchDraw方法很长,这里截取了最重要的部分,ViewGroup会依次遍历所有子View然后通过drawChild方法绘制子视图,自顶向下不断传递,从而完成了整个View树的绘制。
步骤六:绘制装饰
绘制装饰是调用到View的onDrawForeground方法,从方法的名字也可以看出来,这个方法是用来绘制在视图内容的上层的,主要是用来绘制ScrollBar及其其他装饰的,这里我们也给出源码,不过就不详细分析了:
 public void onDrawForeground(Canvas canvas) {
        onDrawScrollIndicators(canvas);
        onDrawScrollBars(canvas);

        final Drawable foreground = mForegroundInfo != null ? mForegroundInfo.mDrawable : null;
        if (foreground != null) {
            if (mForegroundInfo.mBoundsChanged) {
                mForegroundInfo.mBoundsChanged = false;
                final Rect selfBounds = mForegroundInfo.mSelfBounds;
                final Rect overlayBounds = mForegroundInfo.mOverlayBounds;

                if (mForegroundInfo.mInsidePadding) {
                    selfBounds.set(0, 0, getWidth(), getHeight());
                } else {
                    selfBounds.set(getPaddingLeft(), getPaddingTop(),
                            getWidth() - getPaddingRight(), getHeight() - getPaddingBottom());
                }

                final int ld = getLayoutDirection();
                Gravity.apply(mForegroundInfo.mGravity, foreground.getIntrinsicWidth(),
                        foreground.getIntrinsicHeight(), selfBounds, overlayBounds, ld);
                foreground.setBounds(overlayBounds);
            }

            foreground.draw(canvas);
        }
    }
它是将一个drawable对象创建加载出来,最后调用其draw方法来实现绘制到顶层的。
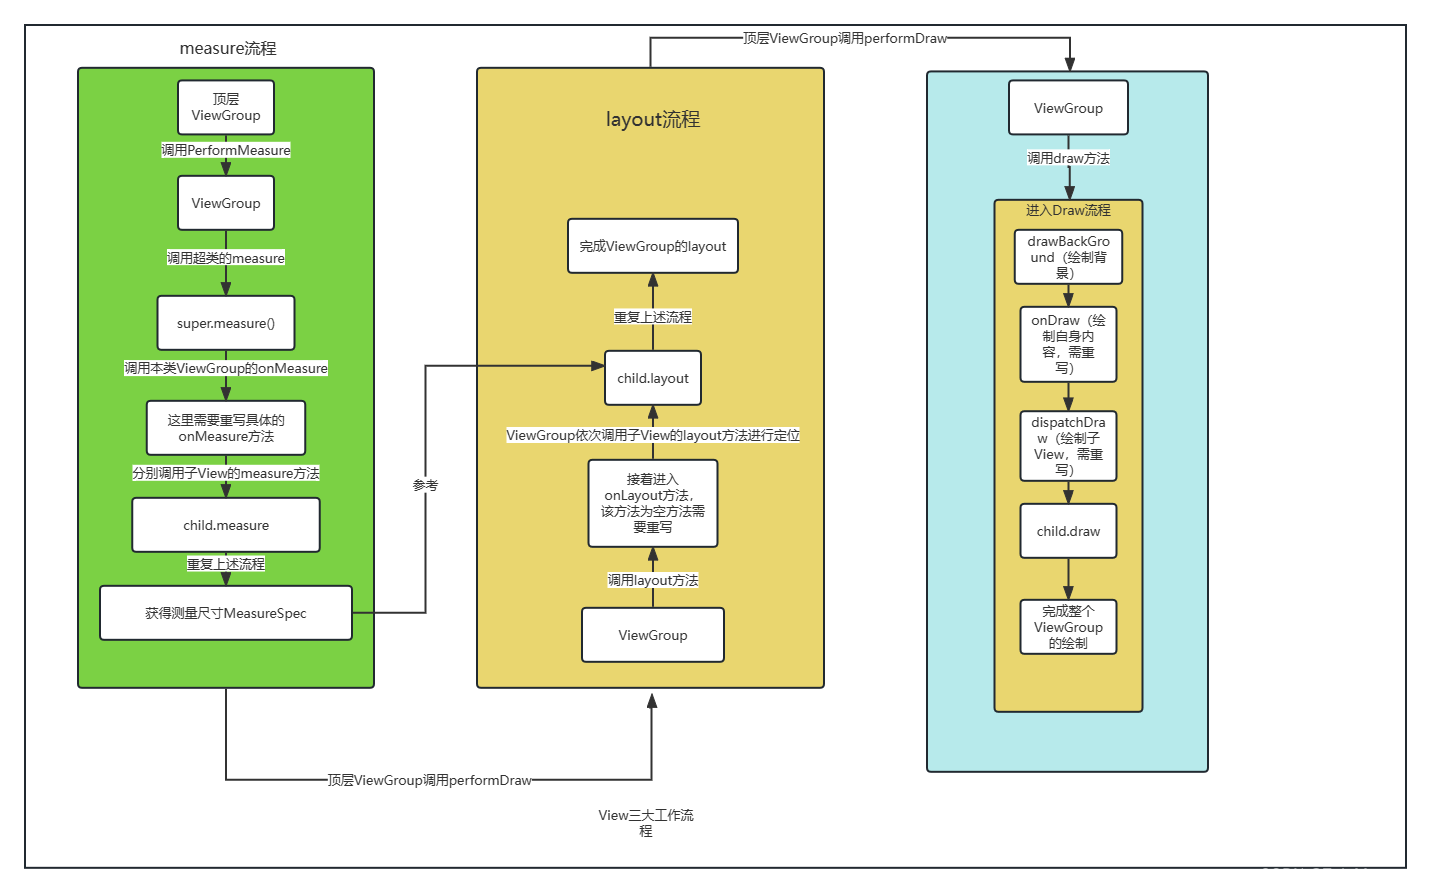
总结
到此为止,我们就分析完了整个View的工作流程,主要是三大部分:
- 测量
- 放置(设置边界)
- 绘制
熟悉这些工作流程不仅能帮助我们理解Android系统的绘制过程,同时为我们以后使用自定义View也有很大帮助。关于自定义View的内容,将在下一篇文章介绍。
下面是一张我总结的流程图,省略了一些细节: