分布式数据库中间件Mycat2
分布式数据库中间件Mycat2
简介
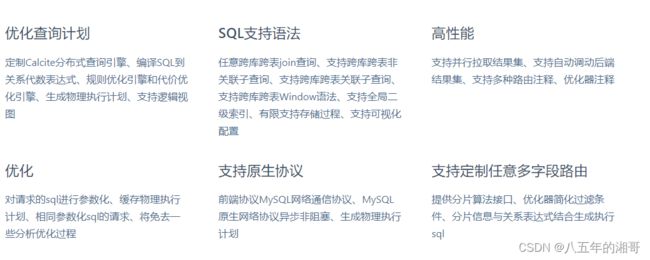
Java语言编写的MySQL数据库网络协议的开源中间件,GPLv3协议开源,在Mycat1的基础上做了如下优化或者加强:
官网:http://www.mycat.org.cn/
关注Mycat1可以链接到:https://blog.csdn.net/huxiang19851114/article/details/113845705
安装部署
Mycat2目前还不支持直接获取Docker镜像,需要自己通过Dockerfile打包镜像,其实这也是为了开发者考虑,比如一些个性化功能,如自定义分片等
Dockerfile
FROM docker.io/adoptopenjdk/openjdk8:latest


ENV AUTO_RUN_DIR ./mycat2
ENV DEPENDENCE_FILE mycat2-1.20-jar-with-dependencies.jar
ENV TEMPLATE_FILE mycat2-install-template-1.21.zip

#设置阿里云源,下载快一点
RUN sed -i "s@http://.*archive.ubuntu.com@http://mirrors.aliyun.com@g" /etc/apt/sources.list
RUN sed -i "s@http://.*security.ubuntu.com@http://mirrors.aliyun.com@g" /etc/apt/sources.list

RUN buildDeps='procps wget unzip' \
    && apt-get update \
    && apt-get install -y $buildDeps


RUN wget -P  $AUTO_RUN_DIR/ http://dl.mycat.org.cn/2.0/1.20-release/$DEPENDENCE_FILE \
   &&  wget -P  $AUTO_RUN_DIR/ http://dl.mycat.org.cn/2.0/install-template/$TEMPLATE_FILE

RUN cd $AUTO_RUN_DIR/ \
    && unzip $TEMPLATE_FILE \
    && ls -al . \
    && mv  $DEPENDENCE_FILE mycat/lib/ \
    && chmod +x  mycat/bin/* \
    && chmod 755  mycat/lib/* \
    && mv mycat /usr/local

#copy mycat /usr/local/mycat/

VOLUME /usr/local/mycat/conf
VOLUME /usr/local/mycat/logs


EXPOSE 8066 1984

CMD ["/usr/local/mycat/bin/mycat", "console"]
编译镜像
#如果执行目录不是Dockerfile所在目录,需要-f指定
docker build -t mycat2:1.20 .
创建容器
docker run -d --name=mycat2 -p 8066:8066 -p 1984:1984 mycat2:1.20

# 复制容器内配置
cd /usr/local/mycat
docker cp mycat2:/usr/local/mycat/conf .
docker cp mycat2:/usr/local/mycat/logs .
docker-compose.yml
version: '3.3'
services:
  mycat2:
    build:
      context: ./
      dockerfile: Dockerfile
    image: mycat2:1.20
    container_name: mycat2
    ports:
     - 8066:8066
    links:
     - mysql1
     - mysql2
    volumes:
      - /usr/local/mycat/conf:/usr/local/mycat/conf
      - /usr/local/mycat/logs:/usr/local/mycat/logs
配置文件修改
数据库主从复制
我们将要使用mycat2实现读写分离,所以前提是需要将数据库设置为主从复制模式(不然读的永远为空),3306端口为master,3307端口为slave
参考链接:https://blog.csdn.net/huxiang19851114/article/details/113846022
数据源配置
#从原生配置复制两个json文件
[root@paratera128 datasources]# cp prototypeDs.datasource.json master01.datasource.json
[root@paratera128 datasources]# cp prototypeDs.datasource.json slave01.datasource.json
[root@paratera128 datasources]# ls
master01.datasource.json  prototypeDs.datasource.json  slave01.datasource.json

#master01.datasource.json
{
        "dbType":"mysql",
        "idleTimeout":60000,
        "initSqls":[],
        "initSqlsGetConnection":true,
        "instanceType":"READ_WRITE",
        "maxCon":1000,
        "maxConnectTimeout":3000,
        "maxRetryCount":5,
        "minCon":1,
        "name":"master01",
        "password":"root",
        "type":"JDBC",
        "url":"jdbc:mysql://192.168.137.128:3306?useUnicode=true&serverTimezone=Asia/Shanghai&characterEncoding=UTF-8",
        "user":"root",
        "weight":0
}

#slave01.datasource.json
{
        "dbType":"mysql",
        "idleTimeout":60000,
        "initSqls":[],
        "initSqlsGetConnection":true,
        "instanceType":"READ_WRITE",
        "maxCon":1000,
        "maxConnectTimeout":3000,
        "maxRetryCount":5,
        "minCon":1,
        "name":"slave01",
        "password":"root",
        "type":"JDBC",
        "url":"jdbc:mysql://192.168.137.128:3307?useUnicode=true&serverTimezone=Asia/Shanghai&characterEncoding=UTF-8",
        "user":"root",
        "weight":0
}
数据源集群配置
#clusters/prototype.cluster.json

{
        "clusterType":"MASTER_SLAVE",
        "heartbeat":{
                "heartbeatTimeout":1000,
                "maxRetry":3,
                "minSwitchTimeInterval":300,
                "slaveThreshold":0
        },
        "masters":[
                "master01" #写
        ],
        "replicas":[
        		"slave01" #读
        ],
        "maxCon":200,
        "name":"prototype",
        "readBalanceType":"BALANCE_ALL",
        "switchType":"SWITCH"
}
物理库配置
#schemas/matomo_tj.schema.json

{
    # 物理库
    "schemaName": "matomo_tj",
    # 指向集群,或者数据源
    "targetName": "prototype"
}
Mycat2 登录用户配置
#users/root.user.json
{
        "dialect":"mysql",
        #ip 为 null,允许任意 ip 登录
        "ip":null,
        "password":"root",
        "transactionType":"proxy",
        "username":"root"
}
测试连接
测试1:
通过mycat2 执行插入,会发现master01,slave01都有相同的数据
测试2:
手动修改slave01数据,通过mycat2进行查询,会发现查询的数据为slave01的数据
测试3:
修改/clusters/prototype.cluster.json
{
        "clusterType":"GARELA_CLUSTER", //改为集群模式
        "heartbeat":{
                "heartbeatTimeout":1000,
                "maxRetry":3,
                "minSwitchTimeInterval":300,
                "slaveThreshold":0
        },
        "masters":[  //多主模式
                "master01",
                "slave01"
        ],
        //"replicas":[
        //      "slave01"
        //],
        "maxCon":200,
        "name":"prototype",
        "readBalanceType":"BALANCE_ALL",
        "switchType":"SWITCH"
}
关闭masters中任意服务器,然后通过mycat 8066进行数据插入操作,会发现剩下的那台服务器承接了write操作(HA)
Zookeeper统一管理
Zookeeper是个好东西,基本上涉及元数据的服务都可以使用它来实现或者辅助实现高可用集群,Mycat2也盯上了它
其实在这里我们使用Zookeeper作为配置中心,存储Mycat2的配置,以及提供元数据锁和znode监听的功能,简单可以称其为:统一配置中心
zookeeper docker安装配置:
version: '3.3'
services:
  zookeeper:
    container_name: zookeeper
    image: debezium/zookeeper
    ports:
      - 2181:2181
我们 zookeeper客户端来可视化操作比较方便,工具下载:https://issues.apache.org/jira/secure/attachment/12436620/ZooInspector.zip
解压后进入build,通过java -jar zookeeper-dev-ZooInspector.jar 启动窗口
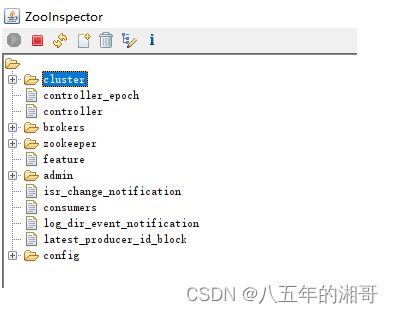
点击运行按钮输入zookeeper地址即可看到zookeeper的数据结构信息了:
下面开始在mycat2的server.json文件配置zookeeper地址信息进行注册
#1、server.json改这两个信息就够了
"mode":"cluster",
"properties":{
   "zk_address":"192.168.137.128:2181"
}

#2、docker restart mycat2

#3、使用ZooInspector登录该zk,编辑里面的mycat配置即可,除了server级别配置,其他配置schema,user,cache,sequence,datasource,cluster.都可以实现热更新,在ZK里编辑相当于直接更改配置文件,暂时无法自动创建物理库,物理表.
分库分表
概念
分库分表就是为了解决由于数据量过大而导致数据库性能降低的问题,将原来独立的数据库拆分成若干数据库组成,将数据大表分成若干数据表组成,使得单一数据库、单一数据表的数据量变小,从而达到提升数据库性能的目的。而且随着微服务这种架构的兴起,我们应用从一个完整的大的应用,切分为很多可以独立提供服务的小应用,每个应用都有独立的数据库。数据的切分分为两种:
l **垂直切分:**按照业务模块进行切分,将不同模块的表切分到不同的数据库中。
l 水平切分:将一张大表按照一定的切分规则,按照行切分到不同的表或者不同的库中
mycat2分库分表包括两种方式:
- SQL脚本命令分库分表,同时会在schemas下生成对应的json文件
- schemas下通过配置的方式进行分库分表
广播表(全局表)
这个其实不属于分库分表的范畴,只是对于分库分表来说,有些数据是公共的,比如数据字典,在每个库中都需要相同的数据
顾名思义,大喇叭声音谁都听得见,所有库表都会收到相同数据,我们这里使用单一节点,就两个数据源,master01,master02(注意这两个库不要存在主从复制设置,或者在之前的slave库执行:stop slave;)
-
数据源master01.datasource.json
{ "dbType":"mysql", "idleTimeout":60000, "initSqls":[], "initSqlsGetConnection":true, "instanceType":"READ_WRITE", "maxCon":1000, "maxConnectTimeout":3000, "maxRetryCount":5, "minCon":1, "name":"master01", "password":"root", "type":"JDBC", "url":"jdbc:mysql://192.168.137.128:3306/matomo_tj?useUnicode=true&serverTimezone=Asia/Shanghai&characterEncoding=UTF-8", "user":"root", "weight":0 } -
数据源master02.datasource.json
{
        "dbType":"mysql",
        "idleTimeout":60000,
        "initSqls":[],
        "initSqlsGetConnection":true,
        "instanceType":"READ_WRITE",
        "maxCon":1000,
        "maxConnectTimeout":3000,
        "maxRetryCount":5,
        "minCon":1,
        "name":"master02",
        "password":"root",
        "type":"JDBC",
        "url":"jdbc:mysql://192.168.137.128:3307/matomo_tj?useUnicode=true&serverTimezone=Asia/Shanghai&characterEncoding=UTF-8",
        "user":"root",
        "weight":0
}
-
集群c0.cluster.json
{ "clusterType":"SINGLE_NODE", "heartbeat":{ "heartbeatTimeout":1000, "maxRetry":3, "minSwitchTimeInterval":300, "slaveThreshold":0 }, "masters":[ "master01" ], "maxCon":200, "name":"c0", "readBalanceType":"BALANCE_ALL", "switchType":"SWITCH" } -
集群c1.cluster.json
{
        "clusterType":"SINGLE_NODE",
        "heartbeat":{
                "heartbeatTimeout":1000,
                "maxRetry":3,
                "minSwitchTimeInterval":300,
                "slaveThreshold":0
        },
        "masters":[
                "master02"
        ],
        "maxCon":200,
        "name":"c1",
        "readBalanceType":"BALANCE_ALL",
        "switchType":"SWITCH"
}
登录mycat2,创建逻辑库,广播表,并插入数据,会发现在master01,master02都会有相同的库表结构及数据
CREATE DATABASE db1;
USE db1;
CREATE TABLE `travelrecord` (
	`id` BIGINT NOT NULL auto_increment,
	`user_id` VARCHAR ( 100 ) DEFAULT NULL,
	`traveldate` date DEFAULT NULL,
	`fee` DECIMAL ( 10, 0 ) DEFAULT NULL,
	`days` INT DEFAULT NULL,
	`blob` LONGBLOB,
	PRIMARY KEY ( `id` ),
KEY `id` ( `id` )
) ENGINE = INNODB DEFAULT CHARSET = utf8 BROADCAST;

INSERT INTO `db1`.`travelrecord` (`id`, `user_id`, `traveldate`, `fee`, `days`, `blob`) VALUES (1, '1', '2022-08-12', 1, 1, NULL);
INSERT INTO `db1`.`travelrecord` (`id`, `user_id`, `traveldate`, `fee`, `days`, `blob`) VALUES (2, '2', '2022-08-12', 2, 2, NULL);
分片表
mycat2分片可以使用SQL脚本和schema配置,内置Hash分片策略,targetIndex,dbIndex,tableIndex总是从0开始计算,支持groovy运算生成目标名,库名,表名
Hash分片(SQL)
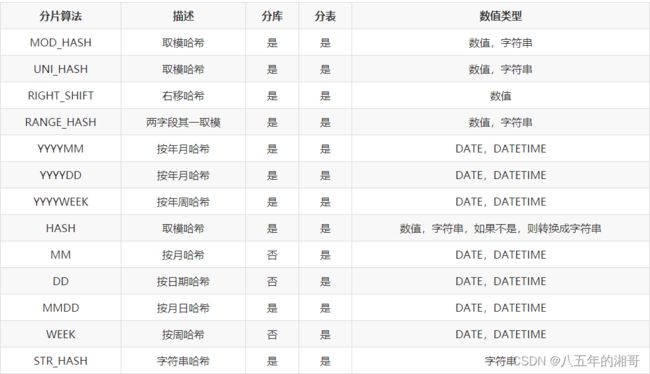
官网截图,可惜有个错误:YYYYDD应该是按年日哈希
需求:进行站点访问统计,按访问年份分库,按访问站点分表
分析:这个地方需要用到取模哈(MOD_HASH)希和按年月哈希(YYYYMM)
登录mycat2,创建逻辑库,分片表,并插入数据,即将采用的最终策略按如下“斜体”计算
-
MOD_HASH
分库键和分表键是同键
分表下标
=分片值%(分库数量*分表数量)分库下标
=分表下标/分表数量分库键和分表键是不同键
分表下标
=分片值%分表数量分库下标
=分表下标%分库数量 -
YYYYMM
仅用于分库
(
YYYY*12+MM)%分库数
DROP DATABASE db2;
CREATE DATABASE db2;
USE db2;
DROP TABLE IF EXISTS `matomo_log_visit_material`;
CREATE TABLE `matomo_log_visit_material`  (
  `idvisit` BIGINT(100) NOT NULL AUTO_INCREMENT COMMENT '访问记录主键',
  `idsite` bigint(20) NULL DEFAULT NULL COMMENT '站点id',
  `user_id` tinytext CHARACTER SET utf8 COLLATE utf8_bin NULL COMMENT '用户id',
  `visit_first_action_time` datetime NULL DEFAULT NULL COMMENT '访问的第一个动作的日期时间',
  `visit_total_time` int(11) NULL DEFAULT NULL COMMENT '停留总时间',
  `visit_goal_buyer` tinyint(1) NULL DEFAULT NULL COMMENT '是否购买',
  `referer_type` tinyint(1) NULL DEFAULT NULL COMMENT '用户来源',
  `location_ip` varbinary(16) NULL DEFAULT NULL COMMENT '访问者ip',
  PRIMARY KEY (`idvisit`) USING BTREE
) ENGINE = InnoDB CHARACTER SET = utf8 COLLATE = utf8_bin COMMENT = '用户访问数据素材表' ROW_FORMAT = COMPACT dbpartition by YYYYMM (visit_first_action_time) dbpartitions 8
tbpartition by MOD_HASH (idsite) tbpartitions 3;

DELETE FROM `db2`.`matomo_log_visit_material`;
INSERT INTO `db2`.`matomo_log_visit_material` (`idsite`, `user_id`, `visit_first_action_time`, `visit_total_time`, `visit_goal_buyer`, `referer_type`, `location_ip`) VALUES (1, '1', '2022-01-12 16:32:13', 1, 1, 1, NULL);
INSERT INTO `db2`.`matomo_log_visit_material` (`idsite`, `user_id`, `visit_first_action_time`, `visit_total_time`, `visit_goal_buyer`, `referer_type`, `location_ip`) VALUES (2, '2', '2021-02-12 16:32:32', 2, 2, 2, NULL);
INSERT INTO `db2`.`matomo_log_visit_material` (`idsite`, `user_id`, `visit_first_action_time`, `visit_total_time`, `visit_goal_buyer`, `referer_type`, `location_ip`) VALUES (3, '1', '2020-03-12 16:32:13', 1, 1, 1, NULL);
INSERT INTO `db2`.`matomo_log_visit_material` (`idsite`, `user_id`, `visit_first_action_time`, `visit_total_time`, `visit_goal_buyer`, `referer_type`, `location_ip`) VALUES (1, '2', '2019-04-12 16:32:32', 2, 2, 2, NULL);
INSERT INTO `db2`.`matomo_log_visit_material` (`idsite`, `user_id`, `visit_first_action_time`, `visit_total_time`, `visit_goal_buyer`, `referer_type`, `location_ip`) VALUES (2, '1', '2018-05-12 16:32:13', 1, 1, 1, NULL);
INSERT INTO `db2`.`matomo_log_visit_material` (`idsite`, `user_id`, `visit_first_action_time`, `visit_total_time`, `visit_goal_buyer`, `referer_type`, `location_ip`) VALUES (3, '2', '2017-06-12 16:32:32', 2, 2, 2, NULL);
INSERT INTO `db2`.`matomo_log_visit_material` (`idsite`, `user_id`, `visit_first_action_time`, `visit_total_time`, `visit_goal_buyer`, `referer_type`, `location_ip`) VALUES (1, '1', '2016-07-12 16:32:13', 1, 1, 1, NULL);
INSERT INTO `db2`.`matomo_log_visit_material` (`idsite`, `user_id`, `visit_first_action_time`, `visit_total_time`, `visit_goal_buyer`, `referer_type`, `location_ip`) VALUES (2, '2', '2015-08-12 16:32:32', 2, 2, 2, NULL);
INSERT INTO `db2`.`matomo_log_visit_material` (`idsite`, `user_id`, `visit_first_action_time`, `visit_total_time`, `visit_goal_buyer`, `referer_type`, `location_ip`) VALUES (3, '1', '2014-09-12 16:32:13', 1, 1, 1, NULL);
INSERT INTO `db2`.`matomo_log_visit_material` (`idsite`, `user_id`, `visit_first_action_time`, `visit_total_time`, `visit_goal_buyer`, `referer_type`, `location_ip`) VALUES (1, '2', '2013-10-12 16:32:32', 2, 2, 2, NULL);
INSERT INTO `db2`.`matomo_log_visit_material` (`idsite`, `user_id`, `visit_first_action_time`, `visit_total_time`, `visit_goal_buyer`, `referer_type`, `location_ip`) VALUES (2, '2', '2012-11-12 16:32:32', 2, 2, 2, NULL);
INSERT INTO `db2`.`matomo_log_visit_material` (`idsite`, `user_id`, `visit_first_action_time`, `visit_total_time`, `visit_goal_buyer`, `referer_type`, `location_ip`) VALUES (3, '2', '2011-12-12 16:32:32', 2, 2, 2, NULL);
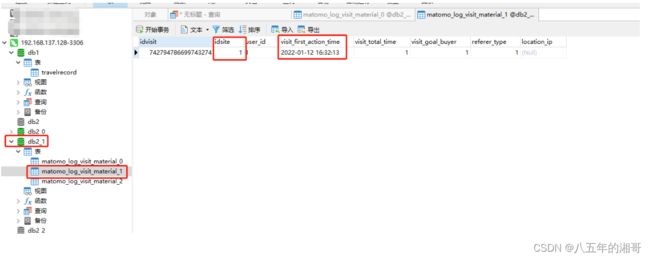
我们拿第一条数据来看:
分库按(2022*12+1)% 8 = 1,数据库下标为1
分表按1%3 = 1,数据表下标为1
Hash分片(Schema)
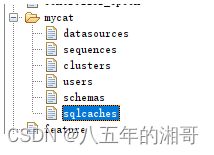
其实,我们通过SQL脚本执行的分片策略,会在schemas下生成对应的json配置文件,如上面两节我们就可以看到对应的文件:
打开可以看到,其实就是SQL脚本解析生成的:
{
        "customTables":{},
        "globalTables":{},
        "normalTables":{},
        "schemaName":"db2",
        "shardingTables":{
                "matomo_log_visit_material":{
                        "createTableSQL":"CREATE TABLE db2.`matomo_log_visit_material` (\n\t`idvisit` BIGINT(100) NOT NULL AUTO_INCREMENT COMMENT '访问记录主键',\n\t`idsite` bigint(20) NULL DEFAULT NULL COMMENT '站点id',\n\t`user_id` tinytext CHARACTER SET utf8 COLLATE utf8_bin NULL COMMENT '用户id',\n\t`visit_first_action_time` datetime NULL DEFAULT NULL COMMENT '访问的第一个动作的日期时间',\n\t`visit_total_time` int(11) NULL DEFAULT NULL COMMENT '停留总时间',\n\t`visit_goal_buyer` tinyint(1) NULL DEFAULT NULL COMMENT '是否购买',\n\t`referer_type` tinyint(1) NULL DEFAULT NULL COMMENT '用户来源',\n\t`location_ip` varbinary(16) NULL DEFAULT NULL COMMENT '访问者ip',\n\tPRIMARY KEY USING BTREE (`idvisit`)\n) ENGINE = InnoDB CHARACTER SET = utf8 COLLATE = utf8_bin ROW_FORMAT = COMPACT COMMENT '用户访问数据素材表'\nDBPARTITION BY YYYYMM(visit_first_action_time) DBPARTITIONS 8\nTBPARTITION BY MOD_HASH(idsite) TBPARTITIONS 3",
                        "function":{
                                "properties":{
                                        "dbNum":"8",
                                        "mappingFormat":"c${targetIndex}/db2_${dbIndex}/matomo_log_visit_material_${tableIndex}",
                                        "tableNum":"3",
                                        "tableMethod":"MOD_HASH(idsite)",
                                        "storeNum":2,
                                        "dbMethod":"YYYYMM(visit_first_action_time)"
                                },
                                "ranges":{}
                        },
                        "partition":{

                        },
                        "shardingIndexTables":{}
                }
        },
        "views":{}
}
