人脸识别5.1.1- insightface人脸检测模型blazeface_paddle
代码参考
insightface:https://github.com/deepinsight/insightface/tree/master/detection/blazeface_paddle#Training_and_Inference
PaddleDetection:https://github.com/PaddlePaddle/PaddleDetection/tree/release/2.5/configs/face_detection
blazeface介绍
由于BlazeFace是谷歌的工作
paper:https://arxiv.org/pdf/1907.05047.pdf
参考:https://blog.csdn.net/zhqh100/article/details/123688945
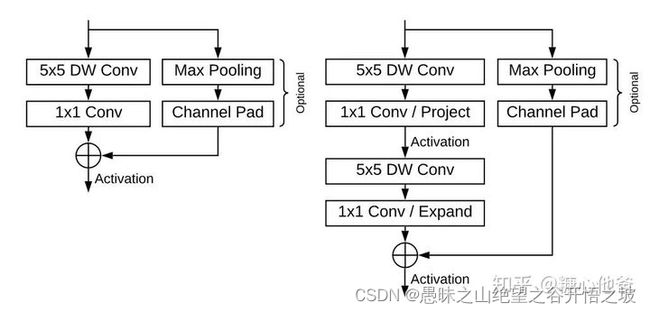
骨干
检测回归器
inputs的shape为[1, 3, 320, 320],其中backbone有四次下采样,会把第四次下采样前和网络的最后结果保存到detections中,分别为[1, 96, 40, 40]和[1, 96, 20, 20]
这两个结果会分别送到loc_layers、conf_layers和landm_layers中去计算,得出的尺寸为
loc[0]的shape是[1, 40, 40, 8],loc[1] 的shape是 [1, 20, 20, 24],加一块,再分成四个坐标,就是bbox_regressions.shape=[1, 5600, 4]
conf[0].shape=[1, 40, 40, 4]
conf[1].shape=[1, 20, 20, 12]
加一块得到classifications.shape=[1, 5600, 2]
landm[0].shape=torch.Size([1, 40, 40, 20])
landm[1].shape=torch.Size([1, 20, 20, 60])
加一块得到 ldm_regressions.shape=torch.Size([1, 5600, 10])
回过头来看anchors,配置文件中’steps’: [8, 16],而图像尺寸为320320,那么就得出小框为320/8,即4040个,大框为320/16,即2020个,
然后’min_sizes’: [[8, 11], [14, 19, 26, 38, 64, 149]],,即4040的框,分别会生成尺寸为8和11的anchor,而20*20的框,就遍历[14, 19, 26, 38, 64, 149],也就是总共会生成40 * 40 * 2 + 20 * 20 *6=3200+2400=5600个框
所以,综上,基本证实了,blazeface,就是一个小号的ssd,其没有FPN的融合,然后,也是基于anchor的实现,所以,如果用anchor-free的方法,网络还有进一步减小的空间?
损失函数,landmark 和 location 都是使用了 smooth_l1_loss,
loss_c,分类的损失函数为focalloss
按说给各个损失都添加了权重的比重系数,不过我看其代码中只用到了分类的系数,也就是 loss_c会再乘以6,然后各个损失相加,就是总损失
计算各损失的时候,都是采样一部分进行计算
总体思想
通过配置文件的方式,把所有的类弄成配置文件,通过加载配置文件的方式,每一个配置文件的键值可能是多种类的组合,做了很多类的嵌套,在代码里通过create(cls_or_name, **kwargs)实例化成类代码,然后再应用。面向对象编程。
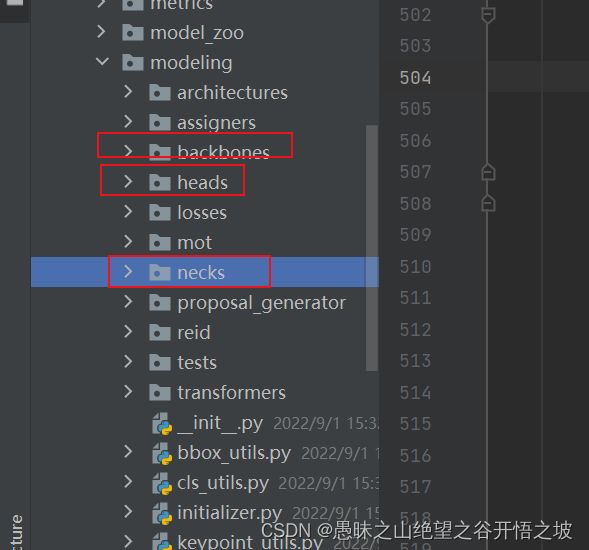
三个架构分层

运行指令参考:https://github.com/deepinsight/insightface/tree/master/detection/blazeface_paddle#Training_and_Inference
源码参考:https://github.com/PaddlePaddle/PaddleDetection/tree/release/2.5/configs/face_detection
windows10
安装
pip install -r requirements.txt
pip install paddlepaddle
运行
注意-c后面接参数,-o后面也是接一系列参数,空格隔开即可
python train.py -c ../configs/face_detection/blazeface_fpn_ssh_1000e.yml -o pretrain_weight=blazenet_pretrain use_gpu=false TrainReader.batch_size=1
linux
运行
cd PaddleDetection
export CUDA_VISIBLE_DEVICES=0,1,2,3 # Do not need to execute this command under windows and Mac
python -m paddle.distributed.launch --gpus 0,1,2,3 tools/train.py -c configs/face_detection/blazeface_fpn_ssh_1000e.yml -o pretrain_weight=blazenet_pretrain
os.path.abspath取绝对路径
https://blog.csdn.net/dmt103/article/details/106170431
# add python path of PadleDetection to sys.path
parent_path = os.path.abspath(os.path.join(__file__, *(['..'] * 2)))
sys.path.insert(0, parent_path)
os.path.join(__file__, *(['..'] * 2):
'E:/quadtalent/baidu_paddle_PR/A_paddlehub_api/PaddleDetection/tools/train.py\\..\\..'
os.path.abspath(os.path.join(__file__, *(['..'] * 2))):
'E:\\quadtalent\\baidu_paddle_PR\\A_paddlehub_api\\PaddleDetection'
Python带_的变量或函数命名,带下划线的方法
Python带_的变量或函数命名,带下划线的方法:https://blog.csdn.net/qq_35290785/article/details/93476722
os.path.splitext
os.path.splitext(“文件路径”) 分离文件名与扩展名;默认返回(fname,fextension)元组,可做分片操作
_, ext = os.path.splitext(file_path)
('../configs/face_detection/blazeface_fpn_ssh_1000e', '.yml')
wider_face.yml

官方:https://yaml.org/spec/1.2.2/
菜鸟教程:https://www.runoob.com/w3cnote/yaml-intro.html
Yaml:基本语法使用:https://blog.csdn.net/fly910905/article/details/99882542
2、“!”(叹号)显式指示类型,或自定义类型标识。单叹号通常是自定义类型,双叹号是内置类型,例如:
 isString: !!str 2015-08-23     # 强调是字符串不是日期数据
 picture: !!binary |            # Base64  图片
     R0lGODlhDAAMAIQAAP//9/X
     17unp5WZmZgAAAOfn515eXv
     Pz7Y6OjuDg4J+fn5OTk6enp
     56enmleECcgggoBADs=
#下面是内置类型

 !!int               # 整数类型
 !!float             # 浮点类型
 !!bool              # 布尔类型
 !!str               # 字符串类型
 !!binary            # 也是字符串类型
 !!timestamp         # 日期时间类型
 !!null              # 空值
 !!set               # 集合
 !!omap, !!pairs     # 键值列表或对象列表
 !!seq               # 序列,也是列表
 !!map               # 键值表

 #下面是一些例子:

 --- !!omap
 - Mark: 65
 - Sammy: 63
 - Key: 58
 --- !!set           # 注意,“?”表示键为列表,在这里列表为 null
 ? Mark
 ? Sammy
 ? Key

 # 下面是自定义的类型或标识

 %TAG ! tag:clarkevans.com,2002:   # % 是指令符号
 --- !shape
 # Use the ! handle for presenting
 # tag:clarkevans.com,2002:circle
 - !circle
   center: &ORIGIN {x: 73, y: 129}
   radius: 7
 - !line
   start: *ORIGIN
   finish: { x: 89, y: 102 }
 - !label
   start: *ORIGIN
   color: 0xFFEEBB
   text: Pretty vector drawing.
#test.yaml(双叹号,强制转换类型)
str: !!str 3.14
int: !!int "123"

输出:{'int': 123, 'str': '3.14'}    #明显能够看出123被强转成了int类型,而float型的3.14则被强转成了str型
python中six.moves的作用是什么
python中six.moves的作用是什么?这个问题可能是我们日常学习或工作经常见到的。希望通过这个问题能让你收获颇深。下面是小编给大家带来的参考内容,让我们一起来看看吧!
six.moves.range的用法似乎与range的用法并无差别。
six是用来兼容python 2 和 3的,我猜名字就是用的2和3的最小公倍数。
six.moves 是用来处理那些在 2 和 3 里面函数的位置有变化的,直接用six.moves就可以屏蔽掉这些变化。
Python capitalize()方法
Python capitalize() 将字符串的第一个字母变成大写,其他字母变小写。对于 8 位字节编码需要根据本地环境。
>>>s = 'a, B'
>>> s.capitalize()
'A, b'

>>> s = ' a, B'    # a 前面有空格
>>> s.capitalize()
' a, b'

>>> s = 'a, BCD'
>>> s.capitalize()
'A, bcd'

